9Setting Up Activity Tracking
Setting Up Activity Tracking
This topic gives you an overview of the steps involved in setting up activity tracking for the administrative actions that are required during the application process.
Set up activity statuses, if desired, and review system statuses.
Set up activities.
Define activity groups.
Add activities to the groups, and configure the activity rules that are used to calculate due dates of tasks.
Assign the activity group to the planning application type.
Setting Up Activity Statuses
Use delivered activity statuses to identify the progression of an activity using activity due dates tracking.
You can review the delivered activity statuses on the Activity Status page:
Canceled
Completed
In progress
Incomplete
Not required
Pending
You can’t delete the system-delivered statuses, but you can modify the descriptions. You can also define additional activity statuses that are associated with either the In progress or Not required system status.
Adding Activity Statuses
Define any additional statuses that your agency will use for activity tracking on the Activity Status page.
Select .
Select the Activity Status tab.
Click Add to define a new status.
On the Activity Status Details page, enter values for these fields:
Page Element
Description
Status
Enter a status name.
Description
Enter a description for the status. The description is exposed to agency staff for an activity using activity due dates tracking.
System Status
Select the system status that you want to use.
Note: You must associate the new status with a system status to ensure correct processing.In process
Not required
Verify that the Enabled switch is turned on. The switch is turned off by default for a new status.
Click Save.
Modifying Activity Statuses
You can modify the activity statuses that you have defined on the Activity Status Details page, but you can only edit the Description field of system-defined statuses. The description is exposed to agency staff for an activity on the activity due dates tracking page.
Select .
Select the Activity Status tab.
Select the row for the status that you want to modify.
For user-defined statuses, you can:
Edit the description.
Select the system status that you want to use for processing: In progress or Not required.
Turn on the Enabled switch to enable a user-defined record status.
For system-delivered statuses, you can only edit the description. You can’t edit the Status field or disable the status.
Click Save to save any changes.
Setting Up Activities
When configuring activity tracking for your agency, you set up the activities that take place during the application process.
Activities are time-sensitive tasks that help you track due dates related to the progression of a planning application. You set up activities on the Activities Details page for reuse in the activity groups associated with the planning application type. When a planning application is submitted, you manage the activities to complete the application. For example, you might set up an activity called Administrative Close for completing the hearing decision report.
You can modify or delete an activity, but when an activity is assigned to an activity group, you can’t delete the activity.
Let’s take a look at how to set up application activities:
Select .
On the Activity page, click Add to add a new activity.
On the Activity Details page, you’ll find these fields:
Page Element
Description
Activity ID
Enter a unique identifier for the activity. You can’t modify this field after saving the activity.
Activity
Enter a name for the activity.
Description
Enter a description of the activity.
Classification
Displays Planning and Zoning to indicate the offering this activity will be used for.
Turn on the Enabled switch when the activity is ready for use.
Click Save.
Setting Up Activity Groups
When configuring activity tracking for your agency and after defining reusable activities, you define the grouping of activities that apply to a planning application type.
First, define the activity group that will be mapped to one or more planning application types. You can reuse activity groups for different application types. Then assign the activities that have already been set up to activity groups and set up the rules for calculating due dates. The groups identify the list of tasks involved in processing a planning application.
You can modify or delete an activity group, but you can’t delete the activity group when it’s associated with a planning application type.
Here’s how to define the activity group:
Select .
On the Activity Group page, click Add to add a new group.
On the Activity Group Details page, enter a values for the group.
Page Element
Description
Activity Group ID
Enter a unique identifier for the activity group.
Activity Group
Enter a name for the activity group.
Description
Enter a description of the activity group.
Classification
Displays Planning and Zoning to indicate the offering this activity group will be used for.
Add activities to the group in the Activity section.
Turn on the Enabled switch when the activity group is ready for use.
Click Save.
The next step is to define the rules for each activity that are used to calculate due dates and manage the activity.
Defining Planning Application Activity Rules
You define planning application activity rules for each activity in an activity group to track and manage tasks based on important due dates.
The rules are based on events that occur during the planning application lifecycle, which include application submission, application acceptance, the hearing schedule, and the hearing decision, and determine how the activity due dates are calculated.
Activity Rule Example
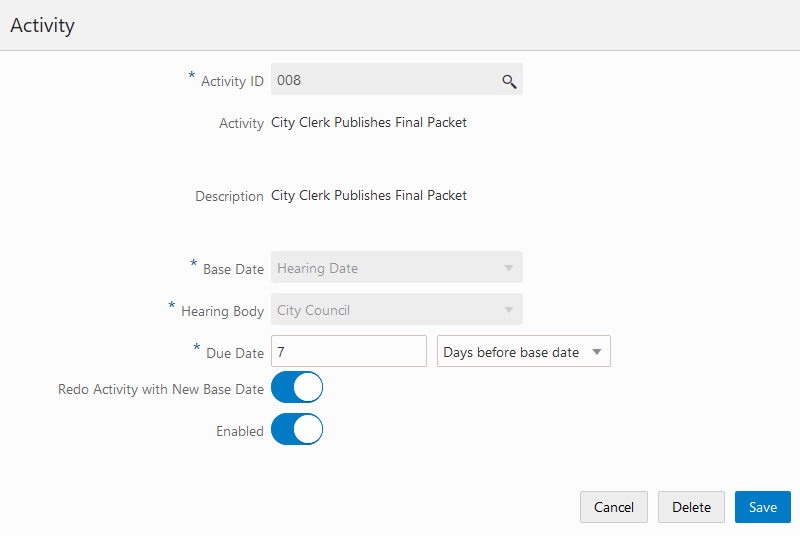
Let’s take a look at an example. First, the agency sets up a reusable activity City Clerk Publishes Final Packet, which can be part of multiple agency groups. This activity reminds the planning application staff to publish the final packet before the public hearing. After the activity is assigned to an activity group, the agency defines the rules for tracking the activity. In this example, the activity is related to the hearing, based on the City Council hearing date. That is, the City Council hearing date is the base date and activities may be due before or after. Here the task is due 7 days before the hearing date, and if the hearing is canceled or rescheduled, agency staff can repeat the activity with a new base date.
The example Activity Group – Activity setup page shown here is described in the surrounding text.
When the hearing with the City Council is scheduled, the activity based on the rule is inserted into the activity tracking list for the planning application as shown here.
The Activity Tracking page shown here is described in the surrounding text.

The due date for the activity is calculated to be 7 days before the hearing date. The hearing date in this example is 10/21/20 and the activity is due 10/14/20.
Notice how the activity or activities with same base date in the group are activated on the application’s activity tracking page. In this example, all of the activities associated with the hearing base date appear in the list when the hearing date is scheduled.
Defining Activity Rules
Here’s how to define activity rules that are used to determine due dates of tasks:
Select .
On the Activity Group page, select the row with the activity group that you want to add activities to.
Click the Add button in the Activity section on the Activity Group Details page.
On the Activity page, select an activity from the reusable activities you set up in the first step of due date tracking setup. For more information, see Setting Up Activities.
The activity name and description are displayed once you select an activity.
Next select the base date for calculating due dates, when the event in the application timeline occurs. Choose one of the following from the Base Date list:
Activity Base Date
Event Description
Submission Date
The date when the application was submitted in the agency system.
Acceptance Date
The date when the agency accepts the application after submission. The workflow process populates the acceptance date in the application
Hearing Date
The scheduled hearing date for the planning application. The calculated activity due date is updated when the hearing date changes.
Hearing Decision Date
The date when the hearing body makes a decision about the planning application, such Approved or Denied.
For each base date, enter the due date rule in days in the Due Date field. For example, if an activity deadline is 30 days after the application acceptance date, enter 30 in the Due Date field and select Days after base date. You can also indicate whether the due date is prior to the base date by selecting Days before base date.
Then set up the unique rules for each activity based on the event date.
If you select the Submission Date base date, you provide a due date and also indicate whether the application can be resubmitted. For example, when an application is submitted, state law provides up to 30 days to review the application and determine its completeness. When an application is resubmitted, the 30-day allowance begins again. It can only be resubmitted if it’s incomplete.
The Acceptance Date base date selection only requires due date values.
For the Hearing Date and Hearing Decision Date base dates, enter the due date and values for the following fields:
Page Element
Description
Hearing Body
This field applies only to the Hearing Date Hearing Decision Date base dates. Select from the available hearing bodies that evaluate the application. Your agency sets up the hearing bodies you can choose from. For more information, see Setting Up Hearing Bodies.
Hearing Decision
This field applies only to the Hearing Decision Date base date. Select one or more decisions about the planning application: Approved, Continue, Denied, and None. The calculated activity due date is based on the date the hearing decision is made with one of the specified outcomes.
Redo Activity with New Base Date
Indicate whether the activity needs to be redone whenever the base date changes. For example, the activity based on the current due date is complete, but you want to redo the activity based on a new date. A new row automatically appears on the activity tracking page with the new base date and calculated due date.
Turn on the Enabled switch when the activity rule is ready for use. You can turn off the switch to disable the activity rule but you can’t delete it if the activity group is in use.
Click Save.