14Working with Maps
Overview of Delivered Maps
Maps provide a convenient way for agency staff and public users to see and interact with geographical information. Maps show the locations of parcels and addresses as well as showing locations of transactions such as permits, planning applications, projects, incidents, and cases.
This example shows the main map that agency staff uses to see properties and transactions.
The following tables describe the delivered maps in the Oracle Public Sector system.
Main Maps
This table lists the main maps that display the agency’s business licenses, permits, planning applications, and projects. There are separate maps for different users. For more information, see Using the Main Map and Explore Your City Map.
| Map Name |
Users |
Navigation |
Usage |
|---|---|---|---|
| Agency main map |
Agency staff |
Click the Map icon in the page header, then click Main Map in the drop-down menu that appears. |
|
| Guest/anonymous user map |
Anonymous public users |
Guest users click the Explore Your City tile on the landing page. |
An anonymous user who attempts to start an application is required to register or sign in first. |
| Registered public user map |
Registered public users |
Registered public users click the Explore Your City tile on the landing page. |
|
Additional Maps for Applications
This table lists additional maps that support applications:
| Map Name |
Users |
Navigation |
Usage |
|---|---|---|---|
| Application intake |
Agency staff Registered public users |
Access the Property section of a new or submitted application, then click the Map View icon. |
Choose the property to associate with the application. |
| Mobile inspection |
Agency staff |
Use the Oracle Inspector mobile application. |
View permits and planning applications on a map. |
| Permit list |
Agency staff Registered public users |
For agency staff: access the application lists on the Transactions page. For registered public users: access the application lists on the Applications page. On any of these pages, click the Map View icon. |
View the locations of the transactions on the list. |
| Public notification |
Agency staff |
|
Create a notification zone by specifying a distance from selected parcels. After creating a notification zone, download .csv files with parcel, address, and owner information for all parcels that are at least partially within the zone. |
Maps for Code Enforcement
This table lists additional maps that support code enforcement:
| Map Name |
Users |
Navigation |
Description |
|---|---|---|---|
| Agency - code enforcement |
Agency staff |
On the Code Technician Worklist page, go to a tab for managing incidents and then click the Map View icon. |
View the locations of incidents that appear on the selected worklist tab. |
| Code enforcement issue intake |
Registered and anonymous public users |
Follow the guided process for reporting an issue until you reach the page where you enter the issue location. |
Identify the location of an issue that is being reported. See Reporting Issues. |
| Mobile code enforcement inspections |
Agency staff |
When reporting a new violation, click the Location of the incident option. |
Identify the location of a violation that is being reported by an inspector who is using the mobile inspection application. |
| Public - code enforcement |
Registered and anonymous public users |
On the code enforcement landing page, click the View Recent Issues tile. |
View recent code enforcement issues. |
Maps in Transaction Headers
This table describes the map that appears in transaction headers:
| Map Name |
Users |
Navigation |
Description |
|---|---|---|---|
| Transaction header |
Agency staff Registered public users |
Access the detail page for the transaction. |
The map that appears at the top of various detail pages. For example, this map appears in the detail pages for business licenses, permits, planning applications, projects, incidents, cases, parcels, addresses, and owners. If the transaction is not associated with a location, the map displays the initial extent that is defined on the map profile. |
Using the Map Toolbar
The general toolbar for maps has tools that relate to the map itself, without regard to specific transactions. This topic describes these general-purpose tofus.
These are the generic map tools that can appear on the main toolbar:
| Image |
Name |
Configuration |
Description |
|---|---|---|---|
 |
Switch Map Profile |
This icon appears if multiple profiles exist for the map.
|
Click to select a map profile. Map profiles control the appearance of the map as well as the availability of other toolbar options. When you click this icon, a list of map profiles appears. The list displays the profile name and a thumbnail image of the map that illustrates its general appearance. |
  |
Zoom In and Zoom Out |
Use the Enable Zoom switch on the map profile. |
Use these tools to zoom in or out. You can also double-click a map location to zoom in. |
 |
Show Default Map View |
Use the Enable Default Map View switch on the map profile. |
Click to restore the map to its default (home) display area. |
 |
Select Base Map |
Use the Enable Base Map Gallery switch on the map profile. |
Click to display a pop-up window for selecting a map type such as Streets or Topographic. |
 |
Select Layers |
Use the Enable Map Layers switch on the map profile. |
Click to display a pop-up menu for changing the visibility of various map layers. Examples of layers include the parcel layer and address layer provided by the map service. |
 |
Show Attribution (for maps in page headers) |
This toolbar button is not configurable. Some maps have this button, while other maps, such as Explore Your City, display attribution information across the bottom of the map page. |
Click to display a pop-up window that identifies the third-party map sources. |
|
Identify GIS Information (for maps that are not in page headers)
|
This tool appears if the Enable Map Layers switch is on and the map service URL for the profile is configured to allow the display of object details on the map. |
Click to enable the display of object details for map objects (such as parcels) that you click. Details appear in a pop-up window. To stop displaying object details, click the button again to turn off the option to identify GIS information.
The map profile settings for
Enable Window Detail Docking and
Detail Window Dock Position control where the object detail window appears. However, on mobile devices, the detail window always appears at the bottom of the screen..
|
 |
Show Selection Tools or Hide Selection Tools |
Use the Enable Selection Tools switch on the map profile. |
Click to show or hide a toolbar with drawing tools. Use the drawing tools to select parcels on the map. |
Viewing Map Markers
Map markers identify the location of an object such as an application, project, incident, case, parcel, or address.
Marker on the Transaction Header Map
The map in the header of a transaction page shows a single marker for the current object.
This example illustrates the Parcel page, where the map marker shows the parcel’s location.

Other Map Markers
Maps other than the ones in transaction headers have these markers:
Transaction-specific icons to mark the locations of single transactions.
Numbered circles to mark locations with multiple transactions.
Orange-shaded double circles to represent multiple neighboring locations that are clustered together because of the map zoom level.
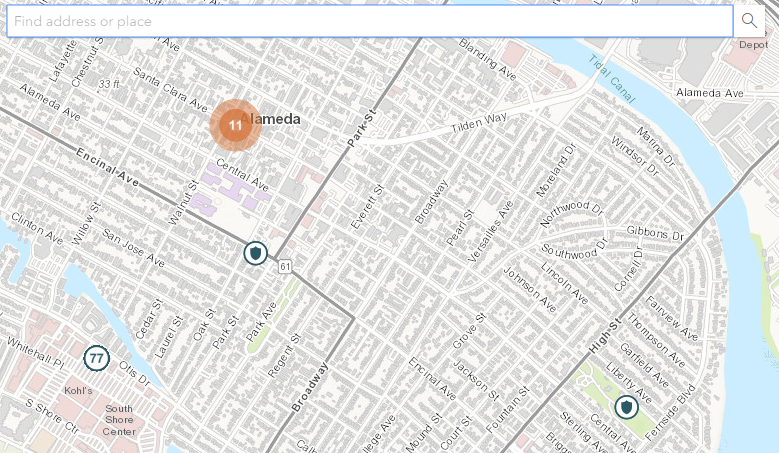
This example is from the View Recent Issues map, where map markers represent code enforcement issues.
The following table provides a key to the marker icons:
| Map Marker |
Description |
|---|---|
 |
The location has a single code enforcement issue. |
 |
The location has a single permit application. |
 |
The location has a single planning application. |
 |
The location has a single project. |
 |
The location has a single business license. |
 |
There are multiple transactions at the same location. The number represents the number of transactions. The marker is the same color as it would be for a single transaction. For example, the marker is brown for multiple business licenses. |
Viewing Details for a Marker
Clicking a marker displays a pop-up window with additional details.
This example illustrates the detailed information for a map marker. The location of the pop-up window depends on the docking settings in the map profile
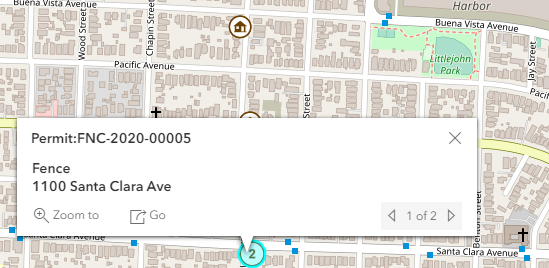
The detail window includes different information for different objects. Here is some of the information that can appear:
The object ID
On maps that show multiple types of objects, the object type (such as “Permit”) appears along with the object ID.
The object status.
Status information appears for incidents and cases, but not for other objects.
Any applicable categorization, such as a permit type or an issue type and subtype.
The address for the location.
Controls for paging through multiple objects, if applicable.
When there are multiple objects, the paging controls appear around the text <sequence number> of <total number of objects>.
A Zoom To icon for zooming in on the map location.
A Go icon for opening the corresponding detail page in a new window.
Using the Main Map and Explore Your City Map
The agency-facing Main Map and the public-facing Explore Your City map provide options for viewing existing applications and projects on the map and for selecting properties so that you can start new applications.
With these maps, users can do the following:
Select a property and view existing transactions for that property.
Start an application for a selected property (public users and agency staff only).
Users who aren’t sure what type of application is needed can launch the guide that provides recommendations based on questionnaire answers.
Search for transactions and view transaction markers on the map.
All users can search for transaction locations. Registered public users have the additional ability to filter search results so that only the user’s own transactions appear.
Selecting Properties Using the Basic Search
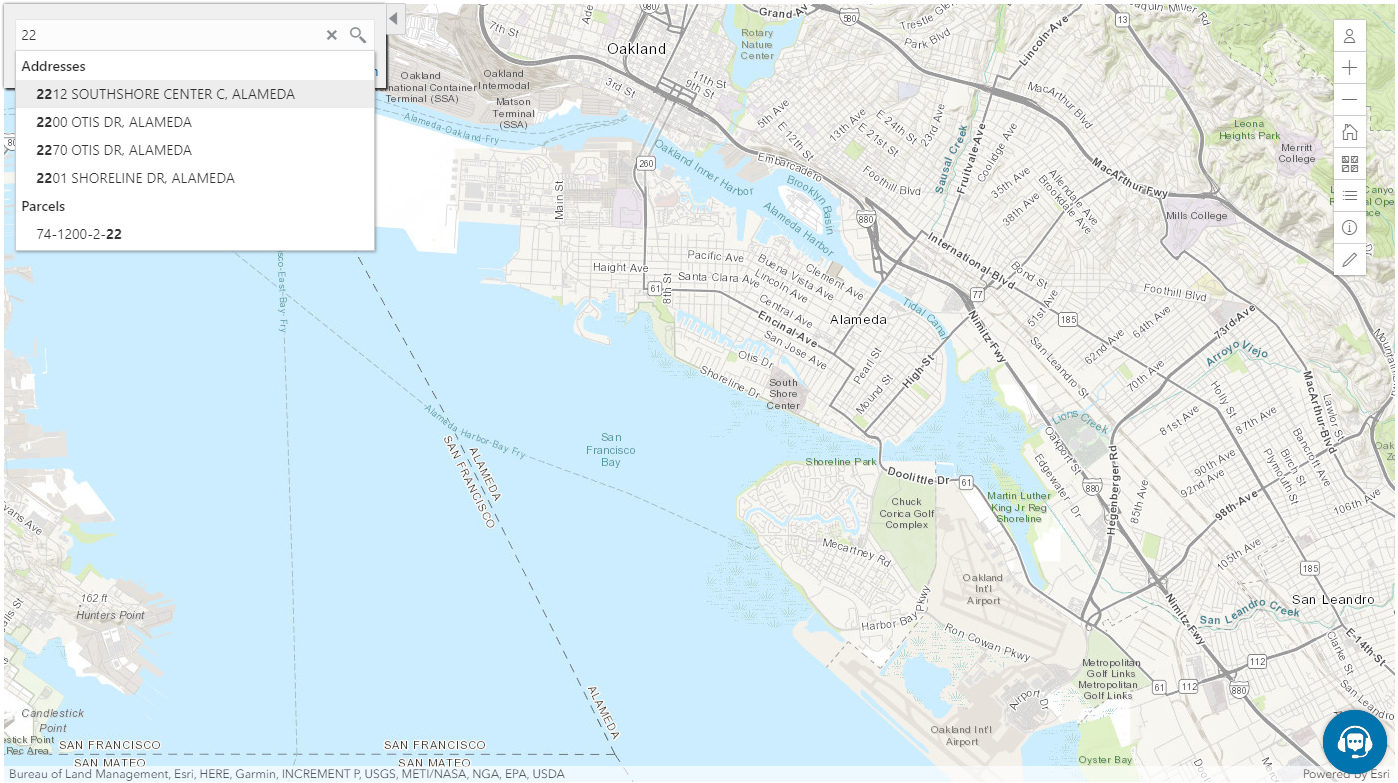
This example illustrates the basic property search on the map.
This example illustrates the map when properties have been selected.

To search for properties and select them:
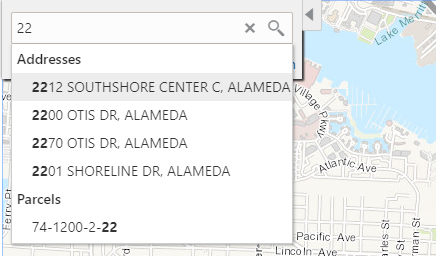
Enter a full or partial address or parcel number in the search field that appears when you first access the map.
As you type, up to five matching addresses and parcels appear in a type-ahead drop-down list. The type-ahead list includes headings to indicate which items are Addresses and which are Parcels.
Press the Return key or click the magnifying glass icon to perform a full search.
The Search window expands to show lists for Addresses and Parcels with a count for each type of result. Initially a maximum of five items appears in each list.
If more results exist, click More to show all results in a scrolling list. When the list is expanded, click Less to shrink the list back down to five locations.
To select a property, click a single address or parcel number from either the type-ahead list or the full results list.
The corresponding property is selected on the map, and the search field is replaced by the Selected Locations list.
To select additional properties without losing your selection, click the Search link to re-display the search field.
Each time you select a property, it is added to the Selected Locations list.
To return to the Selected Locations overlay from the Search overlay without performing a search, click the Selected Locations link. This link appears if at least one property is selected.
Use these options to deselect properties:
Page Element
Description
Delete
Click this icon to remove a single particular property from the list. The icon appears next to each selected property.
Clear All
Click this link to deselect all properties. The link appears at the top of the list.
Selecting Properties Using the Selection Toolbar
To select properties directly from the map, without searching, use the drawing tools. You can use the search and the drawing tools together to add properties to (and remove properties from) your list.
To select and deselect properties using drawing tools:
- Click the Show Selection Tools button on the map’s general toolbar.
The drawing toolbar appears.
Use these tools to make your property selection:
Selection Toolbar Button
Description

Draw a Point
Click one or more points on the map to select the properties that contain the points.

Draw a Polyline
Click two or more points on a map to draw a multi-segment line (a polyline) connecting the points that you click. Double-click on the final point to stop drawing. All properties that intersect the resulting polyline are selected.

Draw a Polygon
Click three or more points on a map to draw a polygon. The system redraws the polygon after each click. Double-click on the final point to stop drawing. All properties that are at least partially within the resulting polygon are selected.

Deselect One
Click a selected property to deselect it.
Note: Selecting a property does not deselect previously selected properties. You must use the Deselect One or the Deselect All tool to remove properties from your selection.
Deselect All
Click this button to deselect all properties.

Close
Click to close the toolbar.
Review details of your selections on the Selected Locations list.
The Selected Locations list replaces the search window whenever properties are selected. This is a single list that also includes properties that you adding using the search.
Using the Selected Locations List
The Selected Locations overlay enables you to review information about selected properties and the transactions that are associated with those properties.
In this example of the Selected Locations list, the addresses and parcel numbers of selected locations are links to the corresponding detail pages. These links are only present for agency staff. When public users see the Selected Locations overlay, the addresses and parcel numbers appear as plain text.
To use the Selected Locations overlay:
Review the information cards for the selected locations.
Each selected property appears on a card. The card title is the primary address for the location. The parcel number, if any, appears below this address. Agency staff can access the detail pages for selected addresses and parcels by clicking the address or the parcel number link on the card. Public users do not have access to detail information, so for public users, the addresses and parcel numbers are plain text instead of links.
Note: If an address has multiple parcels, each parcel appears on a separate card and all parcels are selected on the map.If a parcel has multiple addresses, a link below the parcel number indicates the number of addresses. Click the link to see a list of addresses.Click a card to select it and learn more about the property.
If the selected property is associated with any applications or projects, the selected card expands and displays icons for any associated transactions. There are separate icons for Permits, Planning Applications, Businesses (business licenses), and Projects. The icon label includes a count of the related transactions. If the property is not associated with any transactions, the selected card looks the same as it does when it’s collapsed.
Click the icon for a specific transaction type to access a list of transactions.
The list replaces the Selected Locations list and shows details that are relevant to the specific transaction type.
On the transaction list, click a transaction to open a new window with the corresponding detail page.
The details are read-only for public users. For agency users, access is based on the user’s security. The window does not have any navigation controls, so close the window when you’re done.
From a transaction list, click the return button in the window header to go back to the Selected Locations list.
To start an application for the selected properties, click the Apply button (not available to anonymous users).
The Apply page appears so you can select an application type and start an application. As long as the application intake form includes a Property section, the property information will be pre-filled based on the selected properties.
Users who aren’t sure what type of application is needed can click the Guide button instead. This launches the guide that provides application type recommendations based on questionnaire answers. The Guide button is available only if an Oracle Intelligent Advisor definition is associated with the agency record.
Using Advanced Search to View Transactions
The advanced search is for searching transactions rather than properties. Use the advanced search to view map markers that indicate the locations of business licenses, permits, planning applications, and projects.
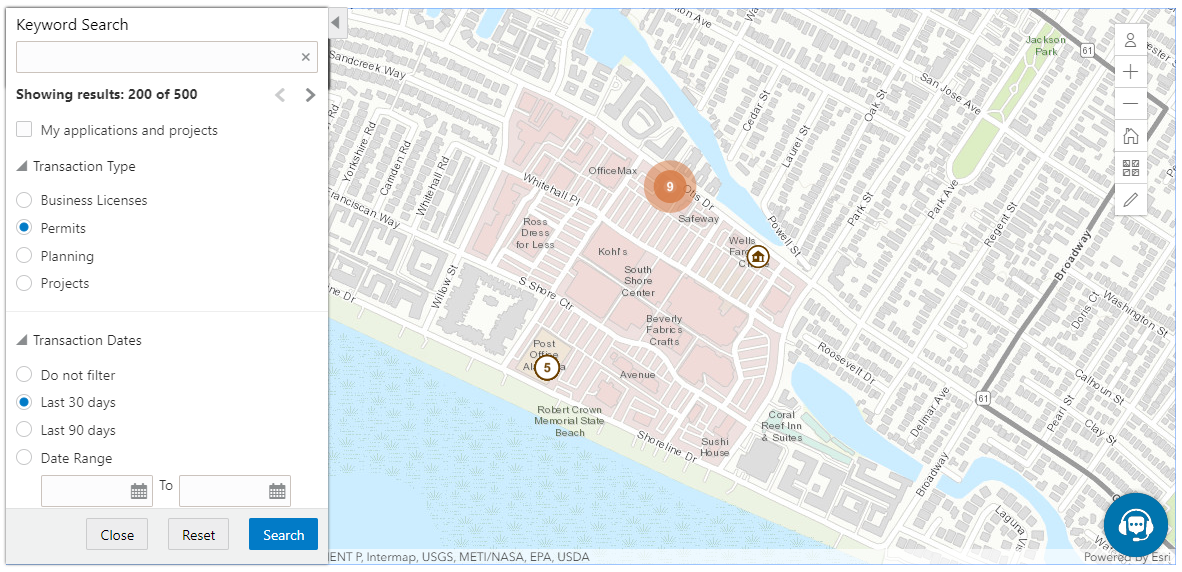
This example illustrates the advanced search.
To show transactions on the map:
Click the Advanced Search link on the basic search overlay.
A new overlay appears.
Enter search keywords, if any, in the search field at the top of the overlay.
Search on data such as a business name or permit type. Don’t use this field to search for addresses; use the basic search instead.
In the Transaction Type section, indicate which type of transaction to search.
Depending on which product offerings you enable, you can search for Business Licenses, Permits, Planning (planning applications), or Projects.
In the Transaction Dates section, choose a date range to search.
Options include Do not filter, Last 30 days, Last 90 days, or a custom Date Range. If you use a custom date range, enter a start date, end date, or both to define the range.
For date-restricted searches:
The application submission date must fall in the specified time period.
A project start date must be after any start date you specify. If you use a custom date range with an end date, the project end date must be before any end date you specify.
Click Search to perform the search.
Map markers appear for the transactions that meet your search criteria. The overlay also displays text stating how many results were found.
Users can see up to 200 results at a time. If more than 200 results exist, use the Previous (<) and Next (>) icons to scroll to a different block of results and update the map to show markers for the new block of results.
To clear search criteria, click Reset.
To close the advanced search and return to the simple location search, click Close.
Creating Map-Based Public Notification Lists
The Public Notification map enables you to define an area on a map and generate .csv files for the parcels, owners, addresses, and neighborhood attributes that are included in that area. Use the .csv files to create your mailing list. The notification area consists of all properties that are at least partially within a specified distance of the selected property or properties.
A context-specific instance of this page is available for scheduling hearing notifications. See Generating a Hearing Notifications List.
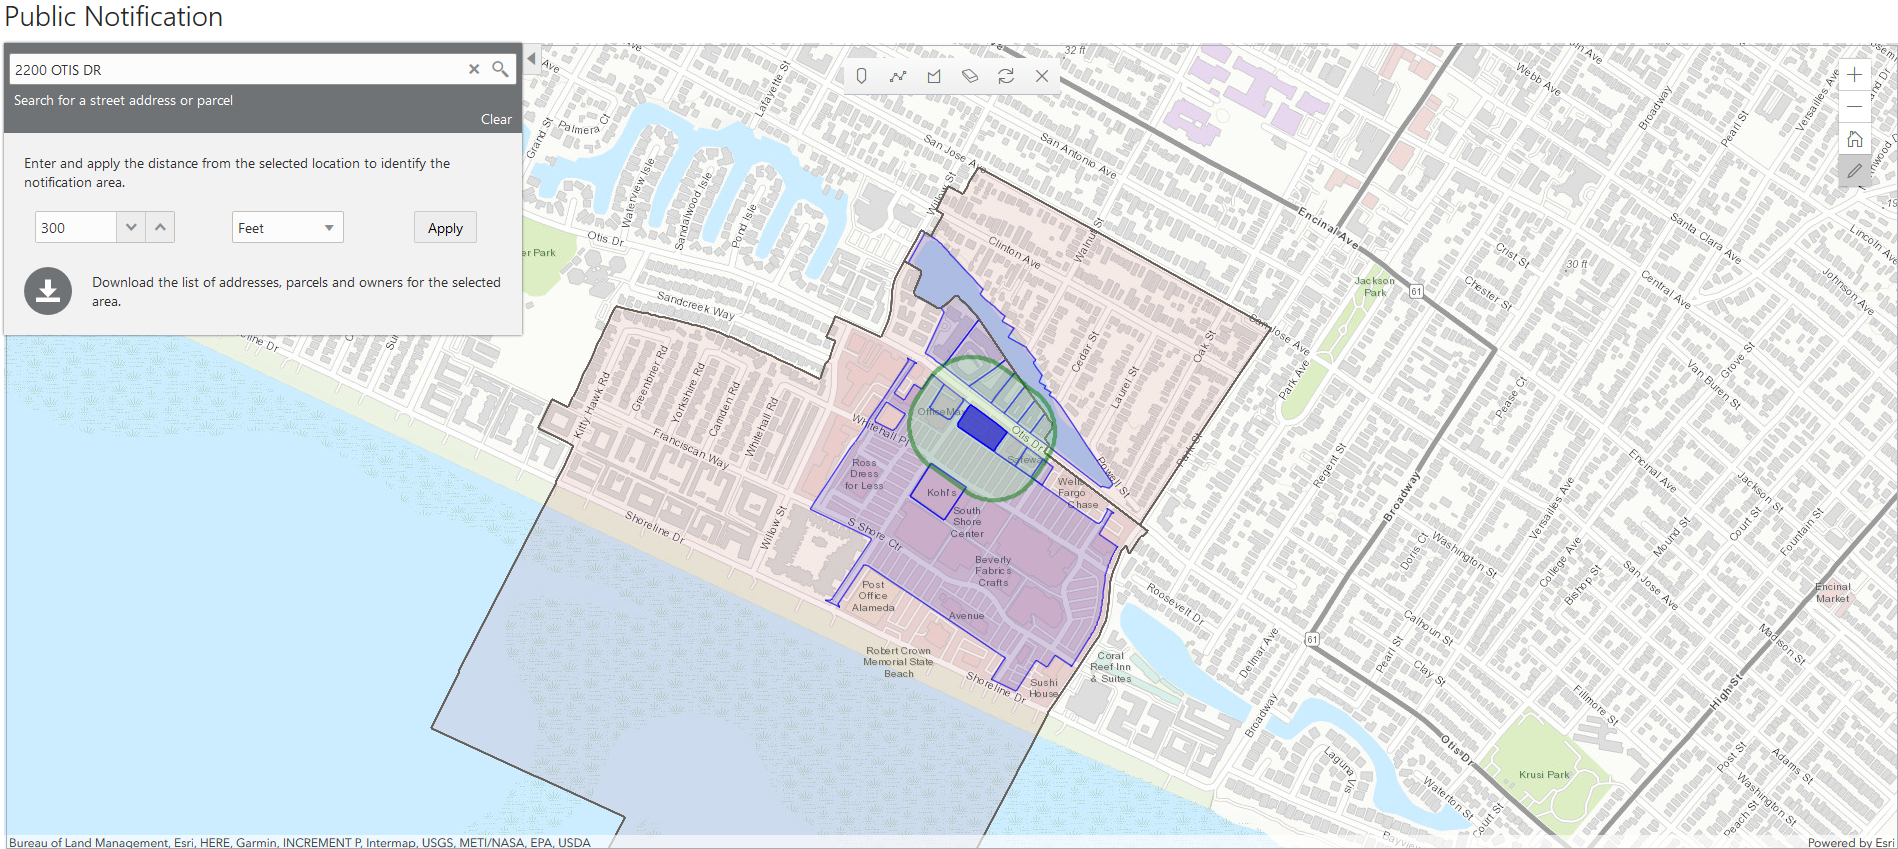
The following example illustrates the Public Notification page, where you can select properties, define a notification area around the selection, and download lists of addresses, parcels, owners, and neighborhood attributes in the notification area.
To define a notification area and generate notification lists:
Access the Public Notification page.
To access the page from the global header, click the Maps icon, then click Public Notification in the drop-down menu.
You can also access the page directly from the list of hearings for a planning application. If the hearing schedule is final, the action menu for the hearing includes the Generate Notifications List action. This action opens the Generate Notifications List window, which contains the Public Notification page. For more information, see Generating a Hearing Notifications List.
Select a property, or confirm the default property selection.
If you access the Public Notification page from a hearing for a planning application, the property or properties from the planning application are selected by default.
The two methods for selecting properties are:
Use the search field to search by street address or parcel number, then click the desired property in the type-ahead list or the search results.
Use selection tools such as Draw Point, Draw Polyline, or Draw a Polygon to select properties.
For detailed information on selecting properties, see Using the Main Map and Explore Your City Map
Define the notification area by entering a distance from the selected properties.
The fields for defining the notification area appear below the search field when a property is selected.
Enter a number, and select Feet, Miles, Meters, or Kilometers to enter a distance.
The fields for entering the distance appear below the search field as long as at least one property is selected.
Click Apply.
The notification area appears on the map. Visually, it appears as a bold green outline that follows the contours of the selected property at the specified distance. If you selected multiple properties, there can be multiple notification areas. Parcels that are fully or partially within the notification area appear with a blue outline so you can see which parcels are included in the notification list. If the map is enabled to show neighborhood groups that are fully or partially within the notification area, they appear as a pink layer with a black outline.
To change the notification area, modify the property selection, the distance for the boundary, or both, and then click Apply again.
If you use add or remove properties from your selection, the notification area is not updated until you click Apply.
To clear the property selection and the notification area, click either the Deselect All tool or the Clear link on the Search overlay.
If you are satisfied with the notification area, click the Download button that becomes visible after you apply a selection.
Three files are downloaded: Address.csv, Owner.csv, and Parcel.csv. If the map is enabled to show neighborhood groups that are fully or partially within the notification area, a fourth file is downloaded: Neighborhood Group Mapping.csv.
Files are saved to default folder defined in your browser settings. Your browser must be able to download multiple files.
Save the .csv files so your agency can use them to generate notifications.
The notification process is not part of the Oracle system.