12Implementing the Business Rules Framework
Business Rules Framework Overview
This topic describes how your agency can use the Business Rules Framework to define and maintain business rules that drive system actions.
The Business Rules Framework is an event-driven, action framework that enables you to execute various actions based on the business rules you define. A business rule is a collection of conditions applied to an event that when met invoke specific actions. For example, a business rule can:
Trigger automatic system communications.
Update the underlying workflow process.
Oracle Public Sector Compliance and Regulation delivers a registry of resources, or business objects, for each offering, that define the events applicable to that business object. Given the events and data contained by a resource, your agency can define rules and conditions to drive the desired actions. While the resources and events are system-defined, your agency defines the rules and conditions.
The following table describes the main elements in the framework.
| Element |
Defined by System or Agency |
Description |
|---|---|---|
| Offering |
System |
Offerings are the set of applications your agency has licensed. They contain the resources with the data for business operations. For example, Permits and Planing and Zoning are offerings. |
| Resource |
System |
Resources are the business objects in the application. For example, the Inspection business object represents the data and activity related to an inspection for a permit. |
| Event |
System |
Events are categorized by offering and by business object. They represent specific, predefined occurrences for a business object in a particular offering. For example, with Permits, the Inspection business object contains these events:
Common events apply to all offerings. |
| Rule |
Agency |
Rules are based on business requirements and constrain the actions associated with events. A rule contains one or more conditions that drives one or more actions. See Setting Up Business Rules. |
| Conditions |
Agency |
Conditions are logical statements that, if satisfied or evaluate to be true on the whole, cause an action to be carried out or stopped. See Setting Up Business Rule Conditions. |
| Actions |
Agency |
Actions the activity that occurs in the system as a result of the conditions being met. Action types include:
Note: The communication actions are preassigned to specific events. For example, the Plan Review business object in the Permits offering contains events where a notification is sent when the plan review is ready to finalize. However, the Business Rules Framework enables you to define conditions that express the requirements for sending the notification.
|
Setting Up Business Rules
This topic describes how to configure business rules in the Business Rules Framework.
Accessing Business Rules
To access business rules:
Navigate to the Business Rules Framework in the Navigator: .
On the Business Rules Framework landing page, select the offering you are implementing, such as Permits.
On the offering’s events page, select the event for which you want to manage business rules, such as Inspection Canceled for the Inspection business object.
Use the Event Details page to view, add, or manage the business rules associated with the event.
Working with Default Business Rules
Each event has a predefined default rule, which you can use as is or use as a template to create your user-defined business rules. Default business rules have no conditions and the only action is Send Communication for All Templates. To begin generating communications, you need to define the communication templates for the relevant event.
Copying a Default Rule
Except for enabling or disabling a default rule, you can’t modify an existing default rule directly; you need to copy it first, and then make your changes.
To copy a default rule:
Access the default business rule.
On the Event Details page, click Copy in the Actions column in the Business Rules grid.
On the Copy page, enter a new Rule Name and Rule Description (if needed).
Click Save.
Note: After you copy a default rule, it becomes disabled automatically, and the new rule you just created is enabled.
Adding User-Defined Business Rules
If you do not want to use the existing default rule, or copy it, you can add user-defined business rules.
On the Event Details page, click Add to create a new business rule for the event.
On the Business Rules Details page, enter these values:
Page Element
Description
Rule Name
The name of the rule.
Note: The rule name can’t be changed after you save.Rule Description
Enter a description to further identify the rule.
Enabled
Turn on the switch to enable the rule to be executed in the system. Turn off the switch to disable the rule.
Add one or more condition.
Add one or more action.
Setting Up Business Rule Conditions
This topic describes how to create conditions for rules in the Business Rules Framework.
The conditions are logical statements that consist of a field to evaluate, an operator, and a comparison value. You can:
Add up to 10 conditions per rule.
Join and group conditions to indicate an order of operations.
Include up to three levels of nested conditions.
Let’s take a look at the elements used to create an expression statement for conditions in a rule.
This example illustrates the grid used to define a conditional statement for a business rule. The details are described in the text surrounding the image.

| Element |
Description |
|---|---|
| Sequence |
Select the order in which the condition executes within the business rule. For example, 1 means that the condition in the row is executed first, 2 is executed second, and so on. You can have up to 10 sequential conditions in a business rule.
Note: Enter condition sequences without any gaps between sequence numbers. For example, the sequence should be 1, 2, 3, 4, not 1, 3, 4.
Note: When you save, the application validates and redraws the grid based on the entered sequence. For example, if you enter a sequence of 2, 3, 1, the application renders it as 1, 2, 3 in the grid after you save, assuming the logic is valid.
|
| Opening Grouping |
Use the opening parentheses to establish the beginning of a grouping of one or more conditions in the business rule expression. You can nest groupings up to three levels using (, ((, and (((. Make sure to balance (pair) the opening and closing groupings. That is, you need the same amount of left parentheses as you do right parentheses. |
| Field |
Select the predefined source field from the event business object.
|
| Operator |
Select from the available operators to specify how each value in a condition must relate to the source field from the event.
Note: Depending on the field’s data type, the list of operators changes to show only those that apply.
|
| Value |
Enter the comparison value to the source field from the event business object. |
| Closing Grouping |
Use the closing parentheses to establish the end of a grouping of one or more conditions in the business rule expression. You can nest groupings up to three levels using ), )), and ))). Make sure to balance (pair) the opening and closing groupings. |
| Grouping Verb |
Select AND or OR to include a logical operator. All condition rows in the grid require a grouping verb, except for the last condition in the sequence. |
| Actions |
Select to add or delete a level (row) in the expression. |
Setting Up Business Rule Actions
This topic describes how to create actions for rules in the Business Rules Framework.
Configuring Send Communication Actions
To trigger send communication actions you must have first set up the applicable communication templates for a communication event. The Business Rules Framework sends the communication defined by the communication template, such as a notification or an email.
For more information on the communications framework, including communication events and templates, see Delivered Communication Events and Setting Up Communication Templates.
To add a send communication action:
Expand the Actions section of Business Rules Details page.
Click Add.
From the Action Name drop-down list, select Send Communication.
Click Configure.
On the Configure Action page select the scope of targeted recipients for the send communication action.
Note: You can select only one scope option.Page Element
Description
Template codes
Sends a communication only to selected communication templates defined for a communication event.
Channel types
Sends a communication to specific channel types defined for a communication event, such as email, notification and so on.
Process all templates
Sends a communication to all communication templates for all channel types defined for a communication event.
Edit Templates
Click the Edit Templates link to go to the Communication Event page where you can select a communication event and review the associated communication templates to verify selections or to manage communication templates.
Click Done.
Configuring Update Workflow Actions
Currently, the Update Workflow action type applies only to the Planning and Zoning offering for the Planning Activity Updated event.
Before you begin configuring an update workflow action, you need to have configured the following definitions:
| Definition |
Description |
|---|---|
| Activity Group |
An activity group contains a set of activities that represent human tasks within a given workflow for processing a planning application. Agency staff track and manage the progress of the planning application using the activities within the activity group. When creating a planning application type, you select an activity group. You need to know the activities in the activity group assigned to the current planning application type. For more information on activities and activity groups, see Setting Up Activity Tracking. |
| Workflow Process Application |
The workflow process application is defined in the Oracle Integration Cloud (OIC). It defines and automates the system-level order of the tasks to complete through the lifecycle of the transaction type, such as a planning application. When creating a planning application type, you select the workflow process. You need to be familiar with the workflow process application assigned to the current planning application type. Specifically, when configuring the Update Workflow action type, you need to know the following information for the workflow task you want to update:
For more information on workflow process applications, see Setting Up Process Definitions for Workflow. |
For more information on setting up planning application types, see Setting Up Planning Application Types.
To add an update workflow action:
Expand the Conditions section of the Business Rules Details page.
Make sure your conditions reference the Activity and the Activity Status as fields required to drive the update workflow action.
When the status is updated for activity on the Activity Tracking page (and any other conditions are met) the update workflow action will be triggered.
This example illustrates the activity and activity status fields being included in the business rule conditions. Details are in the surrounding text.

Expand the Actions section of Business Rules Details page.
Click Add.
From the Action Name drop-down list, select Update Workflow.
Click Configure.
Specify the activity type and action to update in the underlying workflow process application.
This example illustrates how to reference the workflow activity type and action to update. Details are in the surrounding text.
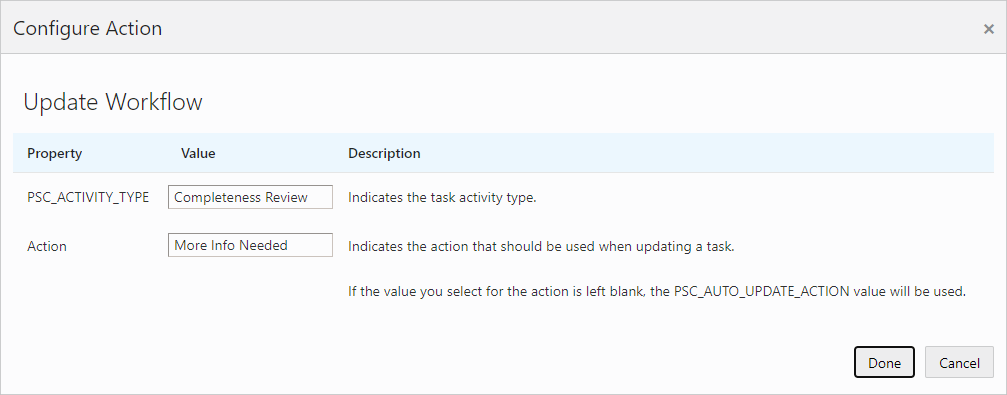
Page Element
Description
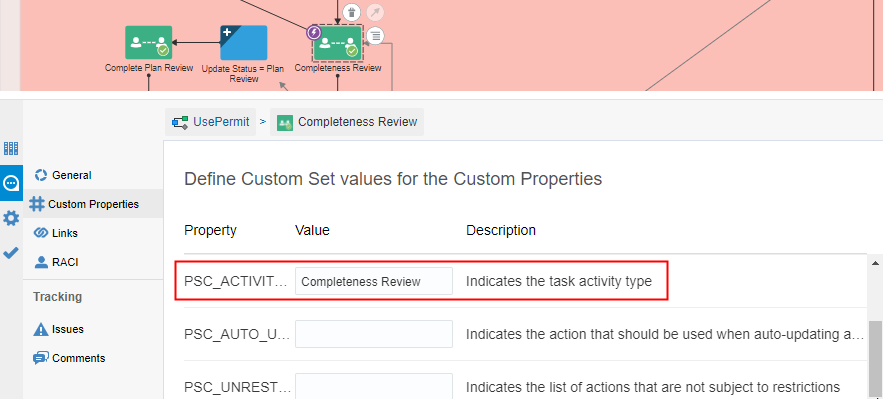
PSC_ACTIVITY_TYPE
The name used to identity the specific human task in the workflow process definition to update. For example, Completeness Review, Complete Plan Review, and so on.
This value is a custom property defined in the business properties for the activity type.
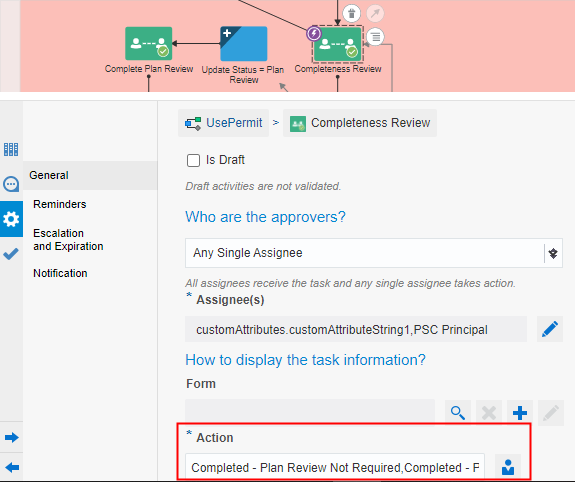
Action
The value to set as the Action in the workflow task properties. For example, Completed - Plan Review Not Required, Completed - No Plan Review Required, More Info Needed, and so on.
These values are stored in the Action field in the General properties of the activity type.
If needed, refer to the workflow process application in OIC for the activity type and action values.
This example illustrates the PSC_ACTIVITY_TYPE property. Details are in the surrounding text.
This example illustrates the Actions property. Details are in the surrounding text.
Click Done.
Repeat these steps for all the activities in the activity group you want to automate with the Update Workflow action type.