1Managing Public Users
Overview of Public User Accounts and Profiles
Public users can interact with an agency for either personal projects or for business projects. To distinguish personal activity from business activity, the accounts for registered public users can have multiple profiles.
Accounts Versus Profiles
Accounts for registered public users can include one personal profile and one or more business profiles. The personal profile represents the user’s personal dealings with the agency, while the business profiles each represent a business on whose behalf the user interacts with the agency.
Applications are associated with specific profiles rather than with the overall account. When the user starts an application, the application is associated with the currently selected profile. Similarly, when users view their existing applications, the system displays the subset of applications that are associated with the current profile.
The public user registration process creates a default profile for the user. During registration, the user indicates whether the account use is personal or business. Information that is provided during registration is associated with this default profile.
After an account is created, additional profiles can be added. If an account has multiple profiles, any profile can be designated as the default profile. Profiles can be made inactive, but they can’t be deleted.
Updates to the address, phone, or email made during subsequent applications can be saved to the user’s account profile.
Profile Selection
When a user signs in, the user’s default profile is the current profile.
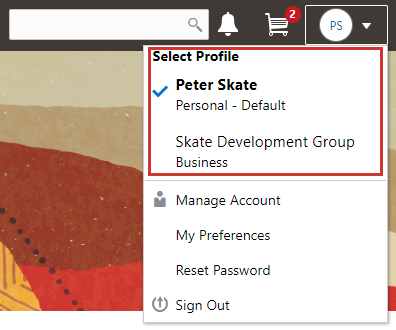
The user’s initials appear in the page header. Clicking the initials displays a menu of account-related options, including a Select Profile section that list all of the user’s profiles. A check mark indicates the profile that’s currently active. To switch to a different profile, the user simply clicks the other profile name.
This example illustrates the Select Profile option in the account menu.
A user who has multiple profiles can switch to another profile on pages that contain profile-sensitive information. When the user changes profiles on a profile-sensitive page, the data on the page reloads to show the selected profile’s data. If the page isn’t profile-sensitive, the user can go to the landing page to switch profiles.
Account Data Versus Profile Data
Accounts have certain information that applies to all profiles. This account information includes the following:
Name: the name of the person who owns the account.
Access: the user name that is used for signing in, the email address that is used during the registration process, and the user’s IVR code for accessing inspection schedules.
Additional Information: whether the user’s contact information is hidden from public view.
Your agency configures whether to give users this option..
Attachments: documents that have been uploaded to the account.
Attachments can be associated with either an account or with a specific profile. The list of attachments for the account displays both account attachments and profile attachments. It identifies which profile, if any, the attachment is associated with.
Terms of Use: the terms of use to which the user agreed.
Conditions: restrictions that prevent certain actions or issue warnings when the actions are attempted.
Conditions can be associated with either an account or with a specific profile. The list of conditions for the account displays only the account-level conditions.
Profiles contain additional information. This profile-specific information does not get synchronized across multiple profiles. Profile information includes the following:
Profile Basics: the profile name, type, active/inactive status, and whether it is the default profile for the account.
Profile Information: the business name and business type for a business profile. This category isn’t relevant to personal profiles.
Contact Information: addresses, email addresses, and phone numbers.
Contacts: people who might be added as contacts for application that are associated with this profile.
When adding contacts to an application, users can quickly pick contacts who are already associated with the profile rather than having to manually add a new contact.
Licenses: a list of licenses such as contractor licenses, the contractor status for the profile, and any related verification statuses.
Trust Accounts: a list of payment accounts and any related verification statuses.
Attachments: documents that have been uploaded to the account.
Attachments can be associated with either an account or with a specific profile. The list of attachments for a specific profile displays only that profile’s attachments.
Conditions: restrictions that prevent certain actions or issue warnings when the actions are attempted.
Conditions can be associated with either an account or with a specific profile. The list of conditions for a profile displays only the conditions that are specific to the profile.
The Public User Registration Process
Although anonymous users can access information that is available to the general public, users must register before starting applications or performing most application-related activities.
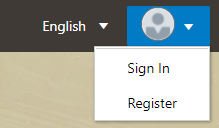
When a public user is not signed in, the account menu on the anonymous user landing page includes options for registering and signing in.
Here is a summary of the registration process:
On the landing page for anonymous users, the public user clicks the account icon and then clicks the Register menu item..
The user enters information on the Register page.
The user accepts the registration terms of use.
The user submits registration information.
A confirmation page directs the user to complete the registration process by following instructions in an email that the system sends.
The user clicks the link in the email to set up the account password.
The user submits the password to complete the registration process.
The system takes the user to the registered public user landing page.
To sign in again in the future, the public user clicks the account icon in the landing page header and then clicks the Sign In menu item.
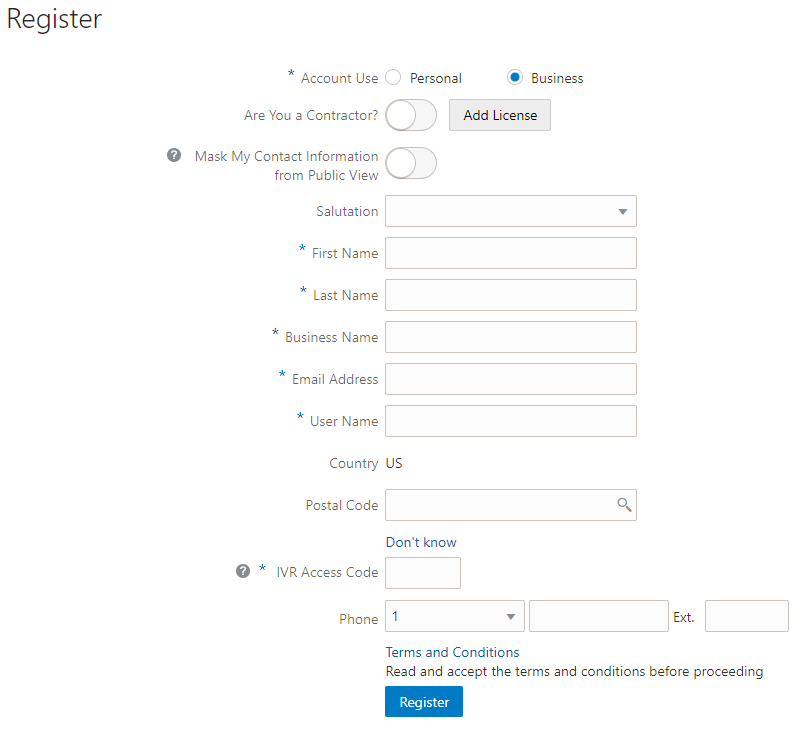
This example illustrates the Register page.
Entering Registration Information
Users enter the following registration information.
| Page Element |
Description |
|---|---|
| Account Use |
Indicates whether this is a personal account or a business account. Accounts can have both personal and business profiles. The registration process creates a single profile, and additional profiles must be added later. The Account Use setting determines whether the default profile that is created during registration is a personal or business profile. For more information about profiles, see Overview of Public User Accounts and Profiles. |
| Are You a Contractor? |
Indicates whether the account holder is a contractor. This switch is visible only if the user selects Business as the account use. The user’s contractor status is associated with the business profile that is created during the registration process. License information is required when a user self-identifies as a contractor. When this switch is set to the on position, the user must click the adjacent Add License button to provide license details. |
| Add License |
Used to provide details of a trade license held by a business. This button is visible only if the user selects Business as the account use. License information is required if the user self-identifies as a contractor. License information is optional for other businesses. Clicking this button opens the Contractor License Details page, which includes these fields: License Type, License Number, Issued On, and Expiration Date. After the user saves license information, the Add License button changes to an Edit License button. During registration, the user can enter information for only one trade license. After registering, the user can add additional licenses from the Manage Account page. See Managing Public User Accounts.
Note: Depending on the settings on the Public User Setup page, a user’s self-identification as a contractor might need to be verified by agency staff. Verification requirements do not affect the registration process.
|
| Mask My Contact Information from Public View |
Gives the user the option to mask their name and contact information when a member of the public views the user’s applications. This question appears only if it is enabled on the Public User Setup page. The default answer to this question is No. Users can access help for this question by clicking the question mark icon adjacent to the question. The help explains that even when the user’s own information is masked, the property addresses for all applications are visible to the public. |
| Salutation |
A title such as Ms. or Mr. that is used to address the person. This field is optional. |
| First Name and Last Name |
The user’s name, which is the same across all of the user’s profiles. |
| Business Name |
This field is visible only if the Account Use field indicates that this is a business account. The business name entered here is associated with the business profile that the registration process creates. If additional business profiles are added later, they have their own business names. |
| Email Address |
The user’s email address. After the user submits registration information, the system sends an email to this address. The email contains a link that the user needs in order to complete the registration process. This email address is also associated with the default profile that the registration process creates. If the user registers as a business, the email type is Work. If the user registers a personal account, the email type is blank. If a user attempts to register with an email address that is already associated with an account, an error message appears. The message says to use the Sign In page to access the existing account or to recover a forgotten user name or password. |
| User Name |
The user name that the public user will use to sign in to the system. User names must be unique, and the system displays an error message if the user tries to create an account under a user name that already exists. Note that the user does not select a password at this point. Password creation occurs after the user submits registration information. |
| Address Fields |
The user’s address. This address is automatically added to the default profile that is created when the user creates an account. The Country field displays US. As the user enters a Postal Code, the type-ahead list shows values that include appropriate city and state combinations. After the user selects a value, the city and state appear as read-only fields, and two address fields appear so that the user can enter the rest of the address. A user who doesn’t know the postal code can click the Don’t know link to display a full set of address fields. |
| IVR Access Code (Interactive Voice Response Code) |
A 4-digit code that enables the public user to access and change the schedule for permit inspections using interactive voice response. When users dial in, they are asked to enter their code before accessing the inspection records. The code is masked on this page, and users will not be able to see this code again even after registration is complete. Users who forget their code must enter a new code. For information about entering a new code after registering, see Managing Public User Accounts. This field appears only if you enable IVR access codes on the Public User Setup page. |
| Phone |
A phone number for the account holder. This field is optional. |
Agreeing to Terms and Conditions
The Public User Setup page specifies whether public users must agree to terms and conditions. If users must agree, the setup page also specifies the Terms of Use definition to use during registration, and public users must accept the terms and conditions during the registration process.
If users must agree to the terms of use, the description from the Terms of Use definition appears as a link on the Register page. Instructional text directs the user to read and accept the terms before proceeding.
To view and accept the terms, the user clicks the link to open a new window. The window displays the complete text of the terms followed by a check box labeled I have read and accepted the terms and conditions. The user must select the check box to continue. A user who does not want to accept the terms can cancel.
After the user accepts the terms and continues, the main Register page displays a selected agreement check box instead of instructions. The check box is not editable. The link to the detail window is till available, and the user can return to the window to re-read the terms or rescind agreement.
Completing Registration by Resetting the Password
When the public user clicks the Register button, a confirmation page provides instructions for completing the registration process. The instructions direct the user to an email with the necessary information.
The confirmation page also provides a registration ID number for reference in case the user needs to contact the agency for help. The registration number is the user’s party ID.
These are the system actions and user steps that finalize the registration:
The system creates user account information in the Oracle Public Sector Compliance and Regulation system and in the Fusion Applications system.
The system emails the user a link for completing the registration process.
The link takes the user to the Reset Password page in the Oracle Applications Cloud.
Although the page name suggests that the user is resetting a password, the user is actually creating a password for the first time.
The user enters a password and confirms it, then clicks the Submit button.
The system creates the password, completing the registration process.
The system transfers the user to the Public Sector Compliance and Regulation landing page for registered public users.
The emailed link that the user clicked to access the Reset Password page includes the parameter that redirects the user to the appropriate page.
Accessing Public User Account Information
Registered public users have self-service access to account management. Agency staff can also update account and profile information for public users.
Account Management Navigation for Agency Staff
Agency staff accesses the Manage Account page using these steps:
Select
The Public User Access page displays summary information about public user accounts. The list includes information such as the person’s name, user name, email address, and the number of pending verification requests.
An icon before the user’s name indicates that the account or a profile is subject to one or more conditions. Conditions relate to permits and to planning applications. They prevent certain actions or issue warnings when the actions are attempted. To see condition details, access the detail page for the user account. For more information, see Managing Account and Profile Conditions.
Search for the desired user account.
Click the > icon for the row with the desired user account.
Account Management Navigation for Registered Public Users
To access self-service account management functionality, a public user who has signed in follows these steps:
Sign in to access the public user landing page.
Click the account menu that appears in the page header.
A drop-down menu appears.
This example illustrates the account menu under the user’s initials.
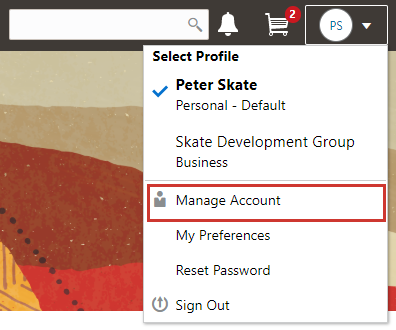
Select Manage Account.
Adding Profiles to a Public User Account
When a public user registers, the new account has a default profile with information supplied during the registration process. The public user can create additional profiles through self-service account management. Agency staff also have access to this account management option.
Create new profiles from the Manage Account page. For information on the different ways that registered public users and agency staff access this page, see Accessing Public User Account Information.
This example illustrates the Manage Account page and the buttons used to create additional profiles.
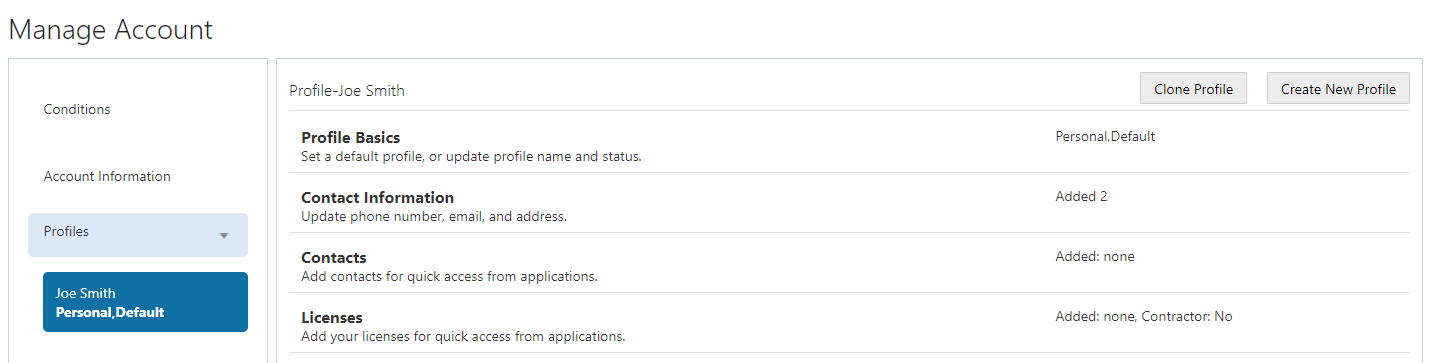
Creating a New Profile
To create a new profile:
Access the Manage Account page.
Click any profile name in the left frame of the page.
Click the Create New Profile button.
On the Create New Profile page, enter the following information:
Page Element
Description
Profile Name
Enter a descriptive name. This is the name that appears in the page header when this profile is in use.
Profile Type
If the account does not already have a personal profile, select either Personal or Business.
If a personal profile already exists, the profile type is Business and the field is read-only.Business Name
If the profile type is Business, enter the business name. This field is not visible for personal profiles.
Status
Select Active or Inactive. A profile must be active to be the default profile or for a user to switch to the profile.
Inactive profiles are not editable. To add any information other than the basic information on the Create New Profile page, you need to make the profile active.
Click Create.
The new profile is created. The only profile data is the basic data that you provided, so you need to manually add any additional information such as contact information or licenses. For information about adding additional profile information, see Managing Public User Accounts.
Cloning a Profile
Cloning profiles minimizes data entry when you want to create a new profile that has some of the same information as an existing profile.
If the original profile has verified licenses or trust accounts, cloning the profile ensures that the verification status is carried into the new profile and no new verification is needed.
The cloning process does not copy attachments or conditions to the newly created profile.
To clone a profile:
Access the Manage Account page.
In the left frame of the page, select the profile that you want to clone.
Click the Clone Profile button.
On the Clone Profile page, enter the following basic profile information:
Page Element
Description
Clone From
This read-only field displays the name of the profile that you’re cloning.
New Profile
Enter a descriptive name for the new profile. This name appears on the landing page banner when this profile is selected.
Profile Type
If the account does not already have a personal profile, select either Personal or Business.
If a personal profile already exists, the profile type is Business and the field is read-only.
Business Name
If the profile type is Business, enter the business name. This field is not visible for personal profiles.
Select the check boxes for the types of information that you want to copy into the new profile:
Page Element
Description
Contact Details
Select this check box to automatically select the check boxes for all three specific contact methods: Address, Phone, and Email.
Deselect this check box to clear the check boxes for all three specific contact methods.
You can also select and deselect the individual check boxes for each contact method.
Contacts
Select this check box to copy contacts into the new profile.
Licenses
Select this check box to copy licenses into the new profile. Verification statuses are also copied to the new profile, so agency staff does not have to re-verify the information.
Trust Accounts
Select this check box to copy trust account information into the new profile. Verification statuses are also copied to the new profile, so agency staff does not have to re-verify the information.
Click Create.
The new profile is created with the profile information that you specified. You can make additional changes manually.
Setting the Default Profile
The default profile is the one that is selected when a user first signs in. The default can’t be changed during the creation of a new profile, but after the new profile is saved, it can be made into the default.
To designate a profile as the default profile:
Access the Manage Account page.
In the left frame of the page, select the profile that you want to use as the default.
In the right frame of the page, select Profile Basics.
On the Profile Basics page, select the Default check box.
Only active profiles can be set as the default. If the profile is inactive, change the status to Active and save the new status. This closes the Profile Basics page. When you return to the Profile Basics page, you can select the Default check box.
Click Save.
The new default is saved. The Default check box on the previous default profile is deselected when the new default is saved.
Managing Public User Accounts
This topic describes the account and profile information that can be updated using account management functionality. The Manage Account page is available to both public users, who can manage their own accounts, and to agency staff, who can manage information for any public user.
Registered public users access the Manage Account page from the account menu in the page header. Agency staff accesses the Manage Account page from the Public User Access page. For detailed navigation instructions, see Accessing Public User Account Information.
Public User Access Versus Agency Staff Access
For the most part, public users and agency staff have access to the same account management options. These are the exceptions:
Public users can see the verification status for any data that requires agency verification, but only agency staff can update the verification status.
If account attachments are enabled, public users can’t delete attachments unless you configure the Public User Setup page to allow this action. Agency staff can always delete attachments.
Only agency staff can apply and manage account and profile conditions. Conditions are account restrictions. Both public users and agency staff can see active conditions that have been applied to the account or to profiles.
For more information about conditions, see Managing Account and Profile Conditions.
Managing General Account Information
General account information includes data that is part of the overall user account rather than being related to a profile. General account information is initially provided during the user registration process.
To manage account information :
Access the Manage Account page.
This page has two frames. Use the left frame to select either the overall account or a specific profile. Use the right frame to view and update details for the selected item.
If the account has active conditions, the left frame displays a warning icon next to the Account link. Similarly, if any profiles have active conditions, an icon appear next to the profile name. Conditions relate to permits and planning applications. Active conditions can prevent certain actions or issue warnings when the actions are attempted. For detailed information about managing conditions, see Managing Account and Profile Conditions.
Select Account Information in the left frame.
This is selected by default when you first access the Manage Account page. When it is selected, the right frame list the different types of account information. The row for each type of information includes the section name and instructional text. The Name row additionally displays the user’s full name.
To view or update name information:
Click the Name row in the right frame.
The Name page appears.
Review or update information in the following fields: First Name, Middle Name, Last Name, Salutation, Display Name (a read-only value that concatenates the user’s first, middle, and last names), Initials, Suffix, and Title.
Click Save to save changes and close the page.
To view account access information:
Click the Access item in the right frame.
The Access page appears.
Review the following information:
Page Element
Description
User Name
The user’s first and last name. This field is read-only.Email
The email that was provided during registration. This field is read-only.
This email is used for account access notifications such as those related to setting passwords and changing or verifying account or profile information.IVR Access Code (Interactive Voice Response Code)
This field appears only if you enable IVR access codes on the Public User Setup page.
This field is for the 4 digit code that enables the public user to access and change the schedule for permit inspections using interactive voice response. When users dial in, they are asked to enter their 4 digit code before accessing the inspection records.
The code is masked on this page. To change the code, click the Edit icon. The field is cleared so you can’t see the original code, and OK and Cancel icons appear next to the now-editable field.
You can click the cancel icon to return to the original code, or you can enter a new code and click the check mark to save the new value.
Click Cancel to close the page.
To view or update additional information:
Click the Additional Information item in the right frame.
The Additional Information page appears.
Review or update the setting for the Mask My Contact Information from Public View check box.
Click Save to save any changes and close the page.
To review the most recently accepted terms of use:
Click the Terms of Use item in the right frame.
A window with the full text of the terms of use appears.
When a public user views this information, the terms are always current as of the time the user signed into the current session. This is because users must agree to any changes in the terms of use when signing in.
When agency staff views this information, they see the terms that the user last accepted, even if the agency has changed the terms since then.
Click the x in the top right corner of the window to close it.
To view conditions that have been applied to the account:
Click the Conditions item in the right frame.
A window that lists account-level conditions appears. Active conditions are first, followed by resolved conditions.
Review the conditions, and optionally access condition details or resolve conditions.
For detailed information about adding and managing conditions, see Managing Account and Profile Conditions.
Click the x in the top right corner of the window to close it.
Managing Account Attachments
Your agency controls whether attachments can be added to accounts. Set this option on the Public User Setup page. Attachments can be associated with either an account or with a specific profile.
This procedure describes how to manage attachments that are associated with the overall account.
To manage account attachments:
Access the Manage Account page.
This page has two frames. Use the left frame to select either the overall account or a specific profile. Use the right frame to view and update details for the selected item.
Select Account Information in the left frame.
This is selected by default when you first access the Manage Account page. When it is selected, the right frame list the different types of account information, including attachments. The row for attachments includes information stating how many attachments (if any) have been added. Both account attachments and profile-specific attachments are included in the count.
Click the Attachments item in the right frame.
The Attachments window opens. It lists all attachments for the account, including both account attachments and profile attachments. The following information appears:
Page Element
Description
File Name / Date
The file name of the attachment, and the date that the attachment was added to the account.
Description
A user-supplied description. Users can optionally add a description while adding the attachment.
Profile Name
If the attachment is associated with a specific profile, the profile name appears. If the attachment is associated with the account in general (and not with a specific profile), this column is blank.
Category
This column appears only if the agency’s public user setup specifies a document group for public user attachments. Document groups consist of a set of document categories.
When visible, this field displays the document category for the attachment.
For more information, see Setting Up Document Categories and Subcategories and Setting Up Document Groups.
Subcategory
This column appears only if the agency’s public user setup specifies a document group for public user attachments. The categories in a document group can optionally include subcategories. For example, a Licenses category might have subcategories for different types of contractor’s licenses.
When visible, this field displays the document subcategory for the attachment.
Actions
Click to access a menu with options for viewing attachment information, downloading the file, or deleting the attachment from the account.
To add a new attachment:
Click Add.
Select a file using your browser’s file selection window.
On the Add Attachments page, verify the File Name and optionally enter a Description.
If document groups are enabled for public users, optionally select the appropriate Category and Subcategory values.
Click Upload.
When the upload is complete, the new attachment appears in the list on the Attachments page.
To view or modify attachment information:
Click the Actions icon and select View Details.
On the Attachment page, review the File Name, the File Size, and the Last Updated By and Uploaded By user names.
Optionally update the Description.
If document groups are enabled for public users, optionally update the Category and Subcategory.
To change which profile, if any, is associated with the attachment, use the Profile Name field.
If this field does not have a value, the attachment is associated with the overall account rather than a specific profile.
Click Save or Cancel to return to the Attachments page.
To download a file, click the Actions icon and select Download.
To delete a file, click the Actions icon and select Delete.
You are prompted to confirm the deletion.
Note: Agency staff can always delete attachments. Public users can’t delete attachments unless the Public User Setup page is configured to allow this action.To close the Attachments window, click Cancel.
Viewing a Profile Summary
On the Manage Account page, the left frame lists all of the profiles that are associated with an account. Below each profile name, the profile type appears. The word Default identifies the default profile. The word Inactive identifies any inactive profiles.
Selecting a profile in the left frame causes the right frame to display summary information about the profile. This information is broken into sections.
Clicking a section opens a detail page with complete information, but you can also see summary data directly beneath the section name on the Manage Account page.
To view the summary information for a profile:
Access the Manage Account page.
Select a profile in the left frame.
If no profiles are visible, click the Profiles header to expand the list of profiles.
Review the following summary information:
Profile Section
Information Displayed
Profile Basics
The profile type: Personal or Business.
Profile Information (for business profiles only)
No summary information appears.
Contact Information
The number of contact methods for the profile.
Contacts
The number of contacts for the profile.
Licenses
The number of licenses for the profile, and whether the profile has contractor status.
The self-reported contractor status appears, but you must access license details to see if the status has been verified.
Trust Accounts
The number of trust accounts for the profile.
Conditions
The number of active conditions for the profile.
Although the details for this section includes both active and resolved conditions, the count in the summary includes only active conditions.
Updating Profile Basics
To update profile basics:
Access the Manage Account page.
Select a profile in the left frame.
Click the Profile Basics section to open the Profile Basics page.
Review and update the following fields:
Page Element
Description
Profile Name
The identifying name for the profile. This name appears in the page header when this is the current profile and in the Select Profile menu for switching profiles. This name also appears in the profile list on the Manage Account page.
The default name for the profile that is created during the registration process is the public user’s first and last name. This default name is truncated if it is longer than 60 characters.
Default
Select this check box to designate the profile as the default profile for the account.
The default profile is the one that’s used when the public user signs into the system. The profile that gets created during the registration process is the default profile until you add additional profiles and change the default.
Only one profile can be the default, so when you select this check box for one profile, the check box is automatically deselected for the previous default.
The check box is read-only for the current default profile. This prevents you from deselecting it and creating a situation where there is no default profile.
Profile Type
Displays either Personal or Business. You cannot change the profile type.
Status
Profiles can be Active or Inactive. Only active profiles appear in the Select Profile menu for switching profiles.
Inactive profiles are not editable. To make a profile active after you create it, edit the profile basics using account management functionality. See Managing Public User Accounts.
Click Save or Cancel to return to the Manage Account page.
Updating Profile Information for a Business
To update profile information for a business:
Access the Manage Account page.
Select a profile in the left frame.
Click the Profile Information section to open the Profile Information page.
Review and update the following fields:
Page Element
Description
Business Name
A free text field for the business name.
Business Type
A drop-down list of business types. The values for this field are defined on the Lookup Type Details page for the ORA_PSC_CC_BUSN_TYPE lookup type.
Click Save or Cancel to return to the Manage Account page.
Managing Contact Information
Contact information consists of the user’s addresses, phone numbers, and emails. Only US addresses are supported.
The primary contact information for a profile is used as the default contact information in the user’s applications.
To update contact information:
Access the Manage Account page.
Select a profile in the left frame.
Click the Contact Information section to open the Contact Information page.
To add or modify a contact method:
If you are adding a contact method, click Add in the appropriate section (Address, Phone, or Email) to open the Details page.
If you are updating a contact method, click the > icon at the end of an existing row to open the Details page.
Select the Type.
The Details page displays different fields depending on the type of contact method, but all contact methods include the Type field. Address types are Home and Work. Email and Phone types are Home and Business.
If you’re adding a new address, either enter the Postal Code or click the Don't know link.
As you enter a Postal Code, the type-ahead list shows values that include appropriate city and state combinations. After you select a value, the city and state appear as read-only fields, and two address fields appear so that you can enter the rest of the address. If you don’t know the postal code, clicking the Don’t know link displays a full set of address fields.
If you accessed an existing address, the additional address fields are already visible.
Enter the complete contact information: either an address, a Phone and Ext (extension), or an Email.
If this will be the primary address, phone number, or email, select the Primary check box.
Only one contact method of each type can be primary, so if you select the check box, the previous primary address, phone number, or email (if any) is updated to no longer be primary.Click Save or Cancel to close the Details page and return to the Contact Information page.
To delete a contact method, click Delete for the appropriate row.
Click Cancel to return to the Manage Account page.
Managing Contacts
Contacts are people who can interact with the agency regarding business related to the associated profile. If a user wants a person to be a contact for more than one profile, the system provides a simple way to copy contact information between profiles.
To manage contacts:
Access the Manage Account page.
Select a profile in the left frame.
Click the Contacts section to open the Contacts page.
To copy existing contacts from other profiles in this account:
Click Copy from Other Profiles.
The Select Contact List page appears. It lists all contacts that are associated with other profiles for this account. A contact who is already associated with multiple profile appears in the list multiple times.
The contact list displays the contact’s name, business name, address, email, and phone number.
Select one or more contacts to be copied.
Click Select.
The Select Contact List page closes. The selected profile(s) now appear on the Contacts page.
To add a new contact or modify an existing contact:
If you are adding a contact, click Add to open the Contact Details page.
If you are updating a contact, click the > icon at the end of the row to open the Contact Details page.
On the Contact Details page, enter the contact’s First Name, Middle Name, Last Name, and Business.
To enter an address, enter the ZIP Code or click the don't know link to reveal additional address fields, then enter information in those address fields.
Enter a Phone and Ext (extension).
Enter an Email.
Click Save or Cancel to close the Contact Details page .
Any information you save immediately appears on the Contacts page.
Click Cancel on the Contact page to return to the Manage Account page.
Updating Licenses
The licenses section of the Manage Account page includes both a list of professional licenses and a statement of whether the profile is for a contractor.
If your agency requires staff to verify contractor status and professional licenses, staff members who access the information can update the verification statuses for both types of information. Public users can see but not update the verification statuses.
To update license information:
Access the Manage Account page.
Select a profile in the left frame.
Click the Licenses section to open the Licenses page.
Review or update these fields related to the user’s contractor status:
Page Element
Description
Are you a Contractor?
To indicate the contractor status, select either Yes or No.
Verification Status
This field is visible if the contractor status is Yes and the Public User Setup page is configured to require that contractor status be verified.
The default value is Pending verification.
Agency staff updates the status to either Verified or Verification failed after independently verifying the user’s contractor status.
Note: Although public users and agency staff can both see the verification status, only agency staff can update the value.To add a new license , click the Add, or to view an existing license, click the row for the license you want to view.
The License Details page opens.
Review and update the following fields on the Licenses page:
Page Element
Description
License Type
This is a free text field for entering the type of license, such as a General Contractor license or an Electrical Contractor License.
License ID
Enter the license number that uniquely identifies the license.
Start Date
Enter the date that the license became valid.
Expire Date
Enter the date that the license expires or requires renewal.
Verification Status
This field is visible if the Public User Setup page is configured to require that licenses be verified.
The default value for a new license is Pending verification.
Agency staff updates the status to either Verified or Verification failed after independently verifying the license.
Note: Although public users and agency staff can both see the verification status, only agency staff can update the value.Click Save or Cancel to return to the Licenses page.
Click Save or Cancel to return to the Manage Account page.
Saving on the Licenses page saves changes to the Are you a Contractor and Verification Status fields. Changes to licenses are saved from the License Details page.
Updating Trust Accounts
The Trust Accounts section of a profile lists trust accounts that are used for payments to the agency.
If your agency requires staff to verify trust accounts, staff members who access the information can update the Verification Status field. Public users can see the verification status, but they can’t update it.
Access the Manage Account page.
Select a profile in the left frame.
Click the Trust Accounts section to open the Trust Accounts page.
To add a new trust account, click Add, or to view an existing trust account, click the row for the account you want to view.
The Trust Account Details page opens.
Review and update the following fields on the Trust Account Details page:
Page Element
Description
Account Number
Enter the unique account number for the trust account.
Description
The description might include the financial institution name and other important information about the account.
Status
Select Active or Inactive.
Verification Status
This field is visible if the Public User Setup page is configured to require that accounts be verified.
The default value for a new account is Pending verification.
Agency staff updates the status to either Verified or Verification failed after independently verifying the account information that the user provided.
Note: Although public users and agency staff can both see the verification status, only agency staff can update the value.Click Save or Cancel to return to the Trust Accounts page.
Click Cancel to return to the Manage Account page.
Managing Profile-Specific Attachments
Your agency controls whether attachments can be added to user accounts. Set this option on the Public User Setup page.
Attachments can be associated with either an account or with a specific profile.
To manage profile-specific attachments:
Access the Manage Account page.
This page has two frames. Use the left frame to select either the overall account or a specific profile. Use the right frame to view and update details for the selected item.
In the left frame of the page, select a profile.
When a profile is selected, the right frame displays information for that profile. The row for attachments includes information stating how many attachments (if any) are associated with the selected profile.
Click the Attachments item in the right frame.
The Attachments window opens. It lists the attachments that are associated with the profile.
Page Element
Description
File Name / Date
The file name of the attachment, and the date that the attachment was added to the account.
Description
A user-supplied description. Users can optionally add a description while adding the attachment.
Category
This field appears only if the agency’s public user setup specifies a document group for public user attachments. Document groups consist of a set of document categories.
When visible, this field displays the document category for the attachment.
For more information, see Setting Up Document Categories and Subcategories and Setting Up Document Groups.
Subcategory
This field appears only if the agency’s public user setup specifies a document group for public user attachments. The categories in a document group can optionally include subcategories. For example, a Licenses category might have subcategories for different types of contractor’s licenses.
When visible, this field displays the document subcategory for the attachment.
Actions
Click to access a menu with options for viewing attachment information, downloading the file, or deleting the attachment from the account.
To add a new attachment:
Click Add.
Select a file using your browser’s file selection window.
On the Add Attachments page, verify the File Name and optionally enter a Description.
If document groups are enabled for public users, optionally select the appropriate Category and Subcategory values.
Click Upload.
When the upload is complete, the new attachment appears in the list on the Attachments page.
To view or modify attachment information:
Click the Actions icon and select View Details.
On the Attachment Details page, review the File Name, the File Size, and the Last Updated By and Uploaded By user names.
Optionally update the Description.
If document groups are enabled for public users, optionally update the Category and Subcategory.
Click Save or Cancel to return to the Attachments page.
To download a file, click the Actions icon and select Download.
To delete a file, click the Actions icon and select Delete..
You are prompted to confirm the deletion.
Note: Agency staff can always delete attachments. Public users can’t delete attachments unless the Public User Setup page is configured to allow this action.To close the Attachments window, click Cancel.
Managing Profile-Level Conditions
This procedure describes how to access profile-level conditions from the profile summary page. For detailed information about adding and managing conditions, see Managing Account and Profile Conditions.
To manage profile-level conditions:
Access the Manage Account page.
This page has two frames. Use the left frame to select either the overall account or a specific profile. Use the right frame to view and update details for the selected item.
In the left frame of the page, select a profile that has conditions.
If a profile has conditions, an icon representing the condition severity appears next to the profile name.
Click the Conditions item in the right frame.
A window that lists the conditions for the selected profile appears. Active conditions are first, followed by resolved conditions.
Review the conditions, and optionally access condition details or resolve conditions.
Click the x in the top right corner of the window to close it.
Verifying Public User Information
You can configure the system to require verification of various types of public user account and profile data. The actual verification occurs outside of the system, but after the information is verified, agency staff updates verification statuses to indicate whether the information passed or failed the verification process.
Use the Public User Setup page to configure which types of information require verification. There can be up to three types of information that need to be verified:
Whether the user is a contractor.
The user’s licenses.
The user’s trust accounts.
One option for verifying information is to use the Manage Account page. With this option, agency staff can navigate to the various pages that display each type of information, and they can update the verification status on those pages. For more information, see Managing Public User Accounts.
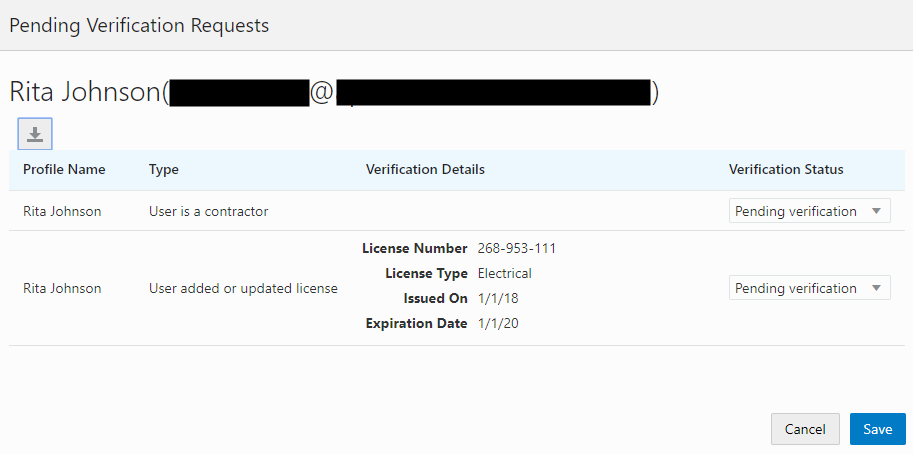
Alternatively, the Public User Access page provides a convenient way to see and manage pending verification requests. This page displays the number of pending verification requests for each user, and it provides a link to the Pending Verification Requests page where you can update the verification status for individual requests.
This example illustrates the Public User Access page.

This example illustrates the Pending Verification Requests page.
Managing Verification Requests
To find and manage pending verification requests:
Select
Locate accounts with a value in the Pending Verification Requests column.
This column displays the number of pending requests for the user. It’s blank for users with no pending requests.
The surest way to locate accounts with pending verifications is to sort accounts based on the number of pending requests. To sort by a specific column, click the triangle icon in the column header. Click again to reverse the sort order.
Click a value in the Pending Verification Requests column to access the Pending Verification Requests page.
The page lists the pending verification requests for the selected user. Requests that have already been verified (or failed verification) do not appear.
Review the following information for the requests to be verified:
Page Element
Description
Profile Name
Displays the profile that is associated with the data to be verified.
Type (type of request)
Explains what type of information must be verified. Values include:
User is a contractor
User added or updated license
User added or updated trust account
Verification Details
Displays identifying details for a license or trust account.
License details include the license number, license type, the date issued, and the expiration date.
Trust account details include the account number and status.
This column is blank for requests to verify a user’s contractor status .
Verification Status
Because this page lists only pending verification requests, all rows initially have the status Pending Verification.
Update the Verification Status for any requests where the verification process is complete.
Select either Verified or Verification failed, depending on whether you were able to verify the information.
Click the Save button.
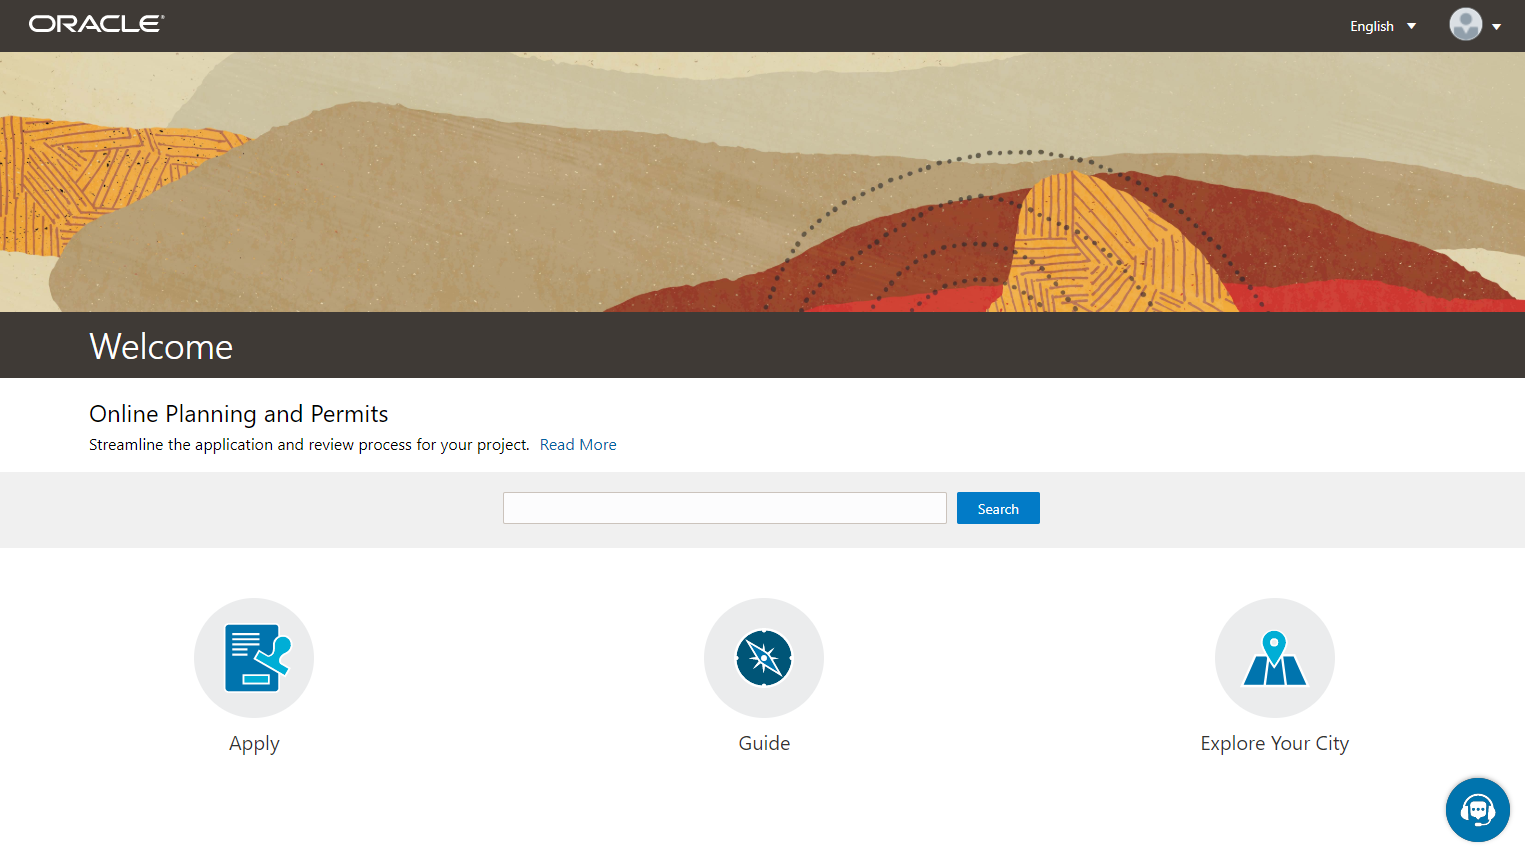
Overview of Public Landing Pages
The public landing pages give members of the public access to agency services. There are two separate public landing pages, one for anonymous users (guests), and one for registered users who have signed in.
Public user landing pages have many of the same elements as the agency springboard (a global header, tiles, and so forth), but the content of the page is tailored to a different audience. For information about the agency springboard, see Using the Agency Springboard.
This example illustrates the public landing page as it appears to a user who is not signed in. This is known as the anonymous user landing page.
Landing Page Configuration
The elements on landing pages vary depending on how you configure the pages.
For information on configuring landing pages, see Setting Up the Landing Page for Anonymous Users and Setting Up the Landing Page for Registered Users.
For information on setting up alerts to appear on the landing pages, see Defining Alerts and Working with Ad Hoc Communications.
For information on setting up the digital assistant button, see Initializing the Digital Assistant.
Tiles on the Anonymous User Landing Page
Also known as guests, anonymous public users are residents, business owners, contractors, and so on, who have not signed in or are not registered. From the anonymous user landing page, they can perform common tasks such as starting an application, accessing an interactive guide that provides recommendations for application types, accessing an interactive map of the city, or starting a chat session using the digital assistant.
As delivered, the anonymous user landing page includes these tiles:
| Page Element |
Description |
|---|---|
| Apply |
Provides access to a page where the user can choose an application type and then start an application. |
| Guide |
Provides access to a questionnaire. The user provides information about a project, and the guide uses that information to recommend application types. Your agency defines the guide questionnaire using Oracle Intelligent Advisor. If your agency is not using Oracle Intelligent Advisor, this tile will not appear.
The questionnaire comes from the
Oracle Intelligent Advisor policy model that you specify for the
Permits offering, if one exists. If there's no offering-level policy, the questionnaire comes from the agency-level
Oracle Intelligent Advisor policy model.
For more information on identifying the Oracle Intelligent Advisor policy model to use, see Setting Up Agencies |
| Explore Your City |
Provides access to a map where the anonymous user can search for and view property details, including applications related to the property. |
Tiles on the Registered User Landing Page
Registered users are residents, business owners, contractors, and so on, who are registered in the system. When a registered user is signed on, the landing page can include additional options related to the registered user’s interactions with your agency.
As delivered, the registered user landing page includes all of the tiles that are available to anonymous users and these additional tiles:
| Menu Link |
Description |
|---|---|
| Report an Issue |
Starts the process for reporting a code enforcement issue. During the reporting process, the public user identifies the type of issue, provides the issue location, describes the issue, and answers any additional questions that the agency has configured. See Reporting Issues. |
| Applications |
Displays a list of the user’s own applications, including business license applications, permit applications, and planning applications. From the list, the user can access application details. The list has a regular list view, a grid view, and a map view. There is also a Show All Statuses switch for toggling between a list of active applications and all applications. The number of active applications appears in the tile label. This number includes both permit applications and planning applications. If one or more conditions have been applied to the user’s applications, a conditions icon appears below the tile. The icon associated with the most severe condition is displayed. For example, if there is a permit application with a lock condition (which prevents further activity on the permit) and another application with a notice or informational condition, only the lock icon appears below the tile. |
|
Business Licenses
|
Displays a list of the user’s own business licenses. The tile is visible only if the user has at least one active business license. The number of active business licenses appears in the tile label. The list displays summary information about licenses, including the license ID, license type, license status, the license period, the business name and physical address, a description, and fee information. There is also a Show All Statuses switch for toggling between a list of active licenses and all licenses. Users can click individual licenses for additional details or to take any actions such as viewing the certificate. |
| Inspections |
Displays a list of the user’s inspections. From the list, the user can access inspection details and schedule additional inspections. The number of scheduled and requested inspections appears in the tile label. |
| Projects |
Displays a list of projects where the user is a contact. Projects are large undertakings that involve multiple applications. Agencies, not users, determine which undertakings are considered projects. A user’s own project is a project where the user is the primary contact. This tile is hidden from users who do not have any projects. The number of active and completed projects appears in the tile label. |
| Businesses |
Displays a list of the businesses associated with the user’s business licenses. This tile is visible only if the user has at least one active business. The number of active businesses appears in the tile label. Uses can review summary information about a business and click an individual business for additional details. The list displays the business ID, legal name, mailing address, and location. |
The Digital Assistant Button
If you implement the digital assistant, a button for invoking the assistant hovers over the public user landing pages.
This image shows the digital assistant button.

Clicking this button opens a chat window where the anonymous user can get help and search for transaction-related information.
For information on setting the digital assistant button, see Initializing the Digital Assistant.