14Working with Payments
Payment Flow Overview
This topic provides a high-level overview of fees and the payment flow. Applicants can make payments online, and agency staff can assist applicants with payments.
After completing an application for a permit, the fees are calculated and applied to the applicant’s account. The applicant manually adds fees to the payment cart, and selects which fees to pay in one transaction. Agency staff can initiate payment from the Transactions list page or from the fees and payments page in the application details. System processing for payments triggers workflow and generates accounting and invoices.
For information about setting up fees and payments, see Implementing Your Financials Framework.
Understanding Fees
Some basics about fees include the following:
Fees for an application are determined by decision modeling and associated with fee schedules.
Fees may be applied during the application process or later for additional fees or adjustments.
Fees appear on the Applications page for applicants, on the Transactions list page for agency staff, and on the Fees and Payments page in the application details for both agency staff and applicants.
If a condition is applied to the transaction, such as a hold or lock on the permit or planning application, the applicant may not be able to pay until the condition is resolved.
Agency staff can add or adjust fees. They can also make full or partial fee payment on behalf of the applicant on the Fees and Payments page.
Fee Payments Process for Applicants
Applicants can make a payment by following this process:
On the Applications list page or Fees and Payments page in the application details, click the Add to Cart button to add fees to the payment cart.
Click the View Cart button to go to the cart.
To select fees for payment in the payment cart, turn on the Pay Now switch.
Fees not selected for payment can remain in the cart or be removed from the cart. Fees removed from the cart are still payable and appear in the Applications list.
Click the Continue to Checkout button.
Review the Checkout page, which lists the different secured payment methods available.
Only agency staff can process cash and check payments.
Select one of the payment methods for payment processing.
Depending on the payment service being used, the payment steps differ.
The applicant must have a PayPal account before selecting PayPal as a payment method.
Wait for the payment to be processed. If you navigate away from the checkout page or close the browser, the payment may not be recorded. If the payment status is Due in the payment cart, try submitting your payment again.
After successful payment, the applicant is returned to the Applications page.
For more information about using the payment cart, see the Payment Cart Overview.
Fee Payments Process for Agency Staff
Agency staff can use the following process to assist an applicant with a payment:
Click the Pay button for a permit, planning application, or business license listed on the Transactions page or on the Fees and Payments page in the application details.
On the Pay Fees page, review the list of fee items and the total payable fee. If you want to make a partial payment, deselect the Select All check box to clear the check boxes for all the fee items and then select individual items. If the application status is Payment Pending, full payment is required. That is, fees that are due when you submit an application must be paid in full.
Click the Continue button.
Review the Checkout page, which lists the different payment methods available, such as cash or credit card.
Select one of the payment methods for payment processing.
Depending on the payment service being used, the payment steps differ.
After successful payment, the agency user is returned to the Transactions list page. The fee item records are now updated.
Working with Cashier Sessions
Cashier sessions are instances of a cashier using a specific cash drawer to receive payments from customers. Cashiers add and modify cashier sessions on the Cashier Session page.
Opening a Cashier Session
Select .
On the Cashier Session page, click Add.
On the Cashier Session Details page, enter values for the following fields:
Page Element
Description
Cashier Drawer ID
Select the cash drawer that you want to use for this session.
Session ID
Displays the unique, system-generated ID for the cashier session.
Start Time
Displays the date and time the session was created.
Status
All new cashier sessions have a status of Open.
Cashier ID
Displays the unique ID of the cashier who is opening the cashier session.
Administrators assign cashier IDs to agency staff on the Agency Staff page. You cannot open a cashier session if you do not have a cashier ID assigned to you.
Opening Balance
Enter the amount in the cash drawer at the beginning of the cashier session.
Click Save.
Modifying a Cashier Session
Select .
Click a row on the Cashier Session page.
On the Cashier Session Details page you can:
Suspend an open cashier session by setting the Status to Suspended.
Reopen a suspended or closed cashier session by setting the Status back to Open.
This option is available only if the Reopen Cashier Session switch is turned on for the CASH payment method on the Agency Payment Options page. See Setting Up Agency Payment Options.
Close a cashier session by setting the Status to Closed. When you close a cashier session enter an amount for the Closing Balance.
Note: The system populates the End Time field with the date and time the session was closed.
Click Save.
Reconciling Cashier Sessions
Agency staff adjust and reconcile cashier sessions on the Reconcile Cashier Session page.
Agencies that collect payments must reconcile the money collected in the form of cash and checks at the end of each cashier session. On the Reconcile Cashier Session, agency staff can:
Reconcile recorded and actual payment amounts.
Print a cashier session reconciliation report.
This example shows the Reconcile Cashier Session page.
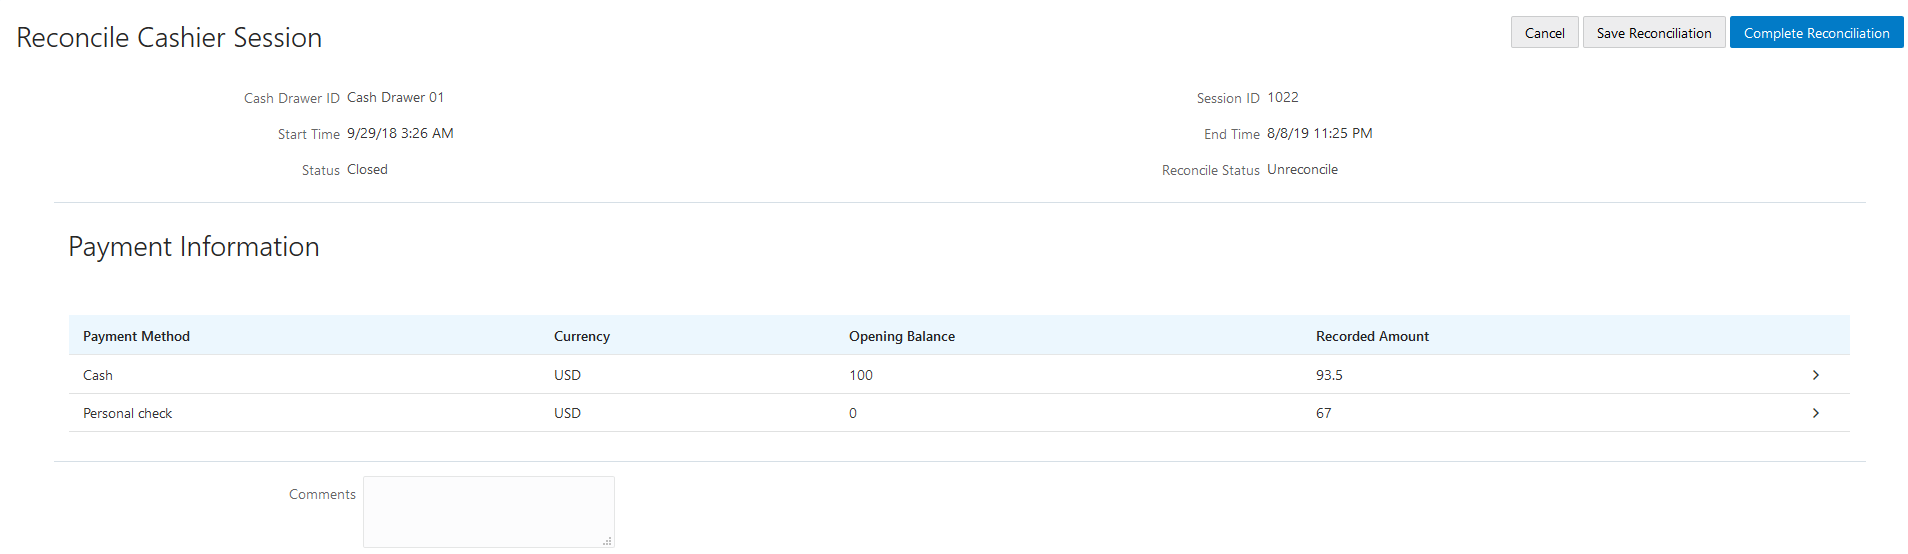
Reconciling Recorded and Actual Amounts
Select in the Navigator.
Click the row for the cashier session that you want to reconcile.
Note: You can view payment information for open cashier sessions on this page, but a cashier session must be closed before you can reconcile recorded and actual amounts. For more information on closing cashier sessions, see Working with Cashier Sessions.Click the row for the payment method that you want to reconcile to access the Payment Details page.
This example shows the Payment Details page.
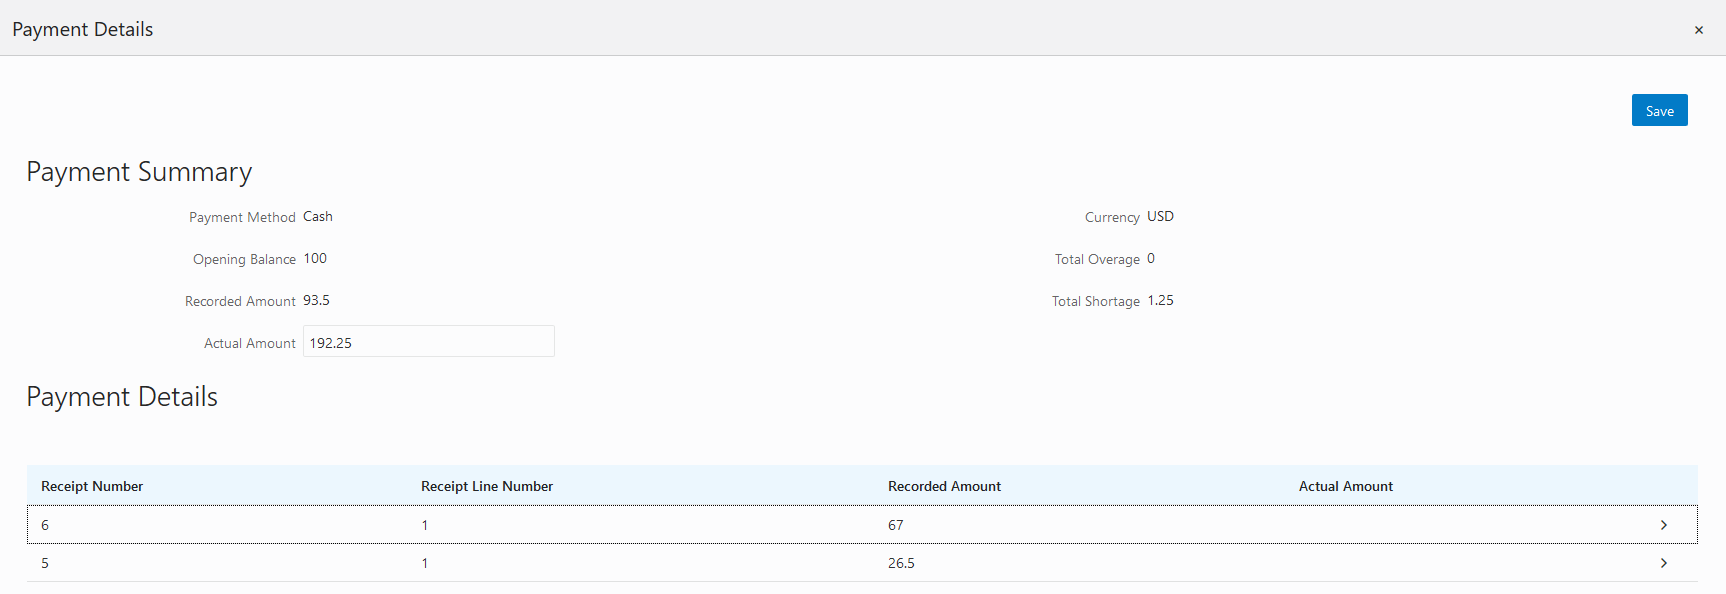
Click a row for a receipt to make changes to the payment information. For cash payments, you can enter comments, but you can’t edit any other payment information. For checks, you can edit the following payment information fields:
Page Element
Description
Payment Method
Select between Personal check and Cashier check.
Actual Amount
Typically this is the same as the recorded amount, but in the event that the check was written for a different amount, enter that actual amount here.
Check Number, Check Date, Payer Name, and Address
Update the check and payer information.
Comments
Enter any comments you want to add about the check payment.
Click Save.
On the Payment Details page, enter the actual amount for the cashier session for all receipts for the payment method. After you enter a value in the Actual Amount field, the page displays any overages or shortages in the Total Overage and Total Shortage fields.
Click Save.
On the Reconcile Cashier Session page, enter any comments you want to add for the entire cashier session and click Save Reconciliation to save all the changes you made for the cashier session.
Click Complete Reconciliation. This changes the status of the cashier session from Unreconciled to Reconciled. In addition, the Save Reconciliation button is replaced by the Print Report button, and the Complete Reconciliation button is replaced by the Generate Event button.
Note: Once you complete a reconciliation for a cashier session, you can’t reopen it or make any adjustments to the session.
Printing a Cashier Session Reconciliation Report
Select in the Navigator.
Click the cashier session row for which you want to print a reconciliation report.
Complete the reconciliation for the cashier session if you haven’t already. You can print reconciliation reports only for sessions with a Reconcile Status of Reconcile.
Click Print Report. The generated report opens in a separate browser tab.
Note: If your browser has a pop-up blocker, make sure it allows pop-up windows from the URL associated with Oracle Public Sector Compliance and Regulation.The Cashier Session Reconciliation report requires the definition of a parameter with the following values:
Page Element
Value
Parameter ID
1
Parameter Name
P_RECONCILE_ID
Parameter Data Type
String
For more information on defining parameters for reports, see Setting Up Reports.
Generate Accounting Entries for Reconciliation Overages and Shortages
Select in the Navigator.
Click the cashier session row for which you want to generate an accounting entry.
Complete the reconciliation for the cashier session if you haven’t already. You can generate accounting entries only for completed reconciliations that result in an overage or a shortage.
-
Click Generate Event to generate an accounting entry for the overage or shortage.Note: To successfully create accounting entries for cashier reconciliation overages and shortages, you must first create accounting rules for them. For more information on setting up accounting rules, see Setting Up Accounting Rules.
Printing Deposit Slips
Agencies that collect payments use deposit slips to deposit the money collected in the form of cash and checks into the agency's bank account.
You print deposit slips using the Print Deposit Slip page.
Prerequisites
Before you generate deposit slips for your agency, you must define the P_DEPOSIT_SLIP_NUMBER parameter for the Deposit Slip (DepositSlip001) report. For more information on defining report parameters, see Setting Up Reports.
Generating Deposit Slips
Select .
On the Print Deposit Slip page, enter values for the following fields:
Page Element
Description
Agency ID
Select the agency for which you want to print a deposit slip.
From Receipt Date and To Receipt Date
Select the date range of receipts that you want to include in the deposit slip.
Payment Method
Select the payment methods that you wanted to include in the deposit slip. Options are Cash, Cashier Check, and Personal Check.
Cash Drawer ID
Select a value to print a deposit slip for the receipts of a specific cash drawer. If you leave this field blank, the deposit slip will include all cash drawers for the specified date range.
Session ID
Select a value to print a deposit slip for the receipts of a cashier session. If you leave this field blank, the deposit slip will include all cashier sessions for the specified date range.
Cashier ID
Select a value to print a deposit slip for the receipts of a specific cashier. If you leave this field blank, the deposit slip will include all cashiers for the specified date range.
Note: The values available in the Cash Drawer ID, Session ID, and Cashier ID drop-down fields represent the cash drawer payment history rows within the entered date range that have not yet been printed. Therefore, the values available in the drop-down fields change based on the entered date range. If a selected drop-down value becomes invalid because you change the date range, the field with the invalid value becomes blank. If the selected drop-down value remains valid after changing the date range, the drop-down value is unchanged.Click Print. The generated deposit slip file opens in a separate browser tab.
Note: If your browser has a pop-up blocker, make sure it allows pop-up windows from the URL associated with Oracle Public Sector Compliance and Regulation.
Viewing Payment History
Agency staff can view payment history on the Payment History page.
This example shows the Payment History page.
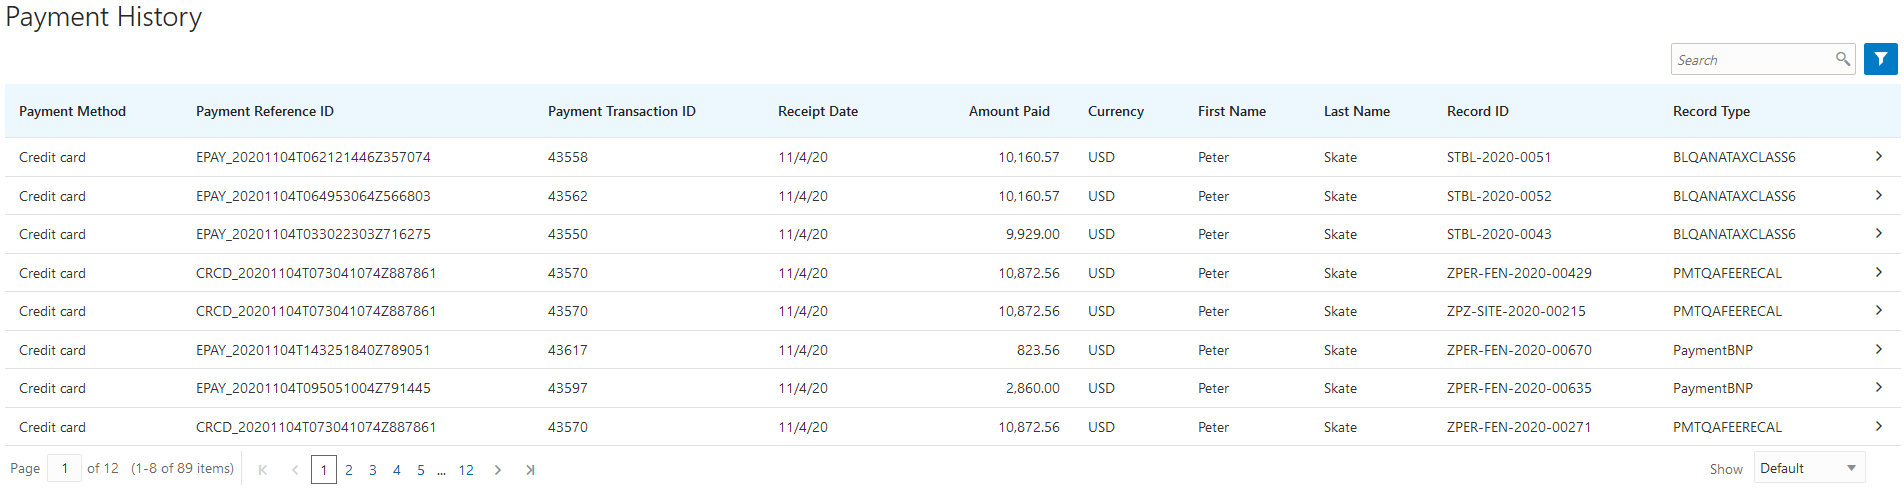
Reviewing Payment History
Select in the navigator.
Note: Registered public users can also access this page from the Registered Public Landing Page by selecting View Payment History from the I Want To field. Public users can view only the payments that they submitted.The Payment History page displays all of the payments received by the agency. You can search for and sort payments by:
Payment method
Payment reference ID
Payment transaction ID
Receipt date
Payment amount
Payment currency
Payer first name
Payer last name
Record ID
Record type
Select a payment to view additional details on the Payment History Details page.
This example shows the Payment History Details page.
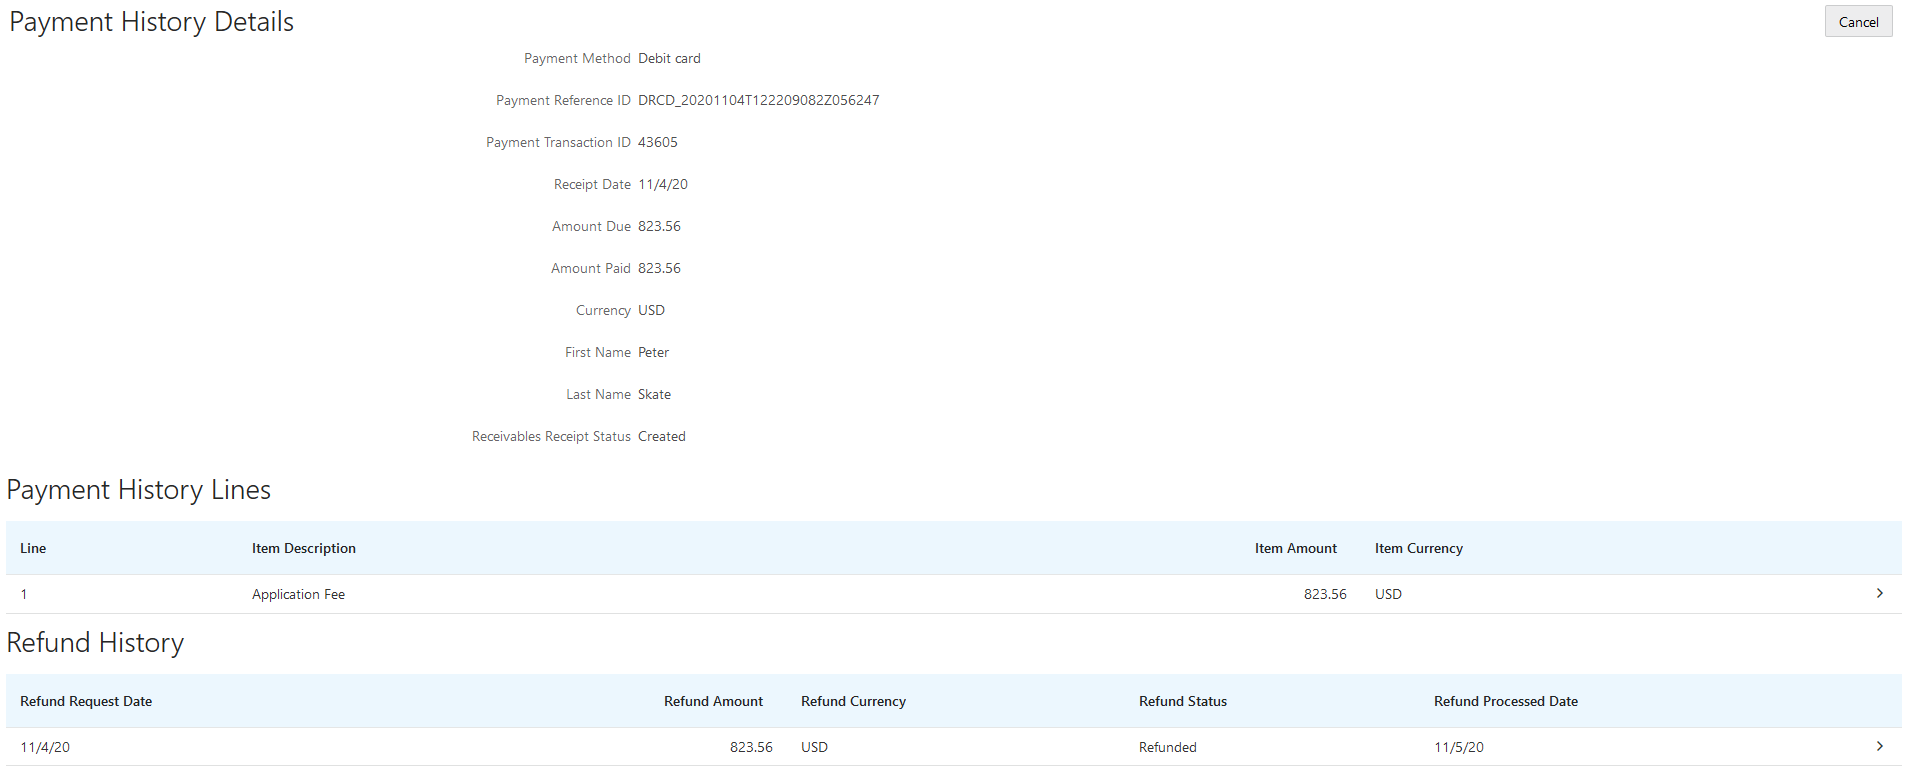
If your agency is integrated with Oracle Receivables, but the Receivables Receipt Status for a payment is Error, the Generate Receipt button appears on this page. Once you correct the source of the error, click Generate Receipt to manually create a miscellaneous receipt for the payment and send it to Oracle Receivables. For more information on the integration with Oracle Receivables, see Oracle Receivables Integration Overview.
The Payment History Lines grid displays the transaction lines associated with the payment. You can select a payment history line to view additional details on the Payment History Line Details modal page.
The Cash Drawer Lines grid displays the cash drawer transaction lines associated with the payment. You can select a cash drawer line to view additional details on the Cash Drawer Line Details modal page.
The Refund History grid displays any refunds associated with the payment. You can select a refund to view additional details on the Refund Detail modal page. For more information on refunds, see Viewing and Processing Refunds.
Viewing Invoice History
Agency staff can view invoice history on the Invoice History page.
This example shows the Invoice History page.
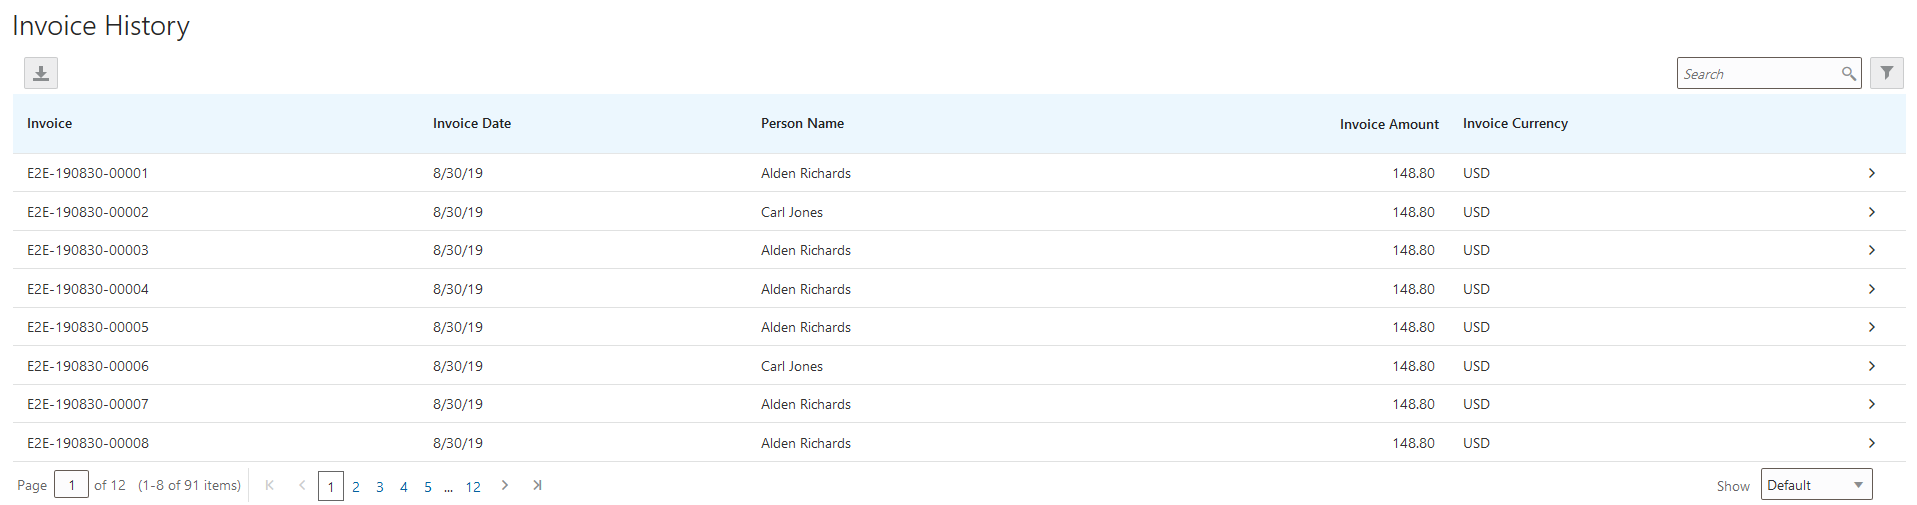
Reviewing Invoice History
Select in the navigator.
Note: Registered public users can also access this page from the Registered Public Landing Page by selecting View Invoice History from the I Want To field. Public users can view only their own invoices.The Invoices History page displays all of the invoices issued by the agency. You can search for and sort invoices by:
Invoice ID
Invoice date
Person name
Invoice amount
Invoice currency
Select an invoice to view additional details on the Invoice History Details page.
This example shows the Invoice History Details page.
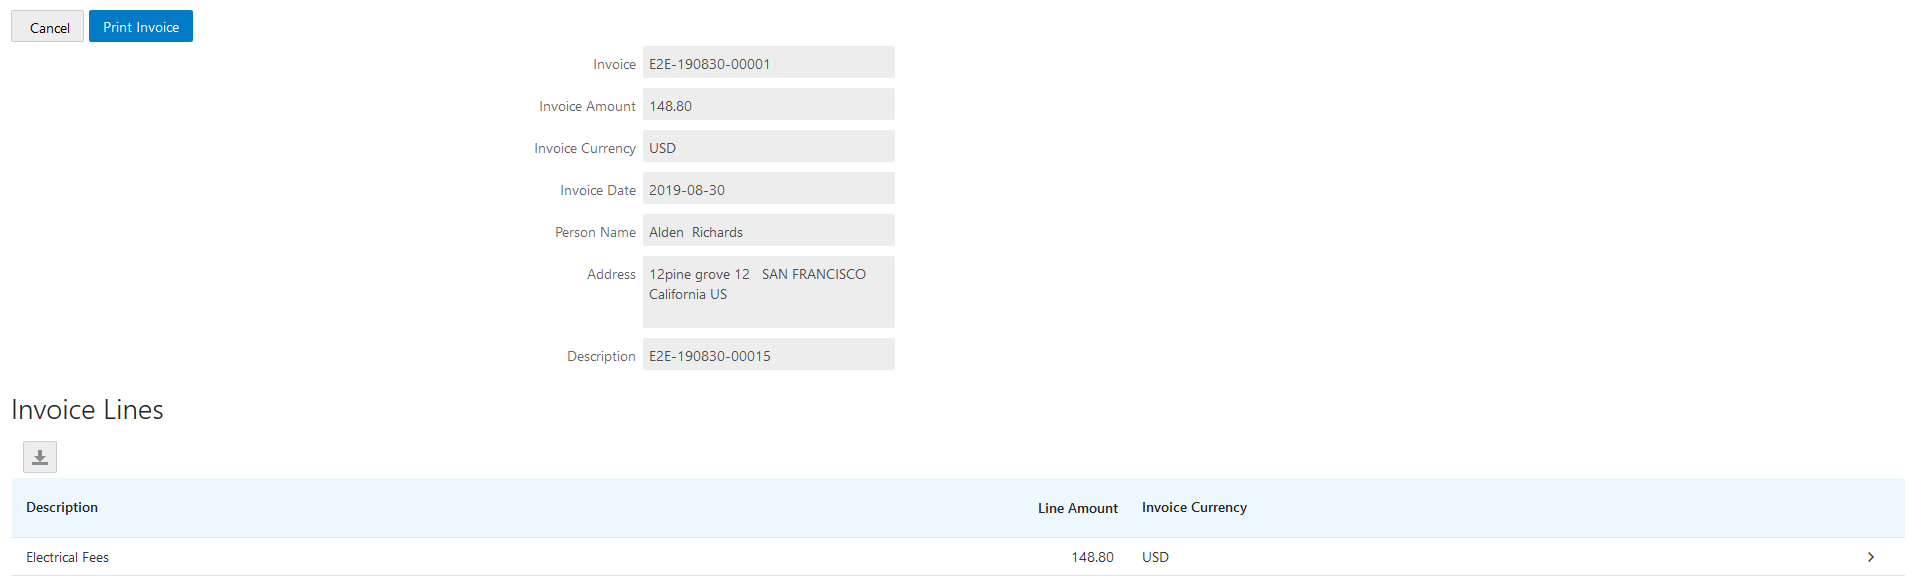
The Invoice Lines grid displays the transaction lines associated with the invoice. You can select a invoice line to view additional details on the Invoice Line Detail modal page.
Click Print Invoice to generate a printable invoice.
Viewing and Processing Refunds
Agency staff can view refund history, process refunds, and print refunds from the Refund History page.
Agency staff initiate refund requests from the Fees and Payments page for transactions. For more information on initiating refund requests, see Working with Fees and Payments.
To distribute requested refunds to customers, agency staff must review and process them on the Refund History page.
This example shows the Refund History page.
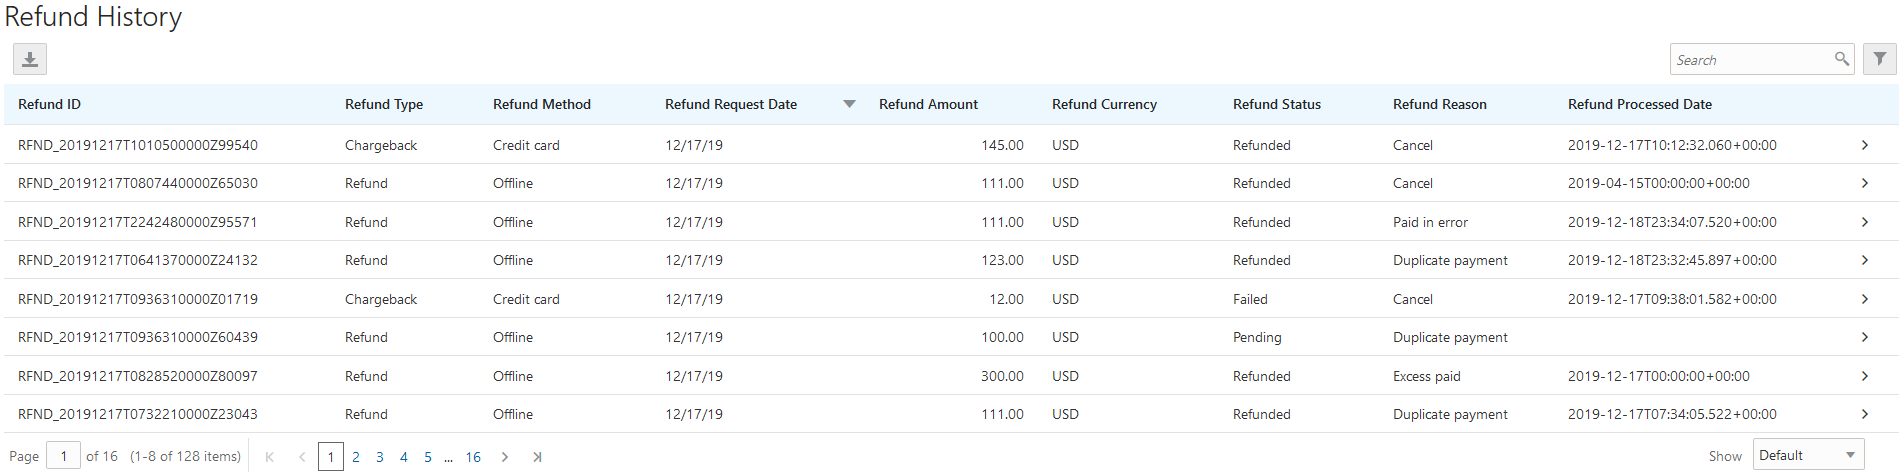
Reviewing Refund History
Select in the navigator.
The Refund History page displays all of the requested or processed by the agency. You can search for and sort refunds by:
Refund ID
Refund Type
Refund Method
Refund Request Date
Refund Amount
Refund Currency
Refund Status
Refund Reason
Refund Processed Date
Select a refund to view additional details on the Refund Detail page.
This example shows the Refund Detail page.
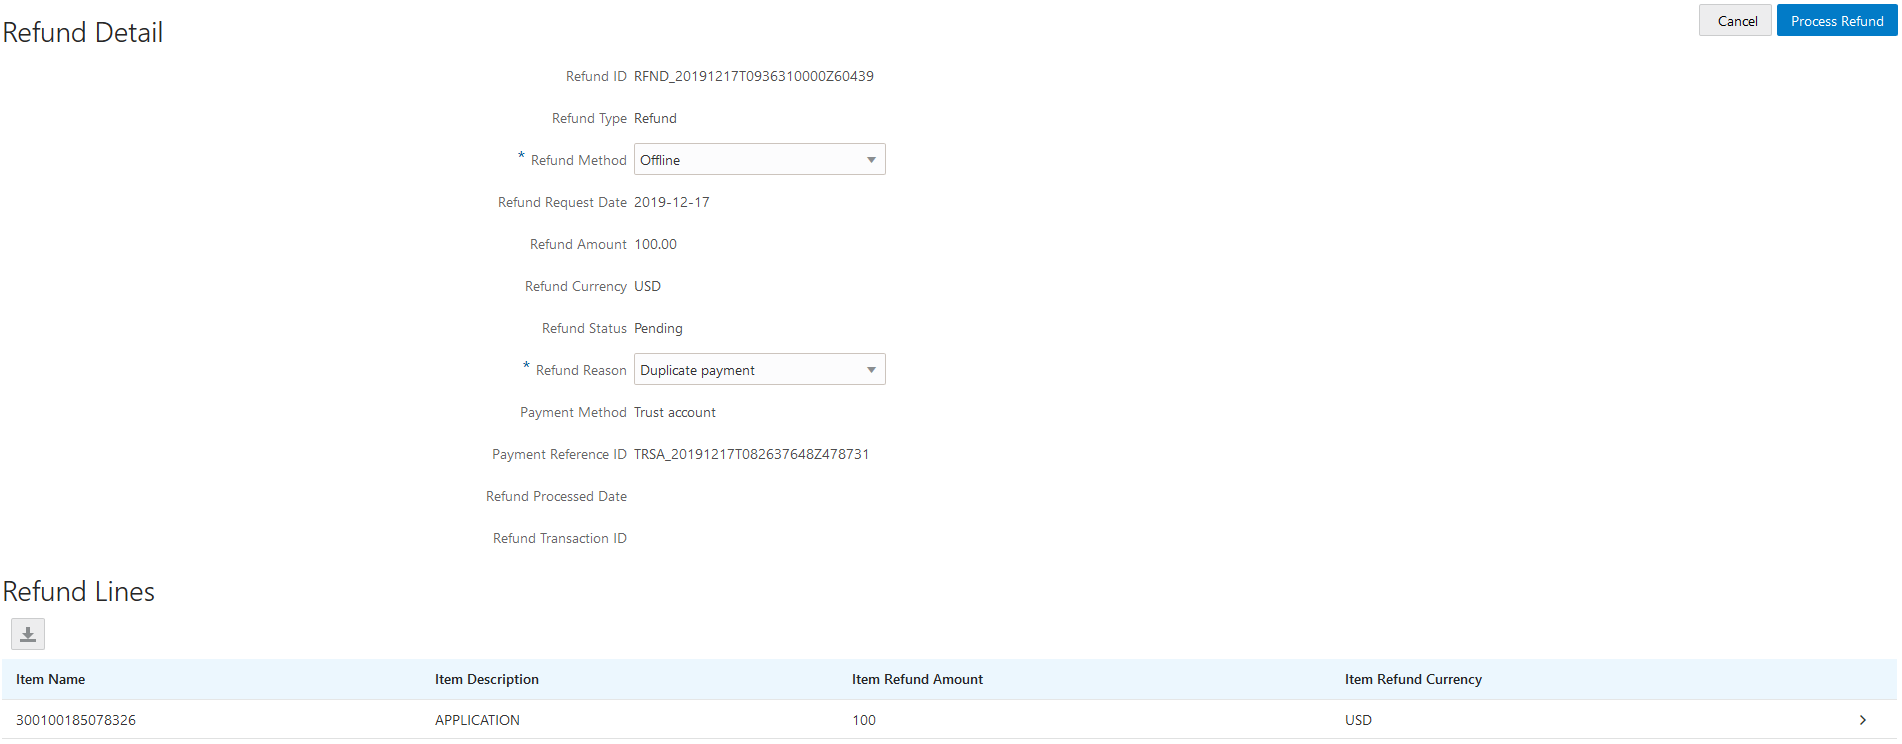
The Refund Lines grid displays the items included as part of the refund. You can select a refund to view additional details on the Refund Detail modal page.
Processing Refunds
Select in the navigator.
Select a refund with a Refund Status of Pending.
On the Refund Detail page, select a Refund Method.
Select Offline if you are issuing a manual check for the refund, or issuing an electronic refund through a system that is not connected to Oracle Public Sector Compliance and Regulation. This is the only option available for payments that were made by check or cash.
Select Credit Card to credit the refund back to the credit card that was used to make the payment.
Refunds to credit cards are processed through Oracle Fusion Payments. For detailed information on setting up the integration with Oracle Fusion Payments, see Public Sector Compliance and Regulation: Financial Integrations.
Note: Cashiers processing refunds charged back to credit cards must have the Accounts Receivable Manager Segregated Role (ORA_AR_ACCOUNTS_RECEIVABLE_MANAGER_SOD_JOB) assigned to them. For more information on assigning roles to agency staff, see Setting Up Agency Staff.-
Click Process Refund.
You are returned to the Refund History page. The process changes the Refund Status of the refund to Refunded and enters the date and time that the refund was processed in the Refund Processed Date column. In addition, the process creates an accounting entry for the refund.
If you configure a template for the delivered Refund Notice communication event, processing the refund triggers the generation of a communication to the refund recipient. For more information on communication event templates, see Setting Up Communication Templates.
Note: If an error occurs before or after a refund is process, the system changes its status to Failed. To prevent duplicate refunds from being processed agency staff cannot process a failed refund. You must set the refund status back to Pending through a patch request before attempting to process the refund again.
Printing Refunds
Select in the navigator.
-
Select a refund with a Refund Status of Refunded.
On the Refund Detail page, click Print Refund generate a printable file for the refund in a separate browser tab.