Completing an Application
Agencies configure the specific sections and fields for each type of application. Regardless of these specifics, the general interface for completing an application is consistent.
Applications for business license renewals and amendments also follow this process. For more information, see Applying for a Business License Renewal and Applying for a Business License Amendment.
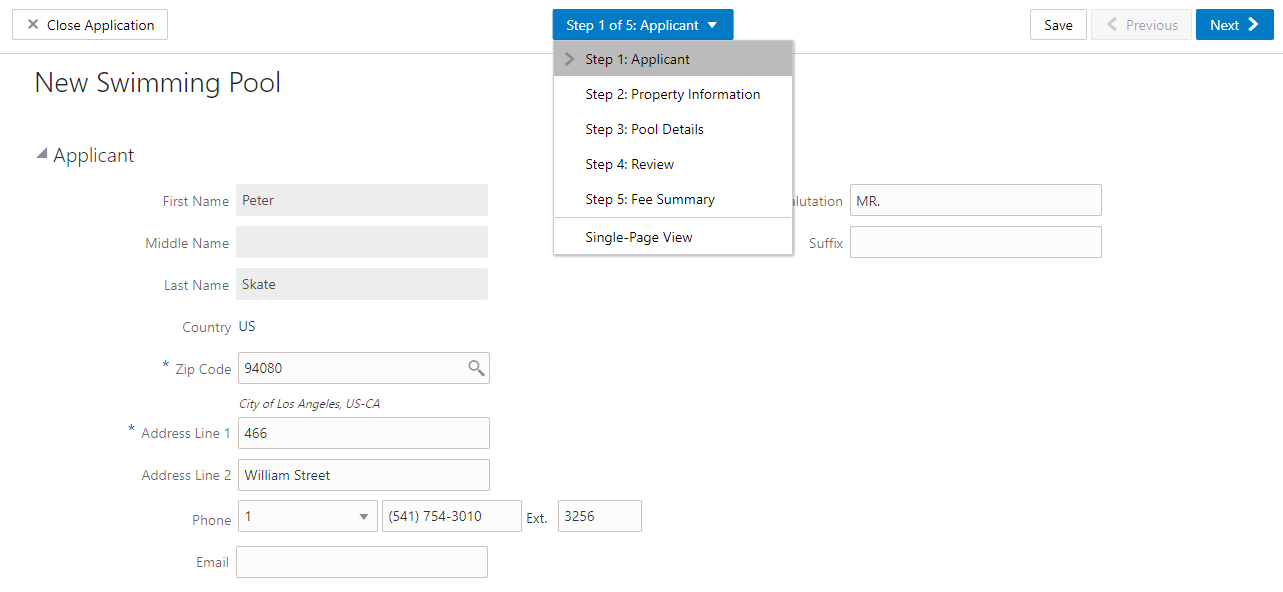
This example illustrates an application.
Data Entry Pages
The application begins with data entry steps that the agency configures. There can be one or many data entry steps. Agencies configure the sections and fields for each data entry step.
Data entry sections are generally self-explanatory, but the following table includes notes about certain sections:
|
Section |
Notes |
|---|---|
|
Applicant |
|
|
Application |
The Application section includes the record ID and a field where applicants can enter a description. Agency staff also provide the date the application was received while entering data into the system. The received date field isn’t available for applicants applying online. |
|
Terms and Conditions |
|
|
Contacts |
All applications:
Permits and planning applications:
Permit and planning application access:
|
|
Contractor |
Applicants who self-identify or are identified by agency staff as contractors (or their authorized agents) are required to select a contractor license. Applicants can search by license number, business, or owner to retrieve information about the license from the agency’s main contractor records, if the information already exists there. If you integrate with an external licensing body, the information can be retrieved from the licensing body’s records. Applicants who are not contractors or authorized agents, such as homeowners, can optionally add contractors to their applications. The same is true for agency staff who are applying on behalf of this type of applicant. Only system administrators can modify contractor information in an application. For more information, see Contractor License Overview. |
Review Page
A Review step appears after the last data entry step for an application. The page for the Review step shows all of the data entry sections on a single long read-only page.
Confirmation Page
If the application includes a confirmation page, it appears after the review page. This page can have any name.
A common scenario is to show a fee summary on the confirmation page. Displaying a read-only fee summary at the very end of the application, after all data entry is complete, ensures that the fee calculations are final.
Single Page View and Multi-Page View
A drop-down field at the top of the application page lists the steps, including data entry pages, the Review page, and the confirmation page. Selecting a step takes the user directly to that step.
The final item on the step list is an option to toggle between the Single-Page View and Multi-Page View.
In single-page view, all of the data entry steps are combined into a single step labeled Step 1: Single-Page View. The review and confirmation steps remain separate.
General Navigation Controls
The banner above the application form includes these buttons for general navigation:
Previous and Next buttons enable users to move through the steps.
On the final step, a Submit button replaces the Next button.
Submitting an application initiates the workflow for the application. Registered public users can’t make changes to submitted applications.
Note: After submitting a business license application, you can’t make changes to the business information. Once the license is approved, you follow the amendment process for any changes. See Applying for a Business License Amendment.The Save button lets users save their progress without submitting the application.
You’ll see warnings when you save an incomplete application, but you can still save the application and complete it later.
The Close Application button closes the application and discards unsaved changes.
A warning message gives users a chance to return to the application instead of closing it.