Working with Predefined Field Groups
This topic provides an overview of predefined field groups and how you use them to build your application forms.
Oracle provides a handful of predefined field groups to help you build application forms easily. Each predefined field group contains a collection of fields commonly used to capture information for a particular facet of the transaction type. For example, the Applicant field group captures information about the person applying for a permit.
Predefined field groups are:
Pre-mapped to attributes in the application view object (VO).
Grouped logically to provide descriptive metadata for a particular element of an intake form, such as Applicant, Property, and so on.
You drag the desired predefined field group from the Elements panel onto the workspace and use various combinations of predefined and user-defined form elements to assemble your application forms.
For example, assume that you need to create a form for applying for a fence permit. In this case, you can drag the Applicant field group, the Fence field group, along with other field groups you need onto the workspace to build your form.
For more information on the delivered predefined field groups, see Using Predefined Field Groups.
Adding Predefined Field Groups
To add a predefined field group to your form:
Make sure the page to which you want to add the predefined field group is the active page.
Expand the Ready to Use list in the Elements panel to the left of the workspace.
Click on the desired field group to activate it.
Select the field group to drag and drop it in the workspace.
Adding Required Predefined Field Groups
The field groups you add to your intake form design will vary, depending on the type of form you are creating. While most field groups are optional to add to your forms, some field groups are required to ensure that specific information is captured or represented in the underlying data structure. In some cases, it is the offering that requires the data, while in other cases a field group may have built-in dependencies on another field group.
|
Offering |
Required Field Groups |
|---|---|
|
Permits |
Applicant Application Fee Summary (if fees are involved) |
|
Planning and Zoning |
Applicant Application Fee Summary (if fees are involved) |
|
Business Licenses |
Applicant Application Business Details Business Owners Business Locations Fee Summary (if fees are involved) Note: The Business
Owners and Business Locations field groups depend on the Business Details field
group. They must appear after
the Business Details field group in the sequence, either in a subsequent page
tab or below it on the same page tab.
|
The Applicant predefined field group is required to be added to your application forms. The internal save logic checks for a valid applicant address when an end user attempts to save or submit an application form. The Application predefined field group displays useful information, including the transaction ID, status, description, important dates related to the application, and so on.
Deleting Predefined Field Groups from a Form
To delete a predefined field group, click the Remove button in the Attributes panel.
Setting Predefined Field Group Attributes
Select the field group to view its attributes in the Attributes pane. To select the field group, click around the border or within empty space within the field group. If you click near a field, the field will become selected.
|
Page Element |
Description |
|---|---|
|
Remove |
Click to remove the field group from the page. |
|
Label |
The name of the predefined field group that describes the set of fields in the field group. For example, the fields in the Photovoltaic field group apply to solar projects. Modify the label to suit your requirements. For example, you may want to change the delivered field group named Photovoltaic to Solar. Note: Changing the label for
predefined field groups is a global change, affecting other intake
forms using the field group. After changing the label, note that the
label of the field group in the left panel’s field group list is updated
to reflect the modified label. The change you make will be available
globally only after you publish the current intake form. Make sure
future intake form developers on your implementation team are aware
of the change to avoid confusion.
|
|
Show Label |
Control whether to show the label. By default, the system shows labels for predefined field groups (Show Label is on). To hide the label, turn off Show Label. When turned off, the system hides the label at both design-time and runtime. Typically, you’d want the label to be visible to describe the logical grouping of the fields in the form element. In some cases, the page tab name and the predefined field group label might be redundant, in which case you may opt to hide the label. You may also want to group multiple predefined field groups within a single group box. In this case, you can hide the individual predefined field group labels within the group box container, using the group box label to represent the combined set of fields. Note: When you turn off Show
Label, the system disables the collapsible feature for a predefined
field group.
Note: If the predefined field
group is delivered without a label, the Show Label attribute does
not appear when you select that form element.
|
|
Add Help |
Click to launch the Contextual Help dialog box, which you can use to add help text to a predefined field group for assisting users with interacting with your intake form. When adding help for a predefined field group, the help text should apply to the overall contents of the predefined field group. You can add help also at the page level and the field level, depending on the scope of the help text. For more information on adding contextual help to your intake form, see Adding Contextual Help to Forms. |
|
License Activity |
Note: This attribute applies
only to the Business Licenses offering.
Expand the Display section to view this feature. License activity filtering enables you to control the display of field groups, depending on the current business license activity selected by the applicant. For more information on setting display filters, see Configuring Activity Filtering for Business Licenses. |
|
Fee Estimate |
Expand the Display section and the Fees section to view this feature. Select to incorporate this field element into simplified fee estimates that users can perform while making decisions regarding the transaction associated with an intake form. For more information on configuring simplified fee estimates, see Configuring Simplified Fee Estimates. |
|
Control Display |
Expand the Display section to view this feature. Click to define other elements in the form to control wether the field group displays. For more information on controlling the display of form elements, see Displaying Form Elements Conditionally. |
Adding a Predefined Field Group Multiple Times to the Same Form
The same predefined field group can be dragged into your form multiple times. This is referred to as a multiple-instance element. How you adjust the Multi-Instance Options attribute determines how the application stores the data for that predefined field group.
If you make no changes to the Multi-Instance Options attribute, the data entered within that predefined field group corresponds to one row of data only. In this case, the system duplicates the display of the data in each area of the form it is displayed. This option enables you to show the same data on a different tab within the form, if necessary. Updating the data in one instance of the predefined field group updates the data displayed in the other instances as well.
For example, assume you want the same comment text to appear on multiple pages in your form. You can do this by adding the Comments field group to the desired pages without making any updates to the Value field in the Multi-Instance Options attribute.
If you make changes to the Multi-Instance Options attribute, the application considers each instance of the predefined field group unique, and then each individual occurrence of the predefined field group is associated with its own row of data.
For example, assume you wanted to incorporate multiple comment sections in your form. In this case, you can add the Comments field group to multiple locations of your form, and then you set the Multi-Instance Options attribute to different values. One might relate to fencing comments while another might relate to contractor comments. Another example would be to enable the end user to upload multiple attachments that apply to separate documents. One attachment might be photos of a property while another attachment might be blueprint or design documents.
Managing Lookups for Predefined Field Groups
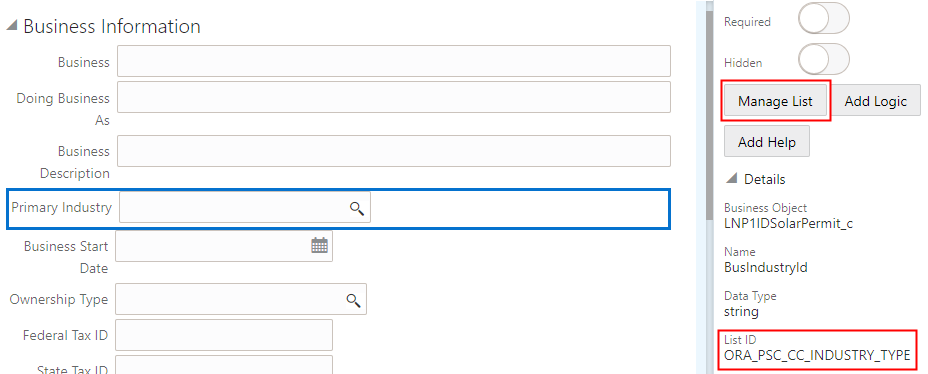
Some of the existing field groups contain fields associated with delivered lookup types. For example, the Primary Industry lookup is associated with the ORA_PSC_CC_INDUSTRY_TYPE lookup type.
This example illustrates a field on a field group associated with an existing lookup. Details are in the surrounding text.
To manage a lookup for a predefined field group:
Identify the lookup fields in a field group, which contain the magnifying glass icon, like the Primary Industry field on the Business Information field group.
Select the field.
Expand the Details section in the Field Attributes panel.
Make note of the List ID associated with the field. This is the lookup type that you will access and update on the Lookups page.
Click Manage List to open the Lookups page displaying the associated lookup type.
This example illustrates the Lookups page displaying the lookup type associated with a field on a field group. Details are in the surrounding text.
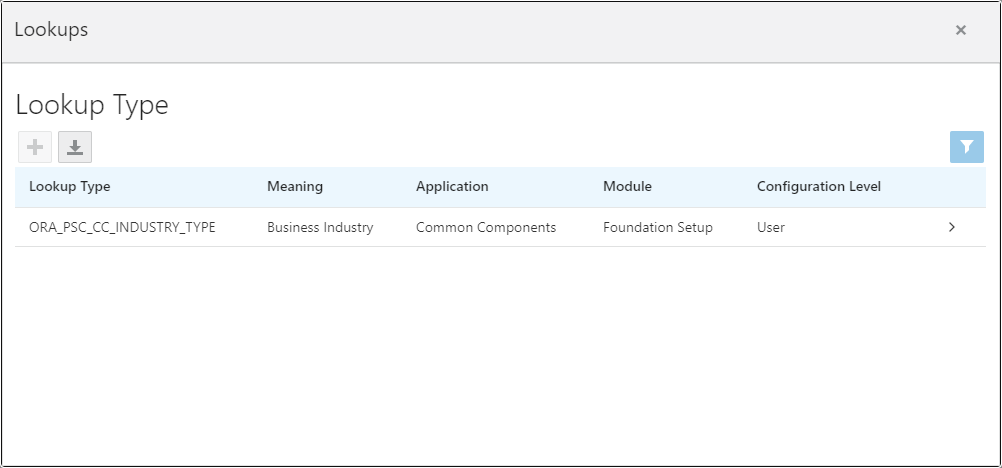
For more information on managing lookup types, see Setting Up Lookups.