Setting Up Map Profiles
Use map profiles to configure specific instances of map functionality in the system. Profiles set the default extent of the map (the area shown by default) as well as controlling the availability of certain map options.
A profile can be linked to multiple maps. All of a profile’s maps share the same map service URL, default map extent, and default base map, but the maps have individual configuration options to control end-user options for the map.
Every map must be associated with at least one map profile. In most cases, a Switch Map Profile button appears on the map toolbar if a map has multiple profiles, and end users can choose which profile to use. The button doesn't appear on the Transaction Header map, because you can't link to the Transaction Header map on multiple map profiles.
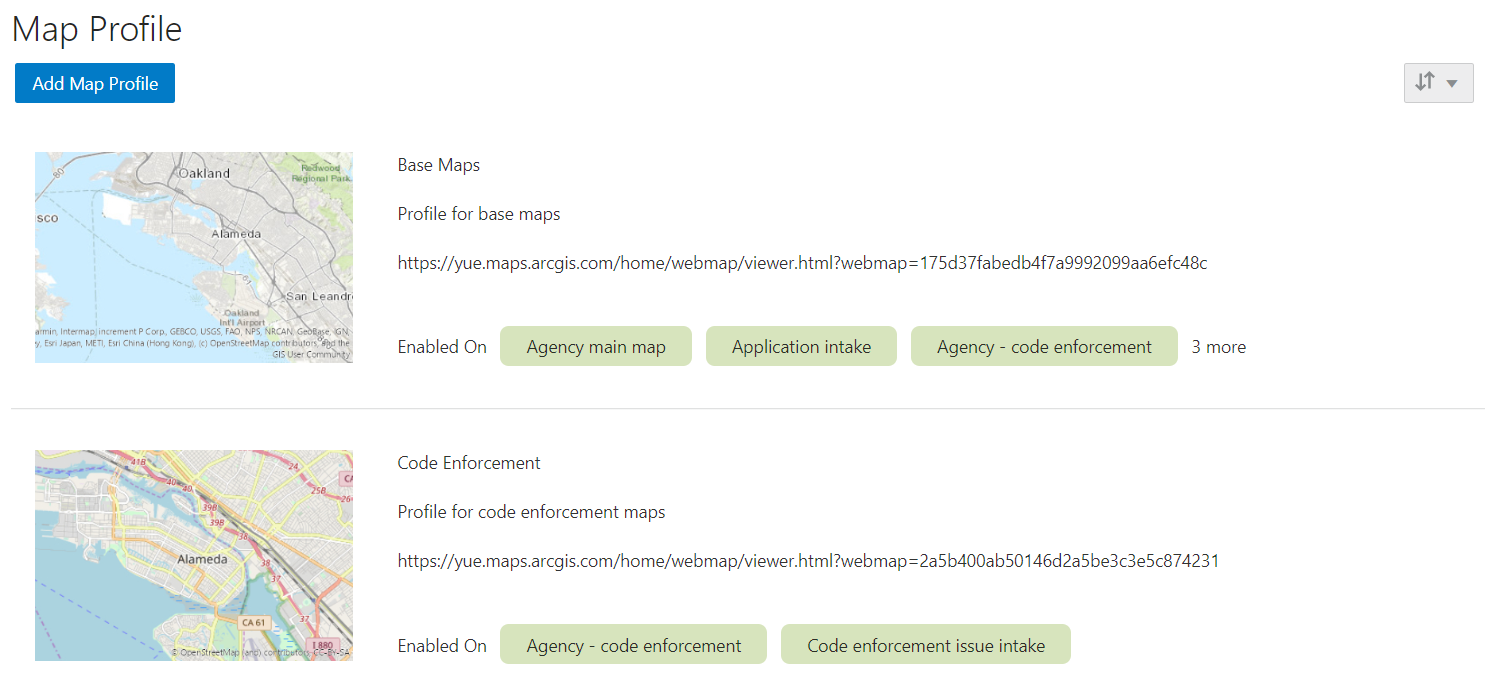
This example illustrates the Map Profile list page. Each row includes a thumbnail map, lists up to three maps that are associated with the profile, and states how many additional maps (if any) are associated with the profile.
Prerequisite
Mapping capabilities depend on integration with a map service such as Esri’s Geographic Information Systems (GIS). Before you set up map profiles, publish your map service so that it can be referenced from within the Oracle system.
Adding a Map Profile
Select
If no profiles exist, the Map Profile Details page opens so that you can create the first profile. If at least one profile exists, the Map Profile list page appears.
If the Map Profile list page appears, click Add Map Profile.
The Map Profile Details page appears.
Enter the following basic profile information:
Page Element
Description
Profile ID
Enter a unique identifier for the map profile.
Profile Name
Enter a descriptive name for the map profile. This identifies the profile on the Map Profile list page.
When end users view a map with multiple profiles, they can switch profiles by choosing from a list that displays this name along with a map thumbnail.
Description
Enter a more detailed description of the map profile. This also appears on the Map Profile list page to help identify the profile.
Map Profile Users
Select the type of user who can access this map profile:
All Users
Agency User
Public User
Only map pages that can be accessed by this type of user can be linked to the profile.
For more information about which maps are available for agency, public, or all users, see Implementing Delivered Maps.
Enter the URL for your map service in the Map Service URL field.
The URL to the profile provides default values for the map extent, which you will confirm or change later in this procedure.
If the Base Map field is editable, choose the type of map to display.
The Esri server settings control whether this field is editable.
The options are Dark gray canvas, Light gray canvas, Imagery with labels, National Geographic, Topographic, Open Street Map, Imagery, Streets, Terrain with labels, and Oceans.
When you link specific maps to the profile, you will configure whether users can change the map type.
-
If your agency is configuring the Esri print widget, enter the URL to the print service in the Print Service URL field.
If you leave this field blank, the print service URL defined on the GIS Attribute Mapping page is used.
Proxy user setup is needed for access if the print service is secured.
Set the map extent.
The map extent defines the geographical area that the map initially displays. When you create a new map profile, a generic map illustration appears above the Choose Map Extent option. After you choose the map extent, a preview thumbnail of your actual map extent replaces the generic illustration.
Although the map service URL provides a default map extent, you still need to click Choose Map Extent to load the default extent into the profile and optionally modify it.
Note: Maps in transaction headers are initially centered on the transaction location. Therefore, the transaction header map uses the default extent from the map profile only if the transaction is not associated with a specific location.Click Choose Map Extent.
The Choose Map Extent page appears. The map service URL that you previously provided sets the default map extent, and the page displays a map with that default extent.
If necessary, modify the default map extent supplied by the map service URL.
Oracle provides the ability to easily set a new map extent without making any changes to the GIS service. To change the extent, pan and zoom until you can see the desired extent, then use the Choose Map Extent toolbar button to draw a selection rectangle. This sets the new extent.
The following fields describe the map extent by identifying a coordinate system and listing the minimum and maximum X and Y values on the coordinate system.
Page Element
Description
X-Min of Default Map View
The top-left X-coordinate of the initial map extent.
X-Max of Default Map View
The bottom-right X-coordinate of the initial map extent.
Y-Min of Default Map View
The bottom-left Y-coordinate of the initial map extent.
Y-Max of Default Map View
The top-right Y-coordinate of the initial map extent.
Spatial Reference
The geographic coordinate system or map projection used by the mapping service to display the map. The map service URL that you previously supplied sets this value.
Click OK to close the Choose Map Extent window.
The thumbnail map on the Map Profile Details page is updated to match your map extent.
Click Save to save the map profile.
Linking Maps to the Profile
To link maps to a profile and define settings:
-
Click Add Map Page in the Linked Map Pages section.
-
In the Map Page field, select a map to link to the profile.
The maps are Agency main map, Application intake, Agency - code enforcement, Code enforcement issue intake, Mobile code enforcement inspections, Public notification, Transaction header, Guest/anonymous map, Mobile inspection, Permit list, Registered public user map, and Public - code enforcement.
Note: The maps available to link to the profile are filtered by the profile users selected on the Map Profile Details page. You can link the Transaction header map only to one map profile for agency users, public users, or all users.For more information, see Implementing Delivered Maps. -
Configure map-specific options.
Depending on the map that you are configuring, some map options might not be available to enable or disable. For example, you cannot enable selection tools or window docking on the maps for mobile devices, and zoom tools are the only widgets available in the transaction header map.
If you create any custom maps, there are no restrictions on which widgets you can enable, so take extra care when configuring those maps.
Use these fields to configure map options:
Page Element
Description
Enable Zoom
Indicate whether the map toolbar includes Zoom In and Zoom Out tools.
Enable Default Map View
Indicate whether the map toolbar includes the Show Default Map View tool. This tool restores the map to its initial extent after a user zooms or pans to change the display area.
Enable Base Map Gallery
Indicate whether the map toolbar includes the Select Base Map tool. This tool lets users change the base map from the one specified in the profile. For example, if the profile’s base map is topographic, users can change to a map with satellite imagery.
Enable Map Layers
Indicate whether the map toolbar includes the Select Layers tool and, depending on your GIS configuration, the Identify GIS Information tool.
The Select Layers tool lets users see the list of layers and switch layer visibility on and off. Examples of layers include environmental, zoning, or infrastructure information provided by the map service.
When you add the Property field group during intake form design, you can link to two separate map profiles, one for agency users and one for public users. For more information, see Using Predefined Field Groups.
The Identify GIS Information icon gives users the ability to click map objects such as parcels to display a pop-up window with object information. This option is available if the GIS administrator has configured the GIS service to provide this information.
Enable Selection Tools
Indicate whether the map toolbar includes the Show/Hide Selection Tools icon. Clicking this icon opens a separate toolbar with tools for selecting and deselecting parcels on a map.
The ability to select parcels on the agency main map, the registered public user map, and the guest/anonymous user map enables users to view associated transactions. Registered users and agency staff can additionally start an application for selected parcels.
The ability to select parcels on the public notification map enables users to create a notification area around the selected parcels.
Enable Print
Turn on this switch to enable the print widget on this map. You can't enable the print widget on a transaction header map. You must also enter a print service URL on the map profile or on the GIS Attribute Mapping page.
Enable Sketch
Turn on this switch to enable the sketch widget on this map. You can't enable the sketch widget on a transaction header map.
Enable Detail Window Docking
Indicate whether the map detail window is docked to the side of the view. The detail window is the pop-up window that appears when a user clicks a map marker or other GIS feature such as a parcel.
Detail Window Dock Position
Specify the position where the map detail window is initially docked: Auto, Bottom left, Bottom center, Bottom right, Top left, Top center, or Top right.
This field is relevant only if you enable detail window docking.
This field does not apply to mobile devices, where the detail window always appears at the bottom of the screen.
-
Configure the map layer display options for the Application Intake page. The Map Layer Display Options section of the page displays all of the layers defined with the map service associated with the map profile. Administrators use this section to enable layers for GIS object selection.
Note: The Map Layer Display Options section appears only for the Application Intake map page.Page Element
Description
Enable Selection
When this switch is turned on for a layer, the GIS objects associated with that layer can be selected on the map.
Unique Identifiers and Display Attributes
Enter the identifiers and attributes that display for GIS objects when you select them on the map.
Note: If you change the map service in Esri to add, update, or delete the associated layers that were enabled for GIS object selection on the map page, you need to update this setup. Delete the map page and add it again. This ensures that the latest layer information is loaded when the administrator enables layers for selection and enters attributes. -
Click Save to close the Add Map Page window.
-
If necessary, click a linked map to re-open the Add Map page.
-
To edit settings, make your changes and then click Done.
-
To remove the map from the profile, click Delete.
-
-
Click Save to save the map profile.
Modifying a Map Profile
Select .
On the Map Profile list page, click the row for the profile that you want to modify.
Update the settings as needed.
Click Save.
Deleting Map Profiles
To delete a map profile:
Select
On the Map Profile list page, click the row for the profile that you want to delete.
On the Map Profile Details page, click Delete.