Setting Up Process Definitions for Workflow
Workflow manages status updates throughout the transaction lifecycle and is an essential part of your setup. This topic provides information for creating your workflow process definitions.
Setting Up Data Objects for a Process
Data objects provide a structure for storing data sent from the Public Sector Compliance and Regulation system. Every process definition that you create needs the same data objects, including:
Simple string data definitions to store identifying information about the transaction and transaction type.
Business object data definitions to store transaction base data, field data, and transaction type data.
The data definition for fields includes all possible fields that can be added to an intake form, even though the transaction may use only a subset of fields that are appropriate for the type of transaction. Any fields that are not part of a specific transaction type remain blank when the workflow process retrieves the field data.
You must set up your data objects before you continue to this topic’s additional procedures for defining data associations.
To set up data objects for a process definition:
Access the process definition in OIC.
Click Data Objects.
Set up the data definition for transaction base data:
In the Data Objects window, click Add.
In the Create Process Data Object window, enter the following information:
Page Element
Value
Name
transactionBaseData
Data Type
Business
The drop-down list for data types
BusinessData.ResponseTransBase
Click Create to create the data definition and return to the Data Objects window.
Set up the data definition for transaction field data:
Click Add.
Enter the following information:
Page Element
Value
Name
transactionFieldsData
Data Type
Business
The drop-down list for data types
BusinessData.ResponseTransFields
Click Create.
Set up the data definition for transaction type data:
Click Add.
Enter the following information:
Page Element
Value
Name
transactionTypeData
Data Type
Business
The drop-down list for data types
BusinessData.ResponseTransType
Click Create.
Click Close to close the Data Objects window.
Click Save.
Creating a Data Object to Store Start Event Arguments
In the next task you will define the start arguments for the Start event. In this procedure, you create the structure to store the arguments.
This procedure involves:
Creating a business type using the business object option.
Creating a data object and associating it with the business object.
To create the data object for start event arguments:
Open the process definition.
Select Business Types from the left panel.
Note: Notice the other business types created automatically when importing the downloaded JSON, such as ResponseTransactionData.Click Edit in the header, which causes the Create button to appear.
Click Create, and select New Business Object.
On the Create Business Object dialog box, enter the business object name, such as InitTransaction, and select the Parent Module as BusinessData.
Click Next.
Use the Add Attribute button to add these string data types to the business object.
Attribute Name
Data Type
transactionKey
String
transactionType
String
externalBaseURL
String
resourceName
String
transactionOwner
String
transactionId
String
classification
String
subclassification
String
Click Finish.
Return to your process definition diagram.
Click the Data Objects button.
Click Add.
On the Create Process Data Object dialog box, make these changes:
Field
Value
Name
transaction
Data Type
Business
drop-down list
BusinessData.InitTransaction
Click Create.
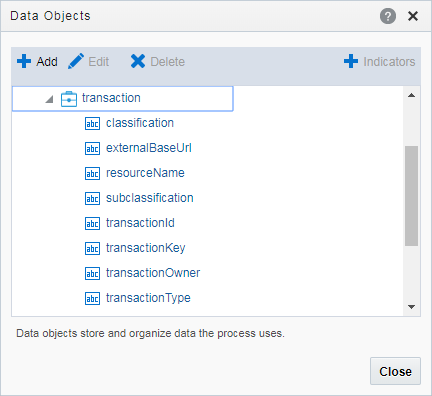
This example illustrates the expanded transaction business data object, with the required string data within it.
Defining Arguments for the Start Event
When a transaction, such as a permit intake application, is submitted, the software instantiates that transaction’s workflow process by passing parameters, such as the transaction ID, to OIC. The Start event in your process diagram must have arguments defined for these parameters.
To set up the arguments for the start event:
Select the Start event in the process definition.
Click the Start event, and select Open Properties.
The default view is the General section of the Implementation Properties.
In the How do you want to implement it? section, select Define Interface as the Type.
Click the pencil icon next to the Type field to open the Configure window.
Enter an operation name, such as start.
Add the following rows to the Arguments Definition.
Use the Add button to add these strings using the values in this table, where each row represents a separate argument you need to create:
Name
Type
TransactionKey
string
TransactionType
string
ExternalBaseURL
string
ResourceName
string
TransactionOwner
string
TransactionId
string
Classification
string
Subclassification
string
Note: Arguments added to the Start event must be named exactly as documented.Note: You need to complete the output data association if you want the argument values stored in a Data Object.Click OK.
Close the properties panel and click Save.
Defining Data Associations for the Start Event
The data associations for the Start event capture identifying information about the transaction for initiating the process instance.
In this task, you map the arguments for the Start event to the data object values you entered for the transaction object.
To set up the data associations:
Open the process definition and select the Start event.
Click the Data Association button.
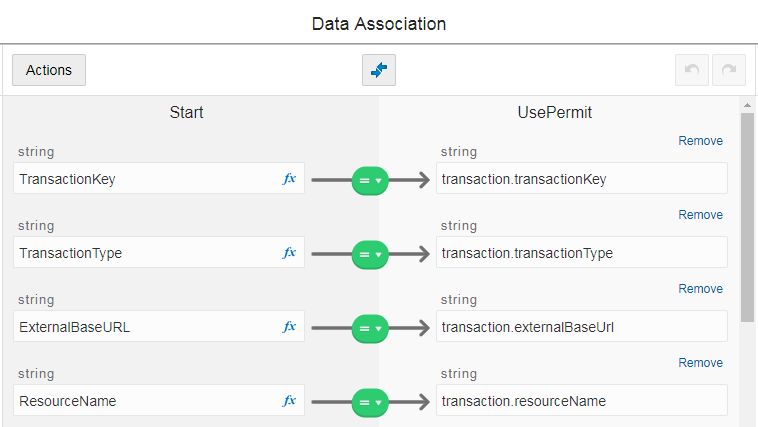
Set up the following data associations, mapping the Start event arguments to the appropriate attributes in transaction business object.
Source Data
(Left side of the map)
Target Data
(Right side of the map)
Description
TransactionKey
transaction.transactionKey
The transaction ID.
TransactionType
transaction.transactionType
The transaction type ID.
ExternalBaseURL
transaction.externalBaseURL
The URL for the Public Sector Licensing and Permitting system.
ResourceName
transaction.resourceName
The name of the REST API resource.
TransactionOwner
transaction.transactionOwner
The owner of the transaction.
TransactionId
transaction.transactionId
The transaction ID.
Classification
transaction.classification
The classification of the transaction.
Subclassification
transaction.subClassification
The subclassification of the transaction.
This example illustrates mapping the Start event arguments to the associated data attributes in the transaction business object.
Click Apply.
Click Save.
Defining Data Associations for Sending Notifications
The data associations for a notification task define the information that the task sends to the public sector communications center.
For more information about the communications center, see Setting Up Communication Templates.
To set up the data associations:
Access the process definition and select the system task.
Click the Data Association button.
Set up the following input data associations:
Source Data
(Left side of the map)
Target Data
(Right side of the map)
Description
[event name]
For example, "LNP_WORKFLOW_001"
body.eventCode
The event as defined in the Communications Center in the public sector system.
The source data string must be in quotation marks, and it must exactly match the identifier of an event.
Oracle delivers these communication events, <Offering>_WORKFLOW_001 through <Offering>_WORKFLOW_005. Where “Offering” refers to your offering code, such as LNP for Permits or PNZ for Planning and Zoning.
[template name]
For example, "Application_Accepted"
body.templateCode
The identifier for the template to be used for the email.
The source data string must be in quotation marks, and it must exactly match the name of a template in the transaction application.
"LnpRecordKey"
body.recordFirstKeyName
The name of the key field.
transaction.transactionKey
body.recordFirstKeyValue
The transaction ID.
true or false
body.email
This Boolean field indicates whether the notification is sent as an email.
Enter true only if the template is an email template.
true or false
body.notification
This Boolean field indicates whether the notification is sent as an in-product notification.
. Enter true only if the template is an in-product notification template.
Caution: Templates are associated with either email or in-system notifications. Be sure to set up the body.email and body.notification values properly. Exactly one of the values must be true. If you want to send both types of notifications, you need to create two notification tasks.Click Apply.
Click Save.
Defining Data Associations for Sending Status Updates
The data associations for a status update task define the information that the task sends to the Oracle Permitting and Licensing system.
To set up the data associations:
Access the process definition and select the system task that updates the transaction status.
Click the Data Association button.
Set up the following input data associations:
Source Data
(Left side of the map)
Target Data
(Right side of the map)
Description
transaction.resourceName
resourceName
The unique system identifier for the transaction type.
transaction.transactionKey
transactionKey
The transaction ID
[new transaction status]
For example: "Accepted"
body.status
The status to be assigned to the transaction.
The source data string must be in quotation marks, and it must exactly match one of the valid statuses for the transaction application.
Click Apply.
Click Save.
Defining Data Associations for Retrieving Transaction Base Data
The data associations for a task that retrieves transaction base data provides a structure for storing the retrieved data. In this task you create both input and output data associations.
To set up the data associations:
Access the process definition, and select the system task that retrieves transaction base data.
Click the Data Association button.
Set up the following input data associations:
Source Data
(Left side of the map)
Target Data
(Right side of the map)
Description
transaction.resourceName
Resource
The unique system identifier for the transaction type.
transaction.transactionKey
TransactionKey
The transaction ID
Click Output.
Set up the following output data associations:
Source Data
(Left side of the map)
Target Data
(Right side of the map)
Description
body
BaseData
This business object contains all of thebase data.
Mapping individual fields would be much more complex and is not necessary.
Click Apply.
Click Save.
Defining Data Associations for Retrieving Transaction Field Data
The data associations for a task that retrieves transaction field data provides a structure for storing the retrieved data. In this task you create both input and output data associations.
To set up the data associations:
Access the process definition, and select the system task that retrieves transaction field data.
Click the Data Association button.
Set up the following input data associations:
Source Data
(Left side of the map)
Target Data
(Right side of the map)
Description
transaction.resourceName
transactionResource
The unique system identifier for the transaction type.
transaction.transactionKey
TransactionKey
The transaction ID.
Click Output.
Set up the following output data associations:
Source Data
(Left side of the map)
Target Data
(Right side of the map)
Description
body
transactionFieldsData
This business object contains all of the transaction fields. This includes all fields that can be included on the application intake form, whether or not the field exists for a specific transaction.
Individual fields are nested within the items object. You can’t expand the items object on this page, but they are available in the expression editor that you use when creating business logic based on transaction data.
Mapping individual fields would be much more complex and is not necessary.
Click Apply.
Click Save.
Defining Data Associations for Retrieving Transaction Type Data
The data associations for a task that retrieves transaction type data provides a structure for storing the retrieved data. In this task you create both input and output data associations.
To set up the data associations:
Access the process definition, and select the system task that retrieves transaction type data.
Click the Data Association button.
Set up the following input data associations:
Source Data
(Left side of the map)
Target Data
(Right side of the map)
Description
transaction.resourceName
transactionResource
The unique system identifier for the transaction type.
Click Output.
Set up the following output data associations:
Source Data
(Left side of the map)
Target Data
(Right side of the map)
Description
body
transactionTypeData
This business object contains all transaction type fields.
Click Apply.
Click Save.
Defining Statuses (Outcomes) for Human Tasks
The Action property for a human task lists the possible outcomes of the task. The actions you define appear as values in the Task Status drop-down list box on the Workflow page where agency staff manages workflow tasks. When the task status is updated on the Workflow page, OIC recognizes it as the task outcome and continues to the next step or gateway.
To define status values representing the outcomes of human tasks:
Access the process definition and select the human task.
Open the task properties.
In the Action field, enter a comma-delimited list of status values.
Do not put a space before or after the comma. For example, if the status are Accept, Reject, and More Information, enter Accept,Reject,More Information in the Action field.
Close the properties window and save.
Defining Conditional Logic for Gateways
In a process map, gateways represent decision points where there is a branch in the process flow. The logic for taking different paths after the gateway is associated with the arrows to the possible subsequent tasks.
An arrow that represents a default branch does not require any logic.
For all other arrows, you need to set up the conditions under which the branch is used. To do this:
Access the process definition and select the arrow.
Click the pencil icon for the arrow to open the arrow properties.
Select the Conditional Flow check box.
This check box is selected for all arrows other than the default arrow after a gateway.
Click the pencil icon for the Condition field.
Use the Expression Editor window to specify the conditions for using this branch.
The Data Objects tab provides access to the data elements that you can evaluate. Transaction field data (the data from the intake form) is nested within the items element under TransactionFieldsData.
In expressions that look for an exact match, take extra care with the spelling, capitalization, and punctuation of values that the expression evaluates.
Select the gateway and open the gateway properties.
Use the Order property to specify the order in which the previous task’s outcomes are evaluated for purposes of determining which arrow to follow.
Configuring a Planning and Zoning Human Task to Reference the Assigned Planner Value
If you want to assign the user to a human task, you need to have first setup the Transaction Connector to use the getTransactionAssignee operation.
For more information on setting up the Transaction Connector, see Setting Up the Transactions Connector.
To associate the transaction assignee data to your workflow process:
When configuring the workflow process data object, create a data object to store the output of the service call to getTransactionAssignee.
Locate the first human task in the process after the service call (Start event), and open the Data Association interface.
On the Input Data Association, map the assignee data object to execData.customAttributes.customAttributeString1.
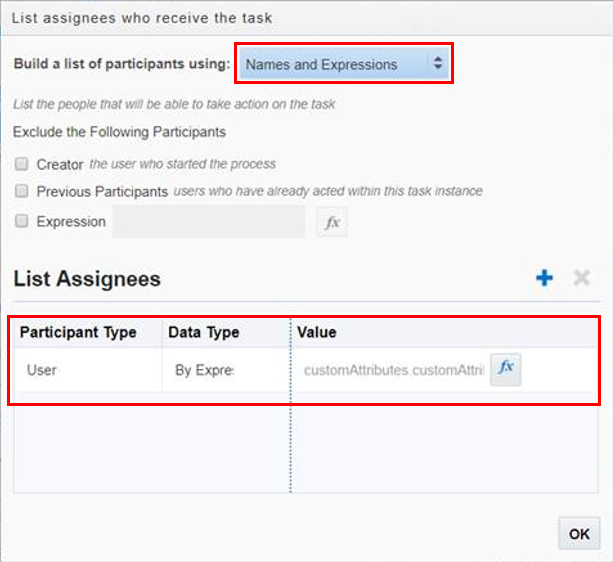
For subsequent human task to which you want to reference the assigned planner, set the Assignee(s) value in the General Properties to customAttributes.customAttributeString1.
Open the properties for the human task.
Select Implementation > General.
Click the Edit icon for the Assignee(s) field.
Select Names and Expressions in the Build a list of participants using list.
Click Add for the List Assignees edit box.,
Select Add User.
Click in the Data Type column, and select By Expression.
Click the fx button in the Value column, and select customAttributes.customAttributeString1.
Click OK.
This example illustrates the settings on the List assignees who receive the task window.
Click Save.
Implementing the Expiration Feature
If you are implementing the expiration feature for Permits or Planning and Zoning, you need to add these system tasks to the workflow process definition in Oracle Integration Cloud:
|
System Task |
Description |
|---|---|
|
Accepted |
Updates the transaction status to Accepted. This task should be placed early in the process flow. |
|
Completed |
Updates the transaction status to Completed or Certified. This task should be placed at the end of the process flow. |