Applying Branding Images
This topic describes how to include images in your branding configuration by using the Fusion Applications Appearance page to upload and store branding images, such as logo, cover image, and background image, or using the Public Sector Licensing and Permitting theme administration pages to reference other images.
Understanding Branding Images
To include images in your branding theme configuration, you use the Fusion Applications Appearance UI tool or your modify delivered theme attributes, depending on the image type. For example, for your site logo, you use the Appearance UI tool, and for the favorite icon, you include the Favorite icon attribute in your theme and reference the desired image. The following table provides a list of the images you can include and where those images are managed.
|
Administration Tool |
Image |
|---|---|
|
Appearance UI |
|
|
Public Sector Compliance and Regulation: Theme Details page
|
|
Using Theme Attributes to Include Branding Images
When using the provided theme attributes to apply images to your branding theme, you reference the image using HTTPS, or you provide a base64 encoded image.
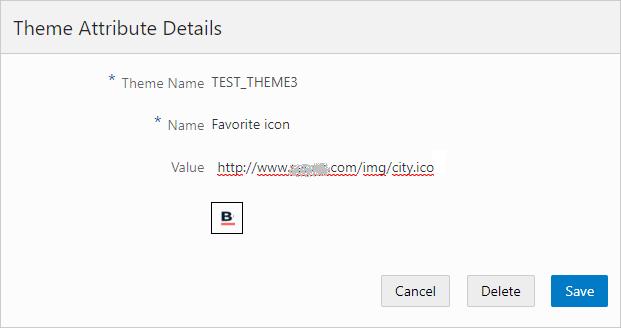
If you have your images stored in a content delivery network (CDN), for example, you can reference the image using an HTTPS reference, such as https://ursrvr.com/img/image.ico.
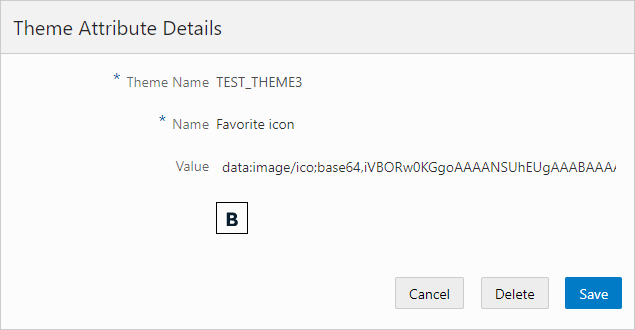
You can also provide a base64–encoded image using a DATA reference, such as data:image/ico:base64,<encoded image>.
Using the Fusion Application Appearance UI Tool to Upload and Store Images
You use the Oracle Fusion Application Appearance page to upload and store the branding images that you will use for your Public Sector Cloud services. The Public Sector Cloud service, retrieves the uploaded images from the Appearance page at runtime. No other branding attributes, other than the specific branding images discussed in this topic, are retrieved from the Appearance page.
This example illustrates the images you can upload using the Fusion Applications Appearance page.
|
Image |
Description |
|---|---|
|
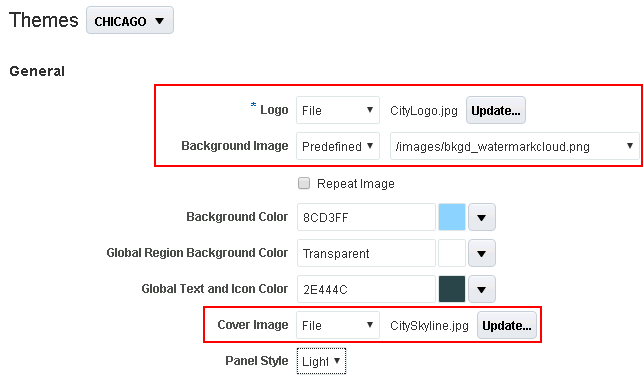
Logo |
Unique logo for your municipality, which appears in the top left of the header for large form factor devices, such as desktop computers and laptop computers. Note: The logo does not appear
in the header for small form factor devices, such as smartphones.
Note: A logo image should
not exceed a height of 50 px or a width of 200 px.
|
|
Background Image |
Defines the background color of the content area of selected pages in Public Sector Compliance and Regulation services. Note: For the current release,
only the Apply for Permit page uses the background image.
|
|
Cover Image |
On a homepage, the cover image spans the page from side-to-side, just below the header, as a banner image. Typically, this image depicts scenic views of the municipality, such as the skyline, an iconic neighborhood, and so on. Note: The cover image should
be 200 px in height. Images exceeding 200 px in height will not display
the full image, while images under 200 px in height will display empty
space (black) in the area between the current image height and 200
px.
|
When using the Appearance page to upload images for your Public Sector Cloud service, make sure to keep these items in mind:
The Appearance page is used only for uploading the logo, background image, and the cover image.
No other branding attributes in the Appearance page are referenced by Public Sector Cloud.
To create or modify a theme in the Appearance page requires you to first create a sandbox.
The name of the theme to which you add the Public Sector Cloud branding images in the Appearance page, must exactly match the name of the corresponding theme name in Public Sector Cloud. For example, if your theme in Public Sector Cloud is CHICAGO, then the theme to which you add images to in the Appearance page must also be CHICAGO, using the same spelling and case.
You do not need to set the theme as active by applying the theme from the Appearance page. However, you need to publish the sandbox containing the new themes or theme updates, from the Appearance page in order to make the theme or theme updates available to your Oracle Permitting and Licensing service.
If you leave the sandbox unpublished and open using the same user ID used to create intake forms in the Intake Form Designer, you may experience issues saving data in the Intake Form Designer.
Accessing the Appearance Page from Public Sector Cloud
To access the Appearance page from your Oracle Permitting and Licensing service:
Select
On the Manage Themes page, open the theme for which you want to view or add branding images.
On the Theme Details page, click the Upload Branding Images link.
This takes you directly to the Themes tab in the Appearance configuration tool
To access the Appearance page from within Fusion Applications:
Click the Navigator button in the global header.
Select Appearance, under Configuration.
Activating a Sandbox
On the Appearance page on the Themes tab, click the Go to the Manage Sandboxes Page link.
On the Sandboxes page, click Create Sandbox.
On the Create Sandbox page, enter a Name and Description, and select Appearance as the tool.
Click Create and Enter.
After activating a sandbox, select Navigator and select Appearance to return to the Appearance page.
Creating a Theme
The theme you use in the Appearance page to store your Public Sector Cloud branding images must match exactly the name of the theme defined in Public Sector Cloud.
To create a theme:
After activating the sandbox, return to the Appearance UI and select a theme to clone by clicking the drop-down list next to the Themes page heading.
Make sure to confirm the theme you select to clone contains all of the image types you can upload, which are:
-
Logo
-
Background Image
-
Cover Image
For example, the Default theme does not contain all of these image types so don't select it to clone.
-
Click Actions, Save As.
On the Save As dialog box, deselect the Apply this theme check box, and enter the name of the corresponding Public Sector Cloud theme that will use the graphics you will be uploading with the Appearance page.
Note: The theme name must be exactly the same as the theme name defined within the Public Sector Cloud service Manage Themes page, in both case and spelling.Note: You must not apply the theme defined in the Fusion Appearance page. Public Sector Cloud services only use the Appearance page to upload and store images for internal reference at runtime. If you apply the theme from the Appearance page, that theme will become the active theme used by the Fusion applications after you publish the sandbox. The theme storing the branding images just needs to exist within the Fusion theme collection; it does not need to be applied in order for the Public Sector Cloud service to access the image attributes.
Uploading Images
To upload branding images:
In the General section of the Appearance page, modify one or all of these image types:
Logo
Background Image
Cover Image
When adding an image, select one of these options:
File: Browse and select a file from your local computer.
Predefined: Select a file from the list of predefined images delivered by Oracle.
URL: Enter a full URL for the logo or the watermark.
Publish Your Changes
Items in a sandbox can’t be accessed or referenced at runtime until you publish the sandbox.
To publish your changes:
When you have uploaded the desired images, click the sandbox banner at the top of the browser window.
On the Sandbox Details page, review the list of changes, and click Publish.
Return to your Public Sector Cloud service, and review your changes.