Submitting Inspection Results
You can submit inspection results to complete assigned inspections one at a time through the inspection's detail pages or submit multiple inspections at once by selecting inspections on the Oracle Inspector mobile app home page.
Whether you complete an individual inspection by accessing the Inspection Result page from the inspection's detail page or you provide results for one or more inspections that you selected on the Inspection Tasks page, the information needed to complete the inspections before you submit the results is the same. Here's how to complete your inspections:
Review calculated inspection results or provide an overall inspection result.
Indicate whether a fee should be assessed for the inspection or inspections.
Capture the inspector, contractor, and property owner signatures.
Add inspection comments and support documents as attachments.
Submit the inspection or inspections.
Your agency determines whether comments are required in the agency-level permit options during the implementation of Oracle Permitting and Licensing. Comments can be optional, required for all results and cancellations, or required for failed results and cancellations.
Your agency decides which signatures are required for each inspection type.
Your agency can also configure the system to send out notifications when an inspection is complete or the final inspection has passed. For more information, see "Sending Notifications" in this topic.
Completing an Inspection in the Inspection Details
Here's how to complete an inspection by providing information on the inspection's Inspection Detail page:
-
On the Inspection Tasks page, click inspection you would like to complete.
-
Click the Result button on the Inspection Detail page.
Before you can provide the overall inspection result, you must provide results for the checklists and resolve conditions on the permit.
Enter the information required to submit the inspection on the Inspection Result page.
This example on a phone illustrates the Inspection Result page, which is described in the table that follows. The inspection results are complete with the required signature, but not submitted. The option to assess a fee is active.
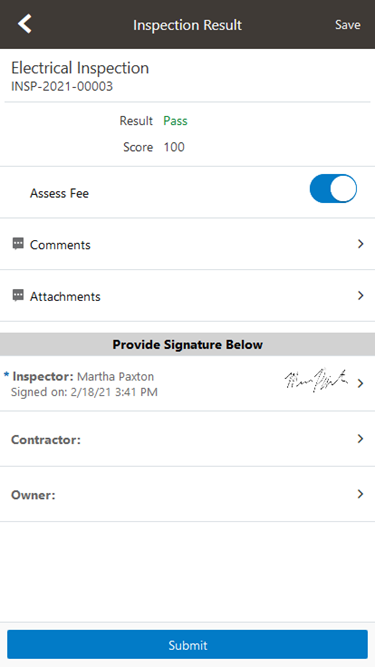
Elements on the Inspection Result page
Page Element Description Result
Depending on the method used to calculate the results, the system may automatically calculate the final result based on checklist results or you can select a passing or failing result.
Assess Fee
Turn on the Assess Fee switch to indicate that a fee should be assessed. If fee assessment is configured by your agency and this switch is turned on, the system calculates the fee and charges it back to the permit applicant when you submit the inspection. For more information, see the "Assessing Fees" section in this topic.
Comments
Click to add comments.
Attachments
Click to add attachments.
Signatures section
Click the row for Inspector, Contractor, or Property Owner to access the field for adding a signature. Click Save to submit the signature. You must also add the names of contractors and property owners when they add their signatures.
- Click Submit. Note: You can’t submit a completed inspection if required comments or signatures are missing.
Completing Multiple Inspection Tasks
Inspectors and inspector supervisors can provide results for multiple inspections from a central location in the Oracle Inspector mobile application without first navigating to the inspection details page then to the Inspection Result page for each inspection.
Here's how to provide results for multiple inspections:
-
On the Inspection Tasks page, click the Selected Inspections icon:

-
Select the check boxes for the inspections that you want to provide results for.
You can only provide results for inspections that are assigned to you or you have the appropriate permissions. The inspections must also meet the requirements listed here:
-
The inspection status isn't completed or canceled.
-
The inspection checklists already have results, if they have checklists.
-
The permits don’t have conditions like Prevent Inspection Result or Prevent Final Inspection applied to them.
-
Prerequisite inspections, if any, are already complete with passing or corrected results.
-
For final inspections, all other required inspections are complete with passing or corrected results.
If an inspection doesn't meet all of these requirements, you can't select it. The number of selected inspections is displayed.
-
-
Click Result Inspections.
-
View the inspections you've selected on the Result Inspections page. Here you have a choice:
-
You can complete the result for each inspection on the Result Inspections page directly without going into each individual inspection. In this case, you can provide a different result for each inspection. You can also provide comments, attachments, and signatures, and turn on the assess fee option.
You can apply the same result, inspector signature, and assess fee option to all of the selected inspections at one time by clicking Result All. However, the result you select here will not override the system-calculated result for inspections using the scoring method.
This example illustrates the Result All modal page where you select the results that you want to apply to all of the selected inspections.
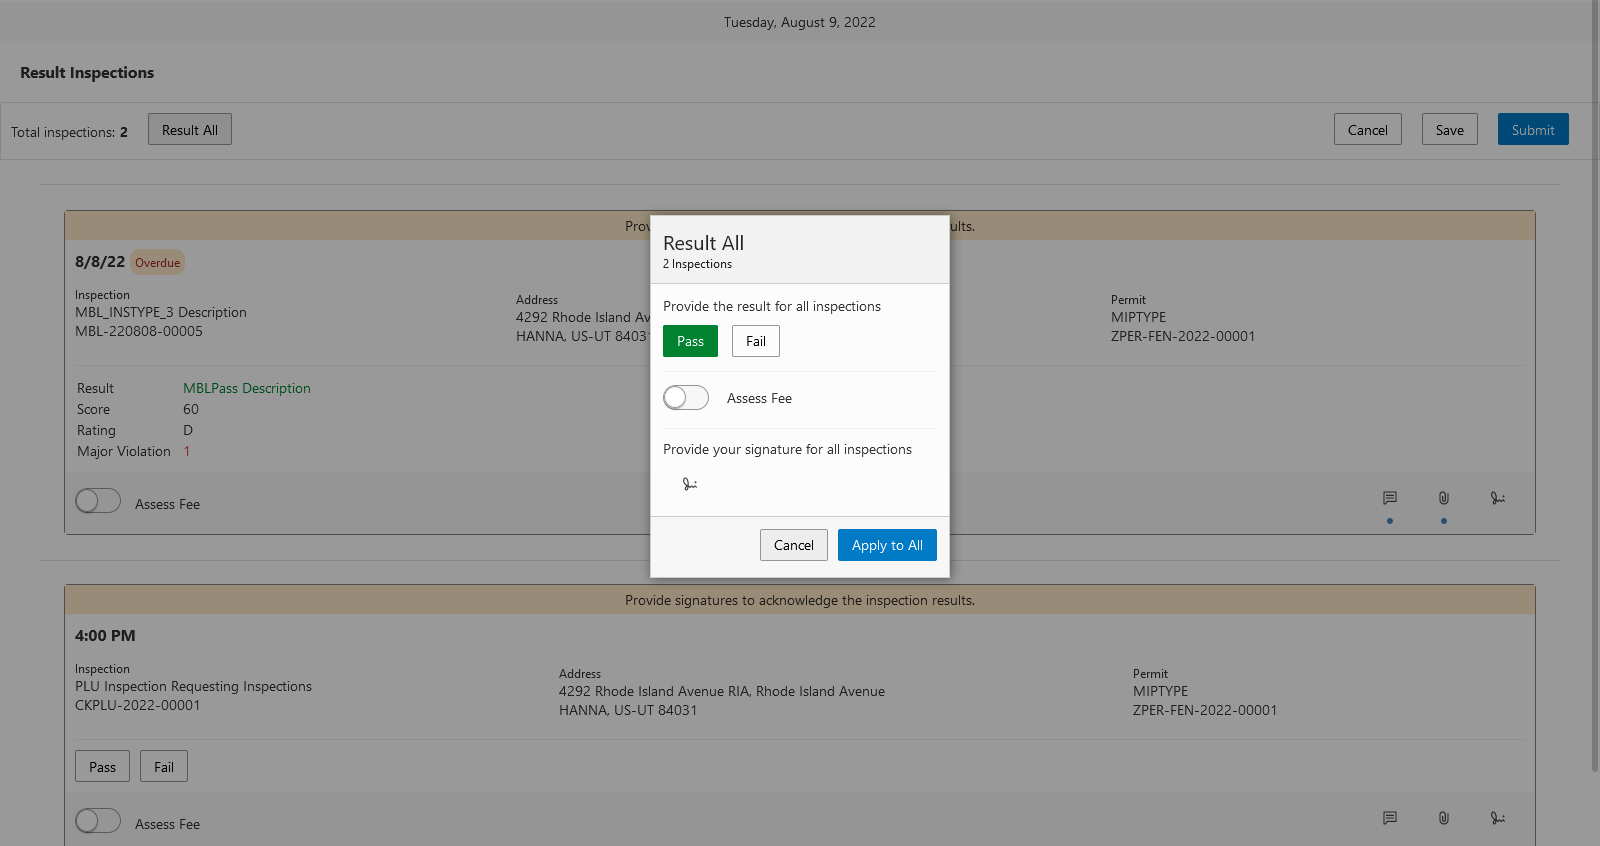
This table describes the elements on the Result Inspections page and on the Result All modal page that appears when you click Result All.
Elements on the Result Inspections page and Result All modal page
Page Element Description Result
Depending on the method used to calculate the results, the system may automatically calculate the final result based on checklist results or you can select a passing or failing result.
On the Result All modal page, you can select a passing or failing result that is applied to all of the inspections on the Result Inspections page. This option overwrites any existing results that have been calculated, but will not override the system-calculated result for inspections using the scoring method.
Assess Fee
Turn on the Assess Fee switch to indicate that a fee should be assessed. If fee assessment is configured by your agency, the system calculates the fee and charges it back to the permit applicant when you submit the inspection. For more information, see the "Assessing Fees" section in this topic.
The switch on the Result All modal page applies fee assessment to all of the inspections on the Result Inspections page.

Click the Add Signatures icon on the Result Inspections page to enter Inspector, Contractor, or Property Owner signatures. You must also add the names of contractors and property owners when they add their signatures. Click Show Signatures, which is the same icon displayed with a dot under it, to show the added signatures.
You can provide only the inspector signature for all inspections on the Result Inspections page using the Result All modal page.

Click the Add Comments icon to enter comments. Click the same icon with a dot under it to show the added comments. You can't add comments on the Result All modal page.

Click to add attachments. Click the same icon with a dot under it to show the added attachments. You can't add attachments on the Result All modal page.
-
-
Click Submit. You must submit the results and inspection information that you provided on the Result Inspections page or Result All modal page to complete the inspection.
Note: You can’t submit completed inspections if required comments or signatures are missing.
Assessing Fees
Your agency may enable you to indicate that a fee should be assessed based on the inspection results for a specific inspection type. If fee assessment is configured by your agency and you turn on the Assess Fee switch, the system calculates the fee and charges it back to the permit applicant when you submit the inspection. For example, if you fail a plumbing inspection and a reinspection is required, you may want a fee to be assessed for that inspection. Your agency must set up the inspection type and Business Rules Framework to assess fees. For more information, see Setting Up Inspection Types and Setting Up Add Fee Actions.
Fee assessment indicators appear on the Inspection Detail page in the mobile application and on the Inspection Detail page in the permit details on a desktop.
Sending Notifications
Your agency can configure communications for events such as Inspection Complete and Final Inspection Passed to send notifications. The communication template in the configuration determines who receives the notification, such as the inspector, agency staff, the applicant, or contacts with application access.
The Inspection Complete event generates a notification when the inspector completes an inspection and submits the inspection results or when inspections are updated from Scheduled to Completed status. The template for this event can include a variety of information, including an overview of the inspection status change and the result of the inspection, whether it passed or failed.
The Final Inspection Passed event generates a notification when you submit the final inspection for a permit with a passing result. The notification may go to the permit technician, applicant, or contacts with application access, depending on the communication template setup.
Your agency determines whether the notifications are sent by email or online notification when the user logs into the permits service.