Reconciling Cashier Sessions
Agency staff adjust and reconcile cashier sessions on the Reconcile Cashier Session page.
Agencies that collect payments must reconcile the money collected in the form of cash and checks at the end of each cashier session. On the Reconcile Cashier Session, agency staff can:
Reconcile recorded and actual payment amounts.
Print a cashier session reconciliation report.
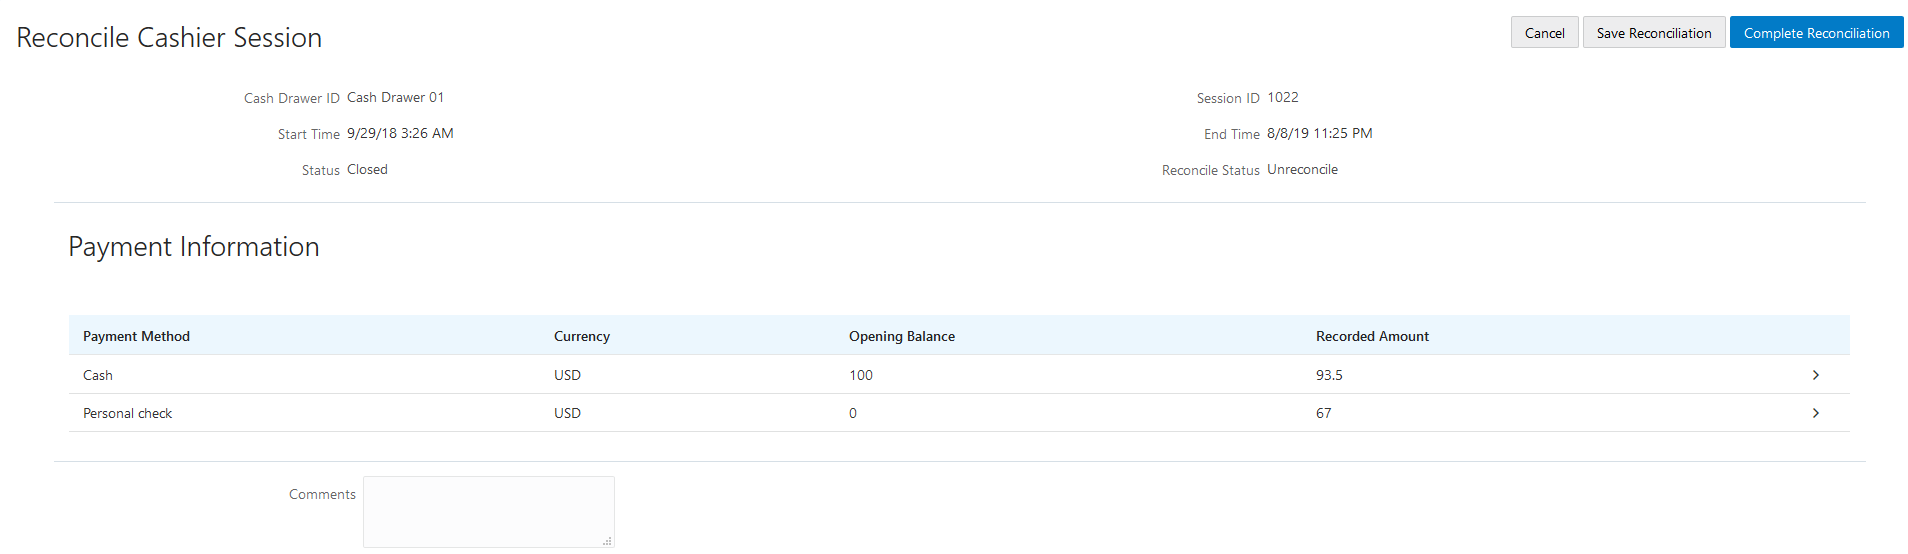
This example shows the Reconcile Cashier Session page.
Reconciling Recorded and Actual Amounts
Select in the Navigator.
Click the row for the cashier session that you want to reconcile.
Note: You can view payment information for open cashier sessions on this page, but a cashier session must be closed before you can reconcile recorded and actual amounts. For more information on closing cashier sessions, see Working with Cashier Sessions.Click the row for the payment method that you want to reconcile to access the Payment Details page.
This example shows the Payment Details page.
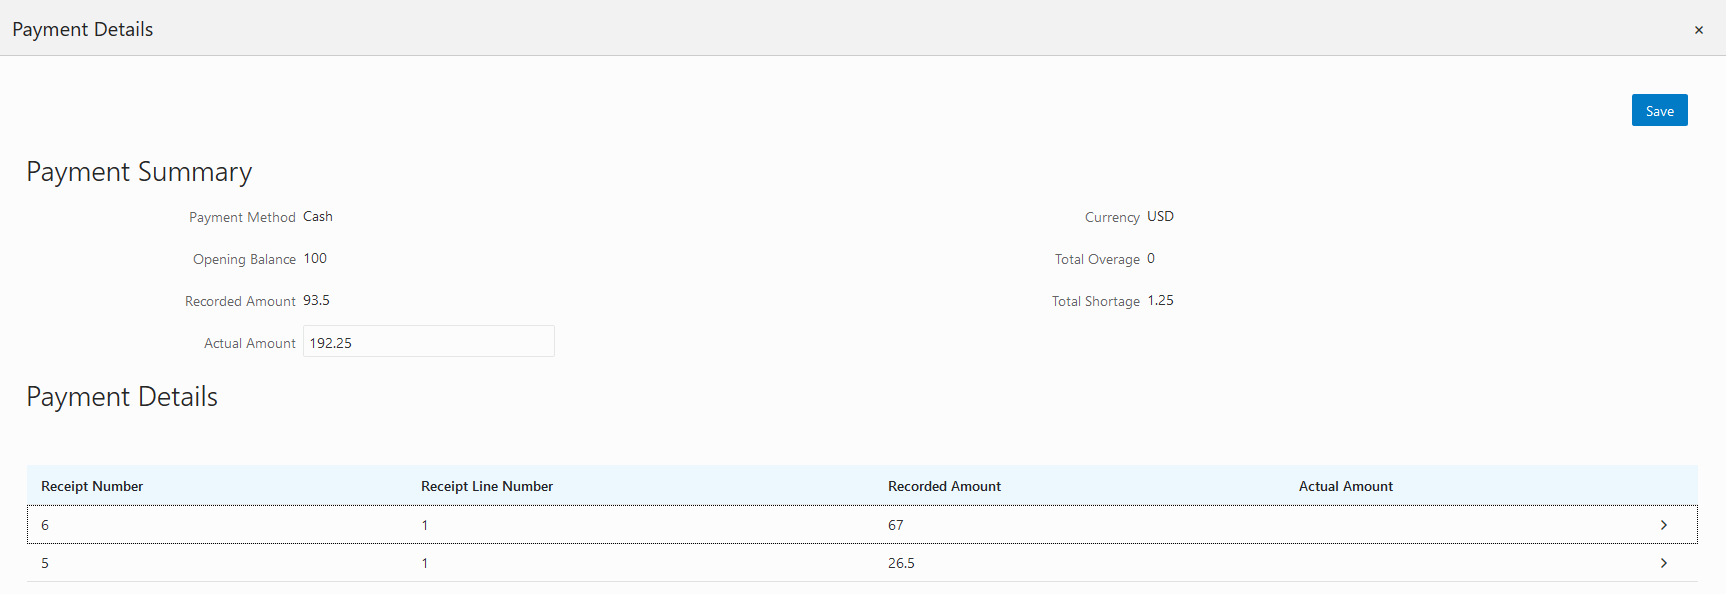
Click a row for a receipt to make changes to the payment information. For cash payments, you can enter comments, but you can’t edit any other payment information. For checks, you can edit the following payment information fields:
Page Element
Description
Payment Method
Select between Personal check and Cashier check.
Actual Amount
Typically this is the same as the recorded amount, but in the event that the check was written for a different amount, enter that actual amount here.
Check Number, Check Date, Payer Name, and Address
Update the check and payer information.
Comments
Enter any comments you want to add about the check payment.
Click Save.
On the Payment Details page, enter the actual amount for the cashier session for all receipts for the payment method. After you enter a value in the Actual Amount field, the page displays any overages or shortages in the Total Overage and Total Shortage fields.
Click Save.
On the Reconcile Cashier Session page, enter any comments you want to add for the entire cashier session and click Save Reconciliation to save all the changes you made for the cashier session.
Click Complete Reconciliation. This changes the status of the cashier session from Unreconciled to Reconciled. In addition, the Save Reconciliation button is replaced by the Print Report button, and the Complete Reconciliation button is replaced by the Generate Event button.
Note: Once you complete a reconciliation for a cashier session, you can’t reopen it or make any adjustments to the session.
Printing a Cashier Session Reconciliation Report
Select in the Navigator.
Click the cashier session row for which you want to print a reconciliation report.
Complete the reconciliation for the cashier session if you haven’t already. You can print reconciliation reports only for sessions with a Reconcile Status of Reconcile.
Click Print Report. The generated report opens in a separate browser tab.
Note: If your browser has a pop-up blocker, make sure it allows pop-up windows from the URL associated with Oracle Permitting and Licensing.The Cashier Session Reconciliation report requires the definition of a parameter with the following values:
Page Element
Value
Parameter ID
1
Parameter Name
P_RECONCILE_ID
Parameter Data Type
String
For more information on defining parameters for reports, see Setting Up Reports.
Generate Accounting Entries for Reconciliation Overages and Shortages
Select in the Navigator.
Click the cashier session row for which you want to generate an accounting entry.
Complete the reconciliation for the cashier session if you haven’t already. You can generate accounting entries only for completed reconciliations that result in an overage or a shortage.
- Click Generate Event to generate an accounting entry for the overage or shortage.Note: To successfully create accounting entries for cashier reconciliation overages and shortages, you must first create accounting rules for them. For more information on setting up accounting rules, see Setting Up Accounting Rules.