Reviewing a Sample Process Definition
A process definition provides a defined flow for processes such as the transaction lifecycle of a permit. This flow can include system tasks, human tasks, and decision gateways. You define your flow using the Process feature in Oracle Integration Cloud (OIC). The Process feature provides a visual design environment to help you create easily understood workflow process definitions.
Let’s look a a sample process definition for a building permit.
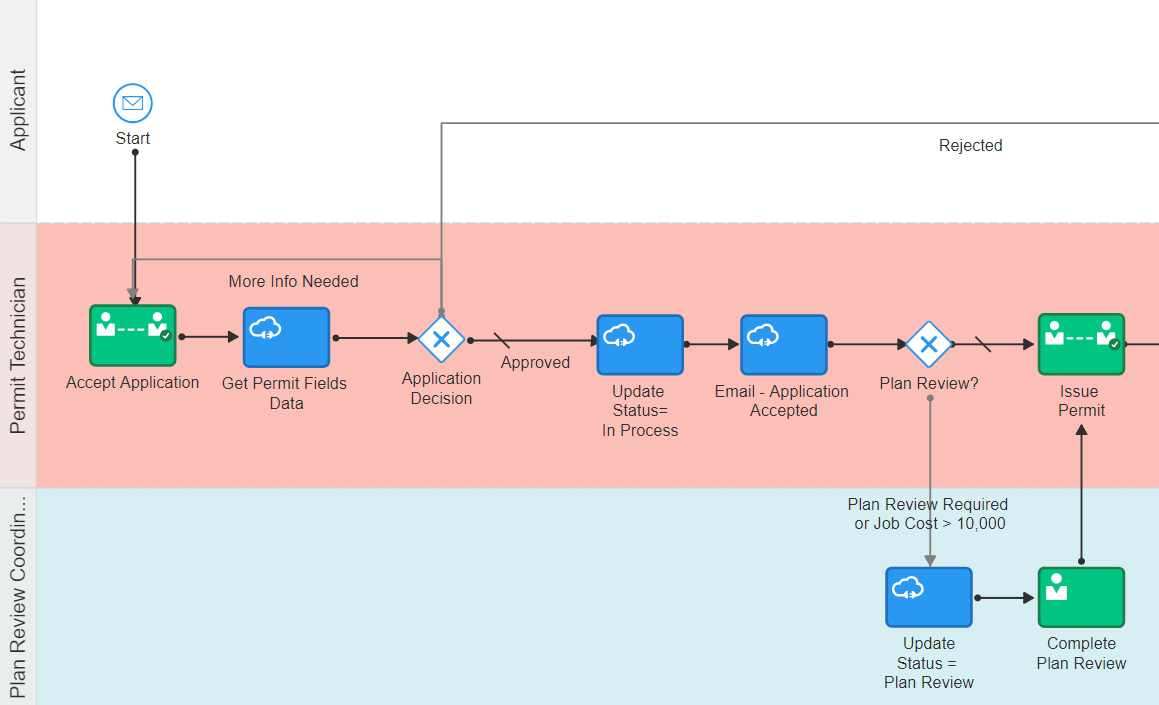
This image shows the first half of the sample process, from the time the permit is submitted until it is issued.
The following table identifies the types of objects shown in the illustration:
|
Object |
Description |
|---|---|
|
Swimlanes |
Horizontal bands in the process map represent the roles involved in the process. |
|
Start and End Events |
All paths through the workflow process must begin at the Start event and finish at the End event. |
|
Human tasks |
Green boxes with an image of a person represent tasks that are performed by humans. |
|
System tasks |
Blue boxes with an image of a cloud represent tasks that the system performs. |
|
Gateways |
White diamonds represent decision points, where the process flow can branch based on criteria you define. |
|
Arrows |
One-directional arrows define flows through the process. Gateways are the only objects that have multiple exit arrows. The exit arrow with a slash through it represents the default option after a gateway. All other exit arrows contain business logic for defining the conditions when the arrow is used. |
With these definitions in mind, let’s look at the sample process flow:
Start: The process starts when a permit application is submitted, which sends a message to OIC to instantiate the workflow process.
Accept Application: A human performs the task of accepting the application and selecting a task status that represents the task outcome.
Get Permit Fields Data: This system task retrieves permit field data to be used later in the process, when it’s time to determine whether a plan review is required.
Application Decision: Exit arrows from this gateway determine the next step based on the outcome of the Accept Application human task.
If more information is needed, the application acceptance task is reinstantiated. This loop continues until the task has a different outcome.
If the application is rejected, a system task updates the permit status to Denied, then another system task sends the applicant an email notification that the permit was denied, then the process ends.
If the outcome is anything else, the process continues.
Update Status = In Process: This system task updates the permit status to In Process.
Email - Application Accepted: This system task notifies the applicant that the permit was accepted.
Plan Review: Exit arrows from this gateway determine the next step based on the outcome of the Accept Application task and based on the job cost that was retrieved by the Get Permit Fields Data task:
If the Accept Application outcome indicates that a plan review is required, or if the job cost is greater than 10,000, the Update Status = Plan Review system task updates the permit status to Plan Review, then a human completes the Complete Plan Review human task. When the Complete Plan Review is complete, the process continues.
If a plan review is not required, the process continues.
Issue Permit: A human performs the task of issuing the permit and enters a task status that represents the task outcome (whether the permit was issued or rejected).
The following image shows the remainder of the sample workflow, after a human completes the Issue Permit task.
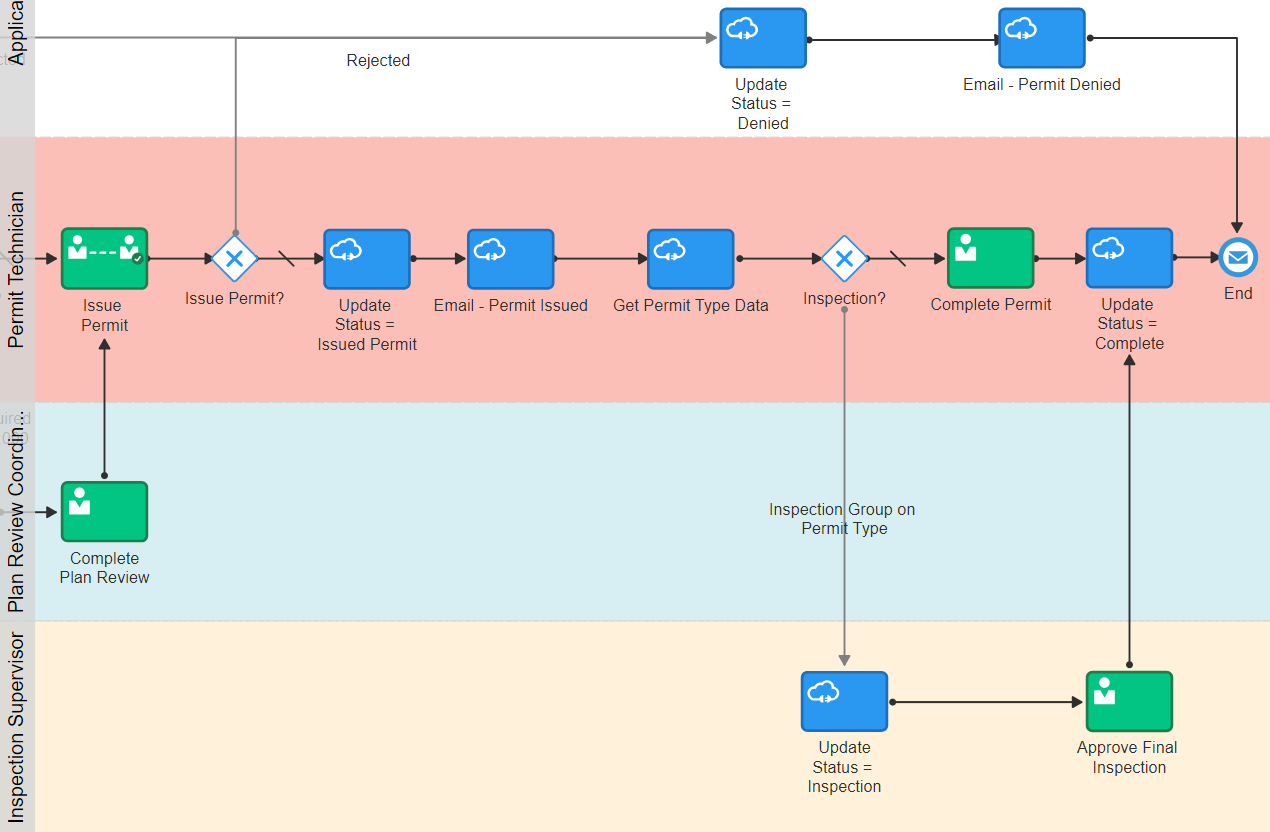
These steps describe the remainder of the workflow process, after the human task for issuing a permit:
Issue Permit: Exit arrows from this gateway determine the next step based on the outcome of the task for issuing a permit:
If the permit is rejected, the Update Status = Denied This system task updates the permit status to Denied, then the Email - Permit Denied system task notifies the applicant that the permit was denied, then the process ends.
If the outcome is anything else, the process continues.
Update Status = Issued Permit: This system task updates the permit status to Issued Permit.
Email - Permit Issued: This system task notifies the applicant that the permit was issued.
Get Permit Type Data: This system task retrieves permit type information for use in determining whether an inspection is needed.
Inspection: Exit arrows from this gateway determine whether an inspection is needed:
If the permit type includes an inspection group, the Update Status = Inspection system task updates the permit status to Inspection. A human then completes the Approve Final Inspection task and enters the task outcome. The process then continues.
If an inspection is not required, a human performs the Complete Permit task and enters the task outcome. The process then continues.
Update Status = Complete: this system task updates the permit status to Complete.
The process ends.