Making Payments
Registered users can pay fees online using a central payment page and checkout process. The Make a Payment page is used to list applications with fees where the registered users can review and select them before making a payment. Agency staff have the Make Payments page to process payments for multiple applications on behalf of registered users.
The Make a Payment page lists the applications associated with the logged in user and are due for fee payment. Registered users can review the details, select items, and make payment.
Registered users include applicants and contacts. Contacts can be primary and others. For more information, see Managing Transactions. For business license transactions, see Managing Business License Transactions.
Registered users can also make payments from an application's Fee and Payments page.
Agency staff can use the Make Payments tile on the Agency Springboard to access the Make Payments page. They can process payments for multiple applications from the Make Payments page. They can make payments on behalf of registered users from the agency’s Transactions list page. In such cases, they see the applications on their Applications page, as well as on the Make Payment page.
For information about fees payment from the registered public user's Applications page or from the agency staff's Transactions page, see Managing Transactions and Managing Business License Transactions.
For information about fees payment from the application's Fees and Payments page, see Working with Fees and Payments.
Viewing Fees from the Registered User Landing Page
The Make a Payment icon appears in the global header when a registered user logs in. The number of applications with fees for payment, if any, appears on the icon:
This example illustrates the Make a Payment icon showing 10 applications with fees for payment.
The number of applications as well as the amount due for the applications appears on the Make a Payment banner:
This example illustrates the Make a Payment banner.

Clicking the icon or the Make a Payment button opens the Make a Payment page, which lists the applications with fees that are awaiting payment or payment is in process.
Registered Users - Making Payments
The system initially applies fees to the user's account when an application is submitted. Later fees may be adjusted or added. When fees for an application are due, the registered users can review and select the applications for payment on the Make a Payment page. Fees not selected for payment remain on the page.
Fee adjustments are automatically reflected on the page before checkout processing.
This example illustrates the Make a Payment page.
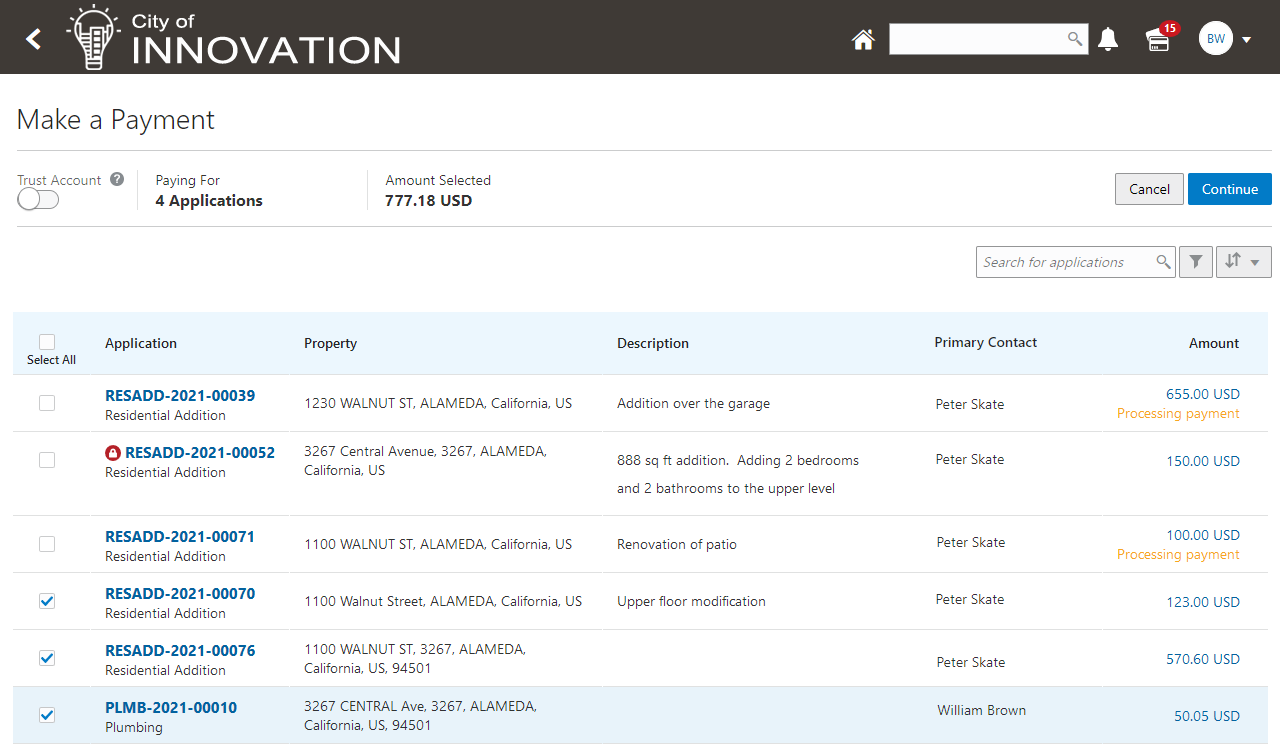
Here's how to use the Make a Payment page:
|
Page Element |
Description |
|---|---|
|
Trust Accounts |
Turn on this switch to select a trust/deposit account from the Account drop-down menu, to make the payment. Note: When a
trust/deposit account is selected, only those applications
are displayed for which payment can be made using the
selected trust/deposit account.
|
|
Select All/Deselect All |
Select the check box to select or deselect all applications. The check box can't be selected when the system is processing payment for an application or a condition preventing payment is applied. The Total Selected field above the grid shows the number of applications selected and the total amount due for the selected applications. |
|
Application |
Each item on the page is identified by the application number. Click the application number to open the overview page with the application summary and access to details. The type of application, such as Residential Addition, appears under the application number. If a condition to prevent payment has been applied to the application, a condition icon appears next to the application ID. For more information about conditions, see Applying Conditions to Applications. |
|
Property |
View the location of the property for the application. |
|
Description |
View a description of the application. |
|
Primary Contact |
View the primary contact for the application. For information on how to add contacts and change the primary contact, see Working with Application Contacts. |
|
Amount |
View the total fees for the application. Click the fee amount link to open the Fee Detail page, which shows a breakdown of the fees. |
|
The Balance Changed alert indicates the fees for the application have been adjusted. Adjusted fees are updated automatically before checkout processing. |
|
|
Cancel |
Click to cancel and go back to the home page. |
|
Continue |
Click to access the Trust Account Payment page to continue with the payment. |
Registered users can't make any changes to the application and associated fees submitted for payment during processing. After the payment processing is complete, the applications are removed from the list, and the system directs the user back to the page where the payment was initiated. If there are no more fees left after a successful payment, the user is directed to their Applications page. If the payment fails, the applications remain on the Make a Payment page and can be updated or resubmitted for payment.
For information about incomplete payments, see Working with Fees and Payments.
Agency Staff - Making Payments
Agency users have a Make Payments tile on their Agency Springboard page. Using this tile they can access the Make Payments page to make payments for single or multiple applications on behalf of registered users.
For an agency user to make payments on behalf of registered users:
-
From the Agency Springboard, select the Make Payments tile.
-
On the Select Customer pop-up window, select a customer.Note: When a customer is selected, the system loads the payment cart of the selected customer and displays all transactions that the customer can make as a registered public user.
-
On the Make Payments page, select the checkboxes to choose the applications to make payments.
-
Click Continue.
-
Review the Checkout page, which lists the different payment methods available, such as cash or credit card.
-
Select one of the payment methods for payment processing.
Depending on the payment service being used, the payment steps differ.
After successful payment, the agency user is returned to the page where the payment was initiated. The fee item records are now updated.
|
Page Element |
Description |
|---|---|
|
Customer Name |
Displays the name of the customer currently chosen to make the payments for. |
|
Change Customer button |
Click to choose a different customer. |
|
Select All/Deselect All |
Select the check box to select or deselect all applications. The check box can't be selected when the system is processing payment for an application or a condition preventing payment is applied. The Total Selected field above the grid shows the number of applications selected and the total amount due for the selected applications. |
|
Application |
Each item on the page is identified by the application number. Click the application number to open the overview page with the application summary and access to details. The type of application, such as Residential Addition, appears under the application number. If a condition to prevent payment has been applied to the application, a condition icon appears next to the application ID. For more information about conditions, see Applying Conditions to Applications. |
|
Property |
View the location of the property for the application. |
|
Description |
View a description of the application. |
|
Primary Contact |
View the primary contact for the application. For information on how to add contacts and change the primary contact, see Working with Application Contacts. |
|
Amount |
View the total fees for the application. Click the fee amount link to open the Fee Detail page, which shows a breakdown of the fees. |
|
Cancel |
Click to cancel and go back to the home page. |
|
Continue |
Click to access the Trust Account Payment page to continue with the payment. |