Setting Up Business Rule Criteria
This topic describes how to create logical expressions as the criteria for rules in the Business Rules Framework.
Understanding Criteria
Criteria are logical statements comprised of these elements:
-
A criteria field to evaluate, selected from the underlying resource.
-
An operator, such as equals, not equal to, greater than, and so on.
-
A comparison field value.
-
Grouping verb, such as AND or OR to link criteria statements and criteria groups.
You can add criteria using these modes:
-
Simple: The criteria and criteria groups exist on a single level (no nesting) within a drag-and-drop user interface.
-
Advanced: The criteria and criteria groups can contain multiple, nested levels where you can create more complex logic using a more free-form text approach.
The attributes you can include in your criteria can come from a variety of sources.
|
Criteria Source |
Description |
|---|---|
|
Event resource |
Each event is associated with a specific resource, or business object, containing numerous attributes. |
|
Transaction type |
You can include the fields from permit types, planning and zoning applications, business license types, and code enforcement sub issue types. The attributes you can select include user-defined fields and field group fields. |
|
Reusable fields |
Fields you've set to be reusable across multiple intake forms in the Intake Form Designer. |
|
Predefined fields |
Fields delivered by Oracle Permitting and Licensing, like Job Cost. Note: Predefined fields is supported for
Permits only.
|
|
Map Layer Content |
Attributes from a GIS map layer. Note: Map Layer Content isn't supported
for Code Enforcement.
|
Adding Criteria in Simple Mode
Select the Simple tab to add criteria in simple mode.
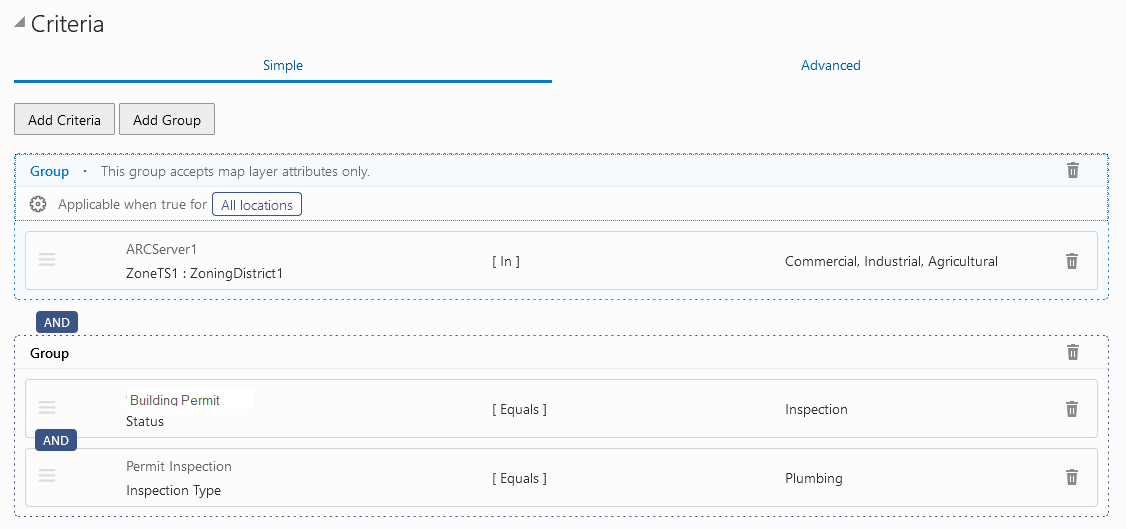
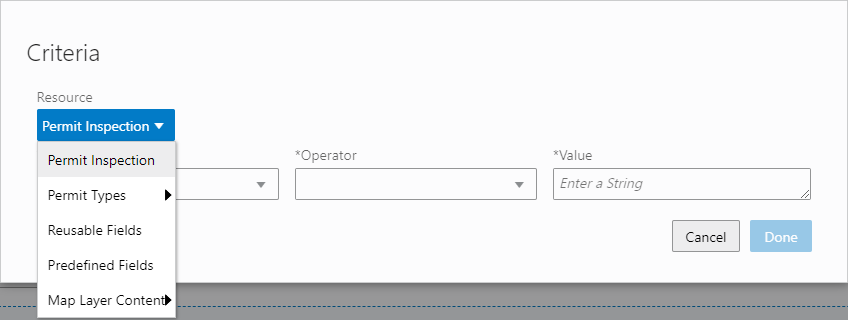
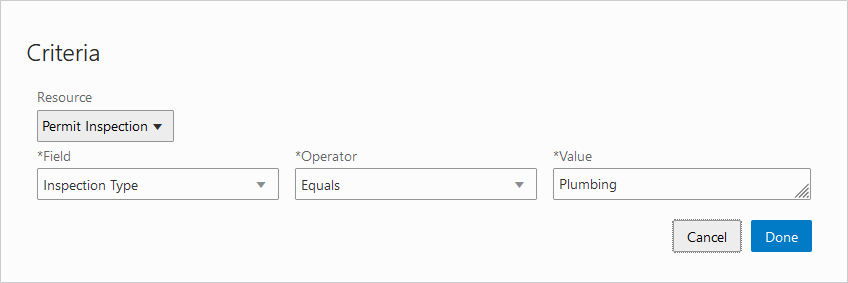
When you click Add Criteria, the Criteria dialog box appears. The controls on the Simple tab and the Criteria dialog box are described in the following table.
Use the Resource drop-down list to select the source of your criteria attributes.
With the resource selected you can select attributes from the Field drop-down list from that resource for your criteria.
|
Page Element |
Description |
|---|---|
|
Add Criteria |
Click to add a criteria statement within a criteria group. A row of criteria must be contained within a criteria group. If there isn't already a criteria group, the system adds a criteria group automatically. Until you add an additional criteria group, you continue to add criteria statements to the current criteria group. To modify a criteria statement, click on it to display the Criteria dialog box. |
|
Add Group |
Click to add additional groups of criteria. When you add a criteria group, it appears at the top of the criteria groups (the first criteria group). |
|
Resource |
Use the Resource drop-down list to select the source of your criteria attributes, which can be:
Note: The resources available to select
depend on the features you've setup and the offering. For example, if you
haven't set up reusable fields in the Intake Form Designer, the Reusable Fields option won't
appear in the Resource list.
|
|
Field |
Select the criteria field from the resource. |
|
Operator |
Select from the available comparison operators to specify how the entered value must relate to the criteria field. Note: Depending on the field’s data type,
the list of operators changes to show only those that apply.
Operators include:
The Before (time) and After (time) operators enable you to set a specific time in the day, such as 1:30 PM and to check before and after that time. You can also define multiple periods throughout a day. For example: (After (time) 8:00 AM AND Before (time) 10:00 AM) OR (After (time) 1:00 PM and Before (time) 3:00 PM). Note: The time used by the business rule
is determined by the agency's default timezone.
|
|
Value |
Enter the comparison value for the selected criteria field. |
  |
Select AND or OR as a grouping verb. The default is AND. Click the icon to toggle between AND and OR. |
|
Click and hold the drag and drop icon to select a criteria statement to move within the current group or to move to a different group. |
|
|
Use to remove entire criteria groups or single criteria statements. |
Working with GIS Map Layer Criteria

When working with map layer criteria, keep these items in mind:
-
Map layer attributes must be in their own criteria group, with only other map layer attributes. You can't add map layer criteria to other types of criteria groups nor can you add non-map layer criteria attributes to a map layer criteria group.
-
Use the Applicable when true for option to toggle between All locations or At least one location or to add flexibility to your logic if needed.
-
Any changes that you make GIS mapping attributes or the map layer content, such as disabling or removing attributes will affect your business rules at runtime. If you intend to make changes to your GIS configuration outside of the Business Rules Framework, you should review any business rules that include any changed GIS attributes as criteria and remove the criteria from the affected rules before changing the GIS mapping attributes or Map Layer Content field group in the Intake Form Designer.
For more information on mapping GIS attributes, see Setting Up GIS Attribute Mapping.
For more information on the Map Layer Content field group, see Using Predefined Field Groups.
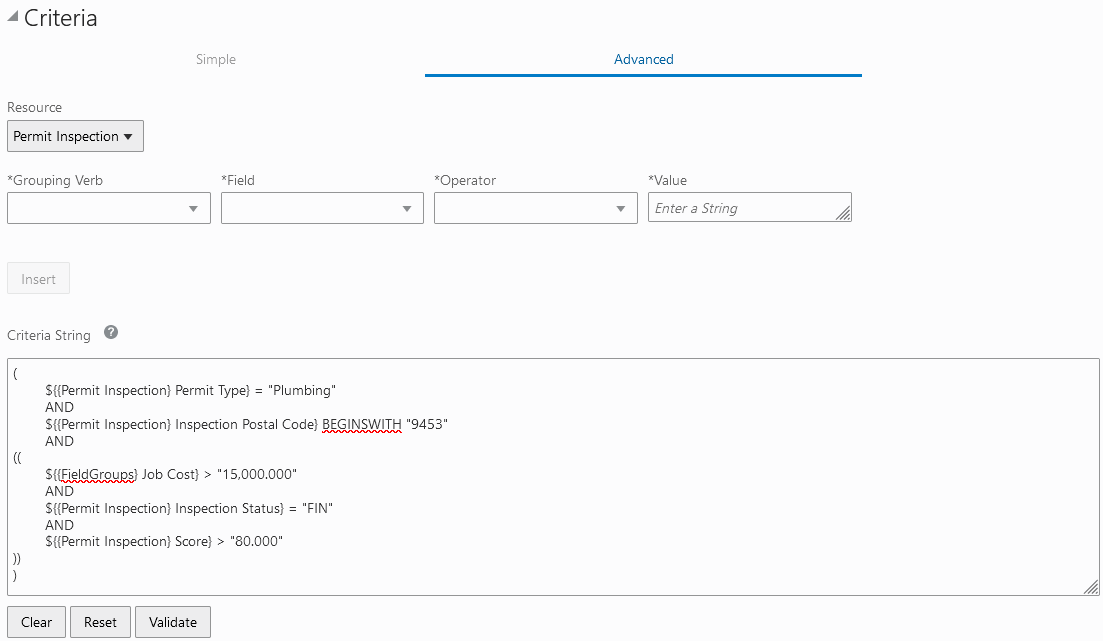
Adding Criteria in Advanced Mode
Select the Advanced tab to add criteria in advanced mode. Use advanced mode to construct criteria that requires multiple levels of nested criteria statements.
On the Advanced tab you can take a more free-form approach to creating criteria. To add criteria, you can:
-
Use the "Criteria Builder" fields at the top to select the parts of a criteria statement, and click Insert.
This approach is recommended to help you adhere to valid formatting.
-
Write your criteria manually in the Criteria String edit box.
-
Use a combination of both approaches.
|
Page Element |
Description |
|---|---|
|
Resource |
Use the Resource drop-down list to select the source of your criteria attributes, which can be:
|
|
Grouping Verb |
Select AND or OR or to include a logical grouping operator. Except for the first criteria statement, you must add a grouping verb for all criteria statements. |
|
Field |
Select the criteria field from the resource. |
|
Operator |
Select from the available comparison operators to specify how the entered value must relate to the criteria field from the resource. Note: Depending on the field’s data type,
the list of operators changes to show only those that apply.
The Before (time) and After (time) operators enable you to set a specific time in the day, such as 1:30 PM and to check before and after that time. You can also define multiple periods throughout a day. For example: (After (time) 8:00 AM AND Before (time) 10:00 AM) OR (After (time) 1:00 PM and Before (time) 3:00 PM). Note: The time used by the business rule
is determined by the agency's default timezone.
|
|
Value |
Enter the comparison value to the criteria field from the resource. |
|
Criteria String work area |
The work area where you add, edit, and structure your advanced criteria string. |
|
Clear |
Click to remove all criteria from the work area. |
|
Reset |
If you've just switched to the advanced mode from simple mode, click to reset the criteria to the initial state in simple mode, prior to selecting the Advanced tab. If you've been working and saving in advanced mode, Reset returns your criteria to the state of the last save. Once you edit the criteria string directly, the Simple tab is disabled. To enable it, click Reset. |
|
Validate |
Click to validate the criteria. You can't save the criteria until the validation result is Success. When there are validation errors, a message box displays to indicate the formatting issue. |
Formatting Advanced Mode Criteria
To save your advanced mode criteria, it must pass validation, which requires proper formatting. This table lists the formatting guidelines for advanced criteria.
|
Criteria Element |
Formatting Guidelines |
|---|---|
|
Part/Statement |
Each criteria statement requires:
|
|
Opening/Closing parentheses for grouping and nesting |
Use the opening/closing parentheses to establish the beginning and end of a grouping of one or more statements in the business rule expression. You can nest groupings up to three levels using ( ), (( )), and ((( ))). Make sure to balance (pair) the opening and closing groupings. You need the same amount of opening (left) parentheses as you do closing (right) parentheses. |
|
Fields |
In advanced mode, fields are enclosed in curly brackets with their resource also within curly brackets, preceded with a dollar sign, like this:
Here is an example of the event resource Permit Inspections with the Score field.
The resource value displays as follows depending on the resource type.
Note: LnpGlobalCuston and FieldGroupsare the names of
the child objects containing the fields added to an intake form in the Intake
Form Designer.
|
|
Operators |
The supported operators are expressed
in advanced mode as follows: Where operators expressed with words,
such as Operators are specific to the field type, such as string, number, date, and so on. Not all operators apply to all fields types. If needed, use the Operator drop-down list in the "Criteria Builder" fields to confirm the operators that apply to the selected field. |
|
Values |
All field values, regardless of data type, must be enclosed in double quotes, such as "123.22" or "Plumbing". |
|
Expressing |
To express an
For example:
|
Using Tokens
When adding criteria, you can use these tokens in the Value field to help define your expressions.
|
Token |
Description |
|---|---|
|
${Current Date} |
Allows for comparison of an attribute date value, such as Scheduled Due Date, to the current system date. This comparison is done on the date portion only, with the time stamp being removed before comparison. |
|
${Current Date Time} |
Similar to $(Current Date), except the time stamp is included in the comparison. |
|
${Weekend} |
Converts the attribute date to a number (1-7) then checks if the returned value is in ('1','7'). |
|
${Weekday} |
Converts the attribute date to a number (1-7) then checks if the returned value is in ('2','3','4','5','6'). |
|
${<Attribute Name>} |
Enables you to compare between two attributes on the same object. Use the name of the attribute as it appears in the Field drop-down list, and place it within curly brackets {}. For example: ${Plan Reviewer Due Date} + 2 Note: In scheduled rules, you can't
perform math operations on attribute tokens, such as ${Plan Reviewer Due Date} +
2.
|
|
${Blank} |
Use to evaluate null, empty, or blank values. For example, the following expression checks if the Federal Tax ID is null, empty (""), blank (""<space> ""), or doesn't exist in the payload. ${{Mechanical} Federal Tax ID} = "${Blank}" |
Triggering Multiple Actions with Different Criteria
If you need to trigger different actions based on different criteria, you'll need to add multiple rules to trigger the separate actions. For example, assume you want to trigger one communication based on Job Cost being less than 10,000 and a different communication based on the Job Cost being 10,000 or greater. In this case, create two rules to define your criteria, and select separate communication templates in the action for each rule.