Completing an Application
Agencies configure the specific sections and fields for each type of application. Regardless of these specifics, the general interface for completing an application is consistent.
Applications for business license and contractor registration renewals and amendments also follow this process. For more information, see Applying for a Business License Renewal, Applying for a Business License Amendment, and Renewing and Amending Contractor Registration.
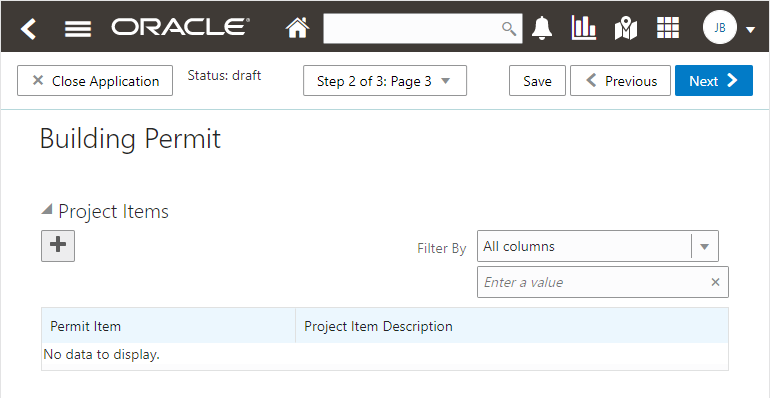
This example illustrates an application.

Single-Page View and Multiple-Page View
A drop-down field at the top of the application page lists the steps, including data entry pages, the Review page, and the confirmation page. Selecting a step takes the user directly to that step.
The final item on the step list is an option to toggle between the Single-Page View and Multi-Page View.
In single-page view, all of the data entry steps are combined into a single step labeled Step 1: Single-Page View. The review and confirmation steps remain separate.
General Navigation Controls
The banner above the application form includes these buttons for general navigation:
Previous and Next buttons enable users to move through the steps.
On the final step, a Submit button replaces the Next button.
Submitting an application initiates the workflow for the application. Registered public users can’t make changes to submitted applications.
Note: After submitting a business license application, you can’t make changes to the business information. Once the license is approved, you follow the amendment process for any changes. See Applying for a Business License Amendment.The Save button lets users save their progress without submitting the application.
You’ll see warnings when you save an incomplete application, but you can still save the application and complete it later.
The Close Application button closes the application and discards unsaved changes.
A warning message gives users a chance to return to the application instead of closing it.
Data Entry Pages
An anonymous public user who starts an application must sign in before the application pages appear. Users who have not previously registered must register before accessing, filling out, and submitting an application.
The application begins with data entry steps that the agency configures. There can be one or many data entry steps. Agencies configure the sections and fields for each data entry step. For more information, see Intake Form Designer Topics. See Using Predefined Field Groups for more information about the sections that might be used in an application form.
Data entry sections are generally self-explanatory, but the following information includes notes about certain common sections.
Grids
Some intake forms contain one or more grids, which are page controls that enable you to collect and display data in a tabular fashion, using rows and columns.
To add data to a grid:
-
Click Add (the plus sign).
A pop-up dialog box appears where you can enter your data.
-
Select or enter all the required data for the grid.
A grid can contain many fields (columns) to capture data of different types, such as dates, numbers, text, drop-down lists, check boxes, and so on. The number and types of fields depends upon the intake form designed by the agency.
Note: Some fields are configured to be read-only and can't be edited. -
Select Add another row to continue to enter data when adding multiple rows.
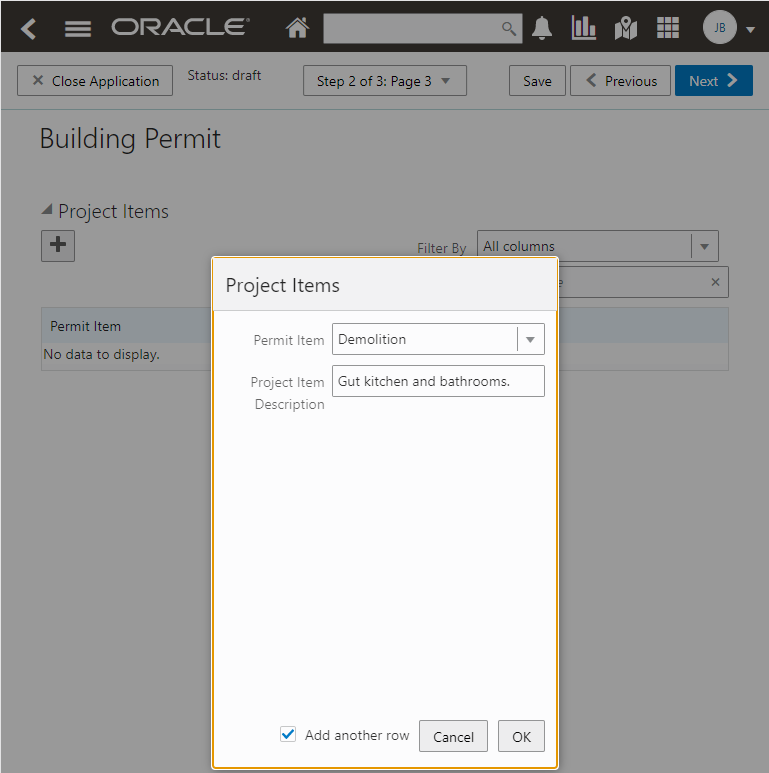
-
Click OK, after you've added all the required information.
-
Click Save.
Applicant
All applications include this section, which is used to identify the applicant. The applicant is also automatically added to the Contacts section.
When a registered public user starts an application, this section is prepopulated, and certain identifying fields are read-only. Updates made to the address, phone, or email when applying can be saved to the user’s account profile.
Agency staff members who complete an application on behalf of a member of the public must identify the applicant by selecting an active profile for an existing registered user or by registering a new user.
When registering a new user, the staff member can continue with the application after entering and submitting the required registration information. A confirmation email is sent to the account email address so the user can complete the registration process by clicking the provided link and setting an account password. The registration is valid even if the agent abandons the application.
Registered users and agency staff with appropriate permissions can update the applicant’s address, phone, or email in subsequent applications and optionally save the changes to the user’s account profile. System administrators can also update account information.
Application
The Application section includes the record ID and a field where applicants can enter a description. Agency staff can provide the date the application was received while entering data into the system. The received date field isn’t available for applicants applying online.
The received date determines the effective dated fee schedule that will be used when calculating fees for the application.
To define the start and end dates of a fee schedule, see Setting Up Fee Schedules.
Adding Multiple Applications to a Permit Application
Projects involving multiple permits can include existing required applications into the same intake form. The Oracle Permitting and Licensing system enables you to create a primary permit application and associate multiple subapplications with it.
The following graphic displays the options for the Primary and Subapplication section on a permit intake form:
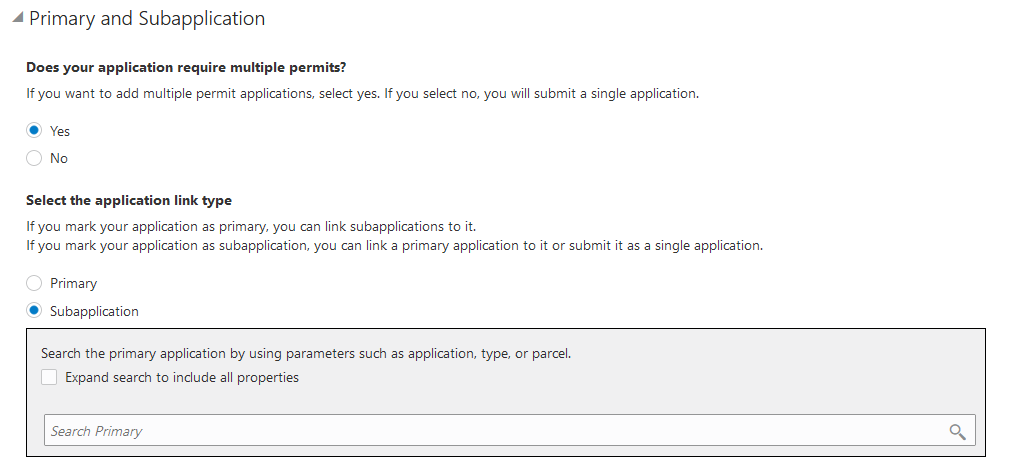
On the intake form, the default selection for the question Does your application require multiple permits? is No. You can proceed with the next steps, review, and submit the form as an independent application (neither a primary application nor a subapplication).
When you can select the option Yes for the question Does your application require multiple permits?, you can mark the application as one of these options:
-
Primary: The current application becomes your primary application. Proceed with the next steps and submit the application. If available, you can use the Related Transactions section to link subapplications before submission, or subsequently access the submitted primary application and link existing or new subapplications to it.
-
Subapplication: The current application becomes your subapplication. To establish a link to the primary permit—you can either search and select an existing application and link it as the primary, or proceed with the next steps and submit the application without any linking. Later when required, access the submitted application and create a primary link between your subapplication and an existing permit application. Use one of these methods to select an existing application:
-
Begin typing the name or ID of the desired application, type, or parcel in the search field. Select the resulting permit.
-
Click the lookup prompt to open the search page and view only the permit applications that are available for primary assignment—permits marked Primary as well as independent permits (neither primary nor subapplication). Select the desired permit to close the modal and return to the intake form.
-
Administrators can use the Contextual Help page to change the descriptive text for the options in the Primary and Subapplication section. You add an agency-defined type of contextual help and enter your own help content. To access the Contextual Help page, navigate to .
See Linking Primary and Subapplications and Setting Up Contextual Help.
Related Transactions
The Related Transaction section allows you to link your current application to other existing applications in the system. Click the Link button to open the Link Transaction page. Select all the desired applications using the check boxes and then click the Add Selected As button to view the options of link type:
-
Primary
-
Subapplication
-
Linked
Select one of the above options to establish a link between the current application and the selected transaction applications. If the current application is:
-
Primary: You can select existing applications and link them as Subapplications.
-
Subapplication: You can only select an application that is not a subapplication and link it as Primary. Once a permit is marked as a subapplication, the system disables the option to link the application as Primary.
Existing applications that are in terminal statuses such as Completed, Canceled, Withdrawn, or Denied aren't available for selection.
For more details, see Working with Related Transactions.
Industry Classification
The Industry Classification section enables applicants to select industry standard classifications for a business when applying for a license.
Search and select one or more NAICS codes that match the various business activities for the selected location. The fee component is updated accordingly in the Fee Summary section.
Agency staff can also edit the NAICS codes on the Application Details page in the business license details. For more details, see Viewing the Business License and Working with Fees and Payments.
Attachments
The Attachments section provides a grid where you can upload files, such as documents or images.
Depending on the agency setup for permit, planning, and business license applications, the Attachments page may display the types of documents that are required for an application type and the stage in the application process at which they are required. Click Upload to attach the specified document in the Required Documents list. The applicant selects the document properties such as category and subcategory during upload and the file appears in the Attachments grid in the application. After you submit the application, the files that you added appear in a list on the Attachments page in the application's detail pages.
You can see which documents are required on the application intake form. The system checks for uploaded attachments with the required category or category and subcategory pair at different steps in the application and displays an error if the required documents haven't been added. Only documents required at the Submittal step are required before you can submit the application. Save the application then click Upload to add attachments.
Public users can't delete attachments that satisfy document requirements defined by the agency once they have been uploaded for previous application steps, but agency staff with permissions can manage the attachments. Once the application form has been saved, agency staff with permissions can also manage the document requirements for the application, such as adding or deleting which documents are required. For more information, see Setting Up Required Documents and Working with Attachments.
Also depending on agency setup, you may be prevented from uploading protected PDF files.
For information about managing application attachments, see Working with Attachments.
Terms and Conditions
If a data entry step includes the Terms and Conditions section, public users must agree to the terms before continuing past that step.
Agency staff can’t accept terms on behalf of a public user, so this section is hidden from agency staff. Instead, users are prompted to accept the terms when they first sign in.
Contacts
The Contacts section lists people who are contacts for this specific application. These people can be, but aren’t required to be, the applicant’s profile contacts.
The list of contacts for the application displays the contact type, description, and level of application access.
The contact types and levels of access that a contact can have are different for business license applications and permit and planning applications. For more details about contact types and their access to a business license application, permit, or planning application, see Setting Up Contact Types.
There are similarities and differences between contacts for permits and planning applications and business license applications:
All applications:
Select an existing contact from a list, or enter information for a new contact on the Contact Details page.
-
The applicant is automatically added as the primary contact in the Contacts section, but you can add or select a different primary contact. You can change the contact type, but you can't remove the applicant contact. You can also change the primary contact in the application details after submission if you are the applicant, primary contact, or business owner for business license application.
-
The page where you enter or edit contact details includes explanatory text to ensure that you are aware of the type of access the selected contact type confers. Applicants and agency staff can elect to provide more access to the contact.
All application contacts must have a contact type that describes the role of the person relative to the specific application. Different contact types have different levels of application access, as set up by your agency. When you add a contact to an application, you select a contact type, but you can upgrade the level of application access.
-
When you add a new contact, select the Add this contact to the applicant's account check box to replicate them to the applicant’s list of profile contacts. Applicants and system administrators only have the option to update contact information and save updates on the user's profile.
-
If configured by your agency, the system sends an email notification to contacts on the intake form upon application submission as well as to new contacts when they are added to the application after submission.
-
The applicant can never be made inactive on an application whereas other contacts can.
-
Contact information for the contractor entered in the Contractor section in the application appears in both the Contractor and Contacts sections.
Permits and planning applications:
-
When you add a new contact, you can see the level of access each contact type confers—Full or None. You must select an agency-defined contact type but you can give the contact full access, which is similar to applicant-level access.
Applicants and contacts with full access can also make a contact inactive. Inactive contacts can't access the application.
-
If the contact type is configured to allow permit or planning application access, and the contact email matches the account email for a registered user, then that registered user can access the permit or planning application after it's been submitted.
Review
A Review step appears after the last data entry step for an application. The page for the Review step shows all of the data entry sections on a single long read-only page.
Confirmation
If the application includes a confirmation page, it appears after the review page. This page can have any name.
A common scenario is to show a fee summary on the confirmation page. Displaying a read-only fee summary at the very end of the application, after all data entry is complete, ensures that the fee calculations are final. Click the Submit button after paying any applicable fees.
Your agency can configure a Business Rules Framework event to automatically stop the submission process and display a message describing the reason for stopping the process.
Agencies configure stop process actions in the Business Rules Framework. You use the following events to configure the business rule for business license, permit, and planning applications:
-
Before Business License Application Submitted
-
Before Permit Application Submitted
-
Before Planning and Zoning Application Submitted
Additionally, your agency can configure a Business Rules Framework event to automatically perform actions when the application is successfully submitted. You use the following events to configure the business rule for business license, permit, and planning applications:
-
After Business License Application Submitted
-
After Permit Application Submitted
-
After Planning and Zoning Application Submitted
For details, see Setting Up Stop Process Actions and Setting Up Business Rules.