Requesting Inspections
Agency users can request inspections for permits and business license applications to ensure compliance with application requirements.
You can request, modify, and cancel inspection requests on the Inspection request page. For information about adding, updating, or canceling scheduled inspections in the Oracle Inspector web application, see Managing Scheduled Inspections.
You can create or update inspections from these pages:
-
Agency staff, applicants, and contacts with permit access can use the Inspections page in the permit details.
-
Agency staff, applicants, business owners, and contacts with business license application access can use the Inspections page in the business license activity details.
See Managing Inspections for a Business License Application.
-
Agency staff only can use the Inspections console page.
-
Only applicants and contacts with application access, including the business owners for business licenses, can use the Inspections list page by clicking the Inspections tile on the registered public user landing page.
Registered public users can also select Schedule an Inspection in the I Want To field on the registered public user landing page.
For inspection request considerations, such as issues that prevent an inspection from being created or scheduled, see Overview of Working with Inspections.
Requesting an Inspection
-
Click the Add Inspection button or in the action menu for an inspection, select the Add Inspection option.
-
On the Inspection request modal page, select the Application for which you want to request an inspection.
Note: If you are requesting an inspection from the Inspections page for a specific application, the Application and Application Type fields already reflect the selected permit or business license application on the modal page. -
You'll see the inspection types that are available to select based on the inspection group that is associated with the permit or business license application type.
Note: Agency staff can select the Show All Inspection Types check box to make all inspection types available for selection. This check box isn't available to public users.For each inspection type listed on the Inspection modal page, you'll see this information:
Element
Description
Inspection Type and Description
Indicates the inspection type code and description.
Dependencies
Lists the prerequisite inspections.
Required
Indicates that this inspection type is required.
Unannounced
Indicates whether the inspection type is for an inspection where the inspector arrives unannounced, without any prior communication sent to the applicant. Unannounced inspections are hidden from applicants and contacts with application access until the inspector has submitted the inspection results.
Final Inspection
Indicates that this is the last inspection that needs to be done.
-
Select the check box next to each Inspection Type that you want to add. You can't select multiple inspections in small form factor or through the Oracle Inspector mobile application.
-
Select the Pending check box to set the status of the inspections to Pending. This option is available only if the Enable Creation of Pending Inspections switch is turned on for the agency. For more information, see Setting Up Agency-Level Options for Permits.
Note: This switch is not available to registered public users. Click Continue to access the Inspection request page.
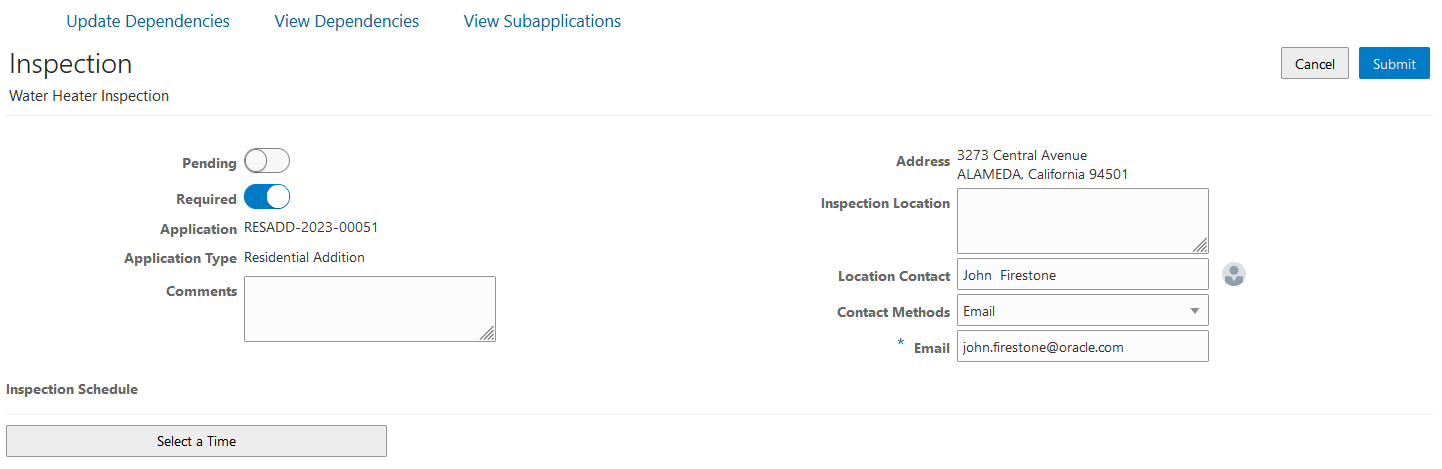
The request page for a single inspection looks like this.
The Select a Time button is available because the inspection was set up with the Schedule method.
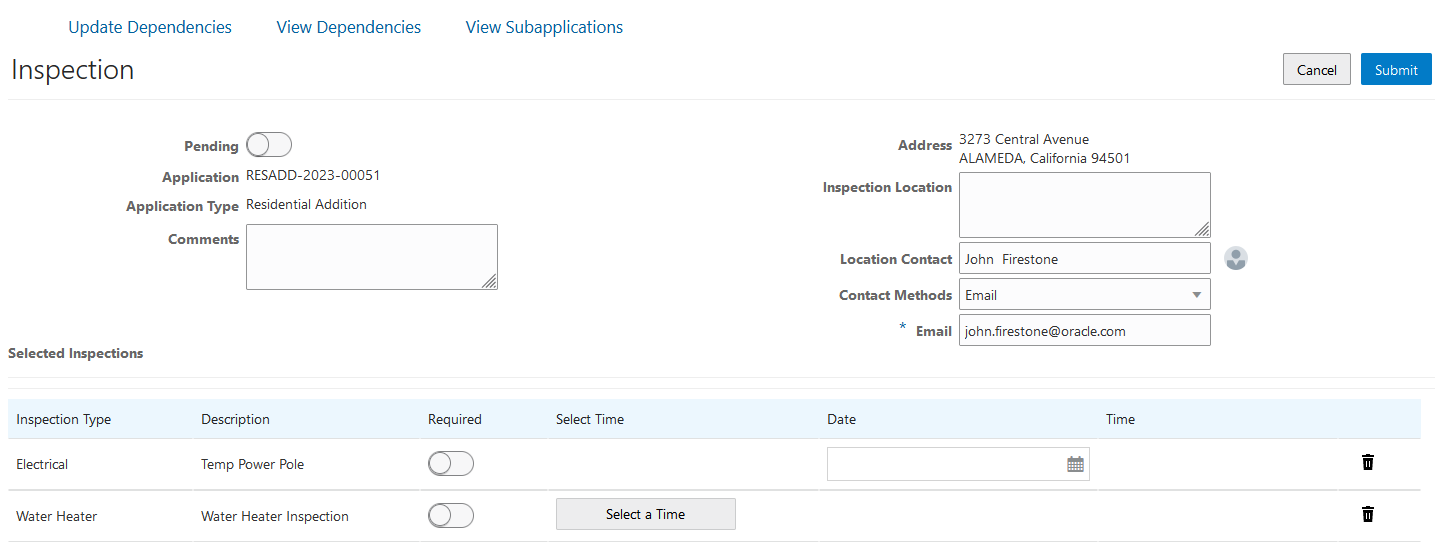
If you selected more than one inspection type, they are all displayed in the Selected Inspections grid as shown here.
Each inspection has a different scheduling method. The inspection with the preferred date and time fields has the Request scheduling method, and the inspection with the Select a Time button has the Schedule scheduling method.
-
Turn the Required switch on or off. The Required switch defaults to the inspection type setting on the Inspection Group Details page. If the inspection is outside of the inspection group or is an unannounced inspection, the setting defaults to Not Required.
-
Depending on the scheduling method set up for the inspection type, agency staff and applicants can enter times in the preferred date and time fields or ready-by date and time fields, or select a time. Depending on agency setup, only date fields or date and a time range may be available.
The Select a Time button appears only for inspection types with a Scheduling Method of Schedule. See the section, "Selecting an Inspection Time" for more information.
-
(Optional) Click the Delete button to remove any inspection types that you don't want to include in your inspection request.
-
Click Submit.
The Update Dependencies, View Dependencies, and View Subapplications links available on the Inspection request page are also available on the Inspections page in the permit details. For information about updating and viewing dependencies, see Working with Inspection Dependencies. For information about working with subapplications, see Working with Linked Permits.
If the Inspection Requested communication event is configured, the system automatically creates an email notification that an inspection request has been created. For more information, see Delivered Communication Events.
Selecting an Inspection Time
The Select a Time button on the Inspection request page appears only for inspection types with a Scheduling Method of Schedule and a Time Entry Method of Specific time or Time range. Both agency staff and applicants can select a time on the Scheduling modal page. Only inspections supervisors can see the inspector names and override availability.
The dates and times that are available for inspection scheduling are based on the following factors:
-
Type of inspection and when the inspection can be performed.
-
District of the parcel or district associated with the address.
-
Inspectors assigned to the district and inspection type.
-
Availability of the inspectors according to work schedules, holiday schedules, and inspection calendars.
An inspector's availability may also depend on whether your agency has set up a maximum daily inspection count for date-only inspection scheduling.
After you select a time and submit the request, the Reschedule button is available to select a different time.
For more information on scheduling inspections as a supervisor, see Managing Inspections for an Agency.
For more information, see Setting Up Inspection Scheduling and Setting Up Inspection Assignment.
Updating an Inspection Request
You can update an inspection request on the Inspection request page, such as making an inspection required or claiming an inspection. You can't update an inspection if the status of the inspection is Canceled or Completed, and you can't change the inspection type for an inspection.
For information about canceling, rescheduling, or postponing an inspection as well as the other available actions, see Modifying Inspection Requests.
In the action menu for an inspection, select the View Request option.
-
Turn the Required switch on or off to override the default required inspection setting for the inspection. The Required switch defaults to the inspection type settings on the Inspection Group Details page. If the inspection is not part of the inspection group, the setting defaults to not required.
-
If the link is available, you can click Assign to me to claim an inspection assigned to another inspector. The inspector who claims the inspection must have the Building Inspector job function for permit inspections or the Business License Inspector job function for business license inspections, with district and inspection type job attributes that match the inspection's district and type attributes.
When an inspector claims the inspection, they can also select a new inspection date or date and time. If the Inspection Rescheduled communication event and template are configured by your agency, the system generates a notification when you reschedule the inspection.
Click Save.
Interactive Voice Response Inspection Requests
When interactive voice response (IVR) is enabled for your agency, registered public users can request inspections over the phone. IVR is compatible with the Request and Schedule scheduling methods. Regardless of which of these two scheduling methods is associated with an IVR inspection request, a user chooses a preferred date and time period (morning or afternoon). For inspections with a Request scheduling method, the selected date and time period are recorded as the Preferred Date and Preferred Time. For inspections with a Schedule scheduling method, the system uses the selected date and time period to automatically assign a specific time slot and inspector.
For more information on IVR, see Setting Up Agency-Level Options for Permits.