Expense Policy Inquiry Enhancements Using Expenses Agent
Agentic expense policy inquiry is now available in AI Agent Studio, making it easier to deliver clear, real-time guidance on expense policies through natural language queries. In addition, the delivered prompt is now refined for higher quality responses.
The agent can be used to answer questions about a company's travel and expense policies, as well as employee FAQs. Expense managers can upload corporate travel, expenditure, and other relevant policy or reference documents, enabling employees to receive contextual answers to policy-related questions from a desktop or mobile device. This helps employees understand corporate policies before incurring business expenses, remain aware of expense submission requirements, and improve compliance with company guidelines.
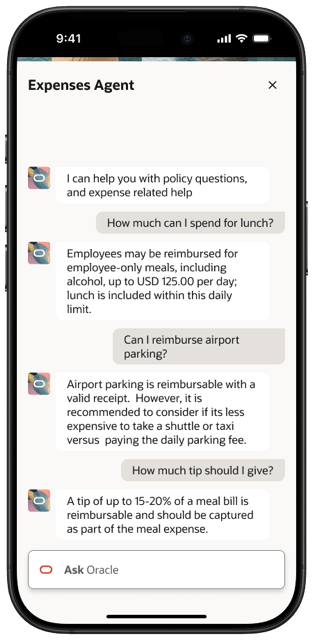
The agent answers expense policy and application-related questions
Once the document is uploaded, the expense policy inquiry is available to users from the navigation bar using the Expenses Agent (messaging) icon.
Business benefits include:
- Delivers tailored and immediate policy guidance, reducing non-compliant expense submissions and audit workload.
- Enhances the quality and relevance of information delivered.
- Streamlines access to policy information and reduces the need for manual searching or policy review, improving productivity and user satisfaction.
Steps to enable and configure
- Existing customers using the Expenses Agent before 26B must enable the FSM opt-in Email-Based Expense Completion Using Expenses Agent to use the Agent Studio version of the Expenses Policy Agent in 26B.
- For new customers using the Expenses Agent in 26B, this opt-in is enabled by default.
- Refer to the Steps to enable and configure section in Expenses Agent for Email-Based Expense Completion for required profile option setup.
- Customers who used the Expense Policy Agent prior to 26B must upload their documents in Agent Studio to use the enhanced 26B version.
To get started, you’ll need to upload at least one document. Here’s how:
- Log in as user having access to Agent Studio.
- Navigate to AI Agent Studio under Tools menu.
- Select Tools tab from the bottom and search for Get Expense Policy Document.
- Select Edit action and go to Add under Documents.
- Enter the document name, change the status to Ready to Publish, and upload the document by selecting Drag and Drop.
- Log in as user having access to run ESS jobs and submit the job Process Agent Documents. Ensure to run the job after any add, edit, or delete operation.
- After the scheduled process completes, go back to the Get Expense Policy Document tool, select your document, and verify the status is Published.
- Refer to the Access Requirements section to configure the access details for the Expenses Agent chat component.
Tips and considerations
- Expense managers can upload multiple documents at a time through Agent Studio. Uploaded documents must be in PDF, TXT, or Markdown format. Convert complex tables and images in documents to plain text for better accuracy.
- The uploaded documents are applicable for all Expenses Agent users across all business units.
Key resources
Touchless Expenses User Application Manual and FAQ
Fusion Applications provides a user application manual and FAQ that can be used as a baseline. Customers are encouraged to enrich the document before uploading it in the Agent Studio. This sample FAQ is written for J.P. Morgan corporate card users and includes sections that require customization with customer-specific information. Download the document and edit it as needed for your corporate or non-corporate card program before use. Touchless Expenses User Application Manual and FAQ
Access requirements
- At least one business unit needs to be enabled with Touchless Mobile Expenses (25D) to use this feature.
- To access the Expenses Agent chat component, add the required AI Agent privileges to the existing Expenses Agent role:
- Log in with IT Security Manager credentials.
- In the Security Console, navigate to Tools > Security Console > Roles and search for the EXM_TOUCHLESS_EXPENSES_ROLE role.
- Edit the role and navigate to Functional Security Policies
- Add HRC_ACCESS_AI_AGENT_CHAT_PRIV.
- Navigate to Data Security Policies for the same role.
- Create a new policy.
- Enter View workflow as the policy name.
- Select AI Agent Workflow as the Data Resource.
- Select Select by instance set as the Data Set.
- Set Condition Name to Access the ai agent workflow for table FAL_WORKFLOWS_B for ai agent workflows associated to the relevant family and Parameter1 to FIN.
- Add View AI Agent Workflow to Actions.
- Click OK.
- Navigate to Tools > Scheduled Processes, and run the Import User and Role Application Security Data process.
- After the synchronization process completes successfully, users assigned the EXM_TOUCHLESS_EXPENSES_ROLE role can access the Expenses Agent chat component.