Display Custom Content in a Content Card Using Guided Journey
You can display custom content in a content card on the Opportunity Marketplace home page. The content card presents content in the form of a guided journey providing guidance to users such as welcome videos, promotional videos about the company, links to company policies, tutorials, and so on.

Content Card on Opportunity Marketplace Home Page
By default, no content card is displayed. To enable this feature, your administrator needs to:
- Create a guided journey using a checklist template in the Setup and Maintenance work area. The checklist template is used to configure the data displayed in the content card.
- Use business rules in Visual Builder Studio to display the content card on the home page.
With this feature, you have the flexibility to customize and adapt the application to align with your unique business or individual needs.
Steps to Enable
Step 1: Create a guided journey using a checklist template
You first need to enable the profile option ORA_PER_GUIDED_JOURNEYS_ENABLED.
- In the Setup and Maintenance work area, click the Tasks icon.
- Click Search.
- Search for the task Manage Administrator Profile Values.
- On the Manage Administrator Profile Values page, search for the profile option code ORA_PER_GUIDED_JOURNEYS_ENABLED.
- Set the profile value at the Site level to Y.
- Click Save and Close.
Step 2: Create a guided journey
To configure a guided journey, you need to create a checklist template using the Checklist Templates task in the Setup and Maintenance work area.
You need the function privilege Manage Journey (PER_MANAGE_CHECKLIST_TEMPLATE_PRIV) to work on checklist templates.
- In the Setup and Maintenance work area, click the Tasks icon.
- Click Search.
- Search for the task Checklist Templates.
- On the Checklist Templates page, click the Create button.
- On the Create Checklist window, enter a name and code for the checklist. Select the Guided Journey category. Complete the other fields as needed.
- Click OK.
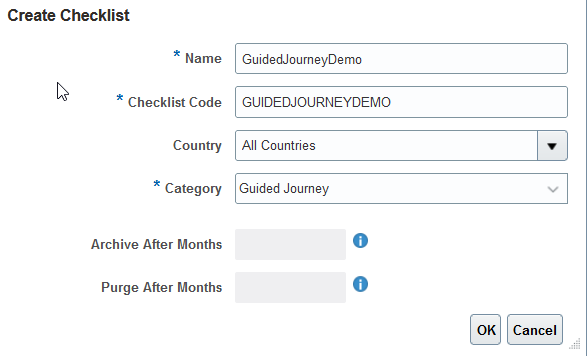
Create Checklist Window
- On the Tasks tab, create the tasks that will be part of the guided journey. You can create as many tasks as you want. For example, task 1 can represent a welcome video, task 2 a promotional video about the company, task 3 a link to company policies, and so on. For each task, you need to set the sequence to display the tasks in a specific order.
- Click the Create button and select Create Task.
- On the Create Task page, enter a name, sequence, and code for the task. Complete the other fields as needed.
- Set the status to Active.
- Click Save and Close.

Create Task Window
On the Messages tab, you can customize the background image of the guided journey.
When the checklist template is ready, it's available on the Tasks tab.

Step 3: Create a rule in Visual Builder Studio to display the checklist template
Once the checklist template is created, you need to create a business rule in Visual Builder Studio to display the checklist template you created. See the Key Resources section for more details.
Key Resources
For more information on guided journeys, refer to the Implementing Journeys for HCM guide on Oracle Help Center.
For more information on extending Redwood pages in HCM, refer to this feature announcement on the Oracle Help Center.