 Autoprovision Areas of Responsibilities
You can now automatically mass assign or inactivate and end-date representatives' areas of responsibilities (AOR) based on user-defined template criteria.
The Responsibility Template’s Criteria section determines the AOR scope for each individual. You must identify your organizational needs and then specify the appropriate criteria to match against your workforce assignments. When the template criteria are matched against a representative’s assignment, a responsibility is created or updated.
In case an assignment no longer matches the template criteria, the assigned responsibility is end-dated, and the Status is set to Inactive. For example, in case of a local or global transfer.
The responsibility autoprovisioning process flow varies when Bypass Preview is enabled and when it’s disabled.
Responsibility autoprovisioning process flow when Bypass Preview is Disabled.
To ensure the correct people are returned to a responsibility template, you must thoroughly test its criteria against your business requirements.
You must run autoprovisioning for each template during your testing phase and then preview the results before applying and committing the responsibilities against a representative's assignment.
Optionally, you can also restore to the template backup. This is helpful in case you clicked the Apply button and inadvertently applied AORs against too many representatives or the wrong group of representatives.
Responsibility Autoprovisioning process flow when Bypass Preview is disabled
Note: The Bypass Preview option is disabled by default. Enable this option only if you are certain you are getting the desired results.
Responsibility autoprovisioning process flow when Bypass Preview is enabled.
If you enable the Bypass Preview option, you bypass the preview step and apply the Autoprovision Responsibility changes directly. When you autoprovision responsibilities, you no longer need to verify the results since the AORs are created, updated, or inactivated and end-dated.
As we look at each step in detail, let's point out the main focus areas related to responsibility autoprovisioning.

Responsibility autoprovisioning process flow when Bypass Preview is enabled
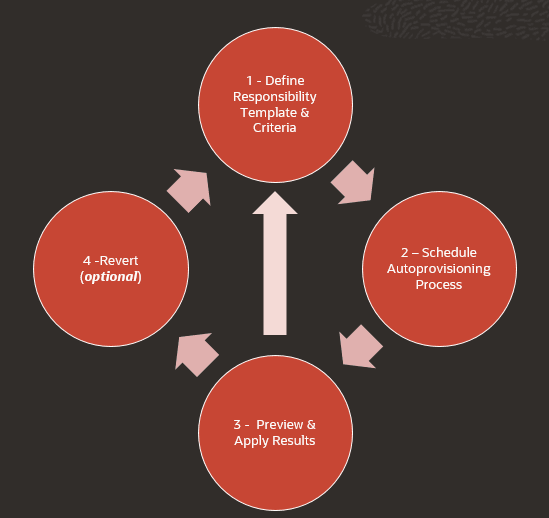
Process flow to Autoprovision Responsibility
Step 1: Define Responsibility Template criteria.
Navigate to the new Area of Responsibility Templates page from Quick Actions pane under My Client Groups section, Workforce Structures subsection.
On the Responsibility Templates homepage, when you add a new template, you will now see a new section to Assign by Criteria.
This section appears when you enable the Autoprovisioning Areas of Responsibility Enabled profile option.
Note: When autoprovisioning is enabled and you copy a responsibility template, the criteria are also copied. You can also modify the criteria if the section is enabled on the questionnaire page.
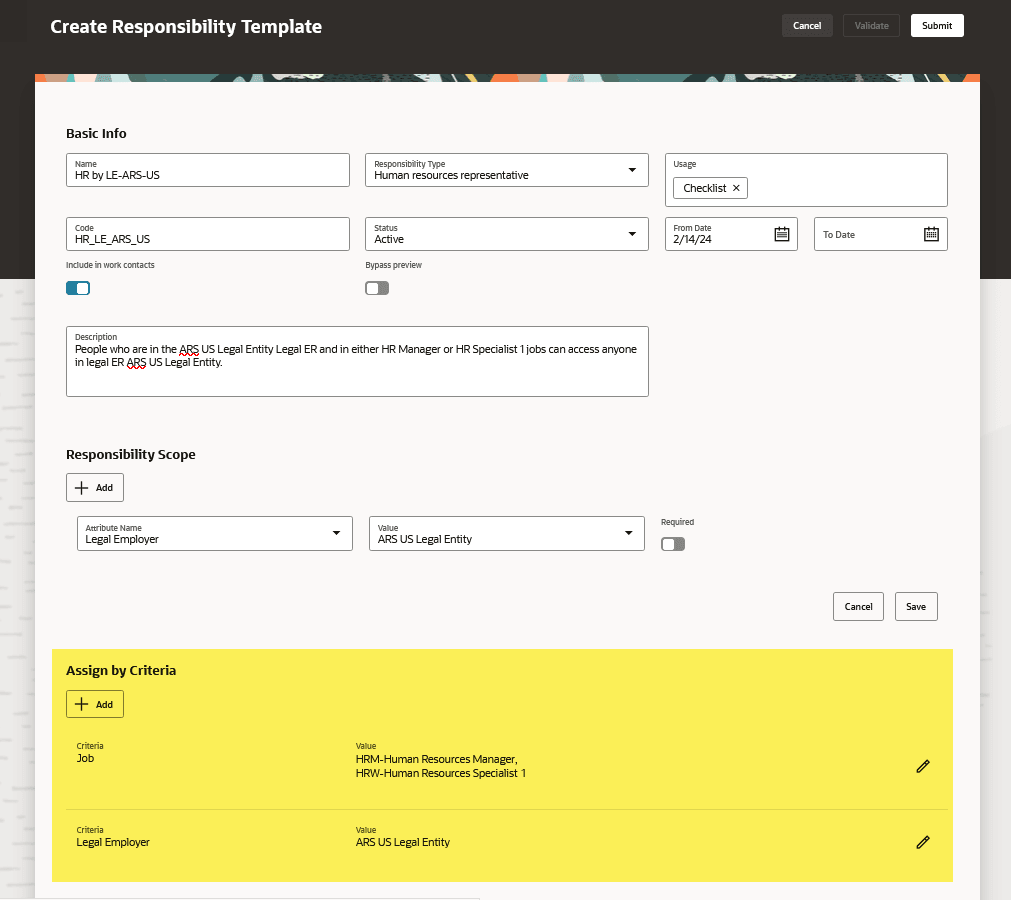
New responsibility template highlighting Assign by Criteria section
The Assign by Criteria section enables you to add criteria and values that identify the representatives who must receive the responsibility with the Basic Info and Scope you defined in the prior sections of this page.
The values related to your selected criteria will appear based on the Responsibility Template's From Date field. The LOVs reflect the current values that are equal to or greater than the From Date. You can enable or disable the Bypass Preview option directly at the template-level. After thorough testing, it is no longer necessary to preview each template and apply the results every time autoprovisioning is run.
Note: It’s recommended to enable the Bypass Preview option on your Responsibility Templates after thorough testing!
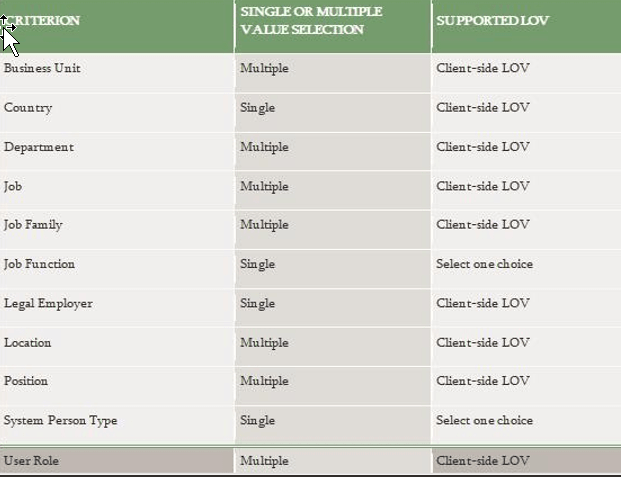
List of single or multi-select Criteria used with responsibility autoprovisioning
This process uses the AND operand if you specify multiple criteria and the OR operand when using multiple values of the same criteria.
For example, using the criteria defined in the above screenshot, the process will search for assignments where these conditions are satisfied.
- Legal Employer = ARS US Legal Entity AND
- Job = HRM-Human Resources Manager OR HRM-Human Resources Specialist 1
Step 2: Schedule Autoprovisioning.
You can Autoprovision Responsibilities using either of these 2 options:
- Responsibility template row-level actions
- Autoprovision Responsibilities scheduled process from the Scheduled Processes work area.
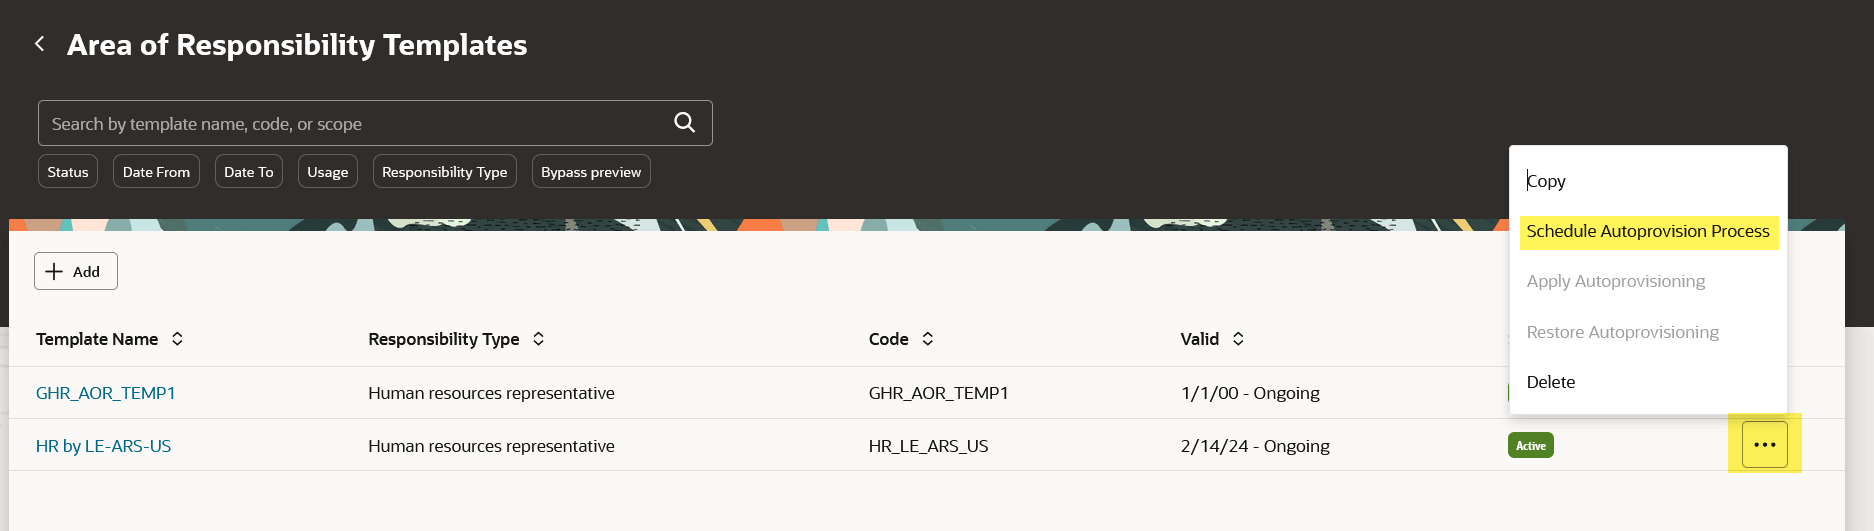
Schedule Autoprovisioning from Actions menu
This action is useful while you are testing the expected results of your responsibility template.
This action helps ascertain that the Autoprovision Responsibilities process will only process this specific template. You will receive a confirmation message that the job has been submitted with the job ID returned.
You can check the progress from the Scheduled Processes work area or refresh your page. The process is complete when the Apply Autoprovisioning option is active.
Autoprovision Responsibilities in bulk
When you run the Autoprovision Responsibilities process from the Scheduled Processes work area, you may have to provide additional parameters. Like any other process, you can also schedule the job daily, or more frequently, depending on the number of global time zones your organization operates in.
Here are the parameters for the Autoprovision Responsibilities process with expected behavior:
- No parameters selected
- All templates will be processed. It’s recommended that you still preview and apply the changes.
- If the Bypass Preview option is enabled, you don’t need to verify the expected results.
- Purge Inactive and Past End-dated Responsibilities
- If this parameter is selected, all other parameters are ignored and the process purges all the AOR records that are inactive and past end-date.
- Only applies to AORs that are created through autoprovisioning.
- UCM Content ID
- The Process ID is generated when data loads via the HCM Data Loader (HDL). If you enter a value for this parameter, the process considers the assignments loaded or updated in the load that matches the template criteria. Then it marks them for creating or updating AOR records. In this case, even if you enter a value for the Responsibility Template parameter, it’s ignored.
- Responsibility Template
- AOR template is considered for autoprovisioning responsibilities. If you don’t select a template, all templates are considered for autoprovisioning.
- If you provide a value only for this parameter, the process will identify all assignments that match the template criteria for creating or updating AOR records. In this case, even if you enter a value for the Legal Employer parameter, it’s ignored.
- Legal Employer
- The Legal Employer parameter (if provided) is valid only when other parameters are not provided. This process calculates the assignments matching the template criteria of all the templates and autoprovisions the responsibilities for those assignments.
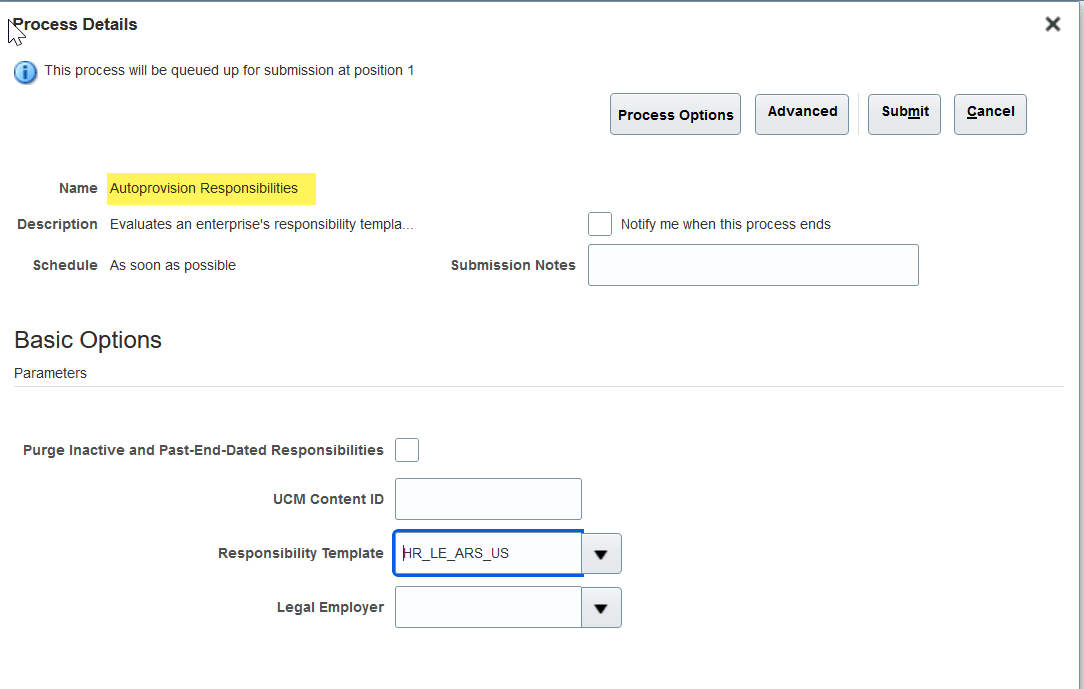
Schedule Process Details
Step 3: Apply Autoprovisioning.
Next, you can preview the results of autoprovisioning your selected template.
For the corresponding responsibility template, click the Hamburger icon, and click Apply Autoprovisioning.
This action appears once the autoprovisioning is completed and you refresh the homepage.
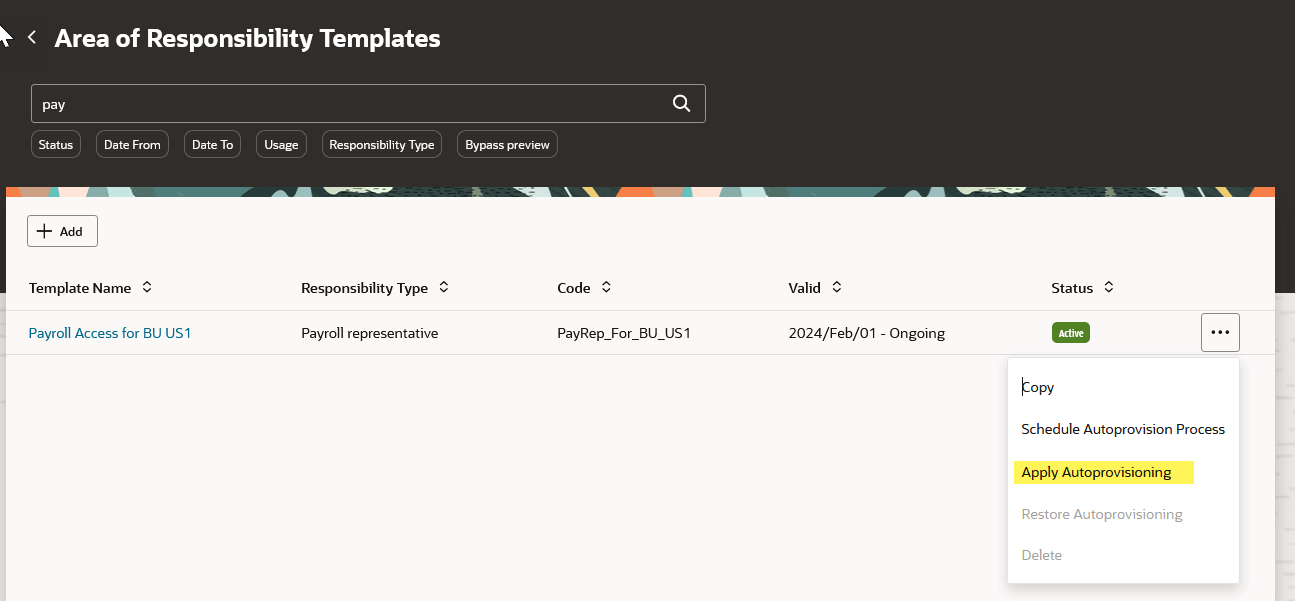
Apply Autoprovisioning from Actions menu
The Apply Autoprovisioning action enables you to see the results in the context of that individual responsibility template.
If you’re satisfied with the results, click Apply to create or update the responsibilities for the intended representatives.
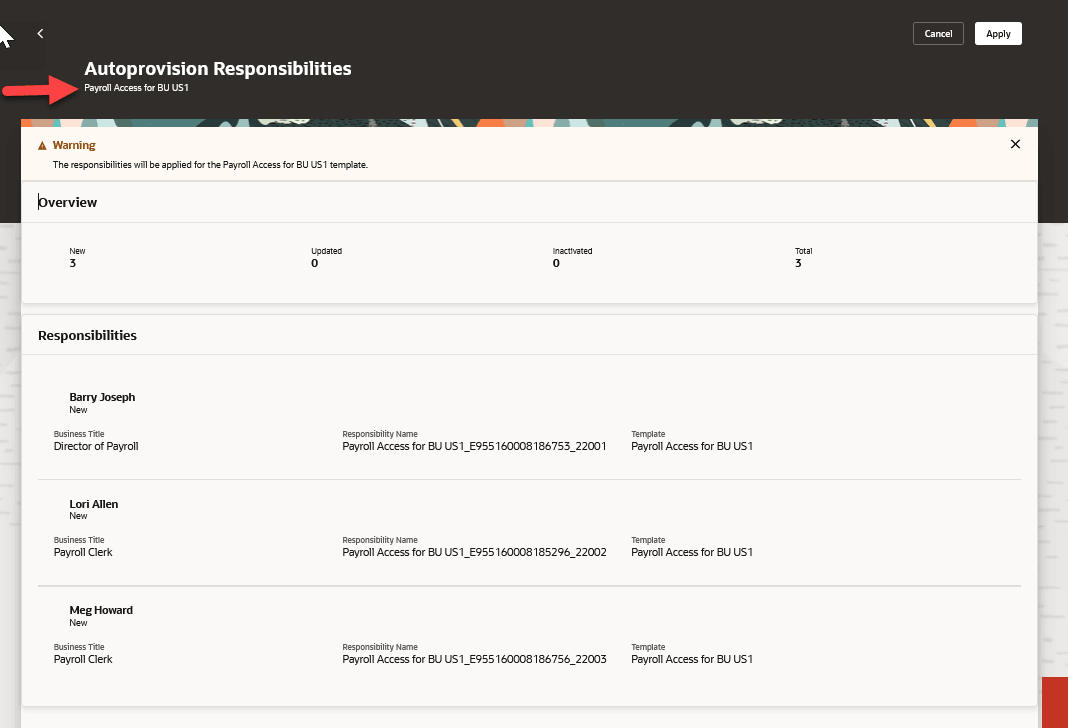
Preview results of the selected template on the Autoprovisioning Responsibilities page
Note: The Inactivated count is calculated based on worker assignments that no longer match the criteria for the template such as promotion, local or global transfer or, termination. When inactivating these responsibilities, 2 things happen:
- The status becomes "Inactive" and
- The end date is updated to the Autoprovision Responsibilities process system date.
Preview and Apply Autoprovision Responsibilities in Bulk
Once you have defined several templates and you've run Autoprovisioning Responsibilities against all your templates, navigate to Autoprovision Responsibilities quick action under My Client Groups section, Workforce Structures subsection to view all template results.
The Autoprovision Responsibilities page displays the results of all templates where the autoprovisioning responsibilities process is initiated and is in the process of being reviewed and applied.
If you want to view a particular template, change the Template LOV at the top of the page and the responsibilities list will be updated to reflect only those people who are identified as representatives.
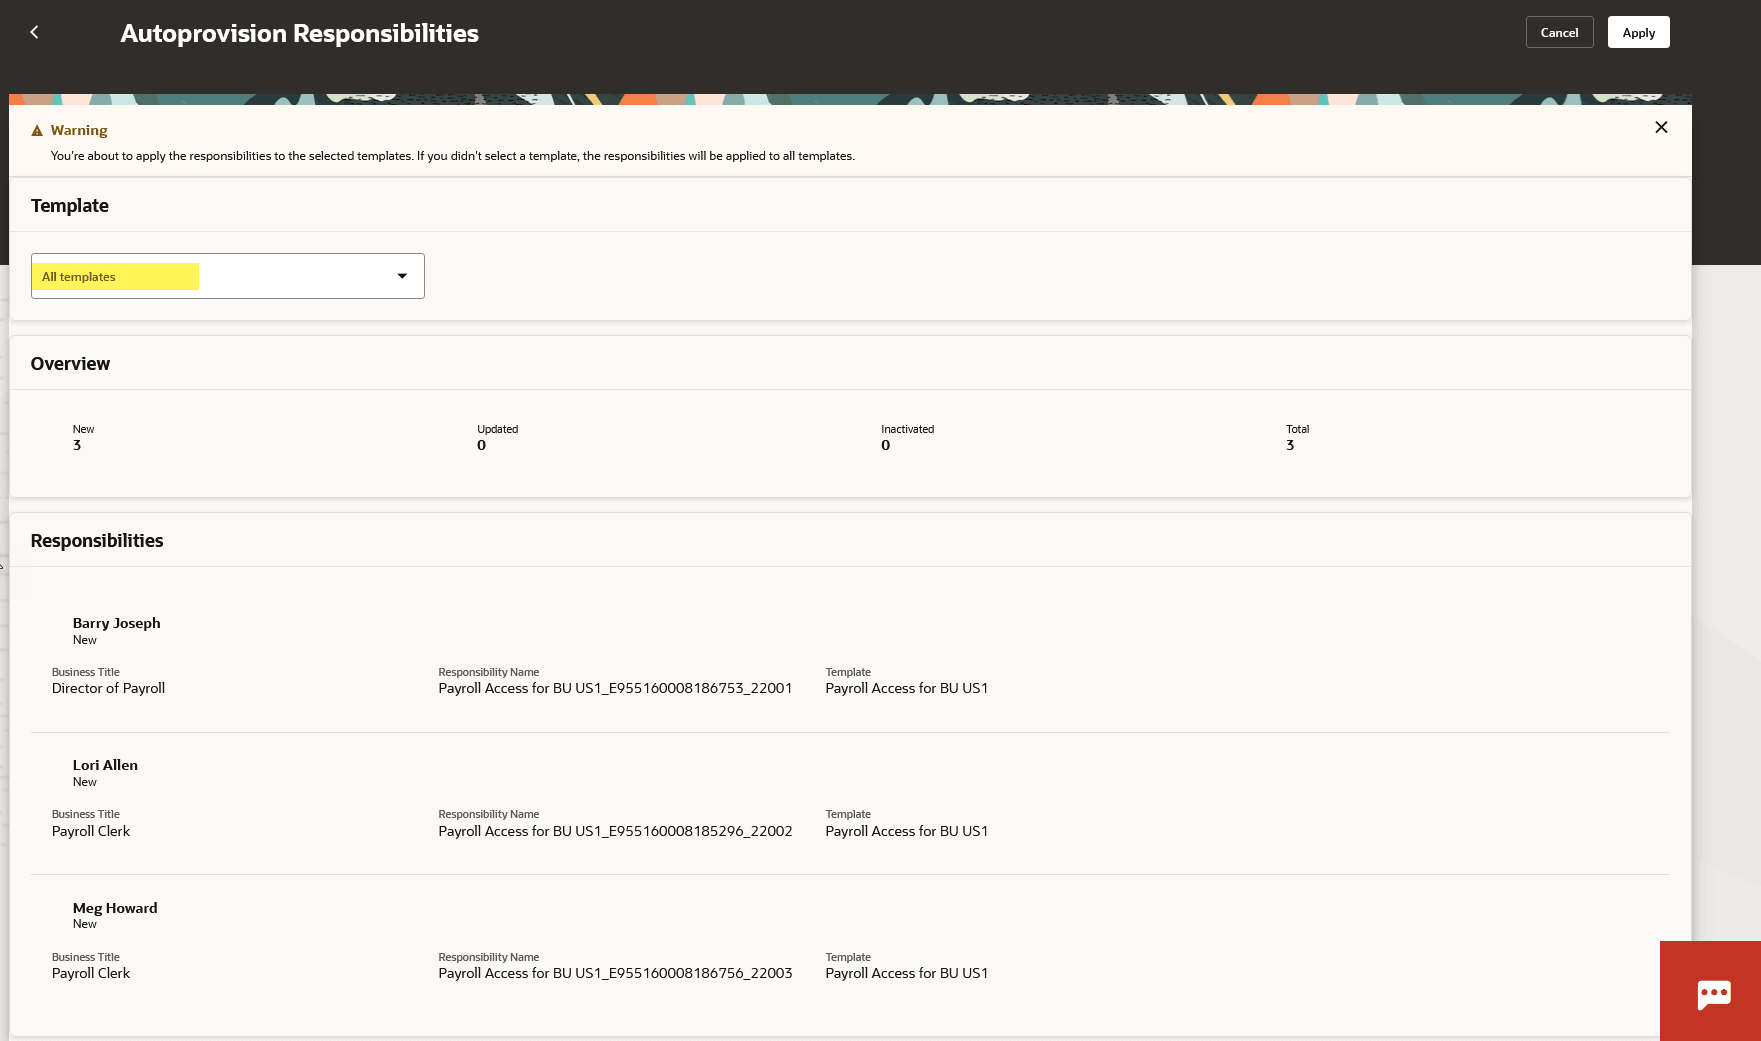
Preview all template results in the Autoprovisioning Responsibilities page
Step 4: Restore Autoprovisioning.
You can restore the responsibilities to their last state after applying Autoprovision Responsibilities, in case you want to revert the data changes.
You can either restore responsibilities for a single template or all templates from Autoprovisioned Responsibilities in the Quick Action pane, My Client Groups section, Workforce Structures subsection.

Restore Autoprovisioning from Actions menu
Restore Autoprovision Responsibilities in Bulk
If you’ve applied AORs to a large number of people, you can either change the criteria to be more granular or restore to the last committed version of the responsibility templates.
Navigate to Restore Autoprovision Responsibilities quick action located under My Client Groups section, Workforce Structures subsection to view all templates with a backup. You’ll see the results of all templates on this page however, there will be one backup per template.
If you want to view a particular template, change the Template LOV at the top of the page and the responsibilities list will be updated to reflect only those people to be restored.
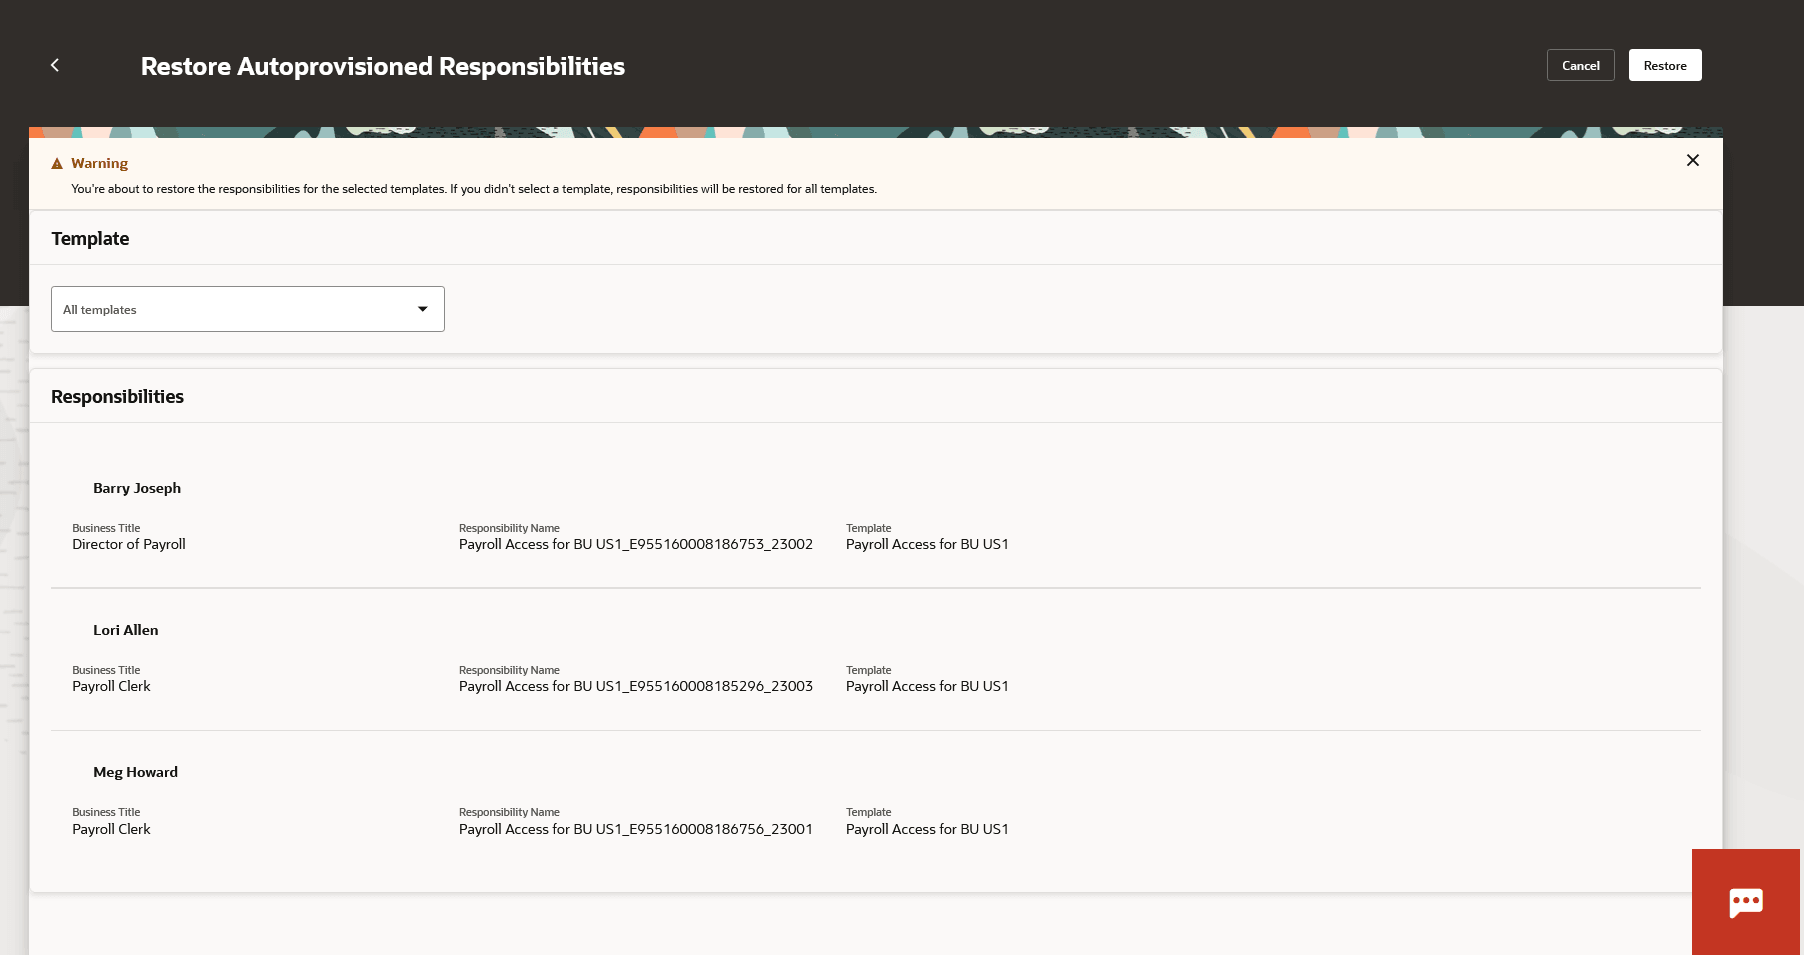
Restore Autoprovisioning Responsibilities in bulk
Step 5: Bypassing the preview and apply step.
You can skip the preview and apply step of the Autoprovisioning Responsibilities process after you’ve tested the results and behavior of your responsibility template.
Once you’ve enabled the Bypass preview option on the responsibility template, new responsibilities and updates to existing responsibilities are reflected directly against the people matching the criteria.
You’ll no longer see a list of the impacted people when applying autoprovisioning. The same applies if a representative no longer matches the criteria. This means the respective AOR will be end-dated and inactivated automatically, and you’ll not see the person listed on Autoprovision Responsibilities.
You can view and confirm changes directly in the representative’s area of responsibility.
Dynamic Representative Scope
Dynamic representative scope enables you to reduce the number of overall responsibility templates. This is useful, especially for organizations with a large number of locations, business units, or departments.
Dynamic Representative Scope settings allow you to automatically assign Location, Business Unit, and Department Scope attributes based on a worker's own assignment location, business unit, or department. This resolves these scenarios where they need access only to the data where they work:
- The line manager or store administrator is responsible for their department.
- The retail or hotel manager is responsible for their location.
- The University department head is responsible for their business unit.
You will see these seeded Responsibility Scope values available:
- Representative's Location
- Representative's Department
- Representative's Business Unit
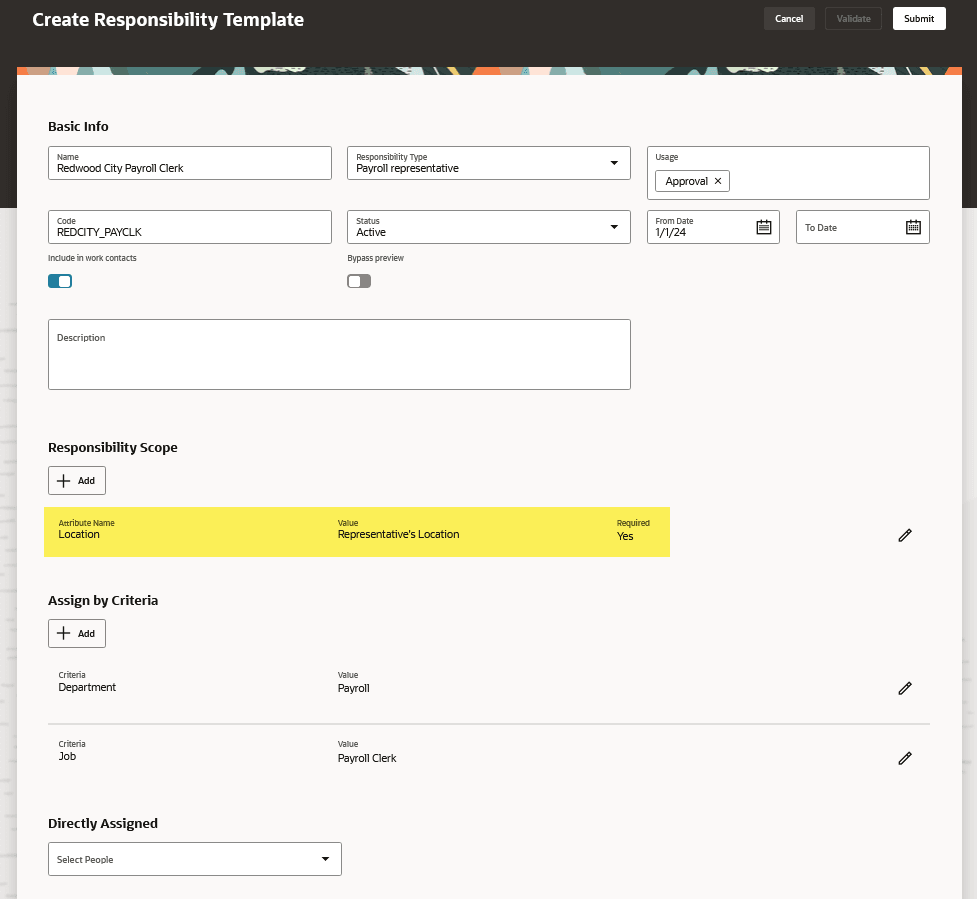
Responsibility template with Dynamic Representative Scope of Location
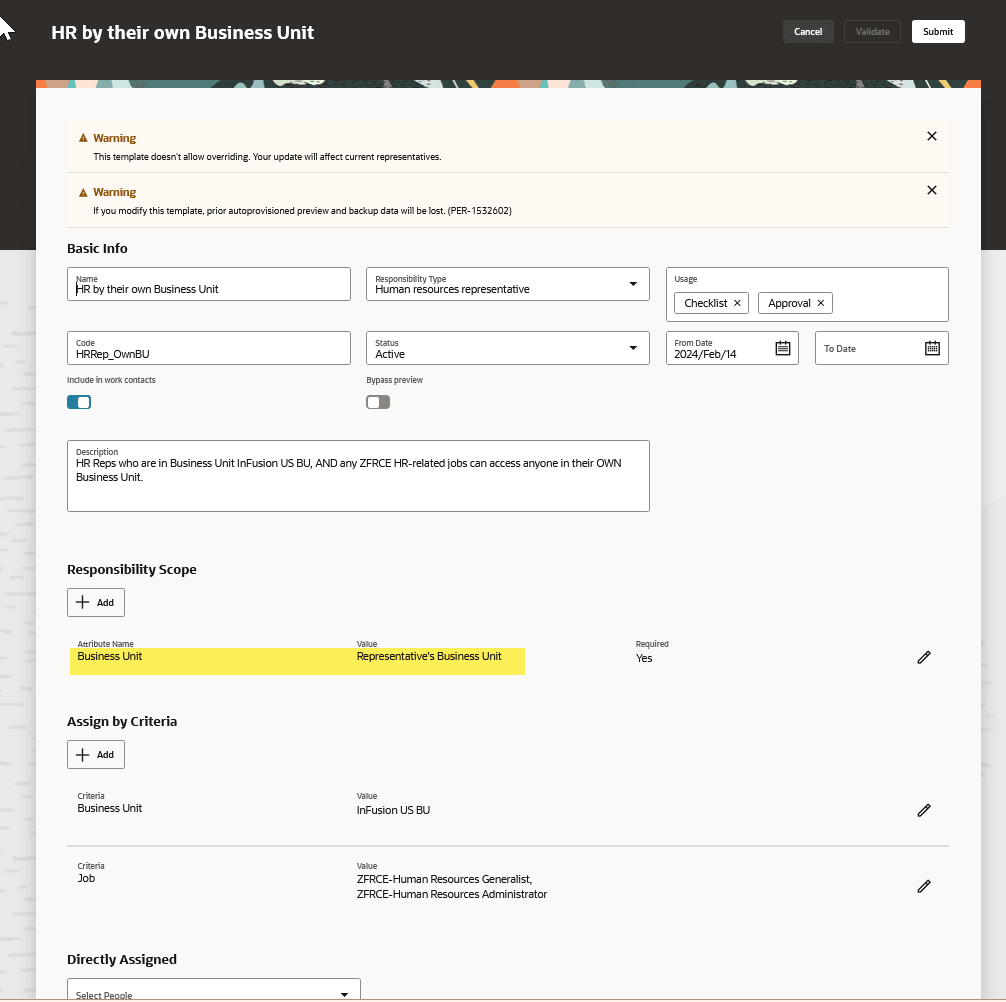
Responsibility template with Dynamic Representative Scope of Business Unit
Dynamic Representative Scope Validation of Directly Assigned Representatives
When using Assign by Criteria for Autoprovisioning, you can add one or more people to the directly assigned section in case you want someone to be assigned the Scope, regardless of the criteria.
When using the dynamic representative scope options (i.e., Representative's Location, Representative's Department, and Representative's Business Unit), you must validate that the directly assigned worker's assignment contains the necessary data value.
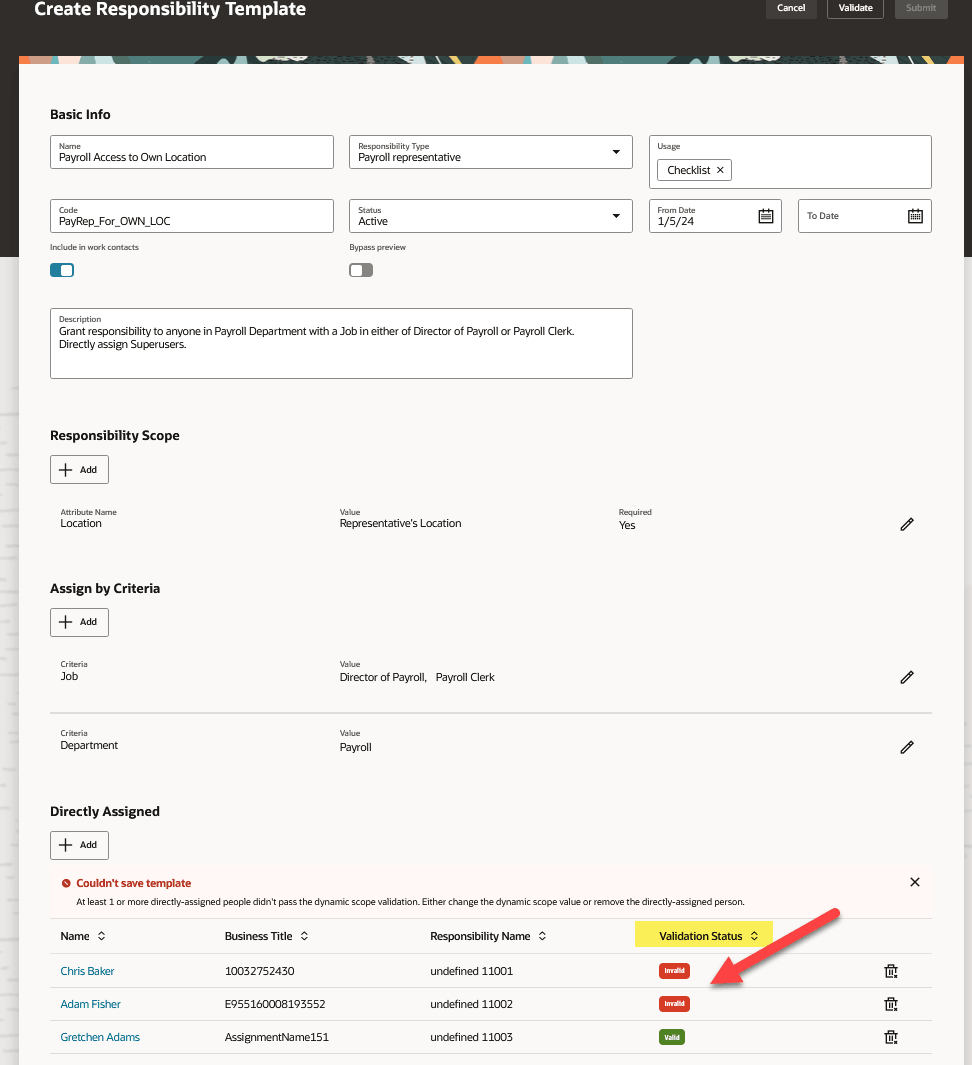
When adding one or more people to the Directly Assigned section, you’ll get a message to validate all directly assigned people.
Click Validate to verify the contents of the worker's assignment and make sure that the expected dynamic scope attribute is present. Then click Submit.
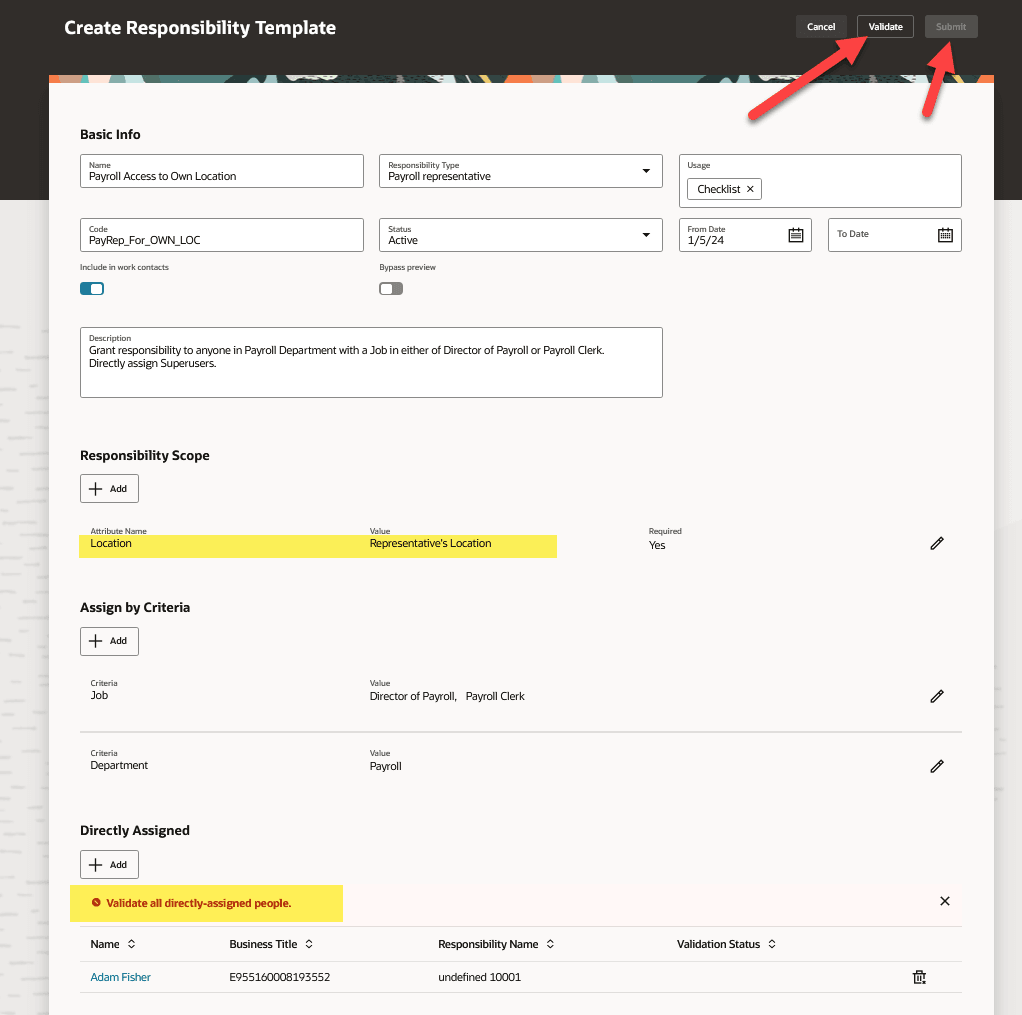
Dynamic Responsibility Scope using Representative’s Location
A badge appears indicating whether the person's corresponding data is valid or invalid under the Validation Status column. If the assignment data is not available, you’ll receive an error message that we couldn’t save the template due to missing data on the assignment.
In this case, you can either change the Dynamic Scope Value to an actual value so it's no longer dynamic or remove the invalid, directly assigned person.
You cannot make worker assignment changes within responsibility templates. You’ll have to remove the invalid person from the directly assigned list and determine what the missing data. Once you add all missing data, navigate to the responsibility template and add the person in the directly assigned section again. Click Validate. Once the template is valid for all workers click Submit.
Note: If you are using the value of the representative's location, their location is missing from their assignment. Similarly, If you’re using the value of the representatives' department, their department is missing from their assignment. Also, if you’re using the value of representatives business unit, their business unit is missing from their assignment however, this scenario is highly unlikely as business unit is required when creating an assignment.
Validation Status badges
Here are the business benefits of this feature:
-
Reduces the time spent maintaining responsibilities for your users.
-
Minimize delays in assigning responsibilities to your workforce.
-
Dynamic Representative Scope enables you to create fewer templates.
Steps to Enable
In order to work with the autoprovisioning, you must enable the ORA_PER_AOR_AUTO_PROVISION_ENABLED profile option.
To enable the profile option, navigate to the Setup and Maintenance work area:
- Search for and click the Manage Administrator Profile Values task.
- Search for and select the profile option:
- Select the Level as Site.
- Enter Yes in the Profile Value field.
- Click Save and Close.
Tips And Considerations
- Keep it simple when defining a responsibility template.
- Responsibility templates must be based on rigid criteria.
- Use responsibility autoprovisioning if you have a large number of directly assigned people on a template.
- If the Bypass Preview option isn’t enabled, make sure to click the Apply button on the Autoprovision Responsibilities page to create, update, or inactivate and end-date AORs.
- The purge option doesn’t remove existing manually created responsibilities.
- Role provisioning must be taken into consideration ahead of Responsibility provisioning, only if your criteria is by role depending on your Implementation.
- If your organization uses Position Management, run Responsibility provisioning after the Synchronize Person Assignments from Position process completes successfully.
- If your organization is using hierarchies, make sure to activate and flatten the corresponding tree structure after any hierarchy updates.
- You can restore responsibilities to the previous state from the last commit, except for the very first time you create a new template.
- If an autoprovisioned responsibility is reassigned to another user, it becomes a directly assigned responsibility
- For a criterion with multi-select capability, the maximum number of values allowed must be under 200.
- Test and verify template results, especially those with large numbers of criteria values.
- You can’t edit the Responsibility Template when the Autoprovision Responsibilities process is running. A message is displayed on the screen that mentions, Autoprovisioning is in process, try again later.
Key Resources
For more information, refer to these resources on the Oracle Help Center.
- Areas of Responsibility, Using Global Human Resources guide.
- What's New for Redwood Experience for Responsibility Templates – Update 24B
Access Requirements
You must be granted the HCM Application Administrator (PER_MANAGE_RESPONSIBILITY_TEMPLATE) function privilege to work on Autoprovisioning AORs.