Total Compensation Statement: HCM AI Agent
You'll find that Retrieval Augmented Generation, or HCM AI Agent, helps employees understand their Total Compensation Statements in a comprehensive way. Employees interact with the AI agent to clarify any questions, by asking them in the Ask Anything chat box.
-
Administrators need to create Guided Journeys (Task - Agent) to uptake HCM AI Agent.
-
Employees ask their questions from the agent in the Ask Anything chat box.
-
Currently HCM AI Agent only supports searching in PDF documents.
- The chat drawer launches with the selected topic and the employee posts the question.
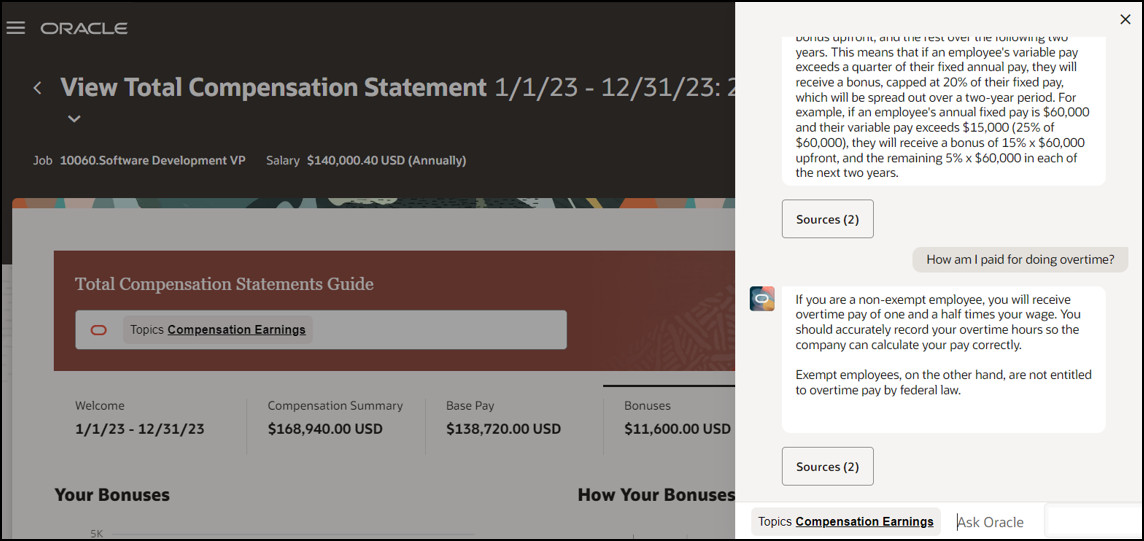
View Total Compensation Statement - Chat Box
Helps employees to understand their total compensation statement.
Steps to Enable
There are four different sets of steps that are required to configure and consume AI Agents in VBCS pages. ESS = Enterprise Scheduler Service, in this case.
-
HCM Agents Admin UI Setup
-
Publish Agent Documents using ESS Job
-
Setup Guided Journey with Agent Task
-
AI Agent Uptake in VB Pages
HCM Agents Admin UI Setup
1) Login to the application as an administrator with the HRC_MANAGE_AI_AGENT_PRIV security privilege, and launch the HCM Agents Admin UI by navigating to My Client Groups -> Show More -> Tools -> Configure HCM Agents.
2) In the search page that launches, select the Tools tab and click the Add button to create a new Document Tool.
3) In the New Documents Tool page, provide values for the mandatory fields (for example, Name and Description) and then click the Add button under the Documents section to create a new Document. A Document is a logical collection of files. The currently supported file format is PDF.
4) Provide values for the mandatory fields of the Document (for example, Name and Description) and upload one or more PDF files related to the Document and then click the Save button.
5) A newly created Document is always in Draft status. Repeat steps 3 and 4 again if you want to add more Documents to the Document Tool. After you're done, click the Add button in the header to create the Document Tool.
6) The newly created Document Tool should now appear in the Tools tab of the search page. After all the reviewed documents are added in and the Tool structure is finalized, the status of Documents is set to "Ready for publish". To do that, click the edit icon against the newly created Document Tool to launch the detail page of the Document Tool.
7) Click the edit button of the Documents and set their Status to "Ready to publish" and then click the Save button.
8) After the Status of all the Documents are updated to "Ready for publish", click the Save button in the header to save the Document Tool.
9) After the Document Tool is created, the next step is to create an Agent and link the Document Tool to the Agent. For this, switch to the Agents tab in the search page and click the Add button to launch the New Agent page.
10) In the New Agent page, provide values for all the mandatory fields. Pick a Category that best fits your use case and provide a unique Code for your agent. After filling in the mandatory fields, click the Add button under the Tools section to link a new Tool to the Agent.
11) Select the newly created Document Tool from the drop down list and click the Save button.
12) Repeat steps 10 and 11 if you want to link multiple Tools to the Agent. When you're finished, click the Add button in the header to create the Agent.
13) The newly created Agent now appears in the Agents tab of the search page. Note that the PDF file attachments linked to this Agent are not published yet.
Publish Agent Documents using ESS Job
1) Launch the Scheduled Processes UI under Tools menu from the Navigator.
2) Click the "Schedule New Process" button.
3) Search and select the job named "Process Agent Documents" and click the OK button.
4) Note the Process ID in the confirmation dialog.
5) Search for the submitted job using the Process ID and wait until the status of the job changes to "Succeeded".
6) After the "Process Agent Documents" job succeeds, go back to the Agents Admin UI, edit the Tool and verify the status of the Documents. The status should now be "Published".
The next set of steps are to setup a Guided Journey with an "Agent" type task, which provides interaction with the AI Agent Chatbot, using the Agent that we created in the HCM Agents Admin UI Setup step.
Setup Guided Journey with Agent Task
1) Launch the Guided Journey Setup UI using My Client Groups -> Show More -> Journeys Setup -> Guided Journey.
2) Click the Create button to create a new Guided Journey.
3) Provide values for the mandatory fields of the Guided Journey and click the "Create Draft" button. Make a note of the Guided Journey Code because it's required in the next step related to linking the Guided Journey with Redwood page.
4) In the detail page of the Guided Journey, click the Add button under the Tasks section.
5) In the New Task drawer that opens, provide values for the mandatory fields of the task. Select the Task Type as "Agent" and select Configuration as the Agent that was created in the first step, and click the Save button.
6) The newly created Agent type task now appears in the Tasks section of the Guided Journey. Make a note of the Guided Journey Code. Click the Activate button to activate the Guided Journey.
AI Agent Search in VB Pages
1) Launch the TCS Redwood Statements page using the Me -> Show More -> View Total Compensation Statements quick action. After the page appears, launch that page in VB Studio by going to "Settings and Actions" menu and clicking "Edit Page in Visual Builder Studio".
2) In VB Studio, switch to the Constants tab, and select the constant exposed by the page to pass in the (above) Code for the page level Guided Journey.
3) Set the Code of the Guided Journey created above, as the value of the constant, and then select the Live view of Page Designer. You should immediately see the Guided Journey component with the Agent task displayed in the designer. The "Topics" drop down list in the journey task banner displays the names of all the Documents that are part of the Agent. You can select a Topic of interest and post questions related to that topic.
Tips And Considerations
AI Agent Chatbot Interaction
The chat drawer launches with the selected topic and the question posted by the user. The answer from the agent populates in the drawer along with the Sources. You click "Sources" to view the supporting chunks of the document that the agent used to answer the question.
The "Topics" drop down list in the journey task banner displays the names of all the Documents that are part of the Agent. You select a Topic of interest and post a question related to that topic.
You can also switch the topic in the chat drawer and post questions related to that topic.
Key Resources
For even more information, see "AI Agents" in HCM Common, What's New in 24D:
https://docs.oracle.com/en/cloud/saas/readiness/hcm/24d/hcom-24d/24D-hcm-common-wn-f36374.htm