Redwood Experience for Process Result Details
The Process Result Details page has been moved to the Redwood toolkit, giving the page the look of Redwood, along with the backend functionality that Redwood has to offer. With this new page you can quickly view and manage results details from Payroll processes.
You can access the Process Result Details page by using any of these navigations:
- Use the Process Results Summary task to search and select the process you've submitted and view the Process Result Details page.
- Use the View Flows page and click on a single task or task flow to go to the Checklist page of the selected flow.
From the Checklist page, search for and select a process to navigate to the Process Result Details page.
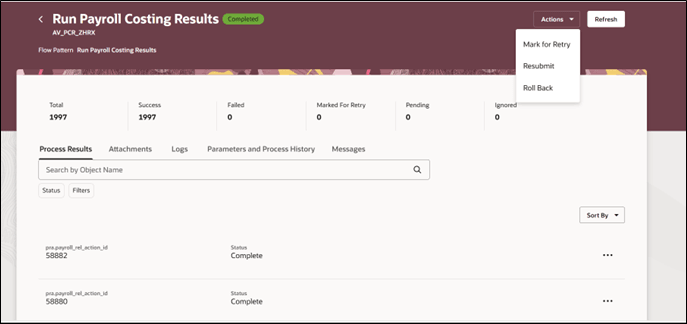
Process Results Page
The redesigned page displays the following details regarding the process:
- View high-level process statistics displayed at the top of the page. It displays the number of records included in the process and their status.
- Review the process analytics to check the total number of records processed, number of records that are processed successfully, records pending, records that have failed, records marked for retry, and so on.
- View list of all employees included in the process, if applicable.
- Use the Parameters and Process History tab to view the details of the parameters used to submit the process and view the process history. The process history details are used for audit purposes and to troubleshoot issues. It includes actions such as submit, rollback, mark for retry, retry, and so on.
- Use the Logs tab to view details of the processes and sub-processes included in the process. Use this data to troubleshoot processing errors.
- Use the Attachments tab to access all attachments for the process such as reports.
- Use the Messages tab to view messages related to the process or any of the sub processes.
- Use the Payroll Checklist option to navigate to the checklist page that this process was submitted by.
- Navigate to employee level results for the process such as the statement of earnings, balance results, and so on.
- Use the Roll Back Errors action at the process level to remove the results of all employees with an error status. You can use any of the options, as shown in this image, to include the rolled back employees in a payroll relationship group.
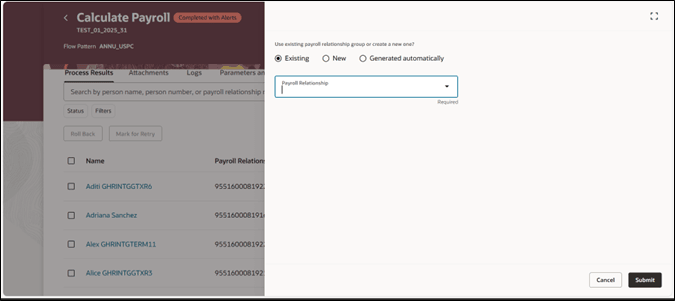
Roll Back Errors - Payroll Relationship Group
When you roll back records that have errors, the application segregates and includes the rolled back records in a payroll relationship group. The application gives you the option to select either an existing payroll relationship group or create a new payroll relationship group or opt for the application to generate a group automatically. The existing group can be a group already created for this flow, or for another flow, or one that’s manually created. You can now use a single payroll relationship group for the whole flow across multiple tasks within the flow.
After you have rolled back results for a process, navigate to the Payroll Relationship Group page and open the PR Group to view the rolled back records.
- Review the status of each individual employee record and perform actions as required.
Use the Process Result Details page to monitor the progress of the process you have submitted and take corrective actions as required.
Steps to Enable
The Process Result Details page is not enabled by default and is controlled by the Redwood Payroll Activity Enabled profile option. The profile option is set to No by default.
Use these steps to enable it:
- Navigate to the Setup and Maintenance area and search for the Manage Administrator Profile Values task.
- On the Manage Administrator Profile Values page, search for and select the Redwood Payroll Activity Enabled profile option. The code for this profile option is ORA_PAY_PAYROLL_ACTIVITY_REDWOOD_ ENABLED.
- In the Profile Values section, click Add.
- Specify the level at which the profile value is to be set. Select Site.
- Click Save and Close.
Note: The ORA_HCM_VBCS_PWA_ENABLED central profile option must also be enabled.