Redwood Experience for HCM Spreadsheet Data Loader
Enrich user experience with the new Spreadsheet Templates page developed using the Redwood tool set. This page is built from the ground up using Visual Builder Studio (VBS) to give you a unique experience of Oracle applications.
Using this UI, you can create and manage bulk-loading spreadsheet templates by selecting and configuring attributes from business object hierarchies, with built-in automation to handle its validation.
You can access the Spreadsheet Templates task from the Data Exchange work area. Browse through existing spreadsheet templates by filtering through business object, legislative data group, status, template action.
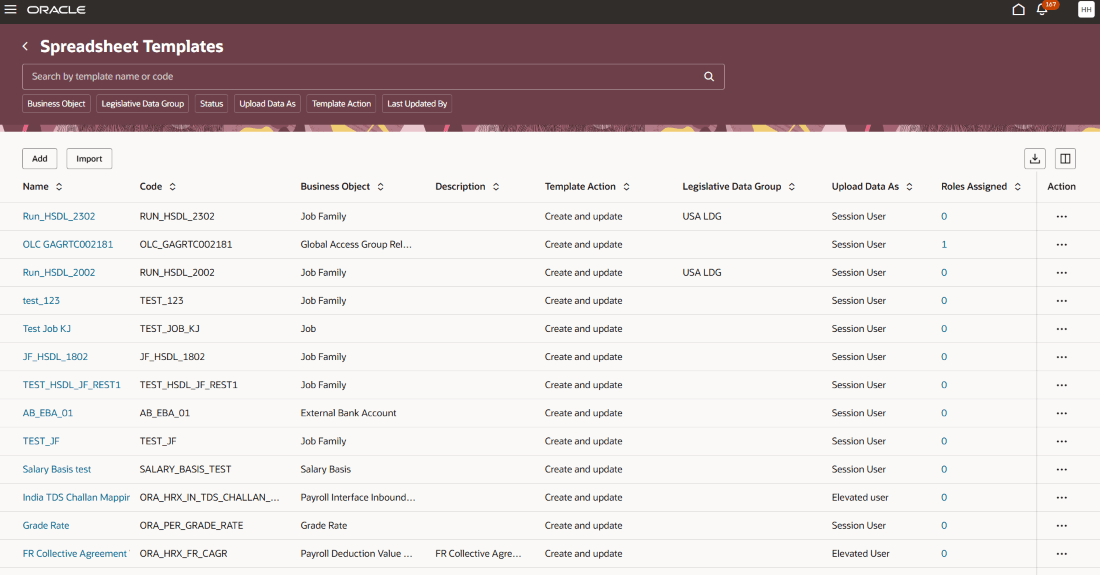
Spreadsheet Template Details:
| Column Name | Description |
|---|---|
| Name | Name of the template. |
| Code | Code of the template. |
| Business Object | Business object defined in the template. |
| Description | Description for the template. |
| Supported Action | Indicates the action applied to spreadsheet rows uploaded using this template (Create and update or delete). |
| Legislative Action Code | LDG for custom templates. |
| Upload Data As | Indicates the type of user who uploads data using spreadsheets generated from this template. |
| Roles Assigned | Roles assigned to this template. |
| Last Updated On | Date and time the template was last saved. |
| Status | Indicates the template status, such as Draft, Active. |
| Category | Category of the template |
| Country | Name of the country for the country-specific template. |
| Last Updated By | Name of the user who created the template. |
| Actions |
Copy Export Download CSV Template Download XML Template Delete Inactivate Download Debug Log View Spreadsheet Template |
TABLE LEVEL ACTIONS:
| Component | Description |
|---|---|
| Search | Search by using template name or code. |
| Filter Chips | Narrow the list using business object, legislative data group, template status, upload user type, template action, or last updated user. |
| Sort | Order and arrange the table details by clicking the column headers sort as needed. |
| Add action | Opens a new guided process to define a new template, configure its attributes, access requirements, and activate it. |
| Import action | Imports an existing spreadsheet template. |
DIRECTLY ASSIGNING TEMPLATE ROLES:
To assign roles for a specific template, select the Assigned Roles Count link to open the Assign Spreadsheet Template Role Access page.
Selecting a preconfigured (Oracle-seeded) template name also opens this page for role assignment.
- Data Security – View the read-only Upload Data As and Assign Roles to Template fields which define the template’s security configuration and determine whether roles can be assigned in the Data Set Operations and Template Maintenance sections.
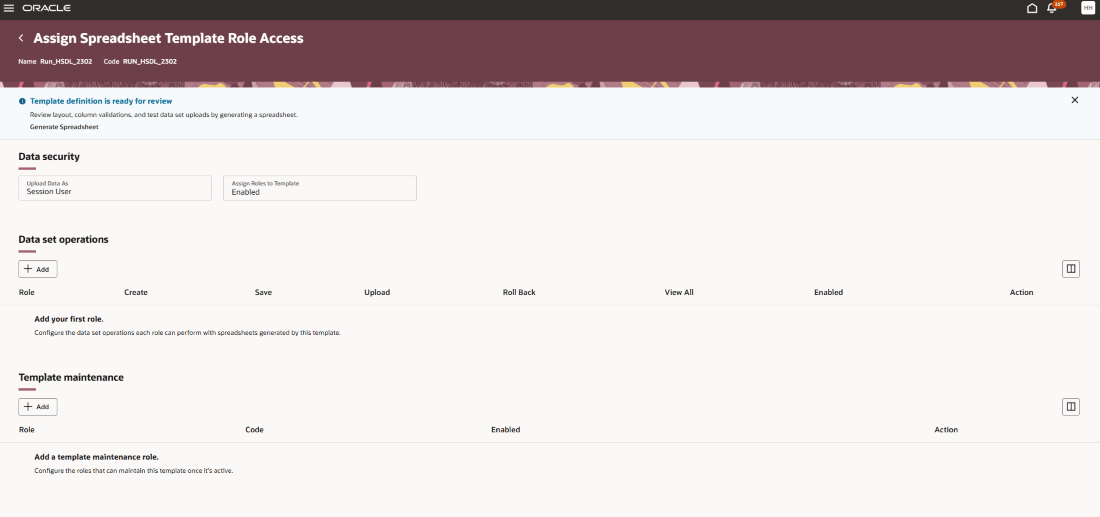
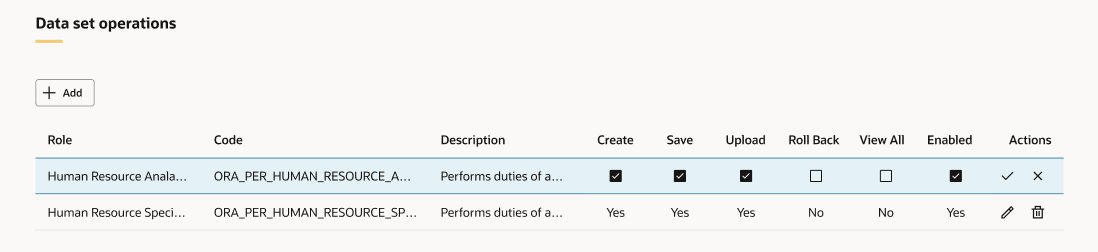
- Data Set Operations – Assign job and abstract roles to control who can generate spreadsheets from the active template.
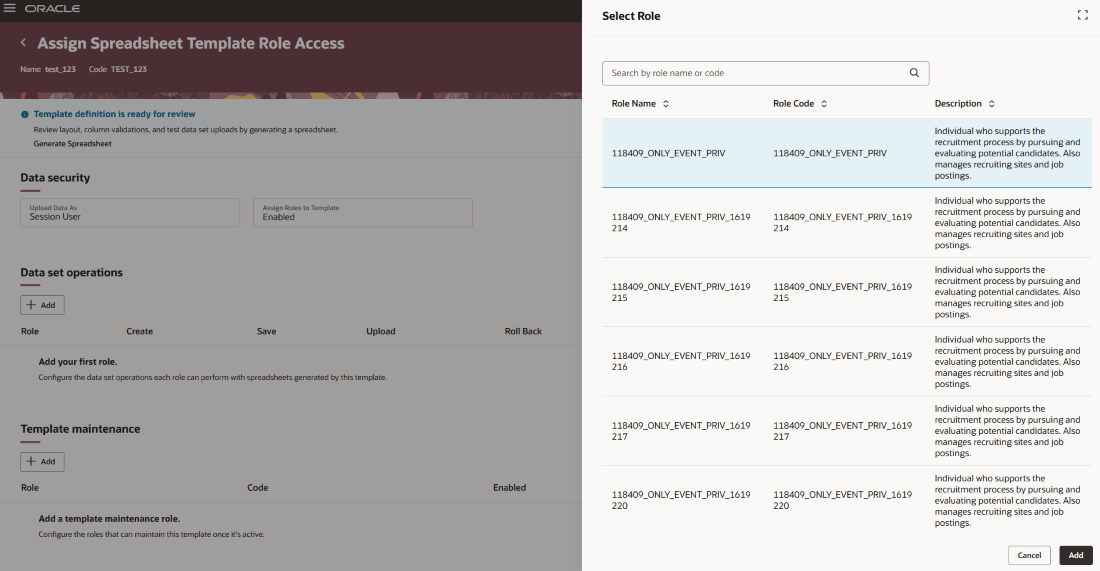
Select Add to open the Select Role panel, choose a role, and add it. Use the Edit icon to modify the role’s properties or remove the role.
This section is available only if the Assign Roles to Template field is enabled in the template definition.
- Template Maintenance - Assign job and abstract roles to control who can maintain the active template.
Select Add to open the Select Role panel, choose a role, and add it. Use the Edit icon to modify the role’s properties or remove the role.
TEMPLATE ACTIONS:
Each template row includes an Actions menu (…) that provides the following options -
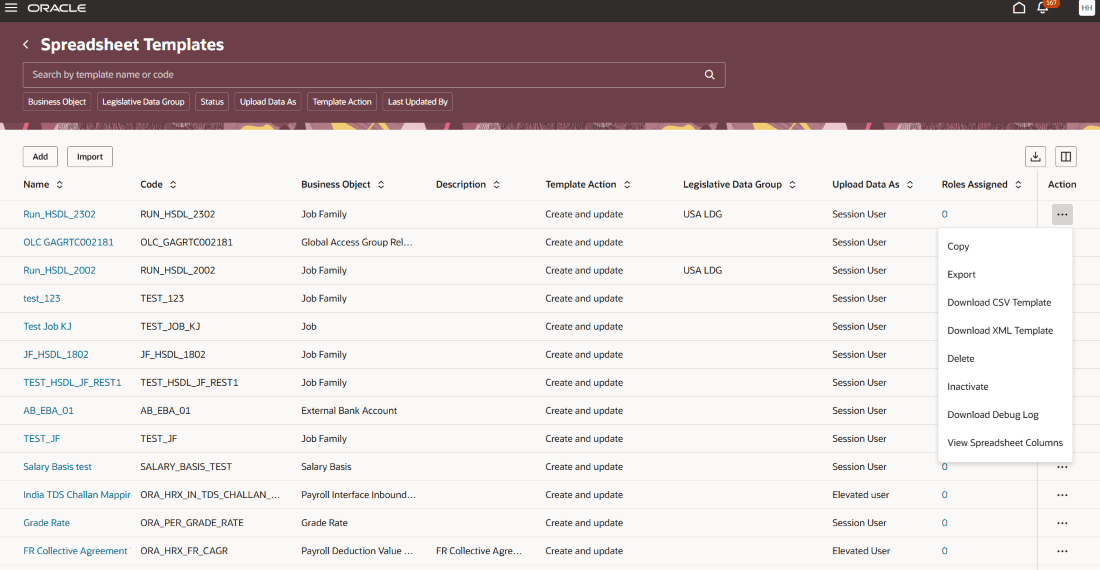
Edit: When you select a template, its details are displayed in a guided process template with prepopulated values. Review and modify the fields as needed, then save and activate your changes.
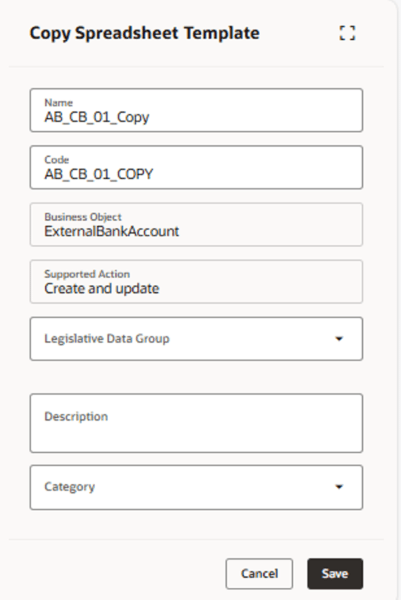
Copy: Opens the Copy Spreadsheet Template panel to create a duplicate of the selected template definition.
Export: Exports the template definition to an XML file in a local folder, which you can import into other environments.
Delete: Deletes the template if no data sets have been created from it.
Inactivate: Inactivates a draft or active template that’s no longer needed. Inactive templates are hidden from the Run Spreadsheet Data Loader page and can’t be edited or used to generate spreadsheets. Templates with existing data sets can’t be deleted, so inactivating removes the template from use while retaining the associated data sets.
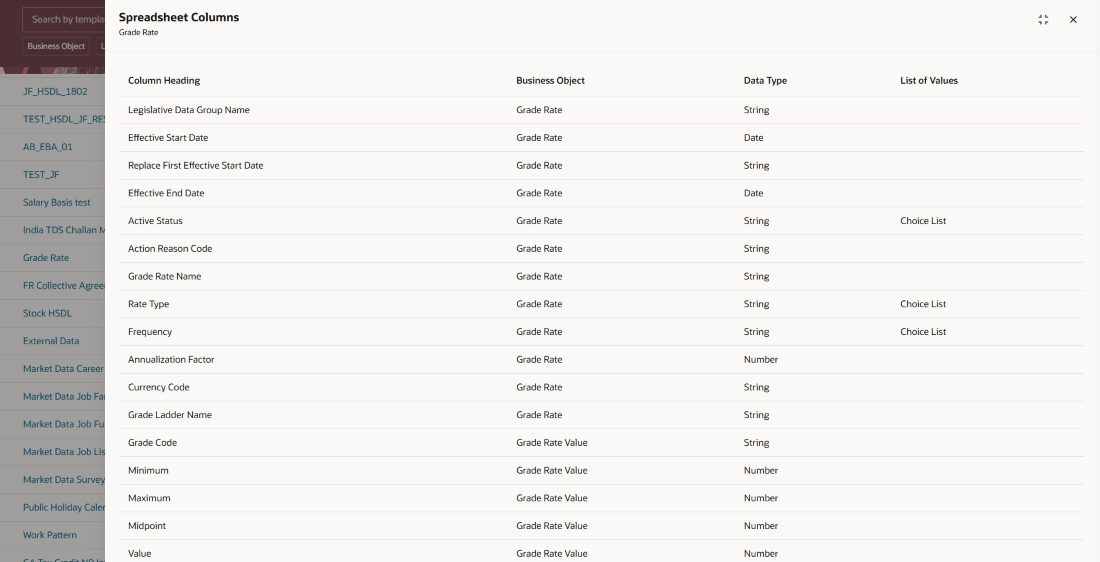
View Spreadsheet Columns: Displays the columns included in the spreadsheet generated from the template.
Enable Debug Mode: Turns on debug logging for the HCM Spreadsheet Data Loader template.
Disable Debug Mode: Turns off debug logging for the HCM Spreadsheet Data Loader template.
Download CSV Template: Downloads a CSV file of the template structure for loading into an HSDL spreadsheet.
Download XML Template: Downloads an XML file of the template structure for loading into an HSDL spreadsheet.
Download Debug Log: Downloads a debug log file for the template to help troubleshoot spreadsheet generation issues.
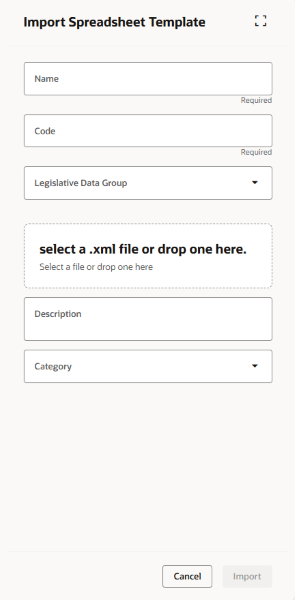
IMPORT SPREADSHEET TEMPLATES:
Creates a template by importing a template definition xml file and providing additional details such as template name, code, legislative data group, description, and category. Upon successful import, you can find the spreadsheet on the spreadsheet templates page.
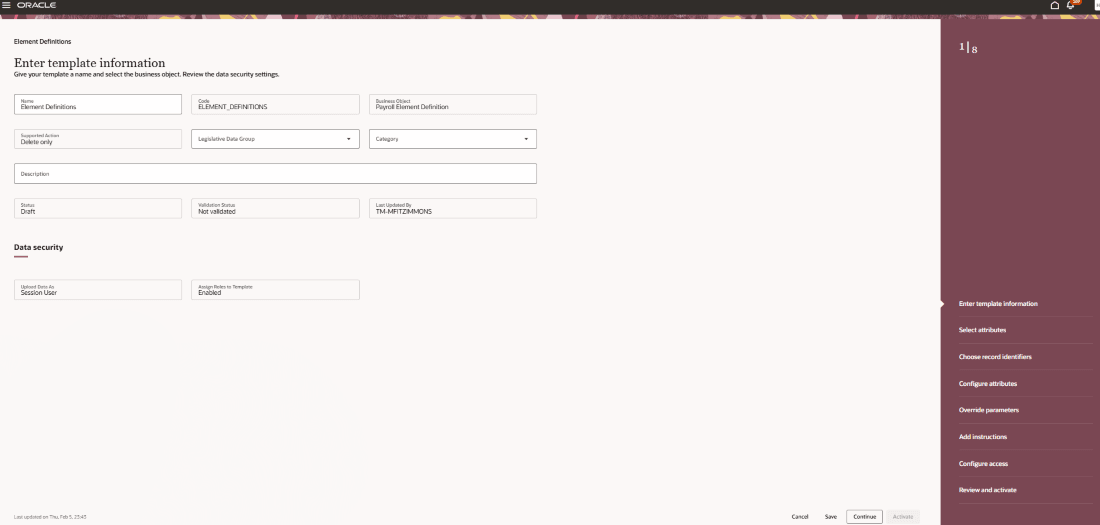
ADD A NEW TEMPLATE:
Use Add to create a new spreadsheet template through a guided process, where you enter template details, select attributes and record identifiers, configure settings, define instructions and security, and activate the template.
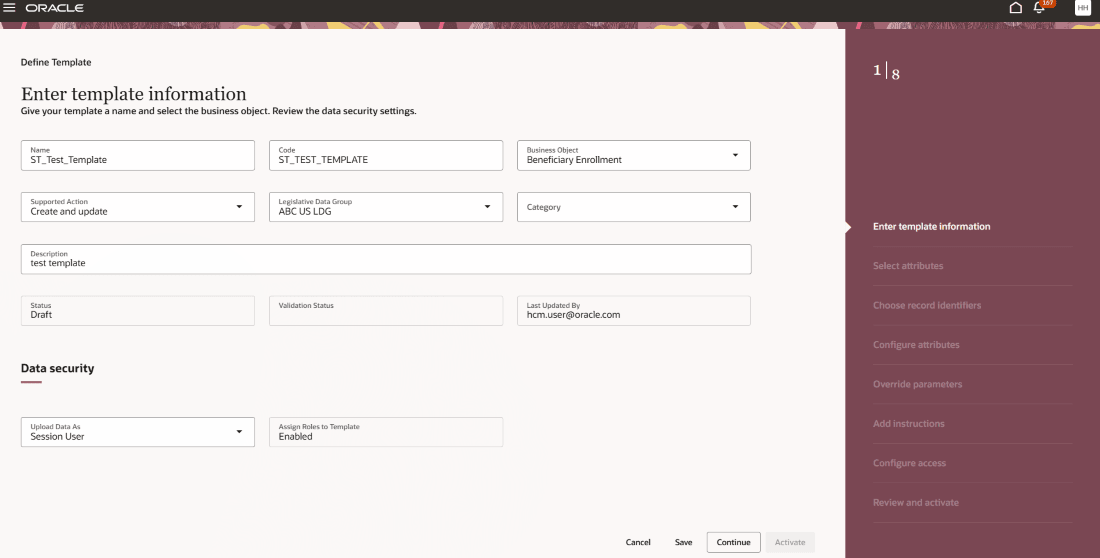
Step 1: Enter Template Information
The Define Template page enables you to specify template details, such as the template name, code, business object, supported action, legislative data group, category, description, upload user type. Select Continue to proceed to Select Attributes step.
-
Name of the field Description Name The name of the template. Code A unique code that identifies the template, defined on the Create or Import page. Supported Action The action supported by the template. Business Object The business object the template is based on - specified on the Create or by the imported template definition Legislative Data Group The legislative data group applicable for the template. Description A description for the template. Category A user-defined category for the template. Status The status of the template, such as Draft, Active and Inactive.
Last Updated By The user who last updated the template. Upload Data As Specifies who can upload data using spreadsheets generated from this template. If the templates based on restricted objects, are automatically set to "Elevated User". Assign Roles to Template Indicates if roles can be assigned to the template. This value is determined by the business object’s security classification and whether the user has the HRC_ASSIGN_ROLES_TO_ANY_HSDL_TEMPLATE privilege to assign roles to restricted templates.
Actions available in the guided process -
-
Action Description Cancel Discards any unsaved changes and returns to the Spreadsheet Templates page. Save Validates and saves the changes made on the current step. Continue Validates and saves changes, then moves to the next step in the guided process. Activate Validates the template and, if no errors are found, activates it.
For templates with an Inactive status, all fields are read-only. You can continue through the guided process to review the remaining steps and activate the template.
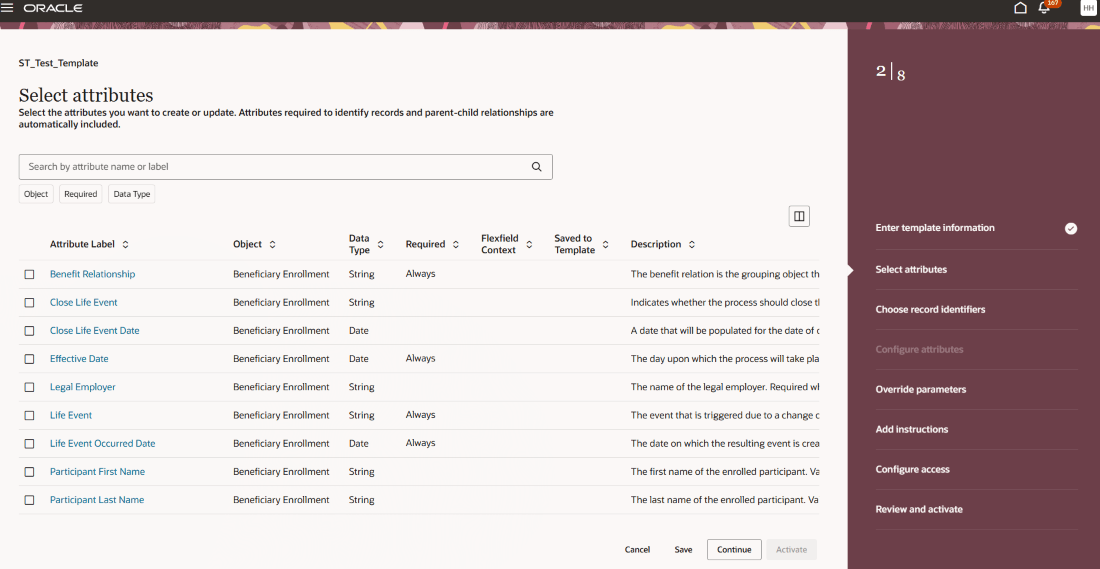
Step 2: Select Attributes
Use this page to select the attributes that users will maintain through the generated spreadsheet. The template automatically includes additional attributes required to uniquely identify records and resolve parent relationships. These system-added attributes are defaulted and hidden as needed.
You can search by attribute name or label or filter the attributes list using business object, specified required status, and data type.
-
Column Description Attribute Label The translated label of the attribute. Object The business object component to which the attribute belongs. Data Type The data type of the attribute such as String, Date, Datetime, Character Large Object. Required The required status of the attribute such as Always, For new records. Flexfield Context The context for flexfield attributes. Description The translated description of the attribute. Attribute Name The name of the attribute. Flexfield Name The flexfield name for flexfield attributes Saved to Template Green 'Yes' badge indicates that the attribute has been saved to the template.
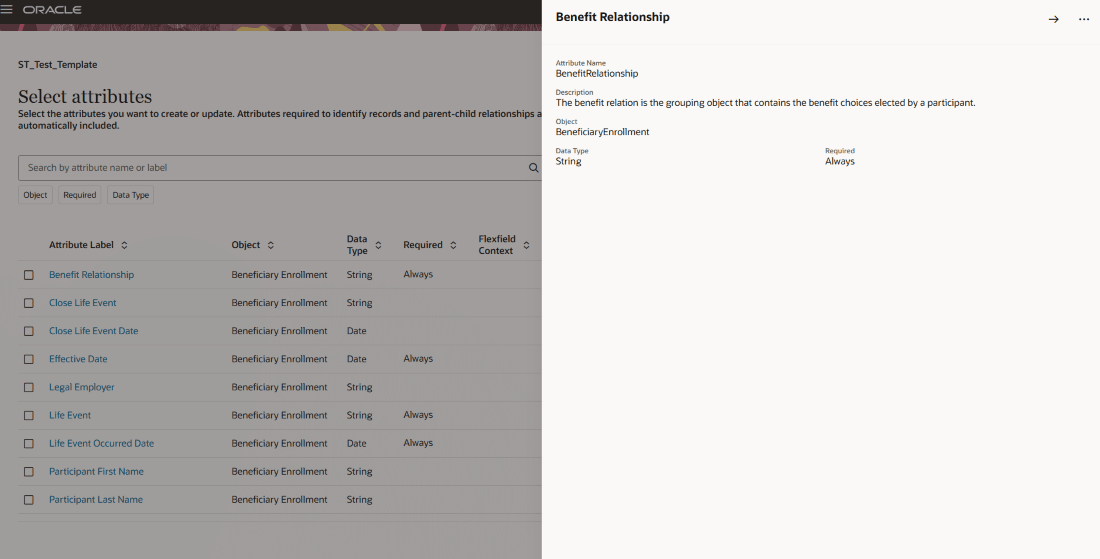
Select the attribute name to view the attribute details.
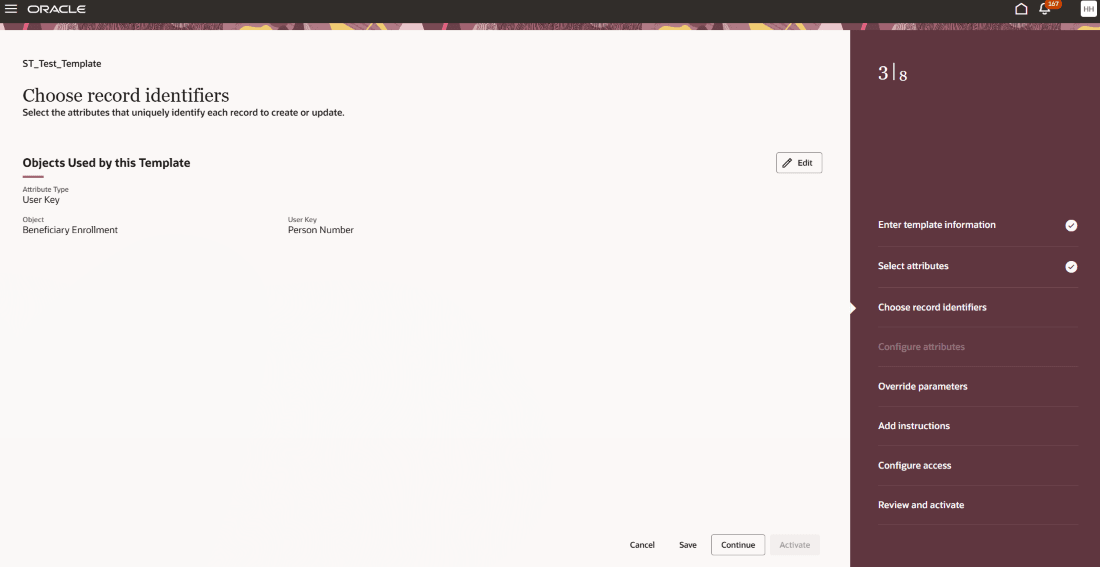
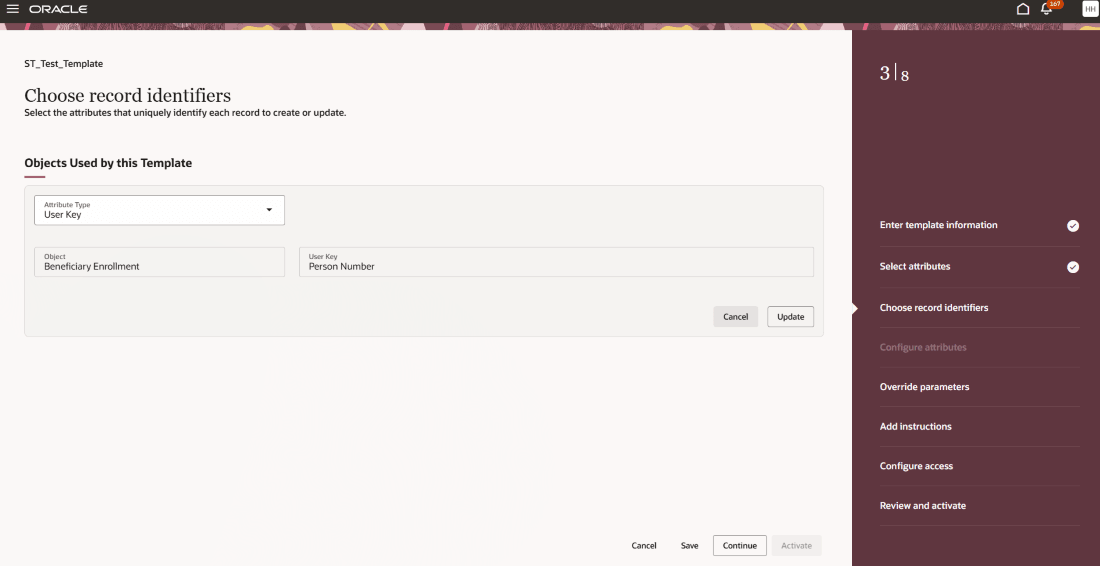
Step 3: Choose record identifiers
This page displays the attributes used to uniquely identify a record for each object included in the template. Use this page to select the key type and, if multiple user keys are available, choose the appropriate key combination.
For delete templates, you don’t need to select attributes to maintain. Instead, select the top-level object to delete and choose the key type. The required identifying attributes are automatically added to the template.
The list of values available for a child object may be restricted based on the user key selected for its parent object.
-
Field Description Object Translated business object name. Attribute Type Determines if surrogate ID or user key attributes are used to uniquely identify records in the spreadsheet. User Key Displays the combinations of user keys available to uniquely identify records for the object.
Surrogate Key Displays the attribute name of the surrogate ID for the object.
Use Edit to update the Attribute Type when there's more than one key identifying the object.
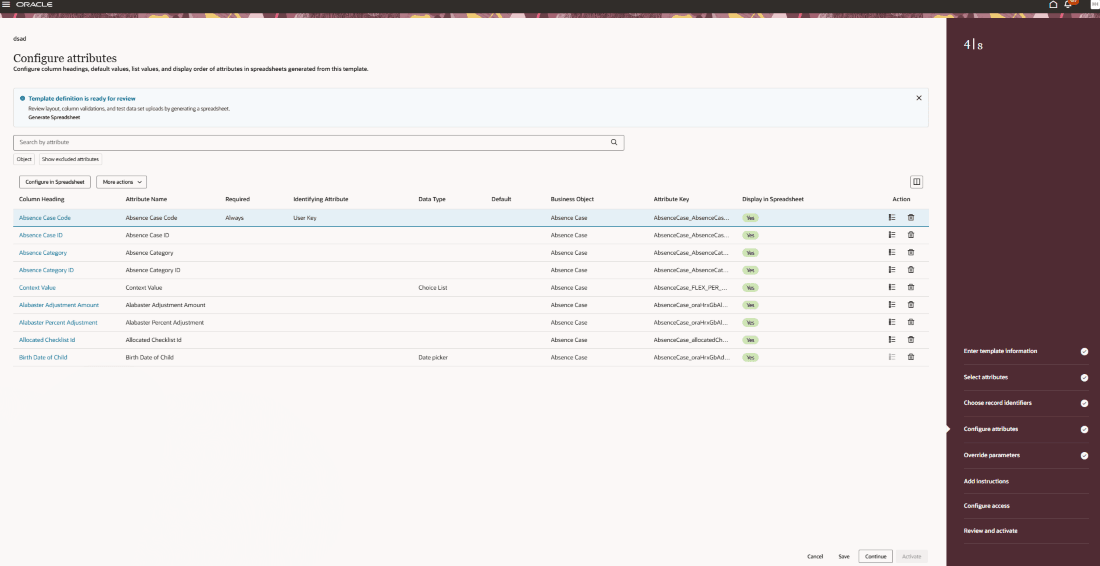
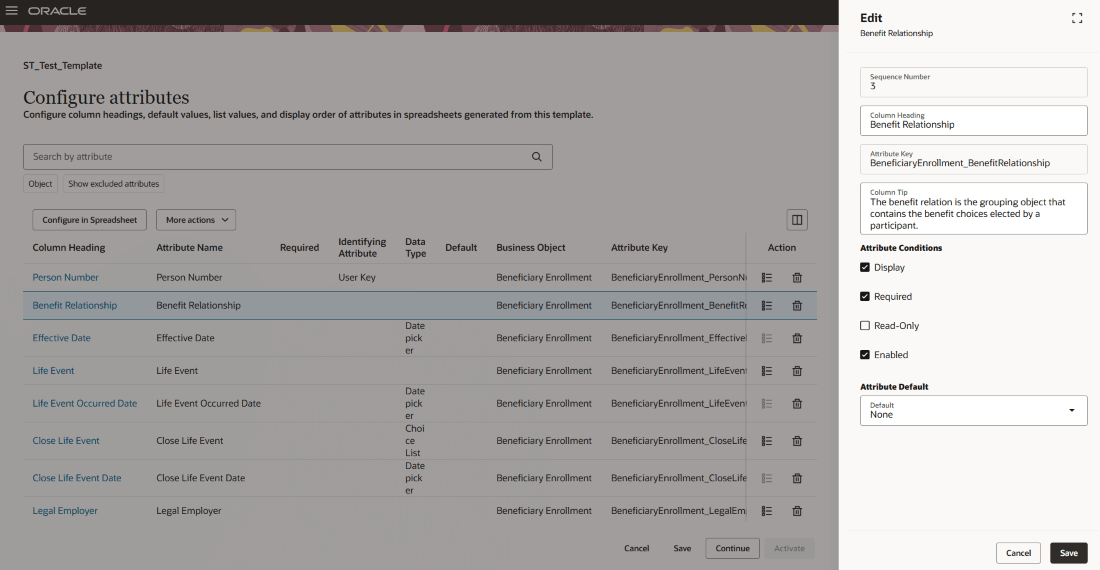
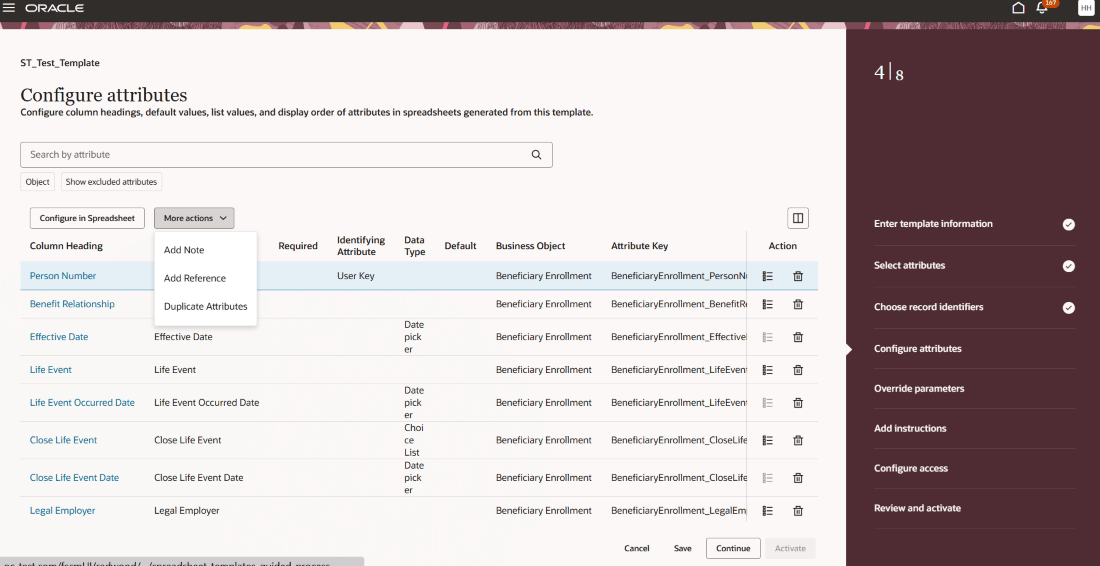
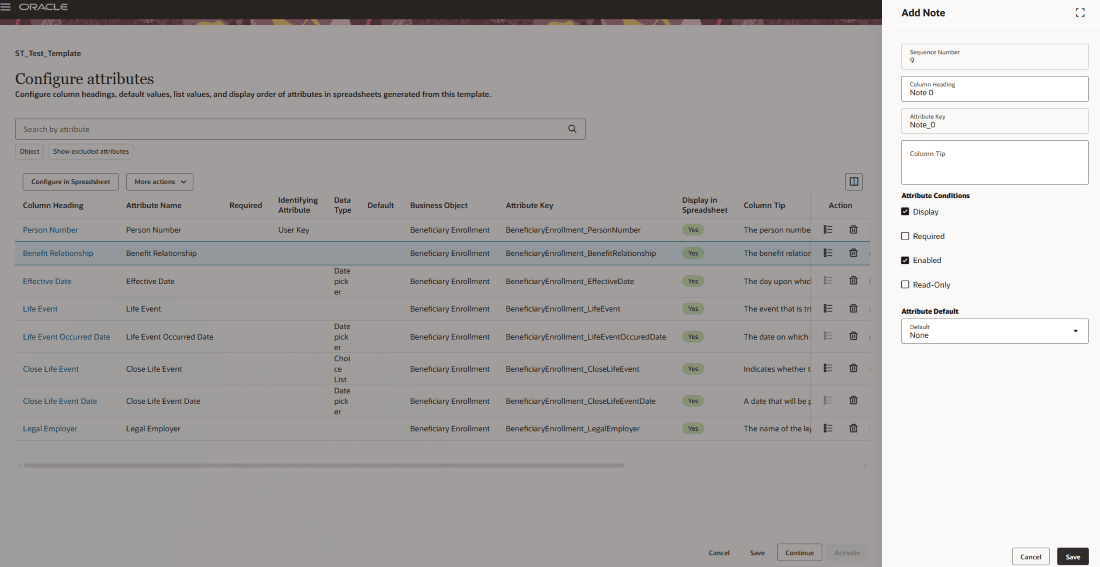
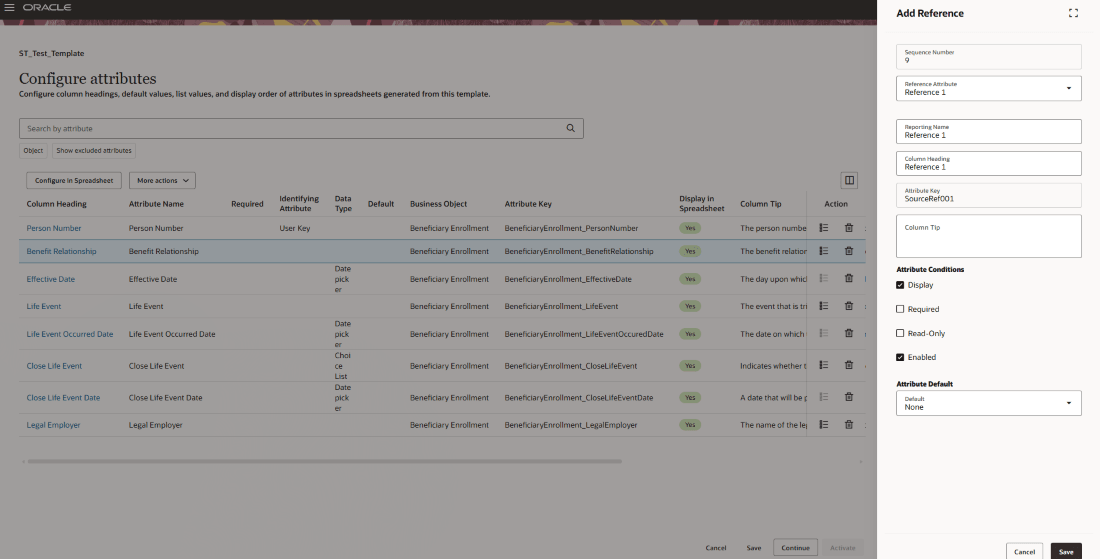
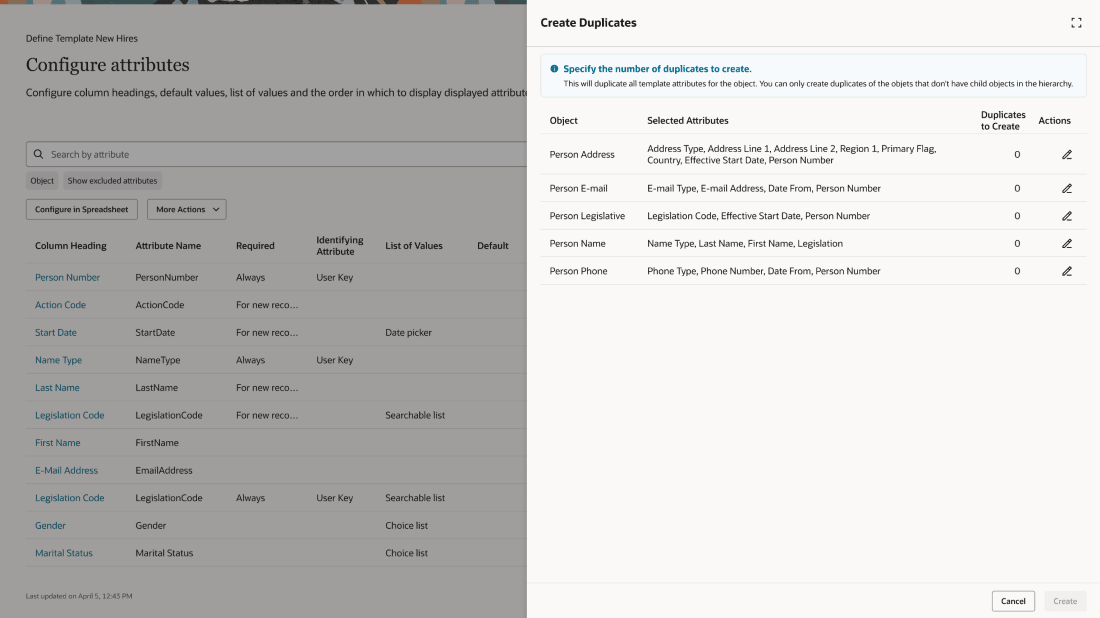
Step 4: Configure attributes
Use this page to configure the attributes included in the template. You can set default values, modify column headings, configure list of values (LOVs), duplicate child objects, and add note or reference attributes.
This page displays all attributes selected for the template, including those chosen on the Select Attributes step and those automatically added to support record identifiers, parent-child relationships, and date-effectivity.
Configure attributes page displays key information each selected attribute, including its column heading, attribute name, required status, identification attribute, data type, default value, business object, attribute key, display in spreadsheet badge, and column tip. Search using attribute name and filter using object and excluded attributes.
You can perform the following from this step:
- Edit the spreadsheet column properties
- Configure spreadsheet by downloading it
- Add a Note
- Add a Reference
- Create duplicate attributes
- Configure LOVs
- Delete Attributes
Editing the spreadsheet column:
Select the spreadsheet column heading to open the Edit panel with prepopulated values. You can update the column heading, column tip and attribute default value.
Review the attribute conditions such as Display, Required, Read-Only, and Enabled. You can set default values for constant values, existing selected attribute, expressions, specified date (only for attributes with a data type of date or date time) and load date (only for attributes with a data type of date).
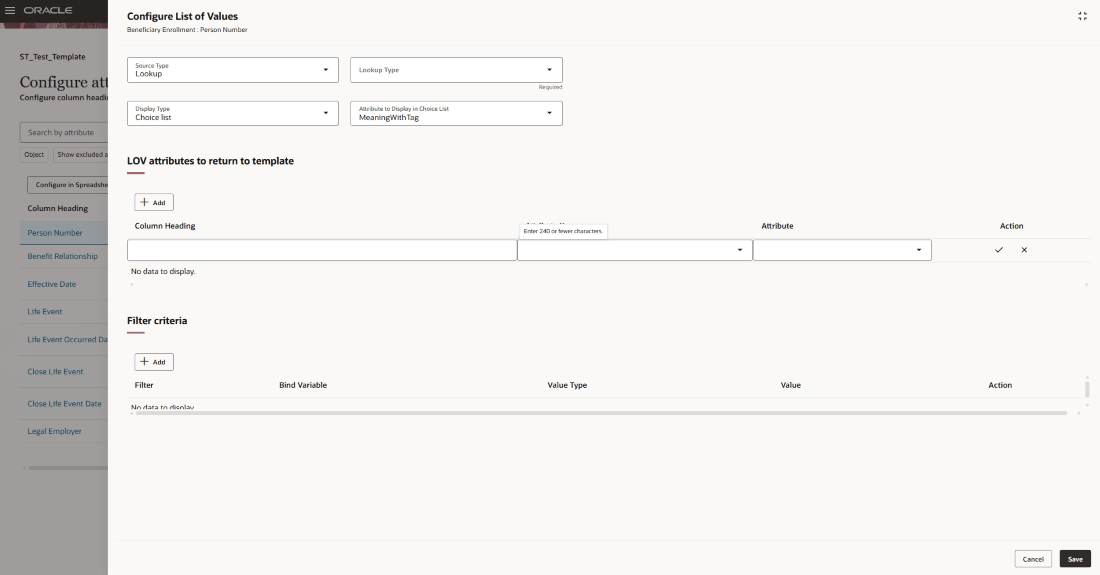
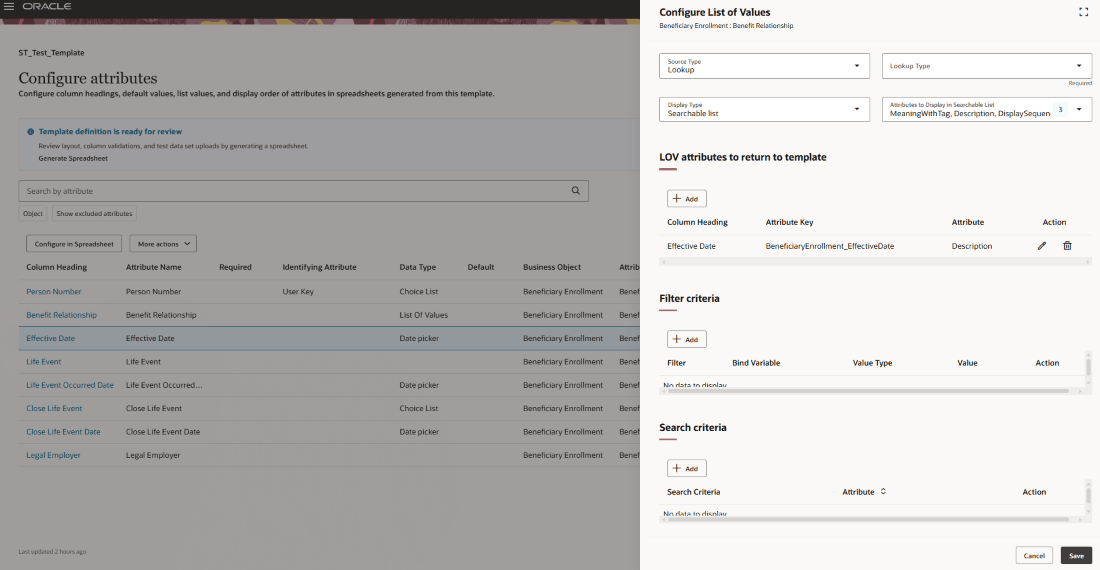
Configuring List of Values:
Use the LoV icon against a column heading row to draw up the Configure List of Values panel.
- Configure various Source Types like Lookup, Value Set and View object, their corresponding Lookup Types, Value sets, and View object with paths, and Display Type and Attribute to display in choice list.
- LOV attributes to return to template - Lists the spreadsheet attributes configured to use a list of values (LOV). The first row always represents the base attribute and must remain in the table, even before the source and display settings are defined.
- Filter Criteria:
- Lookup Filter -The LOV is preconfigured with a default filter criterion of the lookup type.
- Value Set Filter - A default filter is automatically added that includes a record for each parameter.
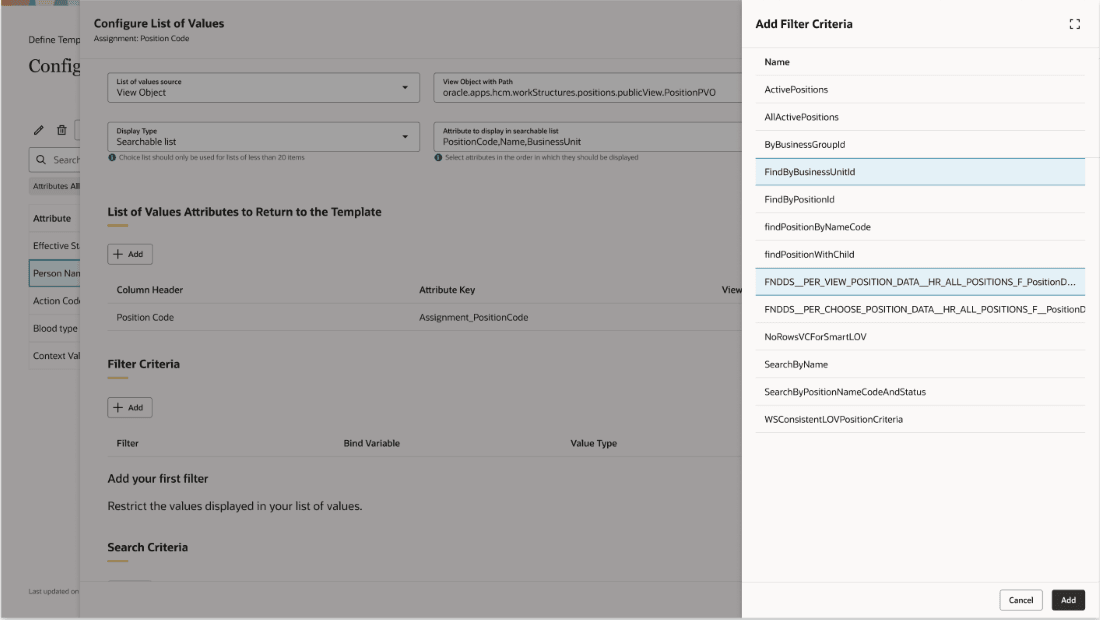
- View Object Filter - No values are defaulted for view object filters; you can choose which of the filters defined on the view object to apply. You'll can view the Attribute Value Filters tab with the Filter Criteria here.
- Search Criteria - You can add search criteria to view objects sourced lists of values. This section is only available when the Source Type is Lookup, or View Object when the view object supports search criteria.
Click Add under the Filter Criteria or Search Criteria to bring up the Add Filter Criteria panel:
More Actions on Configure attributes and Configuring in Spreadsheet:
Use the More Actions button to create a note or reference, duplicate attributes from objects.
Add Note: Use this page to define a note attribute. Note attributes don’t save data to the database and can be used in expressions to derive values for other attributes.
Add Reference: This page allows the user to define a reference attribute. Unlike base attributes, reference attributes are always held in the same columns in the staging tables, so they can be used to store and find reference information. For example, a copy of the Person Number may be help so OTBI reports can find records pertaining to a specific person number.
Create Duplicates: Use this panel to duplicate child objects by selecting the object and specifying the number of duplicates. All selected attributes for the object are duplicated automatically.
Delete Attributes: Use the delete icon against each column header to remove required and optional attributes.
Configure in Spreadsheet: Generates an ADFdi spreadsheet to review and configure the spreadsheet template.
Preview and Test Template Definition:

These are the minimum requirements to enable preview:
- Provide required information in the first step such as the template name, action, and business object
- Ensure that each object included in the template has the necessary identifying attributes selected.
- Select the object to delete during the relevant step, for templates that perform delete actions.
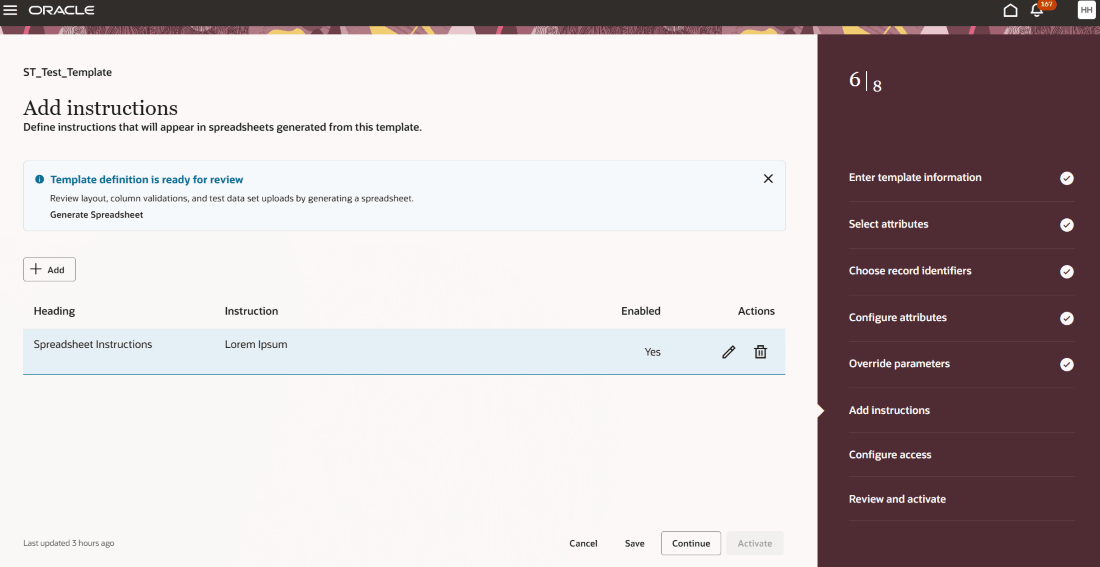
Once these minimum requirements are met, an information banner appears at the top of the page indicating that you can generate a spreadsheet to preview and test the template definition. The banner remains visible until the final step of the guided process. You can choose to either generate a spreadsheet to preview and test the template or continue through the guided process without previewing.
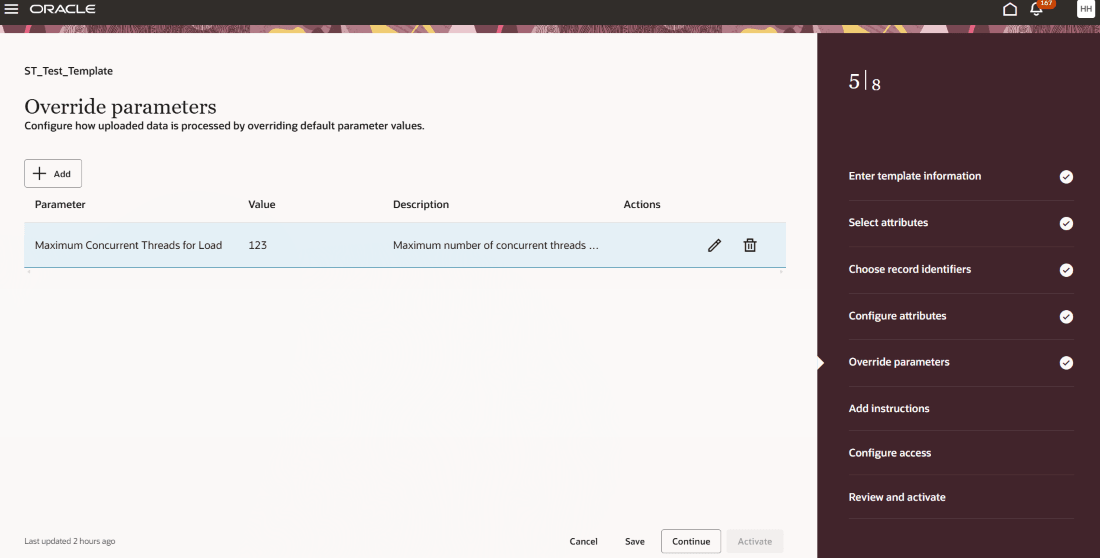
Step 5: Override parameters
Override default parameter values and define how data is processed during bulk load. Select Add to open the Template Parameters panel to select and save needed parameters.
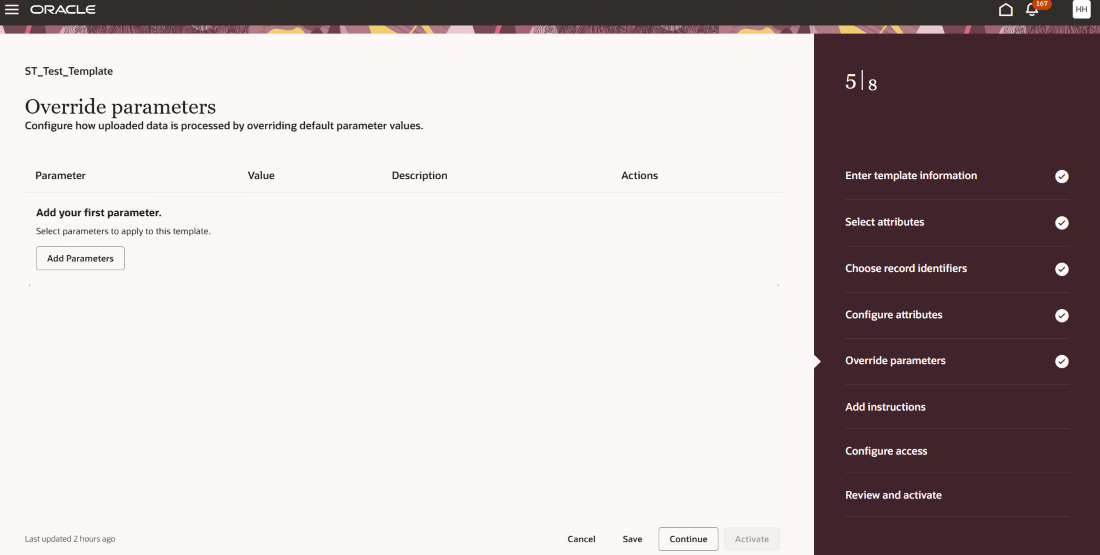
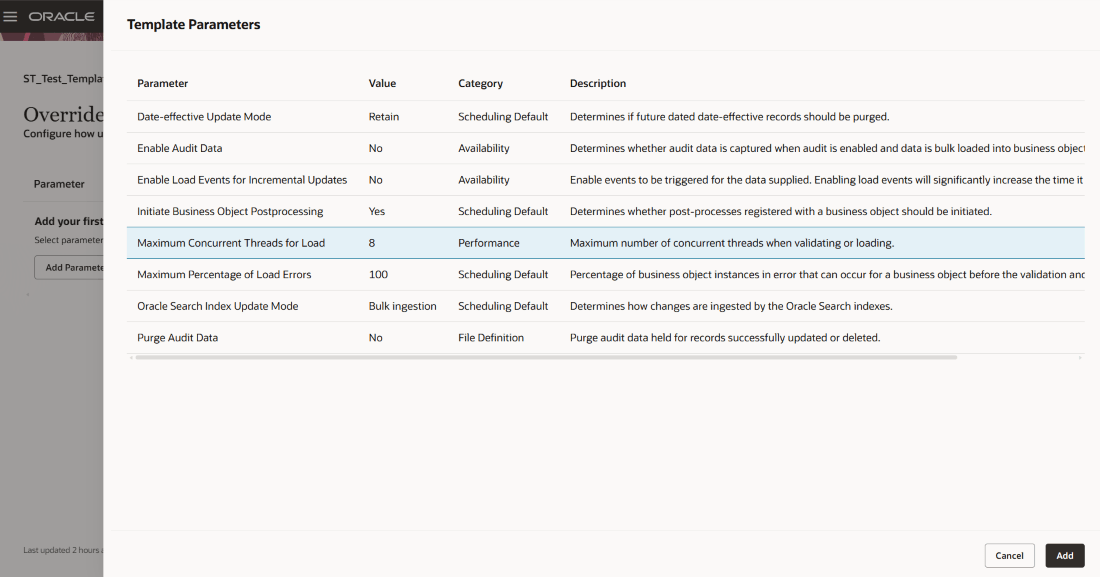
Use the Edit icon to update parameter values and Delete icon to remove the parameter.
Step 6: Add instructions
To add instructions select Add to open the Add Instruction panel and provide the Heading and Instruction.
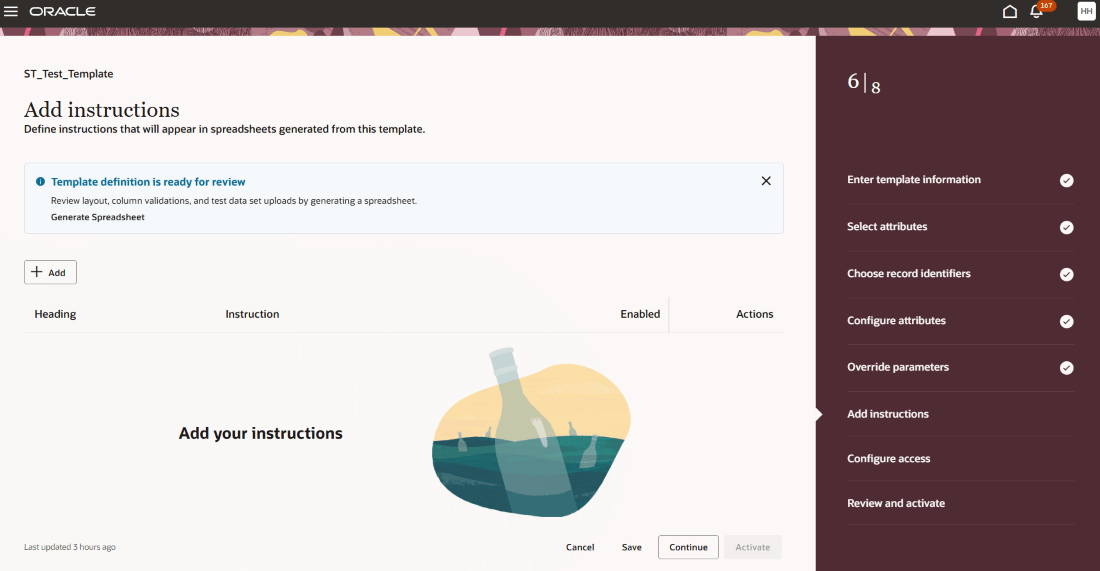

Use the Edit icon to update instructions and Delete icon to remove them.
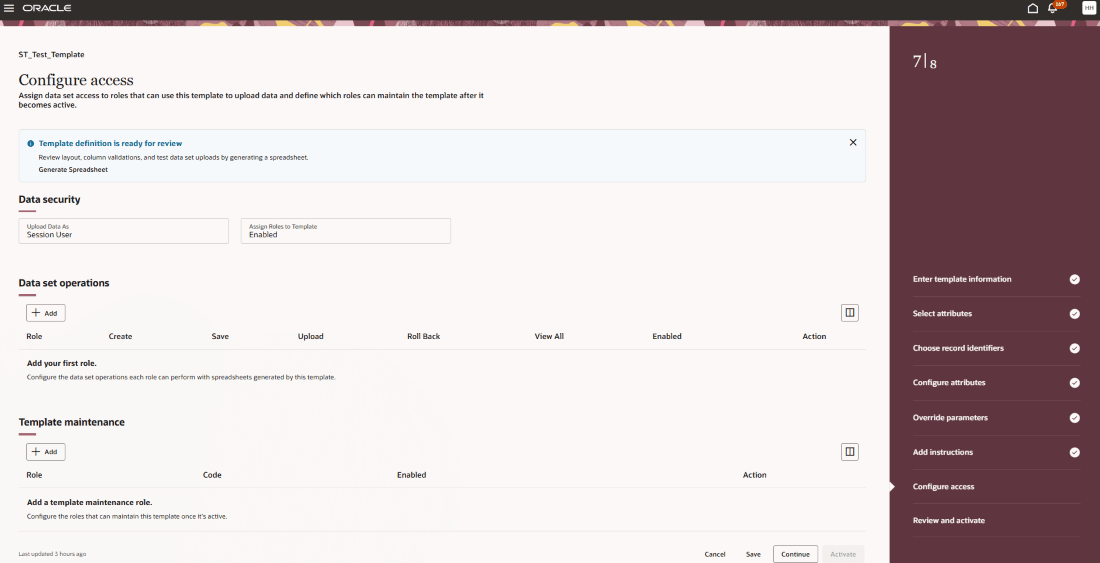
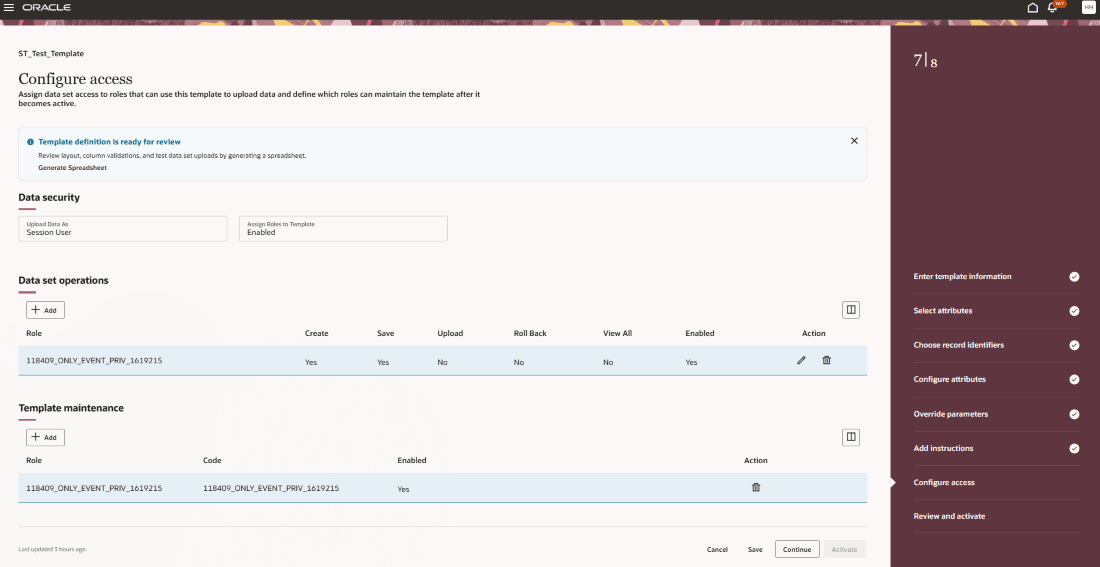
Step 7: Configure Access
Configure roles that can generate spreadsheets from the template and define their data set access. You can also specify which roles are permitted to modify the template after it is activated.
Although this step is optional, if no roles are assigned data set access, only users with superuser privileges can generate spreadsheets and edit the template.
Data security - View the read-only Upload Data As and Assign Roles to Template fields which define the template’s security configuration and determine whether roles can be assigned in the Data Set Operations and Template Maintenance sections.
Data Set Operations - Assign job and abstract roles to control who can generate spreadsheets from the active template.
Select Add to open the Select Role panel, choose a role, and add it. Use the Edit icon to modify the role’s properties or remove the role.
This section is available only if the Assign Roles to Template field is set to Enabled in the template definition.
Template Maintenance - Assign job and abstract roles to control who can maintain the active template.
Select Add to open the Select Role panel, choose a role, and add it. Use the Edit icon to modify the role’s properties or remove the role.
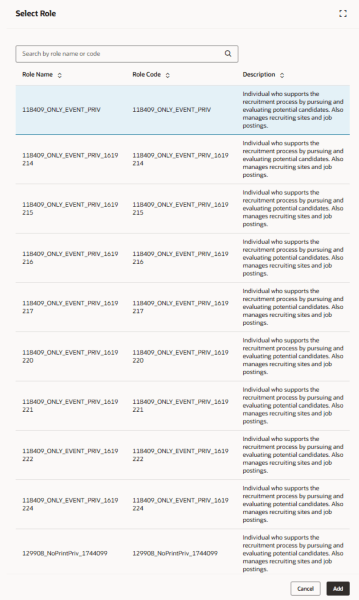
Select Role:
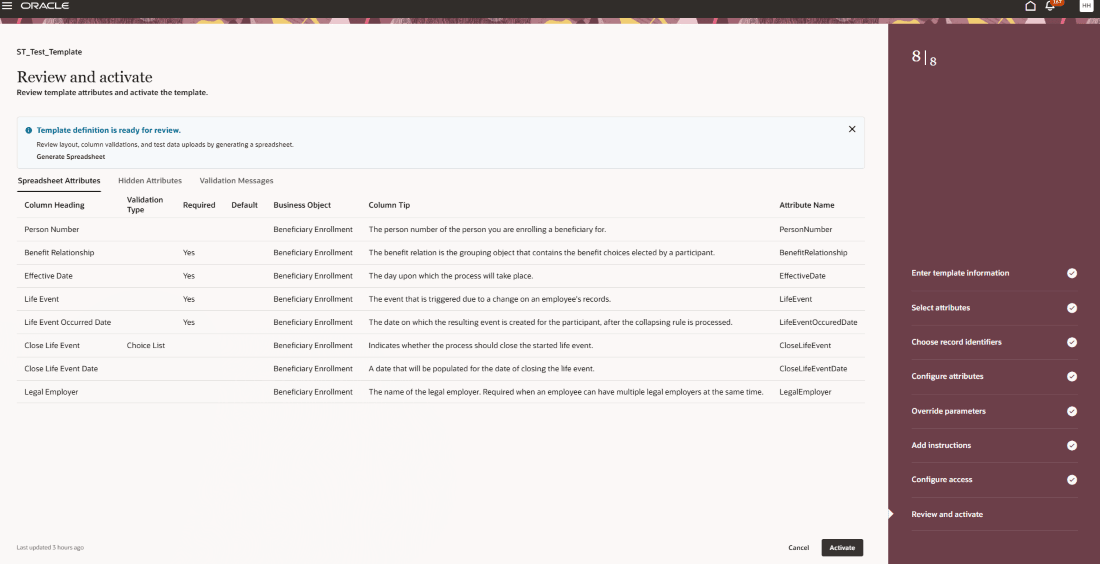
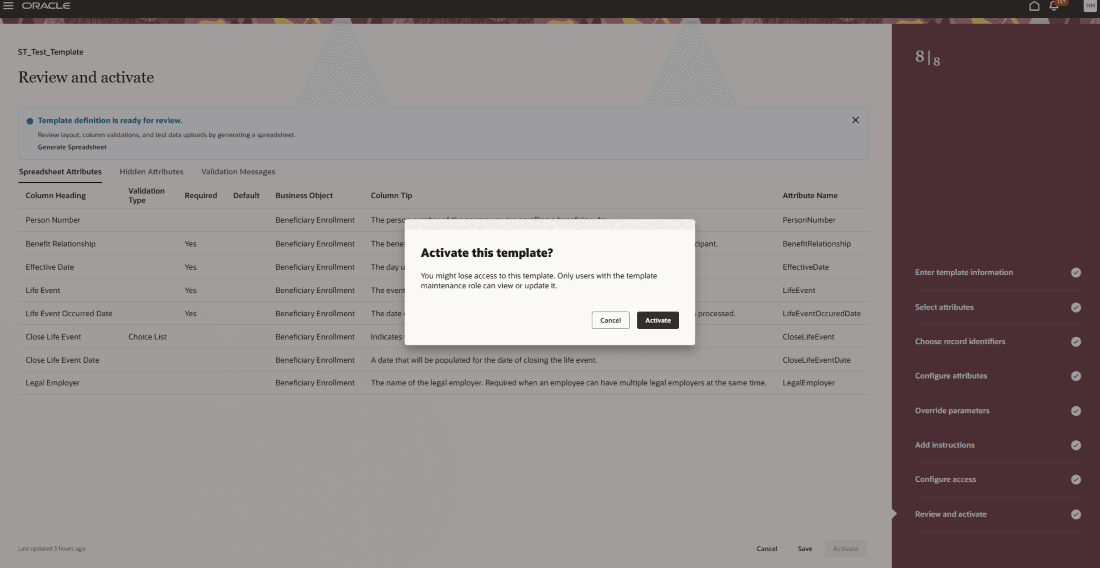
Step 8: Review and activate
Review the Spreadsheet Attributes tab and select Activate. Resolve any errors listed on the Validation Messages tab and use the log file for troubleshooting if needed. Once validated successfully, the template is activated and listed on the Spreadsheet Templates page.
Business Benefit:
The newly designed Spreadsheet Templates page lets you experience Redwood’s high-fidelity interactions. It offers fewer clicks, better performance and increased cohesiveness.
Steps to enable and configure
In order to work with the new HCM Data Loader pages, you must first enable the profile option. By default, the profile option is delivered as disabled. If you want to use the new HCM Data Loader pages, you need to set the profile option to Yes.
| Profile Option Code | Profile Option Display Name | Value |
|---|---|---|
| ORA_HRC_HSDL_REDWOOD_ENABLED | Enable HCM Spreadsheet Data Loader Redwood Pages | Y |
For more information, see How do I enable a profile option?
Key resources
For more information on configuring access to design and maintain HCM Spreadsheet Data Loader (HSDL) templates: Configure Access to Design and Maintain HCM Spreadsheet Data Loader (HSDL) Templates
For more information, see:
- Set Up Desktop Integration for Excel
- Guidelines for Using Desktop Integrated Excel Workbooks
- Troubleshoot Desktop Integration for Excel
Access requirements
You will need the following function security privilege for the Spreadsheet Template pages:
| Privilege | Code |
|---|---|
| Manage HCM Spreadsheet Data Loader Templates | HRC_MANAGE_HSDL_TEMPLATES_PRIV |