Redwood: Manage Build Plan in Sales and Operations Planning Using a New User Experience
Supply chains are often complex, involving multiple echelons of suppliers, manufacturers, and distributors. The build plan enables for robust end-to-end analysis of supply and demand across your entire plan. You can now manage this plan using a Redwood page, leveraging the bill of resources defined for critical components and resources linked to assembly items in your sales and operations plan. Easily analyze multitier supply chain relationships, covering end items, components, suppliers, and resources. Identify constrained demand and capacity shortages, then adjust the plan to resolve these issues. The build plan now includes more measures, helping you quickly pinpoint critical components, bottleneck resources, and key suppliers that are causing end item performance gaps.
Changes have been made in the Redwood version of Build Plan to simplify how a build plan is configured. A significant difference from the classic version of aggregate build plan is how you select items, resources, components, and component suppliers more efficiently. Build Plan in Sales and Operations Planning uses bills of resources for aggregate supply planning to focus on the critical components and resources consumed in the manufacturing of assembly items.
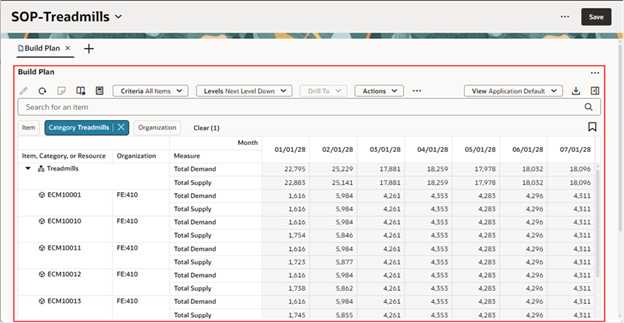
Build Plan Table
Let’s look more closely at the Build Plan table.
Build Plan Toolbar
The following is an image showing the Build Plan toolbar.

Build Plan Toolbar
- Edit: Use this icon to adjust the editable measure values for one or more cells. Select the cells you want to edit, then click the Edit icon to open the Edit drawer. When you’re done, click Save in the top-right corner to apply your changes.
- Refresh: To undo unsaved measure adjustments, click the Refresh icon in the toolbar. In the Refresh data dialog box that opens, click the Refresh icon to discard your changes, or Cancel to keep them.
- Notes: Use the Notes icon to view, add, or edit notes. First, select a cell or a level member such as an item or resource to enable it. Notes are hidden by default when you open build plan. To view or edit them, turn on the Notes icon from the More Actions (…) menu.
- Format Measures: Overrides the display characteristics of a measure or apply color formatting to a measure. Click Save and Close to save all changes made since your last save.
- Calculate Now: Recalculates selected dependent measures in the build plan that use expressions. It doesn’t affect measures without expressions. If you make more changes, those calculated measures won’t update until you click Calculate Now again. To automate this, turn on Automatic Calculations from the More Actions (…) menu. This enables automatic updates for the dependent, expression-based measures.
- Criteria: The option you select on the Criteria menu controls which child items, resources, and suppliers are displayed in the Build Plan table. Unlike the classic version, Criteria isn’t used to select the root items – those are selected using the search component described later. By default, All Items is used, but you can create and set a custom as your default.
- Levels: Determines how far down (or up) the build plan traverses in the bill of resources to retrieve child items, resources, and suppliers. When you select a Criteria option, the Levels menu sets a default level based on it. You can select a different value to broaden or narrow the levels that are displayed. For example, Next Level Down is selected automatically when the All Items criteria option is applied. To see all items at all levels of the bill of resources, select All Levels Down from the Levels menu.
- Drill To: Use the Drill To feature to pass context from selected cells to another visualization (such as table, graph, or page). Select one or more cells, then choose a target visualization or page from the Drill To menu. The selected visualization or page opens with the applied context. To configure additional drill-to actions, select Manage Links from the Actions (...) menu in the upper-right corner of the Build Plan.
- Actions: Use this menu to manage criteria or to save, restore, or delete views. In Redwood, views replace the layouts used in the classic version of Build Plan.
- More Actions (…): The More Actions menu includes options to toggle Automatic Calculations, Empty Rows, and Notes. The Automatic Calculations toggle turns on automatic recalculations of dependent, expression-based measures. Whenever you exit a cell after making an edit, the system recalculates these measures. When this setting is enabled, there’s no need to click Calculate Now, as recalculation occurs automatically. By default, empty rows are hidden in the build plan. Select Empty Rows to display them. For example, when including editable measures that might not yet have values.
- View: Use the View menu to select a view. The view determines the measures, time level, and the number of time buckets displayed.
- Export: Exports the Build Plan table to an Excel spreadsheet. The export reflects the current view, meaning the spreadsheet includes only the measures and columns currently visible.
- Edit View: Opens the Edit View drawer, where you can specify the measures, time level, and number of time buckets to display. Changes made in the drawer are temporary unless you save the view using Save View from the Actions menu.
- Actions (...): The Actions menu has options to Manage Links, Maximize, and Clear Context. These actions are available from the same menu in other visualizations.
Selecting Items to Display in Build Plan
The search component in build plan is responsible for selection of the root items. Later in this feature description we’ll discuss how child items (for example, components), resources, and suppliers are selected.
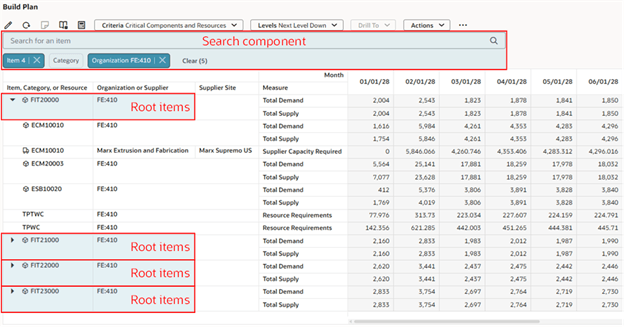
Search Component Selects Root Items
The following is an image of the search component in build plan:

Search Component
- Keyword search: In Build Plan, the keyword search operates exclusively on the Item column using the contains operator. For example, if you enter “FIT2” and click Enter, a build plan is displayed for all items containing “FIT2”, such as FIT20000, FIT21000, FIT22000, and FIT23000. The keyword search is case insensitive, making it easier to locate root items.
- Filters: Use filters to apply column-specific filter criteria. After selecting values and clicking outside the chip, the table updates to display only rows that match the selected criteria. The Organization filter further refines the displayed root items. The Category filter works independently of both the Item and Organization filter chips. To use the Category filter, you need to specify a catalog as the default product hierarchy in the plan’s dimension catalog. Once configured, you can select a category to filter items accordingly.
- Saved searches: The Saved Searches icon allows you to save the current keyword search and filter values as a named saved search. You can also use this action to select an existing saved search. When selected, the keyword search and filter values are refreshed based on the saved search configuration.
When you open Build Plan without any context, a message prompts you to search for one or more items or select a category of items. You must enter values in the keyword search or select specific items or a category to display results.
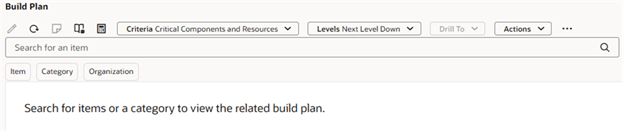
Empty State Message in Build Plan
Once you’ve provided the required search information, the Build Plan is displayed for each of the qualifying combinations. For example, if the Treadmills category is selected in the Category filter, the Build Plan is generated for the category. The displayed child items, resources, and suppliers that are determined by the user-defined criteria option – for instance, Critical Work Centers and Supplier Categories.
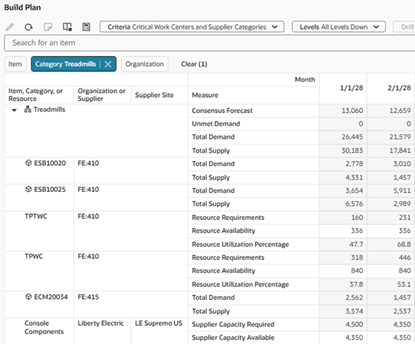
Category Filter in Build Plan
Configuring Criteria
Create criteria to specify which child component items, resources, and suppliers appear in the Build Plan for a given root item.
In the following image, the user-defined criteria Critical Components and Resources, combined with the selected level Next Level Down, determine the child rows displayed under the parent item.
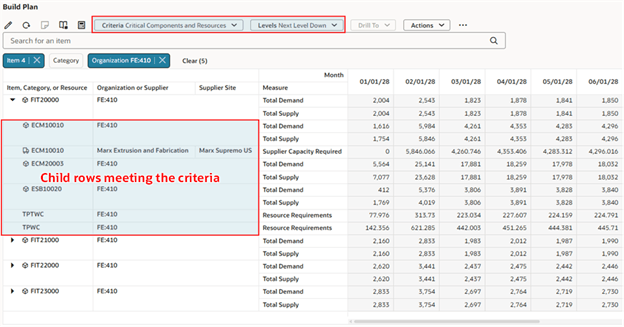
Criteria and Levels Determine the Child Rows
To create, edit, or delete criteria, select Criteria from the Actions menu.
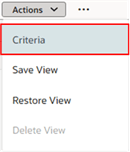
Criteria Action
The Criteria drawer opens and displays the available criteria. For example, All Items is the seeded default criteria. Click Create to create criteria.
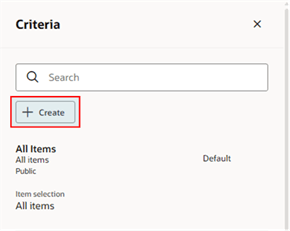
Click Create in the Criteria Drawer
The New criteria drawer opens.
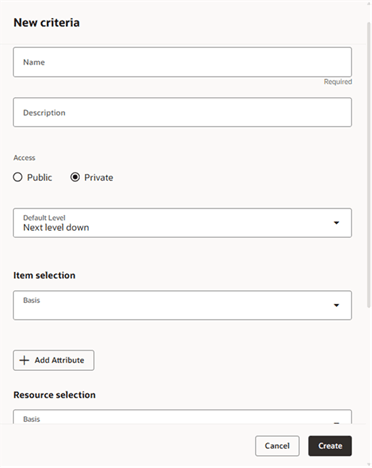
New Criteria Drawer
When creating criteria, enter the following information:
- Name: Enter a unique name for your criteria.
- Description (Optional): Describe the purpose or usage of the criteria.
- Access:
- Select Public to allow all users to view and use the criteria.
- Select Private to restrict visibility to yourself.
- Default Level: Specify the default level that’s preselected when the criteria is applied. You can override this value using Levels in the toolbar during build plan review.
- Item selection: Define the criteria used to determine which child component items are displayed.
- Resource selection: Define the criteria used to determine which child resources are displayed.
- Supplier selection: Define the criteria used to determine which child suppliers are displayed.
- Set as default: Enable this option to make the criteria your personal default when opening or drilling into a build plan. This setting is user-specific and does not affect other users.
The following sections provide a detailed overview of the Item Selection, Resource Selection, and Supplier Selection sections of build plan criteria.
Item Selection
The following image shows the available basis values for item selection.
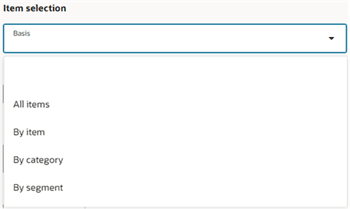
Item Selection Basis Values
The valid values are:
- All items: Select this value to include all component items when traversing bills of resources for a root item.
- By item: Select one or more component items to include in the build plan. These items will be included whenever they are encountered during the traversal of bills of resources for a root item.
- By category: Select this option to include items based on a defined category. You must specify both a catalog and a category. Only items within the selected category are included in the build plan as bills of resources are traversed.
- By segment. Select one or more segments from a segment group to include specific item-organization combinations. Only items that are members of the selected segments are displayed in the build plan during resource traversal.
In addition to using basis for item selection, you can also specify item attribute values to further refine the criteria. Specifying a basis value is optional when using only attribute-based selection. For example, you can filter the build plan to display only items classified as critical components. You can also specify dynamic attributes, which are evaluated each time the plan is run. For example, display only items with unmet demand, such as:
- Subassemblies with independent demand
- Components affected by lead time compression, based on the results of the most recent plan run
The following image shows the item attributes that can be included in the criteria. The valid values are:
- Critical Component: Select Critical Component = Yes to include only items marked as critical components in the build plan. This attribute is defined in the Items table.
- Unmet demand: Select Unmet demand = Yes to include items with at least one unmet demand exception. The displayed items may vary depending on the results of the most recent plan run. This attribute is based on the seeded, measure-based exception Demand Quantity Not Fulfilled.
- Lead time compression: Select Lead time compression = Yes to include items with at least one lead time compression exception. The results depend on the most recent plan run. This attribute value is based on the seeded measure-based exception Lead Time Compression.
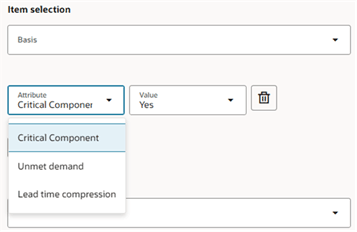
Available Attributes for Item Selection
If you select All Items as the basis for item selection, you can’t specify any item attribute values. For all other basis options, you can use item attributes. For example, you can filter the build plan to show only the critical components in the Treadmills category that have lead time compression. When defining selection criteria using a combination of basis and one or more attributes, an item appears in the build plan only if all the conditions are met.
Resource Selection
The following image shows the available basis values for resource selection.
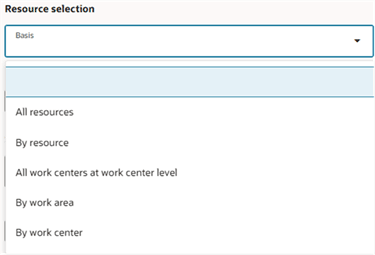
Resource Selection Basis Values
The valid values are:
- All resources: Includes all resources when traversing bills of resources for a root item.
- By resource: Includes one or more resources in the build plan. These resources will be included if encountered during the traversal of bills of resources for a root item.
- All work centers at work center level: Includes all work centers during traversal. This basis displays measure data at the work center level, not the resource level. You can also specify the Work center overloaded attribute with this basis value to display only overloaded work centers.
- By work area: Includes all resources within the selected work areas encountered during traversal of bills of resources for a root item.
- By work center: Includes all resources within the selected work centers encountered during traversal of bills of resources for a root item.
In addition to using basis for resource selection, you can also use resource attribute values. You don’t have to select a basis value if you specify only resource attribute values. For example, you can configure the build plan to display only resources that are bottleneck resources. You can also specify dynamic attributes that change each time a plan is run. For example, to show only resources or work centers that are overloaded based on the latest plan run.
The following image shows the resource attributes that can be included in the build plan criteria. The valid values are Bottleneck, Resource overloaded, and Work center overloaded.
- Bottleneck: Select Bottleneck = Yes to include bottleneck resources in the build plan. This attribute is defined in the Resources table.
- Resource overloaded: Select Resource overloaded = Yes to include resources that have at least one resource overloaded exception. The resources shown may vary depending on the results of the most recent plan run. This attribute is based on the seeded, measure-based exception Resource Capacity Overloaded.
- Work center overloaded: Select Work center overloaded = Yes to include work centers that have at least one work center overloaded exception.
- This applies to sales and operations plans where resource capacity is constrained at the work center level.
- Work centers are selected using Constrained Work Center Level Members in plan options.
- Displayed work centers may vary depending on the most recent plan run.
- This attribute is based on the seeded, measure-based exception Work Center Capacity Overloaded.
Review the configuration of the Work Center Capacity Overloaded exception to ensure it aligns with your planning time level. For example, modify the time hierarchy and exception level if you’re not using Gregorian Month as your planning time level.
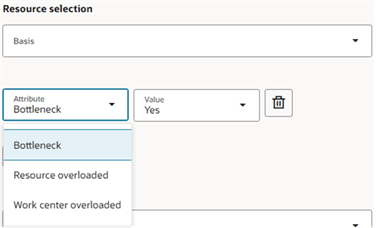
Available Attributes for Resource Selection
If you select All Resources as the basis for resource selection, then you can’t specify any resource attribute values. All other basis values can be used in combination with resource attributes. For example, you can configure the build plan to display only the bottleneck resources that belong to the Treadmills category and are overloaded. When defining selection criteria using a combination of basis and one or more attributes, all conditions must be met for the resource to appear in build plan.
Supplier Selection
The following image shows the available basis values for supplier selection.
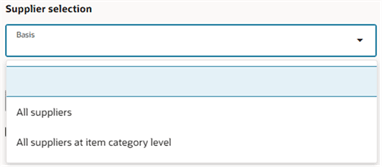
Supplier Selection Basis Values
The valid values are:
- All suppliers: Select this value to include all suppliers for the component items included in the criteria’s item selection when traversing bills of resources for a root item.
- All suppliers at item category level: Select this value to include all suppliers for the component items included in the criteria’s item selection, rather than individual item level. You can also specify the Supplier category overloaded attribute value in combination with this basis value to only display suppliers that are overloaded.
In addition to using basis for supplier selection, you can also specify supplier attribute values. These attributes are dynamic, meaning the value is determined each time a plan is run. For example, you can show only suppliers whose capacity is overloaded. You don’t have to select the All suppliers basis value if you only specify a supplier attribute value, such as Supplier item overloaded.
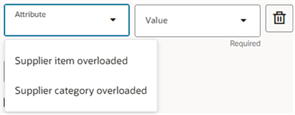
The following image shows the supplier attributes that can be included in the build plan criteria. The valid values are Supplier item overloaded, and Supplier category overloaded.
- Supplier item overloaded: Select Supplier item overloaded = Yes to include suppliers in the build plan that have at least one supplier item overloaded exception. The suppliers shown in the build plan may vary based on the results of the most recent plan run. This attribute value uses the seeded, measure-based exception Supplier Item Capacity Overload.
- Supplier category overloaded: Select Supplier category overloaded = Yes to include item categories that have at least one Supplier Item Capacity Overload exception.
- This is applicable to sales and operations plans that constrain supplier capacity at the item category level.
- The suppliers shown may vary based on the most recent plan run.
- This attribute uses the seeded, measure-based exception Supplier Category Capacity Overloaded.
To ensure correct behavior of the Supplier Category Capacity Overloaded exception, configure the exception to use your plan’s catalog as the product hierarchy. Adjust the time hierarchy and exception level if your planning time level differs from Gregorian Month.
Available Attributes for Supplier Selection
If you select All suppliers as the basis for supplier selection, you can’t specify any supplier attribute values.
Once you’ve created your criteria, it appears in the Criteria drawer. You can also view and search for any public criteria created by other users. You can edit or delete criteria only if you’re the owner of the criteria. These actions are accessed from the Actions menu next to a named criteria in the Criteria drawer.

Criteria Actions Menu
Here’s an example of build plan criteria for critical components and overloaded work centers, and overloaded supplier item categories. The criteria named Critical Work Centers and Supplier Categories has been configured to show only the critical components up to the next level down in the bill of resources. In addition, only overloaded work centers and overloaded supplier item categories relevant to the Build Plan are displayed. This type of criteria is useful for identifying problems that exist in the supply chain.
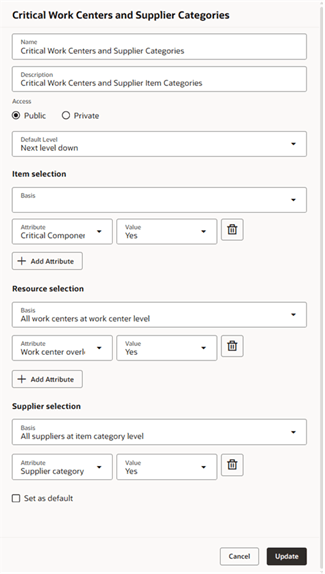
Critical Components and Aggregate Overloads
The following image shows the build plan for a category named Treadmills when the Critical Work Centers and Supplier Categories criteria is selected. The Build Plan shows two work centers, TPTWC and TPWC, two critical components at an upstream organization, ECM20034 and ECM20039, and the item category, Console Components, they belong to that’s supplied by Liberty Electric. You can use colors to format the display of measures.
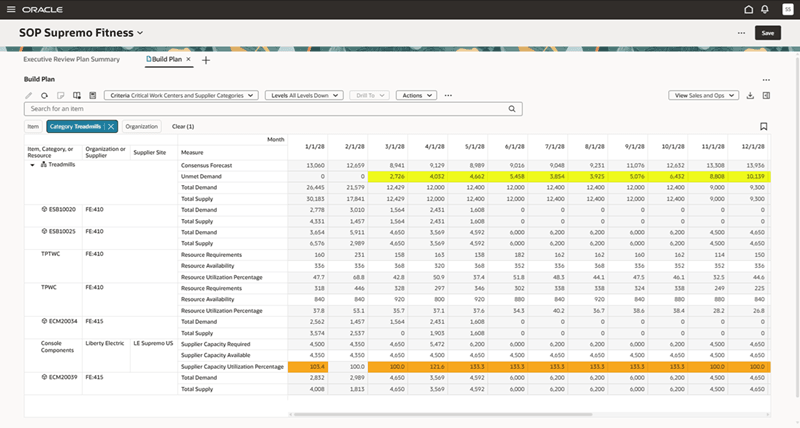
Example Build Plan Displaying Category with Critical Components and Aggregate Resource and Supplier Criteria
Configuring Views
Views control the measures, time level, and number of time buckets displayed in the build plan. You can switch between views to display the data relevant to the type of analysis being performed.

Area of Build Plan Controlled by Views
Use the Edit View icon in the upper-right corner of the page to update the current view.
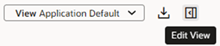
Edit View Icon
The Measures tab in the View drawer is used to specify which measures are visible in the build plan. Items, resources, and suppliers each have their own set of measures that are available for display.
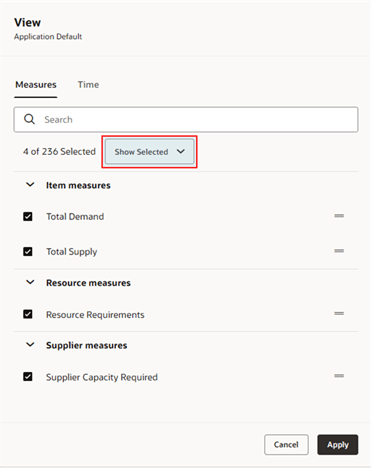
View Drawer Showing Measures Tab
Use Show All to search for and select measures. You can toggle between Show All and Show Selected to display either all available measures or only the selected ones. Drag and drop selected measures to change their display order.
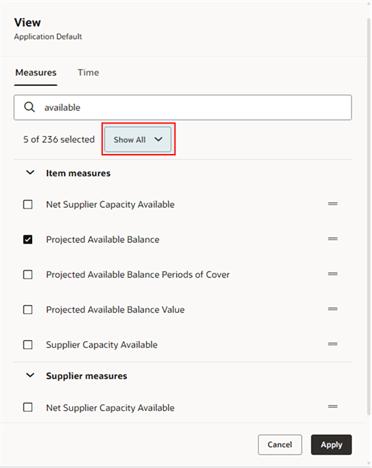
Search and Select Measures in the Measures Tab
Only measures that conform to the required dimensions are displayed in the View drawer are as follows:
- Item measures must conform at least to item, organization, and time dimensions.
- Resource measures must conform at least to resource, organization, and time dimensions.
- Supplier measures must conform at least to item, organization, supplier, and time dimensions.
Some measures are dimensioned by more than one of the item, resource, and supplier dimensions. For example, the Supplier Capacity Required measure is dimensioned by supplier and item but is analyzed as a Supplier measure.
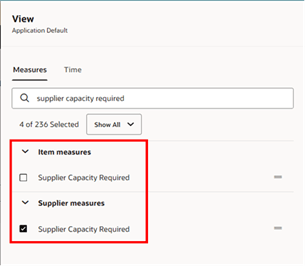
View Measures That Conform to Item and Supplier Dimensions
When creating a user-defined measure for use in the build plan, you must include at least the required dimensions listed in the measure’s definition.
Use the Time tab in the View drawer to set the time bucket level displayed in build plan. If you select Planning calendar, the Planning Calendar and Planning Time Level settings from plan options are used when displaying the build plan.
Optionally, you can specify how many time buckets, starting from the plan start date, to display. If left empty, the build plan is displayed for the entire planning horizon. Limiting the number of time buckets to display can reduce the wait time before build plan results are displayed.
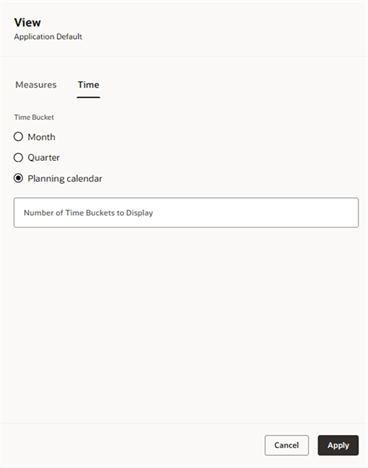
View Drawer Showing Time Tab
When you click Apply in the View drawer, the build plan results updates to show your changes. These changes are temporary. To keep them, select Save View from the Actions menu.
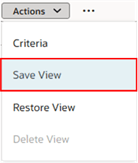
Save View Action
In the Save view drawer, you can either update the current view by selecting the Save as existing, or create a new view by selecting Save as new.
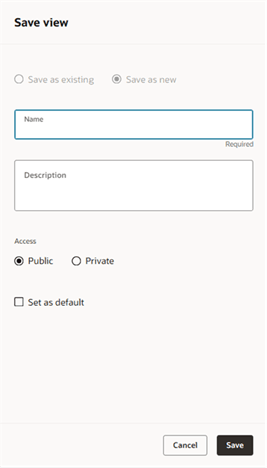
Save View Drawer
If you’re not the owner of the current view, Save as new is selected by default—you can’t save changes to someone else’s view.
Views with access set to Private can only been seen by you. Views with access set to Public can be seen and used by other build plan users.
If you check Set as default, this view is automatically selected when you launch the build plan.
Clicking Save saves the view and makes it your current view.
The Actions menu includes two more view-related options besides Save View:
- Restore View: Discards any temporary changes and reloads the view as it was last saved.
- Delete View: Deletes the current view (you’ll need to confirm first). You can only delete views you own.
Editing Measures
You can update measure values of editable measures in build plan. The editable seeded measures include:
- Adjusted Consensus Forecast
- Adjusted Price
- Adjusted Production Plan
- Adjusted Safety Stock
- Resource Availability
- Supplier Capacity Available
- Adjusted Supplier Cost
Use the More Actions menu to toggle on Empty Rows when selecting a view with editable measures that don’t have existing values. For example, the Adjusted Production Plan measure is empty whereas Resource Availability has existing values.
You can change the measure value within a cell or edit a range of measure values for one or more cells. Editable cells have a lighter background color to distinguish them from non-editable cells. To edit inline, simply click on an editable cell and change the measure value. To edit a range, select multiple cells and then click the Edit icon in the toolbar or right-click to select Edit from the context menu. You can also use Cut, Copy, and Paste actions.
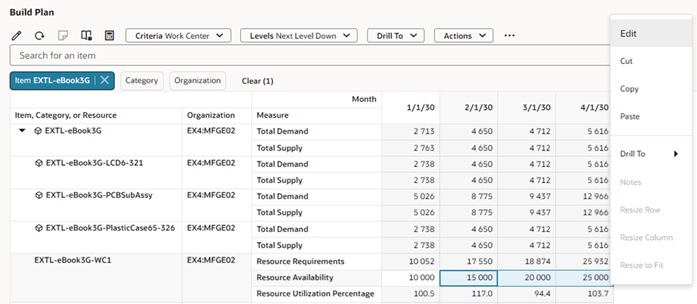
Edit Action
When the Edit drawer opens, you can adjust the selected cell values in several ways:
- Set value to: Enter a specific value to apply to all selected cells.
- Increase by / Decrease by: Add or subtract a number from each cell's current value.
- Increase by percentage / Decrease by percentage: Raise or lower each cell's value by a set percentage.
For example, we'll increase the selected Resource Availability cells by 2,500 units.
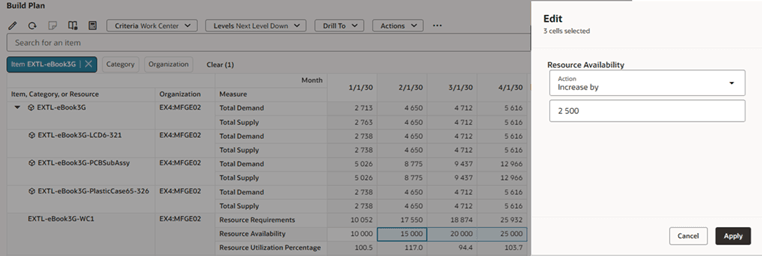
Edit Drawer – Increase by 2500 Units
After you click Apply in the Edit drawer, each selected cell displays a value that’s increased by 2500 units. The Resource Utilization Percentage measure updates to reflect the higher resource availability. If Automatic Calculations was toggled on, this update happened automatically. However, Automatic Calculations can slow down build plan’s responsiveness when editing several cells at a time. To control when updates happen, you can use Calculate Now.
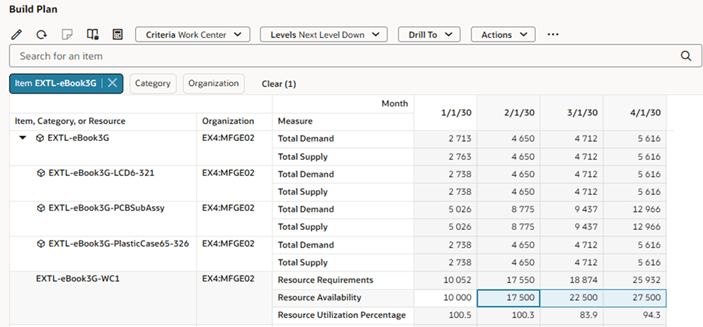
Edited Resource Availability Measure
Changes remain pending until you click Save in the top-right corner.
To undo pending changes, click the Refresh icon in the toolbar. This opens the Refresh data dialog box, where you can:
- Click Refresh to discard pending changes, or
- Click Cancel to keep your changes and close the dialog.
Formatting Measures
You can apply conditional formatting to cells within the build plan by clicking the Format Measures icon in the toolbar.
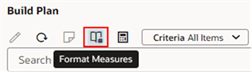
Format Measures Icon
This opens the Format measures drawer.
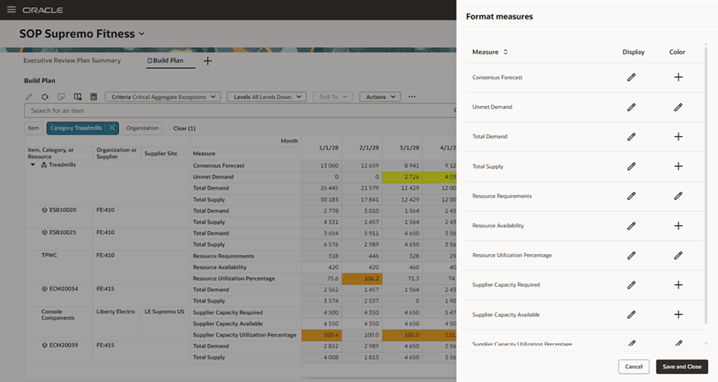
Format Measures Drawer
The Format measures drawer lists the measures in the view. You can override the display characteristics of a measure or apply color formatting to a measure.
For example, to rename the Supplier Capacity Utilization Percentage measure, click the pencil icon in the Display column next to it.
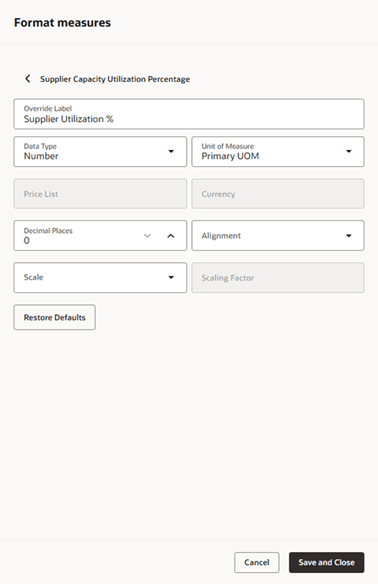
Editing Display Attributes in Format Measures Drawer
You can edit the display settings of a selected measure, such as its label, data type, unit of measure, and more. Some options depend on the data type. For example, if the data type is currency, then the price list and currency fields are enabled, but unit of measure is disabled.
Click Restore Defaults to remove any custom formatting and revert to the measure's default settings.
Use the Back icon (left of the measure name) to return to the list and format other measures.
Click Save and Close to save all changes made since the last time you saved. For instance, you can format multiple measures and save them all at once. If you click Cancel, all unsaved changes will be discarded, and the Format Measures drawer will close.
In the Format Measures drawer, you can set up color formatting rules for measures.
- If a measure already has color formatting, a pencil icon appears in the Color column.
- If not, you’ll see a plus icon.
Click the icon to add or edit color formatting.
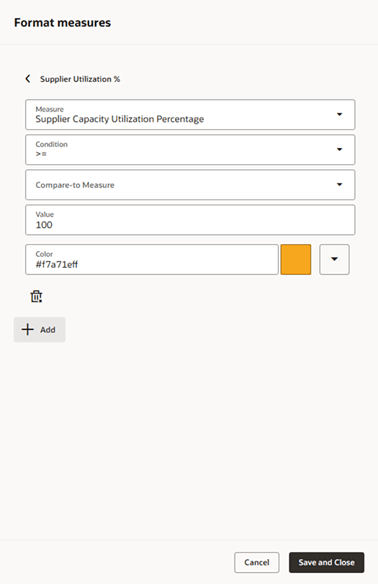
When setting conditional formatting, you can use these comparison options:
- < Less than
- > Greater than
- = Equal
- <= Less than or equal to
- >= Greater than or equal to
- <> Not equal to
You can enter a fixed value (for example, 100) or compare it to another measure.
For example, you could highlight a cell amber when Supplier Capacity Utilization Percentage is greater than or equal to 100.
Editing Color Formatting in Format Measures Drawer
Sometimes, you may want to use different colors for a measure to show varying levels of severity. To add another color format for the same measure, click Add below the existing rule. When you have multiple conditional formatting for a measure, only the first format that meets the condition is applied.
Click Save and Close to save the conditional formatting, close the Format measures drawer, and refresh the Build Plan by applying any measure formats whose conditions are met.
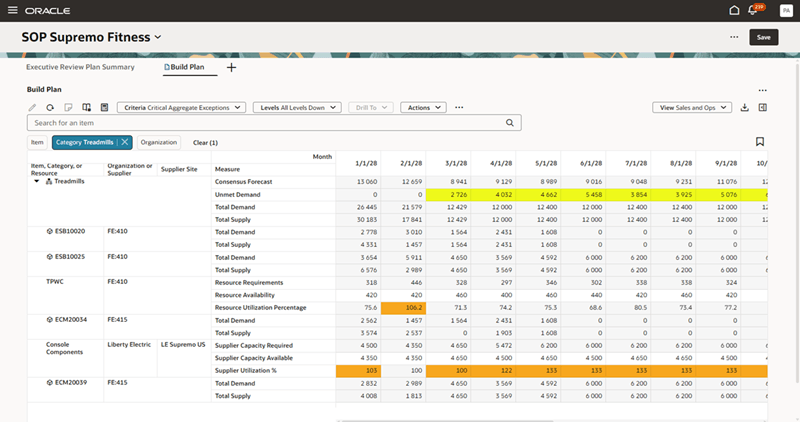
Build Plan with Conditional Formatting
View and Add Notes
In Build Plan, you can view, create, and edit notes just like in other tables (for example, Material Plan by Month).
When you first open Build Plan, the Notes icon in the toolbar is disabled. To enable it, go to the More Actions (...) menu and turn on the Notes toggle.
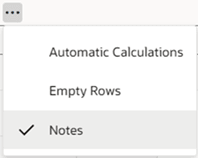
Show Notes Using Notes Toggle Action
Once the Notes toggle action is set to show notes, you’ll see note icons for members or cells that already have notes. The Notes icon in the toolbar is also enabled, letting you add new notes.
To view or add a note, you can:
- Click the note icon in a cell to view existing notes.
- Select a cell, then click the Notes icon in the toolbar.
- Right-click a cell to and select Notes from the context menu.
To add a new note, click Add, enter your text in the Note field, and optionally use the AI Assist button to improve your wording.
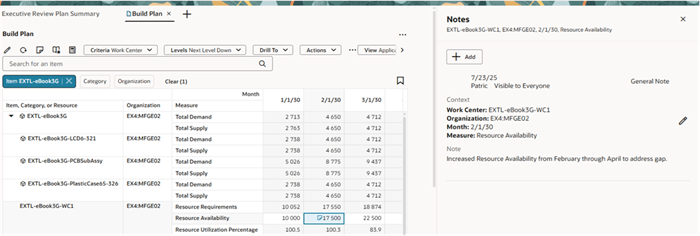
Notes Drawer
Here's the demo of these capabilities:
Steps to Enable and Configure
You don't need to do anything to enable this feature.
Tips And Considerations
- To use the Category filter chip in Build Plan, set a default product hierarchy in the plan’s dimension catalog using the Configure Planning Analytics task. For example, use the Plan items hierarchy specified in plan options as the default product hierarchy.
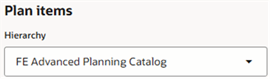
Catalog Used as the Plan Items Hierarchy in Sales and Operations Plan Options

Plan Items Hierarchy Used as the Default Product Hierarchy in Configure Planning Analytics
- Suppliers will appear in the build plan if they are defined in the Approved Supplier List.
- A supplier can only be selected if an item is selected. For example, if no component items are shown, no suppliers will appear either.
- Interlocation Shipping Methods must be defined to display upstream and downstream organizations levels in Build Plan.
- Use the More Actions menu to toggle on Empty Rows working with views that include editable measures without existing values.
- You can’t view a cell’s audit trail directly in Build Plan. However, edits are recorded and can be reviewed in another table for that measure.
- Save the view with selected measures before applying any formatting.
- The drill-to context brought into build plan is mutually exclusive with the search fields. If you enter anything into the keyword search field or apply a filter chip after drilling into build plan, the new search criteria replaces the drill-to context.
- Don’t define a default saved search if you need to use drill-to functionality. It will override the drill-to context.
- You can’t enable dynamic linking or select user-specified parameters as link context in Manage Links.
- You must create new criteria and views in the Redwood version of build plan. The criteria and layouts created in the classic version of aggregate build plan aren’t available.
Key Resources
- Refer to the Cloud Applications Readiness content for the following Sales and Operations Planning What's New 25B feature for more information on Redwood plan analysis:
- Redwood: Analyze Sales and Operations Planning Plans Using a Configurable Redwood Page
Access Requirements
Users who are assigned a configured job role that contains these privileges can access this feature:
- View Planning Items (MSC_VIEW_PLANNING_ITEMS_PRIV)
- Edit Planning Items (MSC_EDIT_PLANNING_ITEMS_PRIV)
- View Planning Objects Using REST Service (MSC_VIEW_PLANNING_OBJECTS_REST_SERVICE_PRIV)
These privileges were available prior to this update.