Redwood: Manage Sourcing Rules Using a New User Experience
You can use the Redwood user experience to view, create, duplicate, edit, and delete sourcing rules. You can define global or local rules to:
- Make, buy, or transfer products.
- Maintain sources with effective dates, ranks, allocations, and shipping details.
- Copy sources between rules.
- View which assignment sets use a rule.
There are built-in guardrails to prevent overlapping effective dates, to enforce rank allocation limits (less than or equal to 100 percent per effectivity), to validate quantity ranges, and to ensure valid combinations are defined for supplier, organization, shipping method, carrier, service level, and mode.
The Sourcing Rules page enables you to:
- Review existing sourcing rules.
- Create, edit, duplicate, and delete sourcing rules.
- View sourcing assignment sets associated with sourcing rules.
The Sourcing Rules page can be accessed from Plan Inputs, Supply Plans, Demand and Supply Plans, Replenishment Plans, Sales and Operations Plans, and Backlog Management in the Redwood Supply Chain Planning work area. It can also be accessed from Global Order Promising.
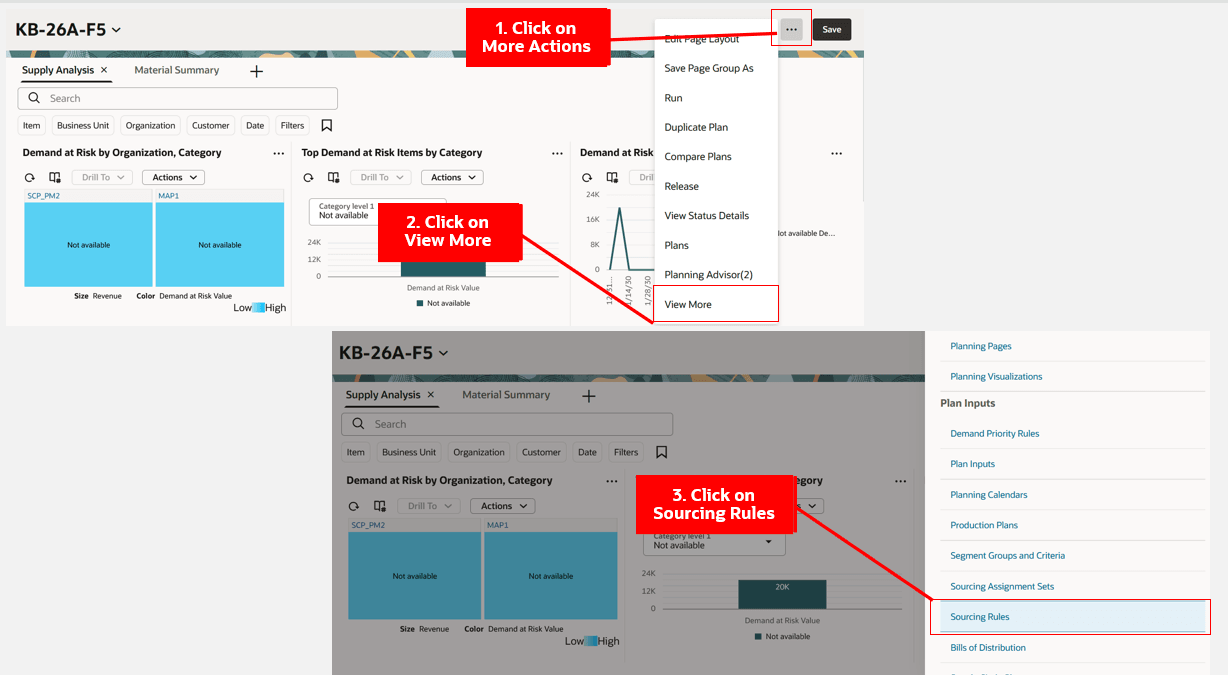
To access the Sourcing Rules page:
- Click the More Actions (…) icon and then click View More.
- In the Plan Inputs section, click Sourcing Rules.
- The Sourcing Rules page opens in a new browser tab.
Navigate to Sourcing Rules Page
Sourcing Rules Page
Sourcing Rules Page
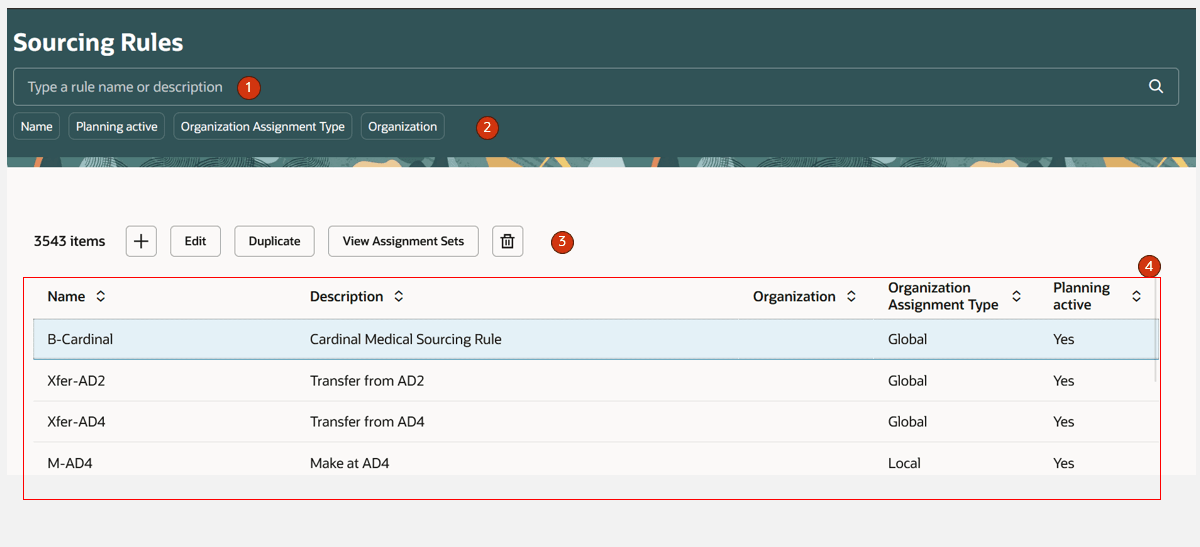
The Sourcing Rules page contains the following:
- Keyword search - Lets you search across the Sourcing Rules page. You can search by sourcing rule name or description. The search is case insensitive and performs a search using the contains operator.
- Suggested filters - Filters the Sourcing Rule page by Name, Planning Active, Organization Assignment Type, and Organization column details.
- Action toolbar - Enables you to create, edit, duplicate, or delete a sourcing rule. Also lets you view assignment sets associated with a sourcing rule.
- Sourcing rules - Displays a table showing the sourcing rules created on the page or collected using the file-based data import (FBDI) process.
Sourcing Rules Actions
Let’s now understand the Sourcing Rules page actions.
Create a Sourcing Rule
- Click the + icon on the Sourcing Rules page.

Create a Sourcing Rule
- A page named New Sourcing Rule opens on the same browser tab.
- Provide a name and description for the new sourcing rule and enter sourcing details. For information on adding sources to the sourcing rule, see "Sourcing Rules – Sources Section Details" later in this document.
- Click the Create button.
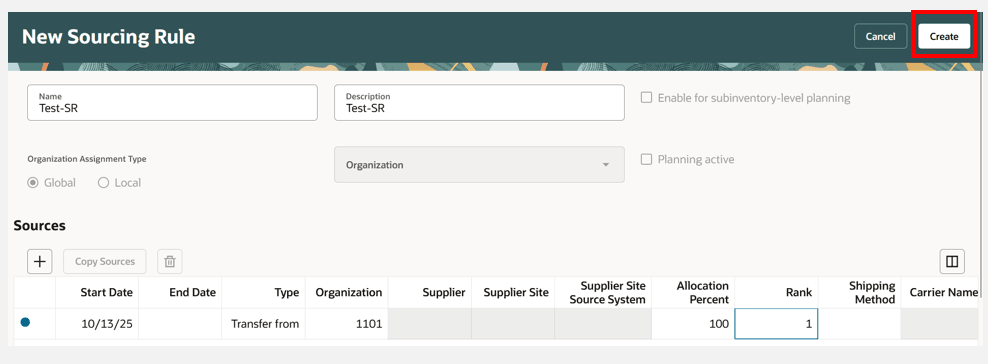
Click Create Button to Create a New Sourcing Rule
- The sourcing rule is now created.
Edit Sourcing Rule
- Select a sourcing rule and click the Edit button.
- The selected sourcing rule opens in the same tab in edit mode.
- Make the desired changes to the sourcing rule and click Save when done.
Delete Sourcing Rule
- Select a sourcing rule and click the Delete icon.
- A confirmation message appears. Click Delete to confirm that you want to to delete the sourcing rule.
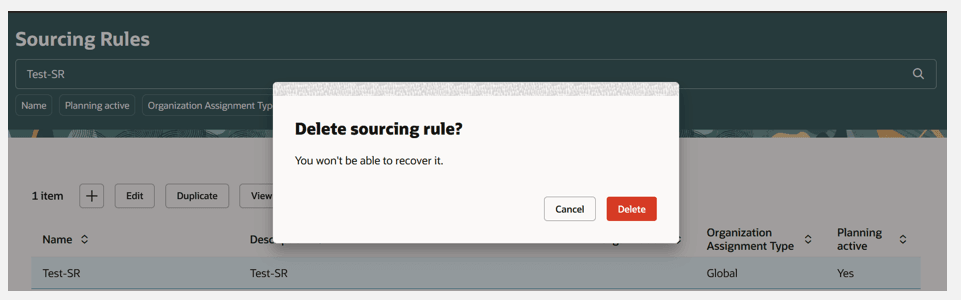
Delete Sourcing Rule
Duplicate Sourcing Rule
- Select a sourcing rule and click the Duplicate button.
- Enter a new name and update the description and add additional details as needed.
- Click the Save button when done.
View Assignment Sets
To view the assignment sets that contain a given sourcing rule:
- Select a sourcing rule and click the View Assignment Sets button.
- The Assignment sets drawer opens, displaying the assignment sets that contain the selected sourcing rule.
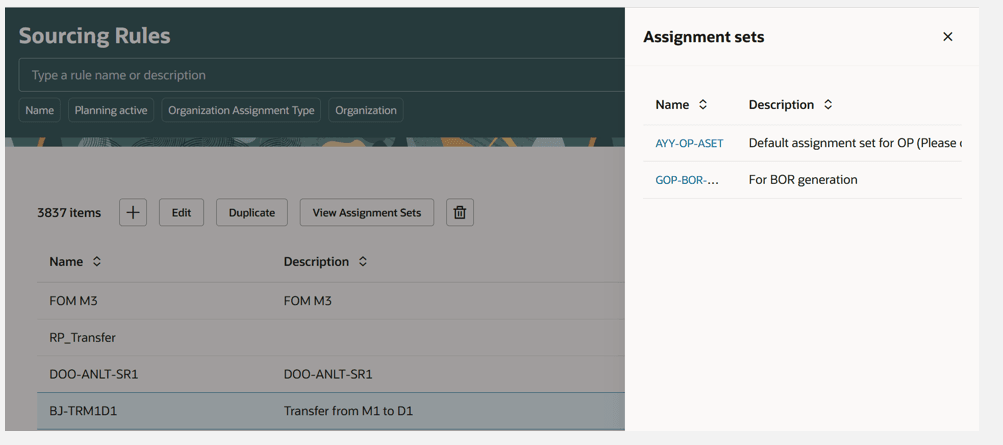
View Assignment Sets
- Click on the assignment set name to open the assignment set and review its details. The Assignment Set page opens in a new tab.
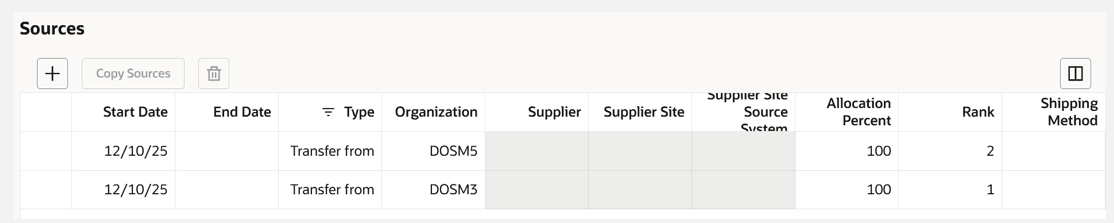
Sourcing Rules – Sources Section Details
Let’s now understand the Sources section on the page.
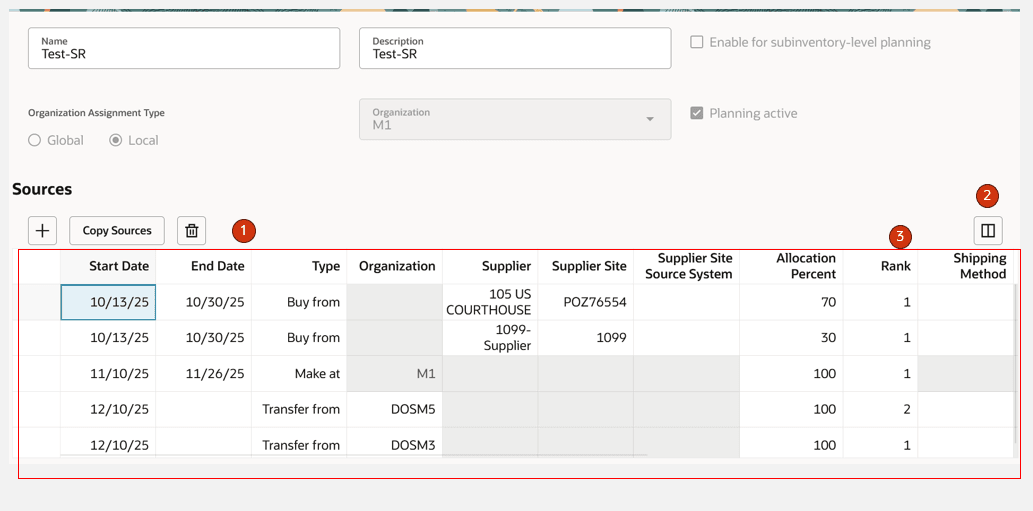
Sources in Sourcing Rule
- Sources toolbar – Enables you to create, copy, and delete a source
- Manage columns – Enables you to manage columns displayed in the Sources section of a sourcing rule
- Sourcing details – Displays the details of the sources within the sourcing rule
Date effectivity (effective start date and effective end date) is a part of each source row in the sourcing details region. Rows with identical date effectivities (same effective start and end dates) are considered to be a related block of sources. When you change the effective start or end date of one source in a block, then the effective dates of the other sources in the block automatically change to match. Within a block of sources, sources with the same rank must have allocation percentages that total 100.
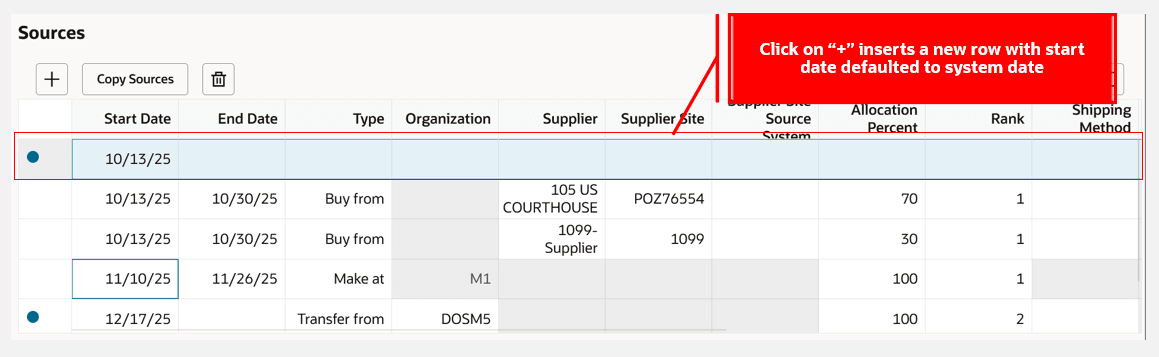
To add a source:
- Click the + icon. A new source row is added at the beginning of the sourcing details region, with the Start Date defaulted to the system date.
- Update the Start Date and End Date as needed.
- Enter other source details.
- Click Save.
Adding a New Source
To edit a source:
- Select a source row and perform inline edits of the details.
- If needed, select another row and perform inline edits for that row. Repeat as needed.
- Click Save when done.
To delete a source:
- Select a source row.
- Click the Delete icon.
Manage Columns and Column Filters
The following columns are displayed for sources:
- Start Date
- End Date
- Type
- Organization
- Supplier
- Supplier Site
- Supplier Site Source System
- Allocation Percent
- Rank
- Shipping Method
- Carrier Name
- From Quantity
- Less Than Quantity
- Quantity UOM
- Mode of Transport
- Service Level
- Transit Time
- Create Movement Requests
- Exclude for Options and Option Classes
Column filters are ad-hoc filters that are appended to the keyword search and filter chips, allowing you to further refine your results. To access column filters, hover over the column header and click on the Filter icon.
Here’s an example of applying a column filter for Type in the sourcing details.
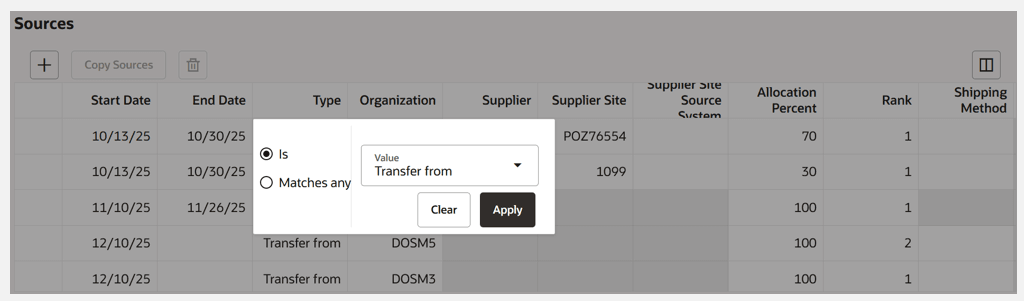
Column Filter for Type Column in Sources
Result After Applying Column Filter for Type Column in Sources
Copy Sources
To copy sourcing details from another sourcing rule:
- Select a sourcing detail from the table and click the Copy Sources button.
- The Copy sources drawer opens.
- Select the sourcing rule, destination organization, and start date reference for the sourcing rule from which the sourcing detail is to be copied.
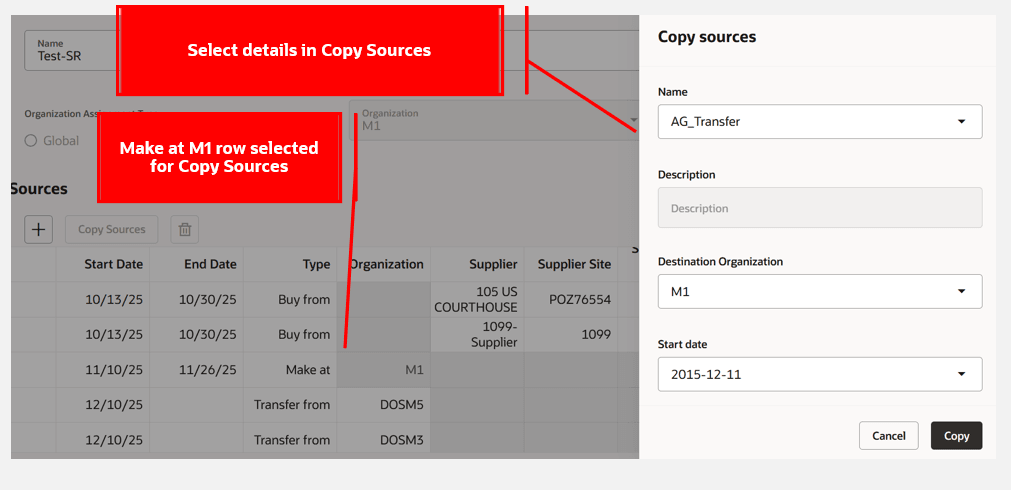
Copy Sources Drawer with Details
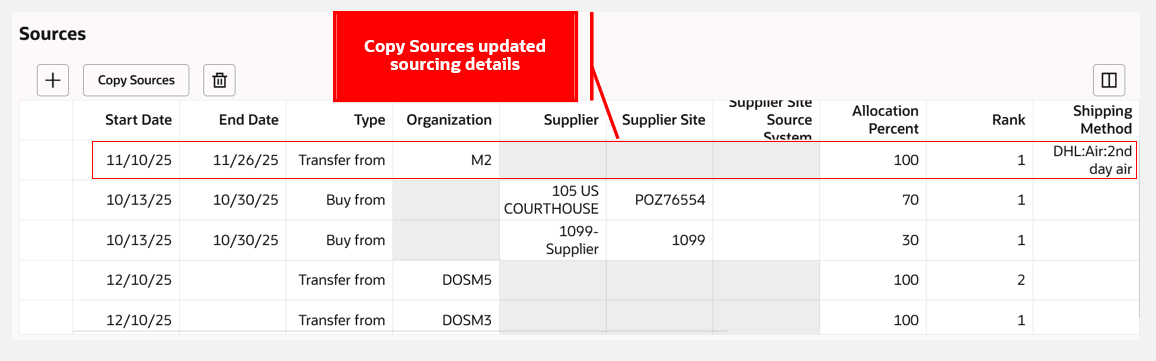
Copy Sources Updated Sourcing Details
- Click Copy and then save the changes.
Quick Actions
You can now navigate to the Redwood Sourcing Rules page from Quick Actions. To enable Quick Actions to navigate to Sourcing Rules.
- Go to Navigator > My Enterprise > Setup and Maintenance.
- Search for and select the Manage Administrator Profile Values task.
- Search for the profile display name: Redwood Pages for Sourcing Rules, Bills of Distribution, and Assignment Sets Enabled.
- Set the Profile Value to Yes and save. (You can set this profile at the User or Site level .
Quick Actions for sourcing rules in Supply Chain Planning and for Global Order Promising in Order Management will now navigate to the Redwood Sourcing Rules page.
Steps to enable and configure
You don't need to do anything to enable this feature.
Tips and considerations
- You can enable a guided journey for the Sourcing Rules page.
- POST and PATCH operations aren’t available for sourcing rules REST services.
- You can enable a sourcing rule for subinventory-level planning on the Sourcing Rules page in Replenishment Planning .
- Click the Cancel button in a sourcing rule to discard unsaved changes or to go back to the Sourcing Rules main page.
Access requirements
Users who are assigned a configured job role that contains these privileges can access this feature:
- Monitor Supply Planning Work Area (MSC_MONITOR_SUPPLY_PLANNING_WORK_AREA_PRIV)
- Monitor Demand and Supply Planning Work Area (MSC_MONITOR_DEMAND_AND_SUPPLY_PLANNING_WORK_AREA_PRIV)
- Manage Replenishment Planning (MSC_MONITOR_REPLENISHMENT_PLANNING_WORK_AREA_PRIV)
- Manage Sales and Operations Planning (MSC_MONITOR_SALES_AND_OPERATIONS_PLANNING_WORK_AREA_PRIV)
- Monitor Backlog Management Work Area (MSC_MONITOR_BACKLOG_MANAGEMENT_WORK_AREA_PRIV)
- Monitor Order Promising Work Area (MSC_MONITOR_ORDER_PROMISING_WORK_AREA_PRIV)
- Manage Planning Sourcing (MSP_MANAGE_PLANNING_SOURCING_PRIV)
- View Planning Sourcing Rule (MSP_VIEW_PLANNING_SOURCING_RULE_PRIV)
These privileges were available prior to this update.