Redwood: Define Processing Rules for B2B Messages
Set up message processing rules to automatically modify inbound messages to meet your enterprise-specific collaboration requirements. You can now set default values or set fields as required, all without complex development.
You now have:
- Increased Flexibility: Easily adapt message processing to specific business or trading partner requirements without needing to custom write your code.
- Reduced Development Overhead: Nontechnical users or functional administrators can manage rules, minimizing the need for complex development efforts.
Steps to enable and configure
You can access this functionality by enabling the feature Simplify Configuration and Processing for B2B Messaging.
After you opt in, perform the following steps to add and configure these override message definitions:
- Define your Processing Rules: A Processing Rule includes a Name, Code, Description, and a designated Type and Subtype.
- Configure Processing Rule Values: Enter values for the predefined set of qualifiers and attributes.
- Validate Processing Rule Values: Use this tool to identify override messages that match the specified Provider ID and Partner ID values.
- Upload and Download Processing Rule Values: Upload or download records within the Processing Rule Values.
Define Processing Rules
- Navigate to B2B Documents.
- Set the filter to Inbound and select a document.
- Select Configure Processing Rules and Add.
- Select Submit after you've added the details for the new processing rule.
You don't need to enter any qualifiers or attributes because they're populated automatically.
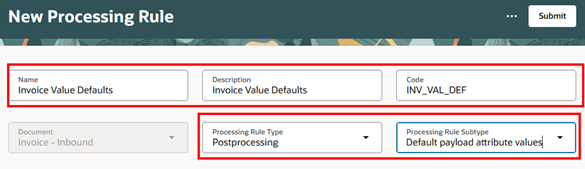
Add a New Processing Rule
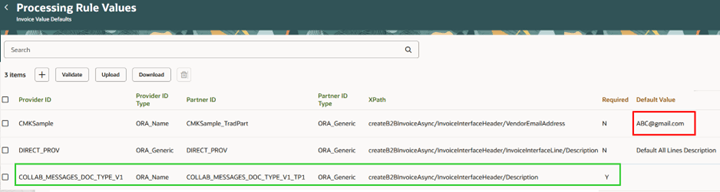
Configure Processing Rule Values
- On the Processing Rules page, select Rule Values.
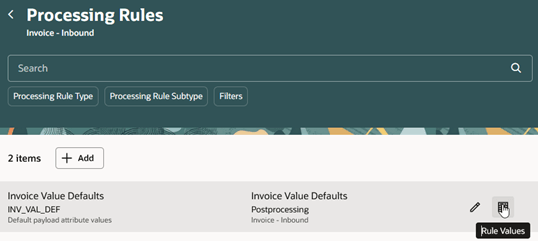
Rule Values Icon on the Processing Rules Page
- Select Add and Save after you've added the details.
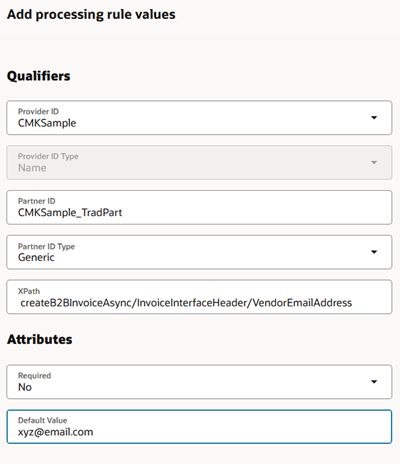
Processing Rule Values
Validate Processing Rule Values
- On the Processing Rule Values page, select Validate.
- Enter a value into each of the fields. If a matching value exists, it will appear in the results.
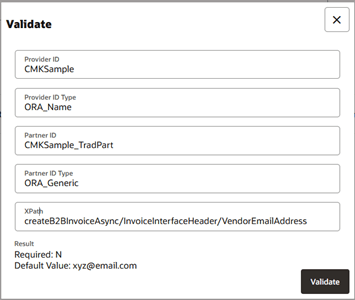
Validate
Upload and Download Processing Rule Values
- Select Download to generate and save the .csv on your computer.
- Open the .csv and update the desired values to make changes.
- Adjust the formatting to display standard, non-scientific notation, but don't alter the value for the ID cell.
- Enter the service provider, partner, XPath, required, and default value to add a new row. Leave the ID cell blank.
- Save the .csv.

.csv File with a Modified First Row and an Added Third Row
- Select Upload and drag and drop the modified .csv file. The values will appear on the page.
Updated Processing Rule Values
Tips and considerations
- Processing rules for outbound documents are not supported currently.
- When the required attribute is set to Yes, a value must be provided in the payload field that the XPath points to. As a result, there's no need to specify a value in the Default Value field. If one is provided, it will be ignored.
- You can define a single processing rule for each processing rule type per document.
- You can add multiple processing rule values for the same processing rule.
- The processing rule code can be any unique value, provided it meets the field’s string requirements.
- When no entries have been added to the Processing Rule Values task, and you want to upload them in bulk, select Download to generate an empty .csv. Enter the service provider and partner values and leave the ID cell blank.
Access requirements
Users who are assigned a configured job role that contains this privilege can access this feature:
- Manage Collaboration Message Definitions by Web Service (CMK_MANAGE_COLLAB_MESG_DEFINITION_WEB_SERVICE_PRIV)
This privilege was available prior to this update.