Redwood: Manage Supply Allocation Rules Using a New User Experience
You can use the Redwood user experience to control access to an item’s supply by customer, channel, region, and other attributes. As conditions change, you can adjust the allocated supply to improve demand satisfaction or meet contractual obligations. You can also set priority rankings and stealing-protection percentages to ensure that key customers or channels are served first.
You can now access Supply Allocation Rules from the Redwood Supply Chain Planning work area.
To navigate to the Supply Allocation Rules page, follow these steps:
- In the context selector, select Backlog Management.
-
Select View More from the More Actions menu.
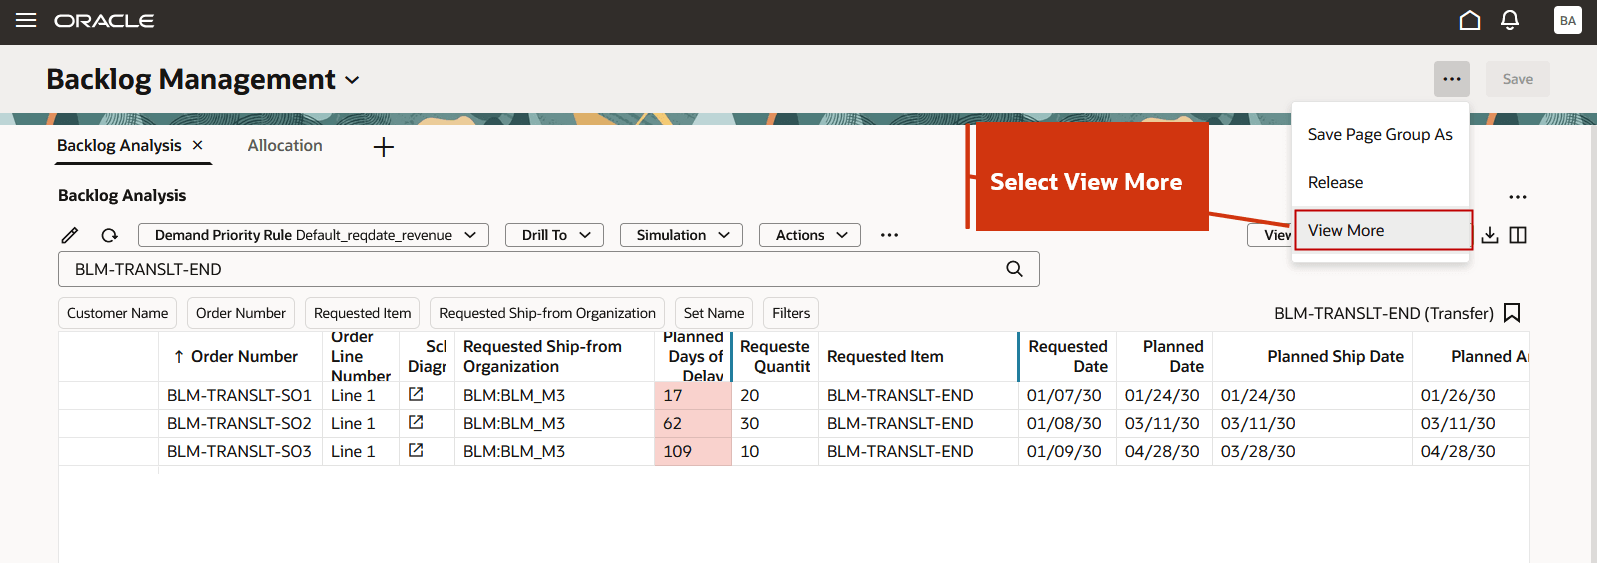
Select View More Under More Actions
-
In the Actions menu, select Supply Allocation Rules under Plan Inputs.
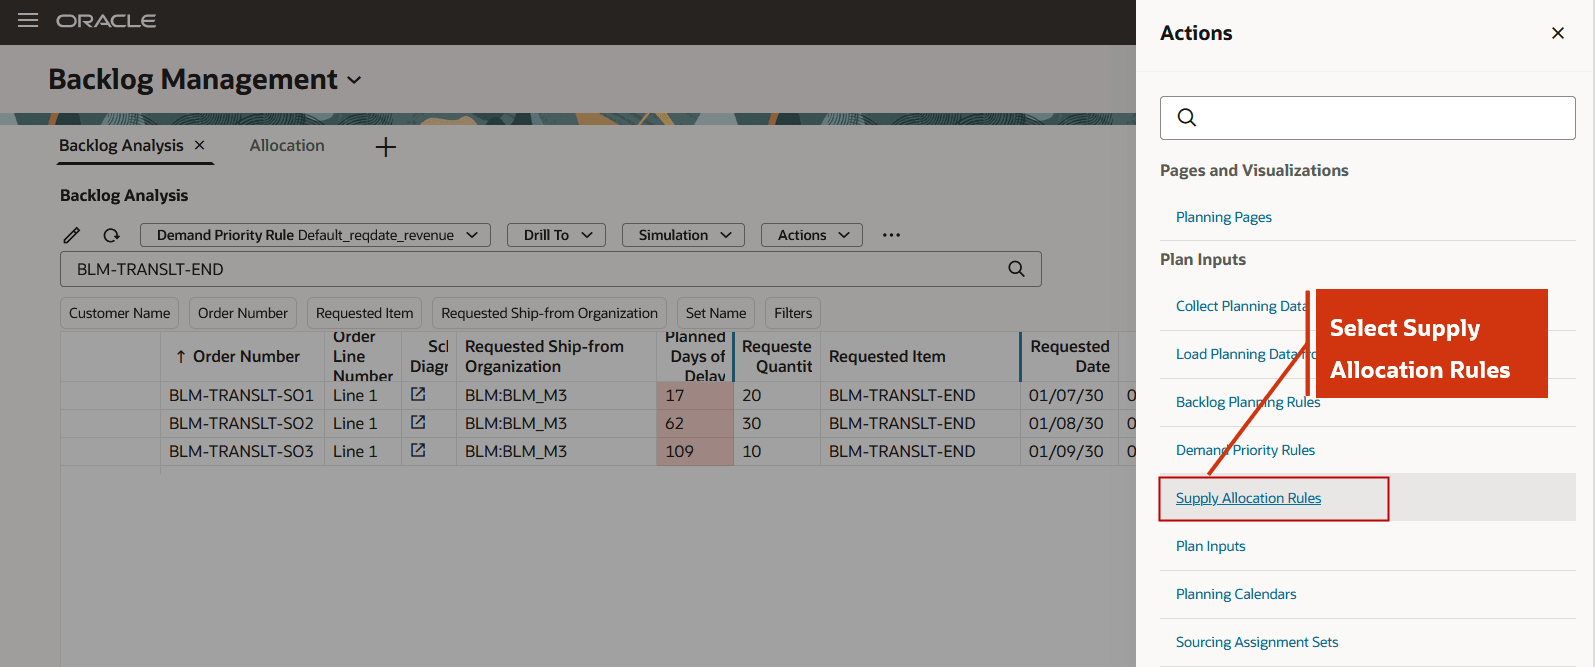
Supply Allocation Rules Action
Note that you can access the Supply Allocation Rules Redwood page directly from the Manage Supply Allocation Rules quick action for Oracle Fusion Global Order Promising.
Supply Allocation Rules Redwood Page
Use the Supply Allocation Rules page to configure how item supply at an organization is allocated across customer groups, demand channels or regions, referred to as allocation nodes. This setup is shared with Oracle Fusion Global Order Promising Cloud (GOP). You can create, assign, and manage Supply Allocation Rules.
On the Supply Allocation Rules page, you can search allocation rule assignments by Name, Description, Item, Category, Organization, Start date, and End date.
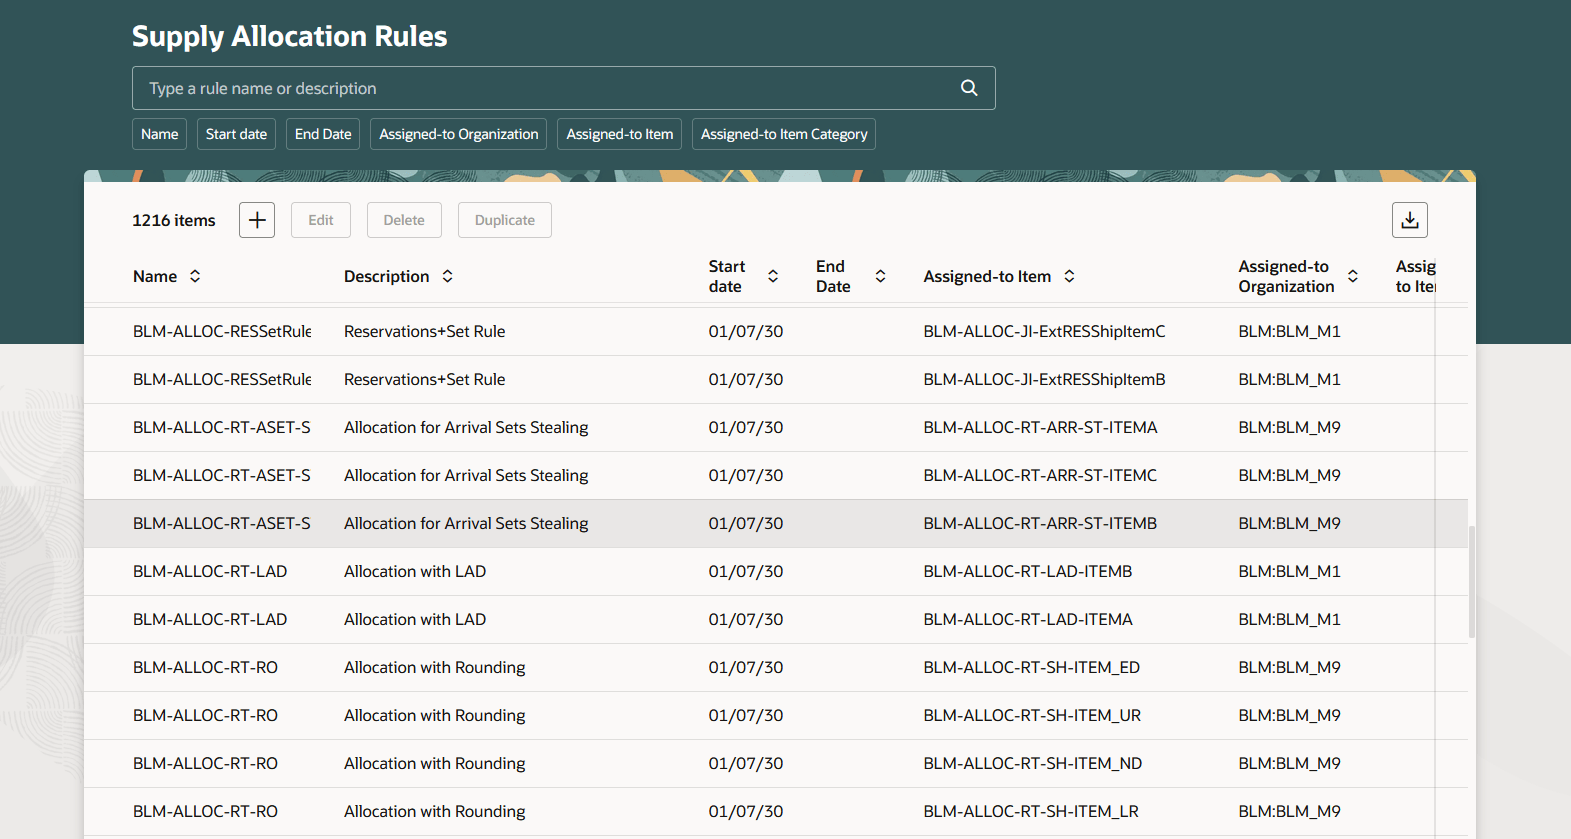
Supply Allocation Rules Page
From the Supply Allocation Rules page, you can create, edit, delete, or duplicate a supply allocation rule.
To create a new supply allocation rule, follow these steps:
-
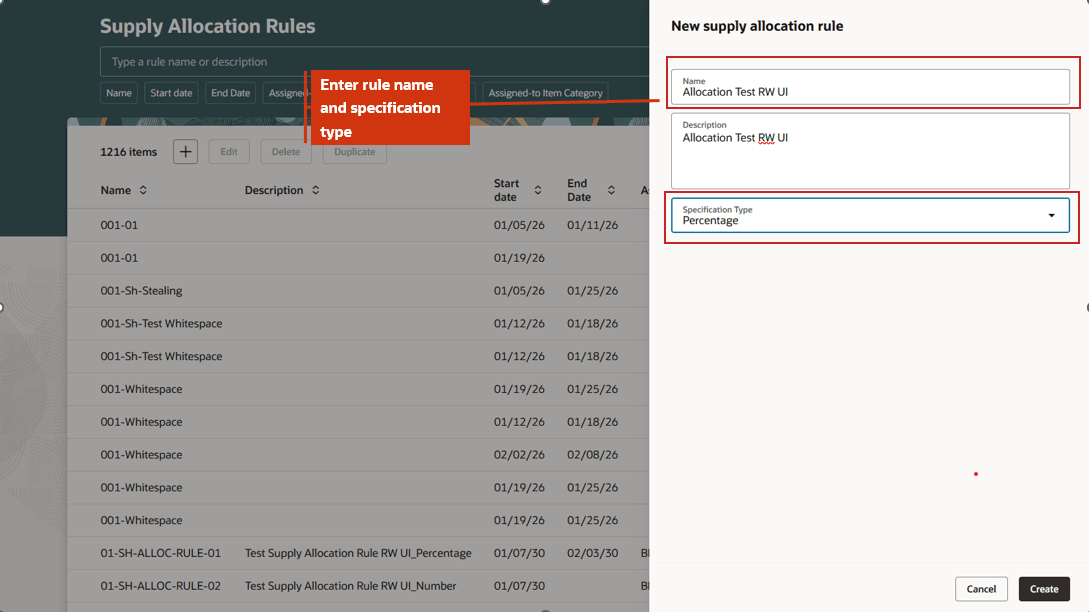
Select Add to create a new supply allocation rule. The New supply allocation rule drawer opens.
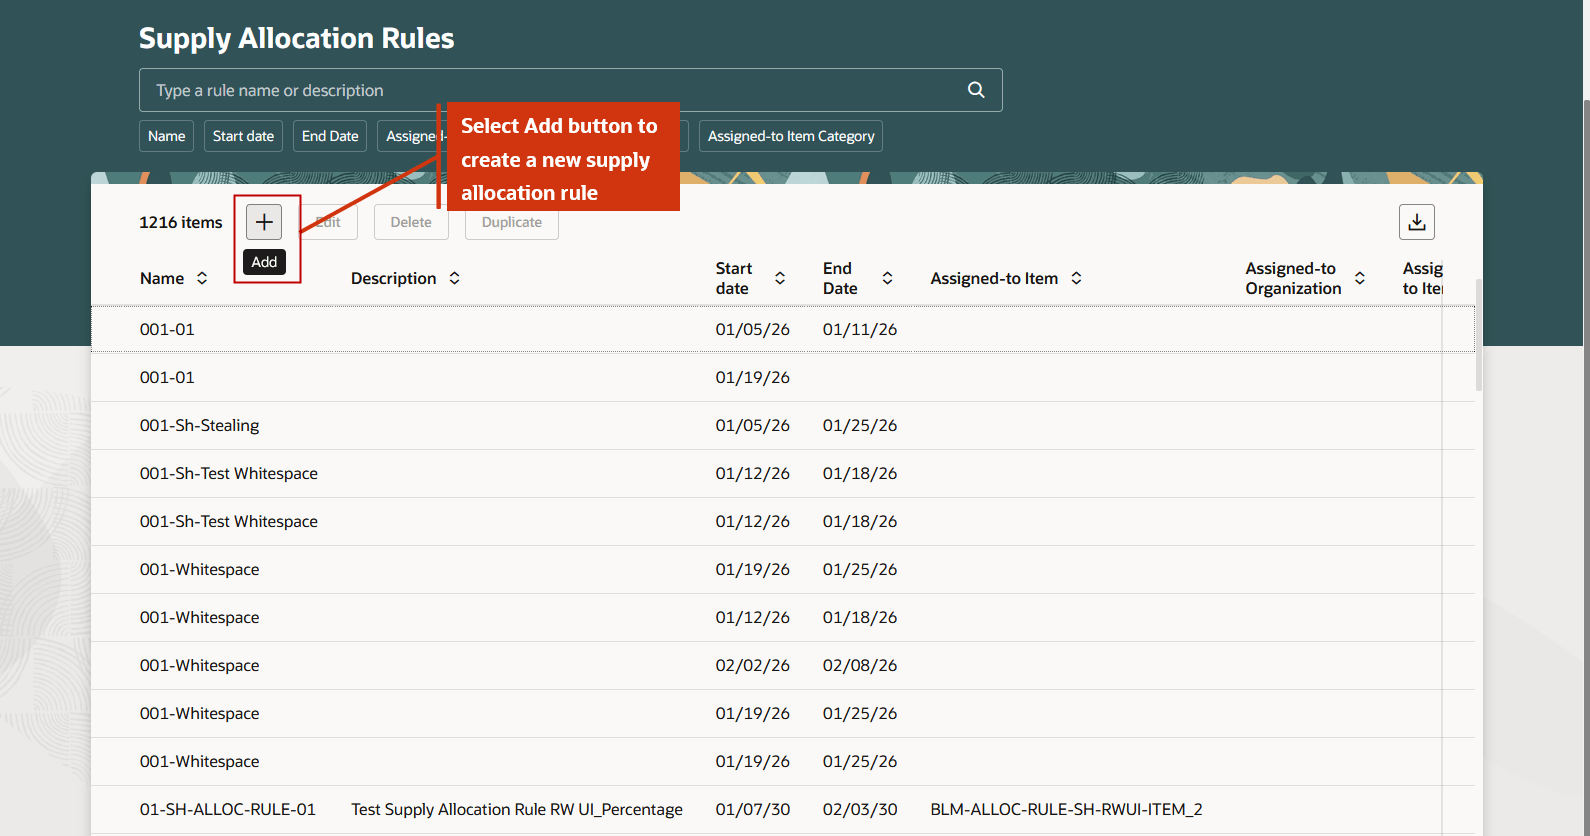
Create a New Supply Allocation Rule
-
Enter a Name and select a Specification Type as Percentage or Number, then select Create. Name and Specification Type are required, while Description is optional.
New Supply Allocation Drawer
-
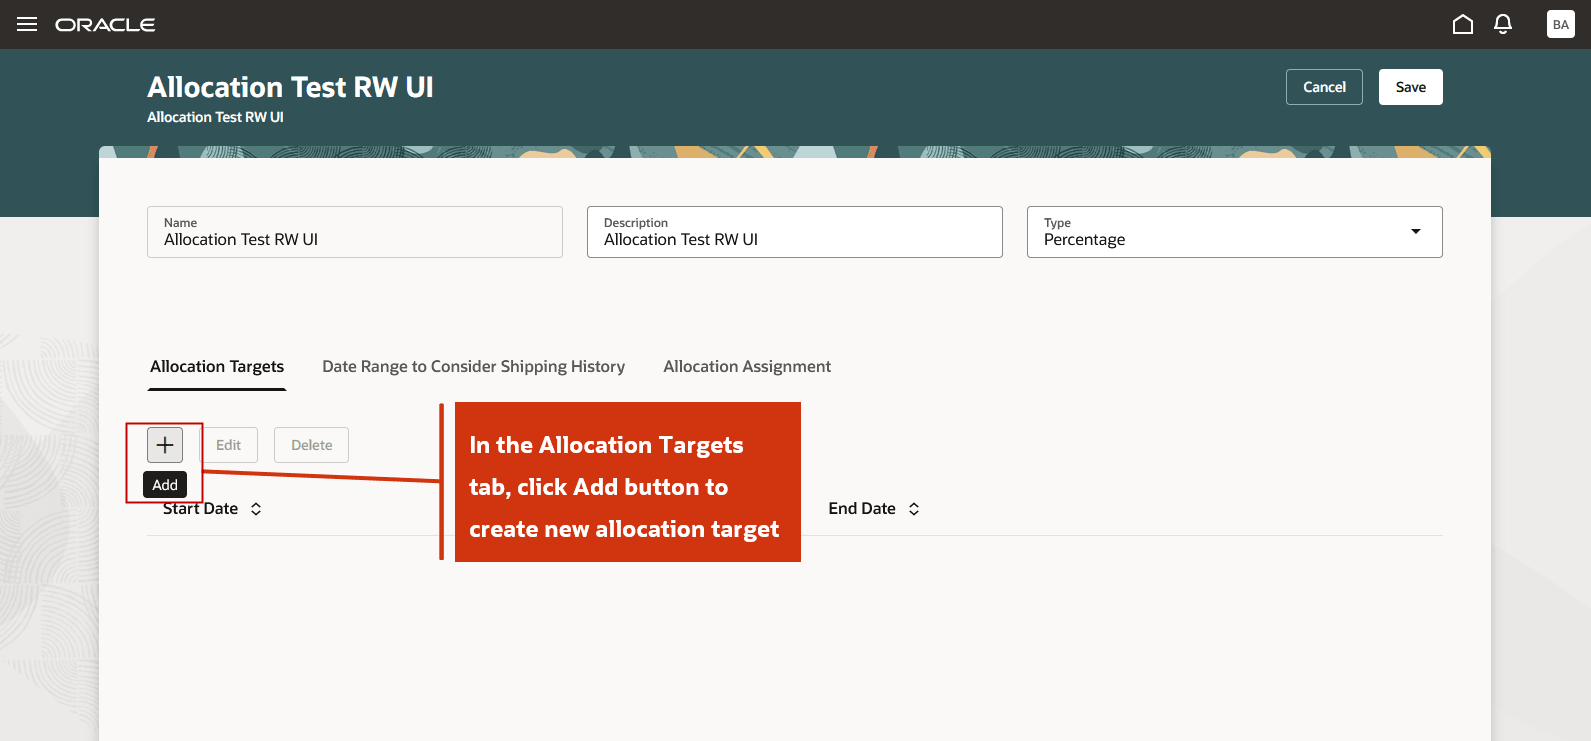
In the Allocation Targets tab, select Add to create an allocation target. The New allocation targets drawer opens.
Allocation Targets Tab to Add New Allocation Targets
-
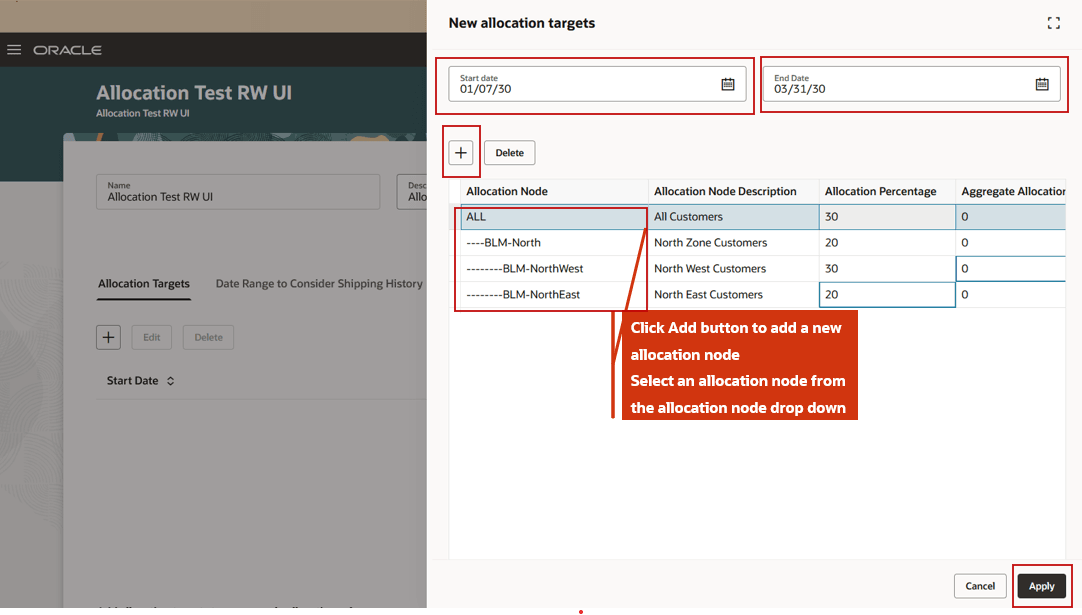
Specify a Start date and End date, add one or more Allocation Nodes, and enter an Allocation Percentage for each node so that the total allocation equals 100 percent. Optionally, specify a Rank and Stealing Protection Percentage to enable allocation stealing. When you select an allocation node, the allocation node description is displayed automatically. Select Apply.
New Allocation Targets Drawer
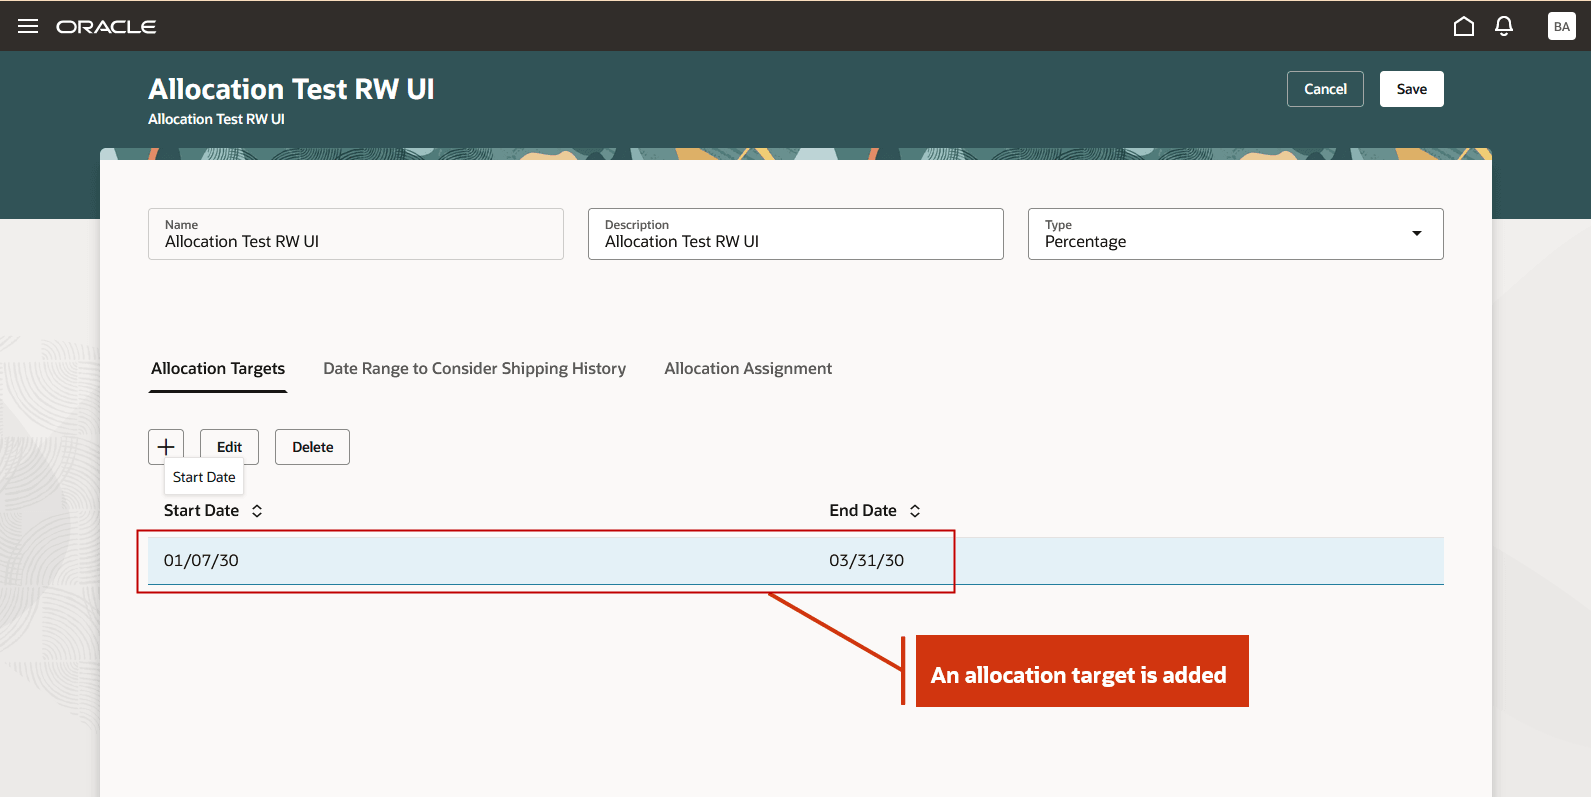
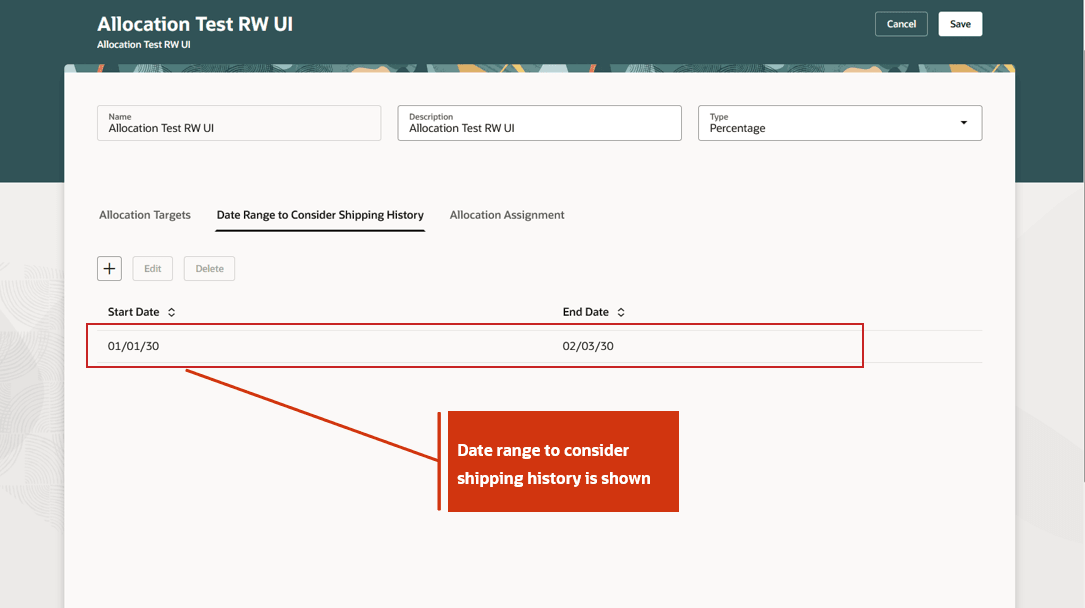
- Review the allocation target that you created. To modify the allocation target, select Edit.
Allocation Targets Shows a Record with Start and End Date
- Optional: To include historical shipments in allocation calculations, select the Date Range to Consider Shipping History tab, specify a Start date and End date, and select Apply. Shipments that occur during this campaign period are included in the calculation of allocated supply.
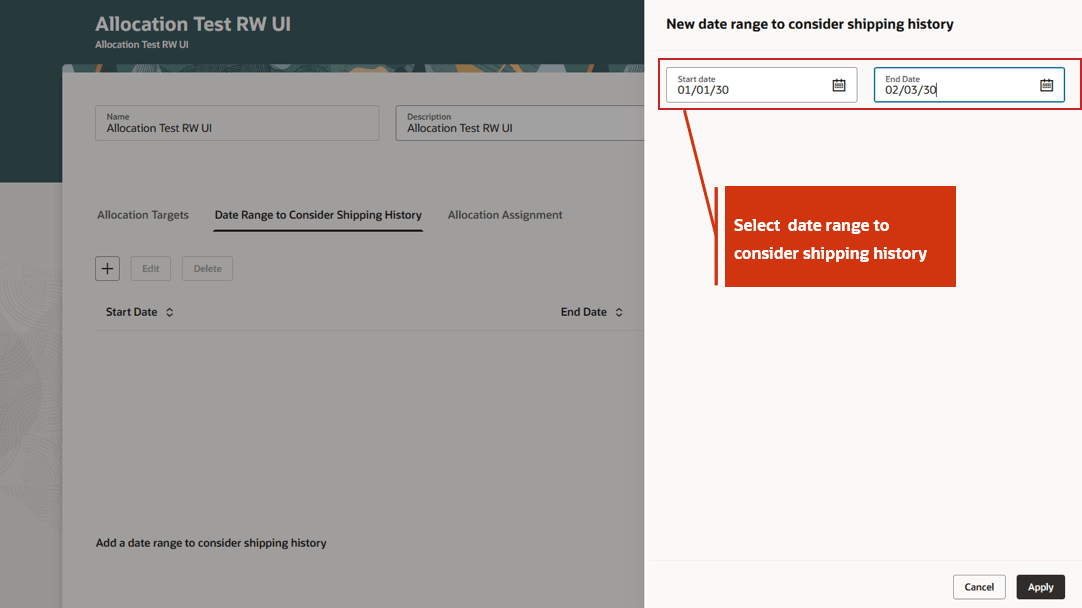
New Date Range to Consider Shipping History Drawer
If the shipping history Start Date is January 1, 2030, and the End Date is February 3, 2030, shipments within this period are considered when calculating allocated supply. This date range is referred to as the campaign period.
Date Range to Consider Shipping History
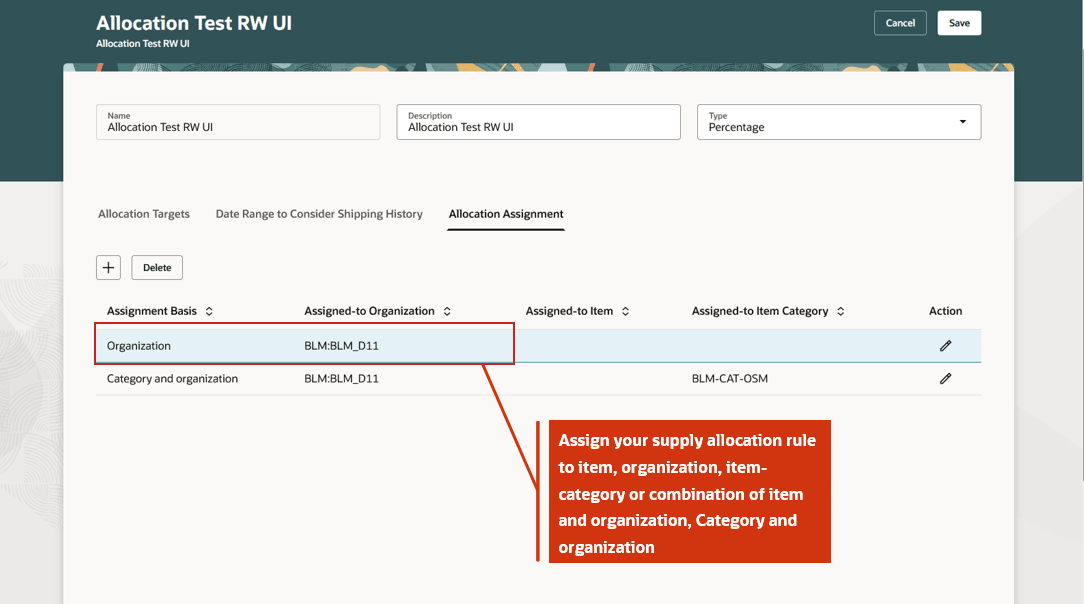
- In the Allocation Assignment tab, assign the rule to an item, organization, or category. Rules can be assigned at multiple levels, from least to most granular.
- Organization (least granular)
- Category
- Category and organization
- Item
- Item and organization (most granular)
- If multiple supply allocation rules apply to an item at different levels, Oracle Fusion Cloud Backlog Management and Oracle Fusion Cloud Global Order Promising apply the most granular rule to the item
New Date Range to Consider Shipping History Drawer
- Select Save to create your Supply Allocation rule.
Number Based Supply Allocation Rule
For number-based allocation rules, you can’t directly enter allocation quantity directly on the page. Allocation Percentage displays 0 and isn’t editable. However, you can select allocation nodes and specify the rank and stealing protection percentage. You can upload allocation quantities through an FBDI file or update allocations through a REST API.
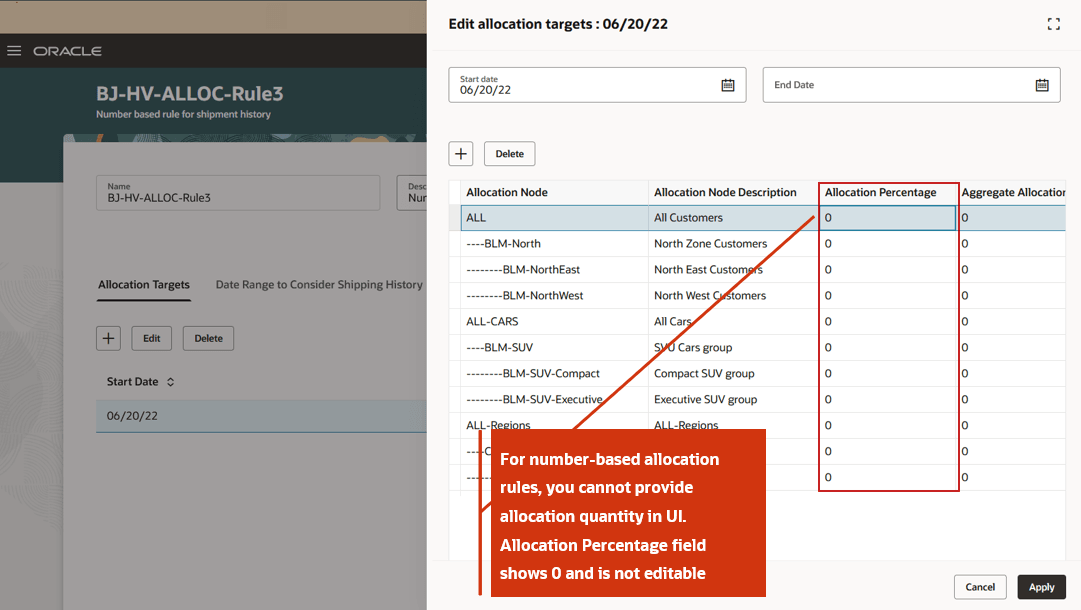
Number Based Supply Allocation Rule
Edit Supply Allocation Rule
Select or highlight an allocation rule and select Edit in the Supply Allocation Rules page. You can edit the following details for the existing supply allocation rule and save your changes:
- In the Edit supply allocation rule drawer, you can modify rule description and specification type.
- On the Allocation Targets tab, you can add or edit allocation targets, add new allocation nodes, add or modify allocation percentage, stealing protection percentage and rank for the allocation nodes.
- In the Date Range to Consider Shipping History tab, you can add or modify campaign period.
- On the Allocation Assignment tab, you can add new assignments or modify existing assignments.
If your supply allocation rule has more than one allocation targets, then you can quickly navigate from from one allocation target to another using backward arrow. For example you can navigate to previous target using backward arrow and next target using forward arrow. If you make and changes in the allocation targets, select Apply and Next to apply your changes and navigate to next target or Apply and Close to apply your changes and close the drawer.
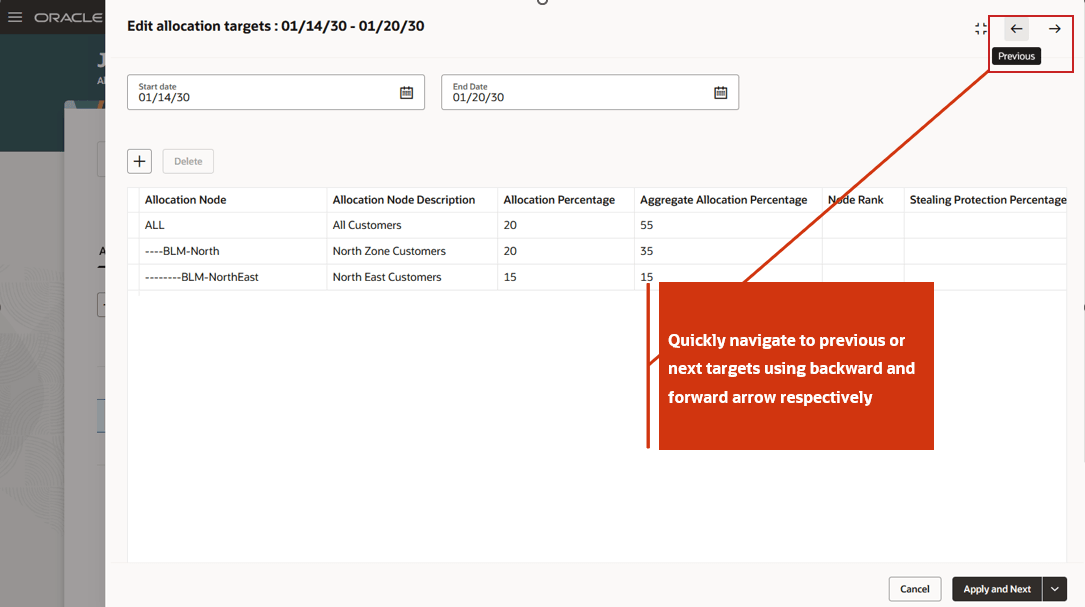
Quickly Navigate to Previous or Next Allocation Targets
You can also delete or duplicate a supply allocation rule in the Supply Allocation Rules page.
Steps to enable and configure
Use the Opt In UI to enable this feature. For instructions, refer to the Optional Uptake of New Features section of this document.
Offering: Supply Chain Planning
Tips and considerations
To use the Redwood Supply Allocation Rules Using a New User Experience feature, you must opt in to its parent feature, Oracle Order Backlog Management. If you’ve already opted in, no additional action is required. You must also opt in to either the Attribute-Based Planning feature or the Project-Driven Supply Chain feature.
Additional tips and considerations:
- For percentage-based allocation rules, ensure that the total allocation percentage across all the selected allocation node equals 100%.
- By default, you can use up to 1,000 allocation nodes in a supply allocation rule. To increase this limit, create the profile option MSC_ALLOCATION_NODES_LIMIT and set the desired value (for example, 1,500). The maximum supported limit is 3,000 allocation nodes, and you can’t set the profile option above 3,000. If you require a large number of allocation nodes, consider consolidating them at the demand class or region level to stay within the supported maximum.
- To enable stealing between allocation nodes, you must specify both the Rank and Stealing Protection Percentage for all the sibling nodes participating in stealing.
- You can access the Supply Allocation Rules Redwood page directly from Supply Allocation Rules quick action from Oracle Backlog Management by enabling the seeded planning profile option ORA_MSC_SUPPLY_ALLOCATION_RULES_REDWOOD_ENABLED. If the site-level profile value is set to Yes, the Redwood page opens on clicking Supply Allocation Rule. If set to No, the classic (ADF) page opens instead.
- You can use the Redwood page to view and edit supply allocation rules that were originally created using the classic user experience.
- You can specify time varying allocation percentages for each allocation target using start and end dates. However, Rank and Stealing Protection Percentage don’t support time varying values. Updates to these attributes apply across all allocation targets.
- You can export up to 1,000 supply allocation rule assignments. Each assignment must be unique. For example, if an allocation rule is already assigned to an item, you can’t assign another allocation rule to the same item.
- If your allocation target has more allocation nodes than allowed by your settings, you cannot edit the allocation targets
- For number-based supply allocation rule, you can upload quantity-based supply allocations in bulk using file-based data import (FBDI). Use the SupplyAllocationQuantities tab in the FBDI template ScpPlanningAllocationRulesImportTemplate.xlsm to upload supply allocations.
- You can also create allocations in bulk for number-based rules using the Create Allocations task through the Backlog Management Plans and Allocations REST endpoints.
- You can search, create, edit, and delete allocation rules using the following REST endpoints:
- Supply Allocation Rule Searches
- Supply Allocation Rules
- Supply Allocation Assignments
- Supply Allocation Histories
- Supply Allocation Targets
- Supply Allocation Target Nodes
Access requirements
Users who are assigned a configured job role that contains these privileges can access this feature from Backlog Management:
- Monitor Backlog Management Work Area (MSC_MONITOR_BACKLOG_MANAGEMENT_WORK_AREA_PRIV) (enables access to work area and enables 'Backlog Management' in the plan switcher)
- Read Access: Create Backlog Plan (MSC_CREATE_BACKLOG_PLAN_PRIV)
- Edit Access: Manage Allocation Data (MSC_MANAGE_ALLOCATION_DATA_PRIV)
The following site-level profile should be enabled:
- Redwood Backlog Management Pages Enabled (ORA_MSC_BACKLOG_MANAGEMENT_REDWOOD_ENABLED)
Following privileges are required to access this feature from Order Management/Global Order Promising work area:
- Read Access: MSP_VIEW_PLANNING_ALLOCATION_RULE_PRIV
- Edit Access: MSP_MANAGE_PLANNING_ALLOCATION_RULE_PRIV
These privileges were available prior to this update.