Redwood: Manage Planning Data Security Using a New User Experience
You can now use the Redwood user experience to manage planning data security. Administrators can define role-based access to planning data by creating access sets and conditions for Plan Inputs. These rules are automatically applied across planning pages, ensuring that users see and work only with the data they’re entitled to.
Data Security allows administrators to restrict visibility of supply and demand planning data to authorized users by applying flexible filters and rules.
Steps to Create Data Security for the Given Use Case
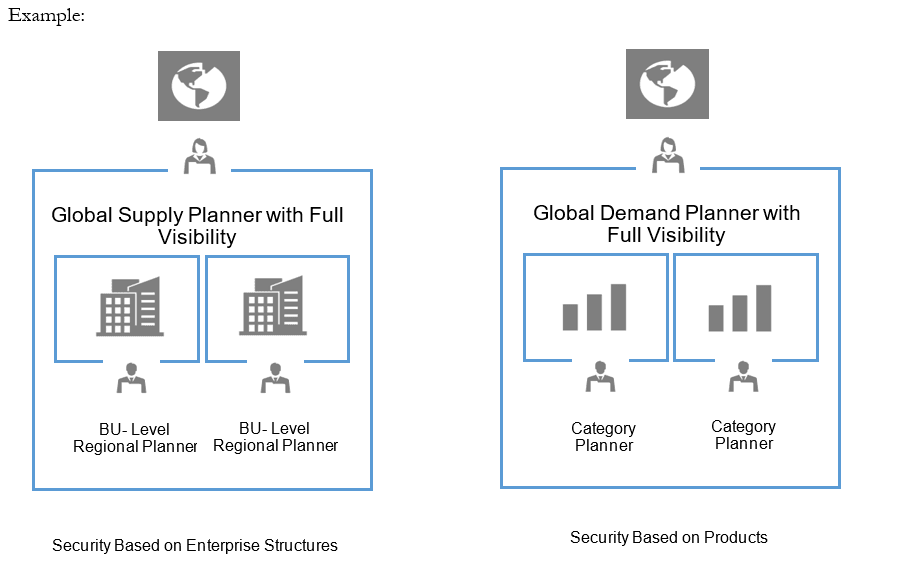
Consider a global plan covering four organizations: A, B, C, and D. The access requirements are as follows:
- Planners 1 and 2 should have access to Organizations A and B
- Planners 3 and 4 should have access to Organizations C and D
Configuration Steps
- Create Job Role X and assign it to Planners 1 and 2.
- Create Job Role Y and assign it to Planners 3 and 4.
- Create Data Access Set DAS1 and assign it to Job Role X.
- Create Data Access Set DAS2 and assign it to Job Role Y.
- For DAS1, create a condition where Organization = A, B.
- For DAS2, create a condition where Organization = C, D.
This configuration ensures that planners can only access the supply and demand data relevant to their assigned organizations.
Accessing the Data Security Page
Click View More to open the Data Security page. It can be accessed from the following functional areas:
- Supply Planning
- Replenishment Planning
- Demand Management
- Sales and Operations Planning
- Backlog Management
- Production Scheduling
- Global Order Promising
- Plan Inputs
To open the page, select Administer Planning Security from the UI Shell. The Data Security page will then be displayed.
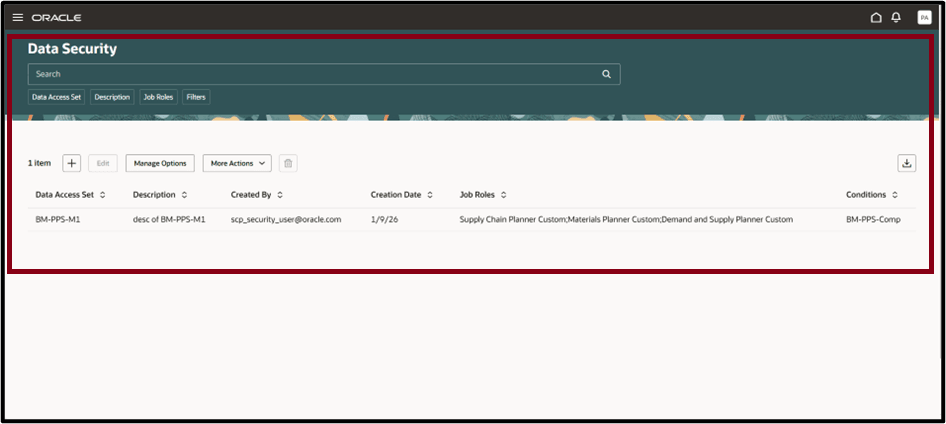
Data Security Toolbar

The Data Security toolbar provides the following actions:
- Add - Create a new Data Access Set.
- Edit - Modify attributes of an existing Data Access Set.
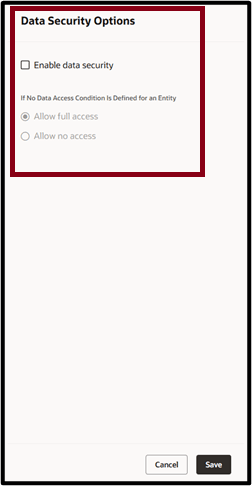
- Manage Options - Enable Data Security at a global level for entities where a Data Access Set is not defined.
- More Actions - Run scheduled processes such as:
- Synchronize Selected Data Access Set
- Synchronize All Data Access Sets
- Delete - Remove the selected Data Access Set.
- Export - Export records to a spreadsheet. Only the columns in the current view are exported, in the same order as displayed.
Searching and Filtering Data Security
You can search for Data Access Set using the search bar and the suggested filters.

Keyword search bar: Search across multiple columns by entering text in the keyword search field. For Data Access Sets, the search specifically applies to the Data Access Set and Description columns, using the contains operator. For example, type DAS and press Enter or click the search icon. The table displays all Data Access Set names containing DAS, such as DAS1.
Note: Keyword search isn’t case sensitive.
Suggested filters: Filter Data Access Sets using the column-specific filter suggestions. For example, select a Job Role or Data Access Set from the suggested filters, then press Enter or click outside the filter. The table updates to show only the rows that match your selection.
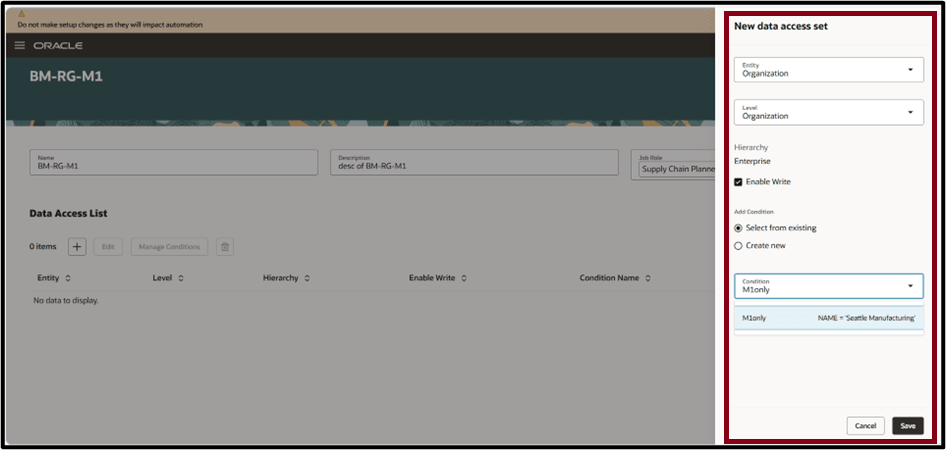
The following screenshot appears on creating the Name and Description of the data access set and assigning to specific roles.
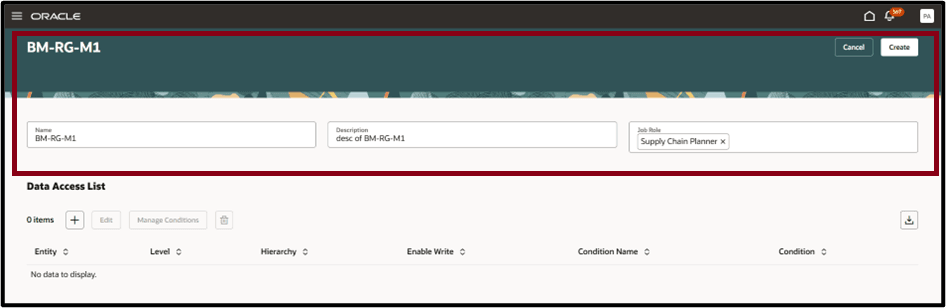
After creating the data access set and assigning it to the appropriate role, configure conditions for the selected entity:
- Define the Level and Hierarchy for the condition.
- Grant Read or Write access by enabling or disabling the Enable Write flag.
- Select between using an existing condition or creating a new condition using the available toggle options.
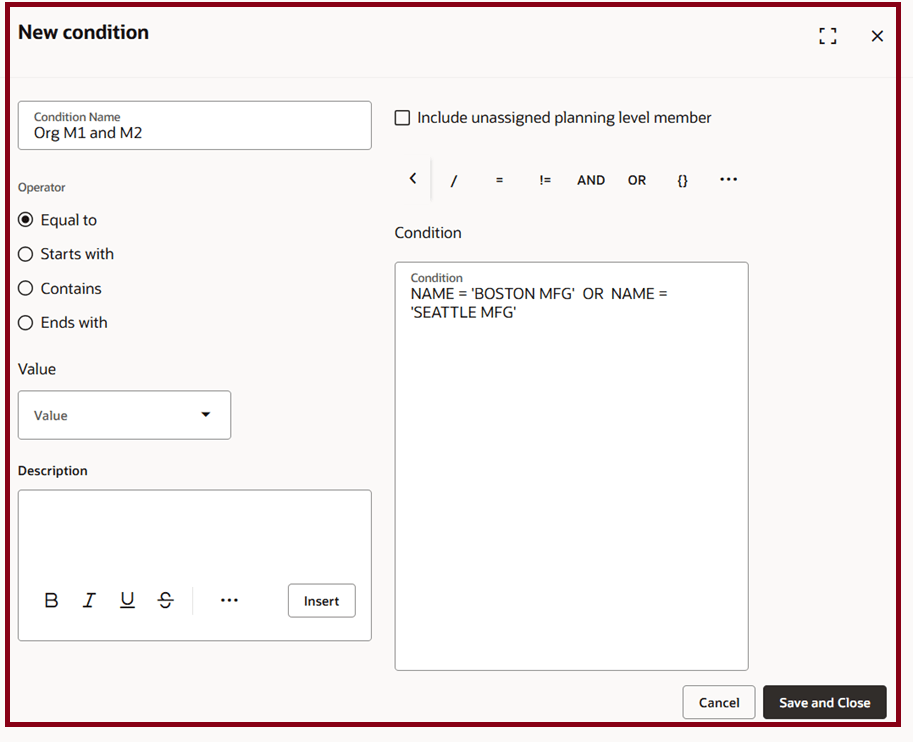
New Condition Drawer
In the New Condition drawer, follow these steps to define a condition for a data access set:
- Enter a Condition Name.
- Define the condition using the Advanced Create Expression option.
For example, an Org M2 condition can be created where data security is applied only when the Organization equals BOSTON MFG or SEATTLE MFG.
Steps to enable and configure
Use the Opt In UI to enable this feature. For instructions, refer to the Optional Uptake of New Features section of this document.
Offering: Supply Chain Planning
Tips and considerations
If you want to use the Redwood: Manage Planning Data Security Using a New User Experience feature, then you must opt in to its parent feature: Order Backlog Management. If you’ve already opted in to this parent feature, then you don’t have to opt in again.
Data security supported by Job Role (these Job roles have to be created prior to setting up the security)
Data security supports rules at the for the following entities:
- Item
- Organization
- Customer
- Supplier
- Segment
- Measure Group
- Sales Organization
Data Security can be defined at one or more of the above entities. When defined at multiple entities, all the filters are applied to decide visibility.
Key resources
See Redwood: Analyze Supply Plans Using a Configurable Redwood Page feature.
Access requirements
Users who are assigned a configured job role that contains these privileges can access this feature:
- Administer Planning Security (MSC_ADMINISTER_PLANNING_SECURITY_PRIV)
This privilege was available prior to this update.