Multiple Attachments
The feature introduces several key improvements:
- Ability to take multiple photos using a single property
- Automatic attachment of photos to Service work order or Maintenance work for persistent storage
- Automatic uploading of photos to OCI Object storage with a defined retention policy
iOS and Android installed apps allow users to take multiple photos, upload them to Fusion attachments or OCI Object storage and view them in user interface.
Browser application just visualizes photos for end users.
As for now photos can be attached to screens and forms related to the OFS Activity business object.
Business scenarios covered by the feature
1) Persistent storage of photos for break fix of damaged asset
There is a maintenance work order to fix a damaged asset. Based on this work order, an activity is created in OFS.
A technician comes to the location and takes a series of photos capturing the conditions of a damaged asset. Photos get automatically attached to the Maintenance work order and persistently stored.
The tech fixes the asset and proceeds to the Debriefing form. As a part of debriefing, the tech takes another series of photos of the asset proving that it has been fixed and is now working properly. Photos become attached to the Maintenance work order and are permanently saved.
2) Temporary storage of photos for safety audit
A company's safety and compliance policy demands technicians to wear protective gear before performing work and provide proof of it. Photos should be stored for 60 days to audit if a tech followed the rules in cases where they were injured at work.
When starting an activity, the tech takes several photos confirming that they wore a helmet, goggles, mask and gloves. Photos get uploaded to OCI Object storage. In 60 days, photos are automatically deleted in accordance to the rule configured by the customer.
When to use Multiple Attachments
The feature is recommended for all clients that use iOS and Android installed apps for their technicians.
The best practice is to use OFS as part of the Fusion suite. In this setup, the feature provides seamless collaboration with Fusion Service and Maintenance Cloud without any additional integration efforts.
However, there could be reasons to not save photos in Fusion. For instance, some photos require a shorter retention policy or some photos should be shared with third-parties or require additional validation via AI. To address these scenarios, we recommend to store photos in OCI Object storage.
Using single images
We retain single image properties for backward compatibility with previous versions. Single image properties are still beneficial for customers that use the browser-based application.
How it works
When the feature is used in conjunction with other Fusion apps, the process is simple and straightforward:
- Technician takes photos
- The application uploads photos to the Service work order or Maintenance work order related to the OFS activity
- Photos become available under the 'Attachments' section of a Fusion business object
The process is a bit different when it comes to collaboration with OCI Object storage
- Technician takes photos
- The application uploads photos to OCI Object storage
- Photos get associated with business objects in customer's system via Work order number
Taking multiple photos
Capture screen
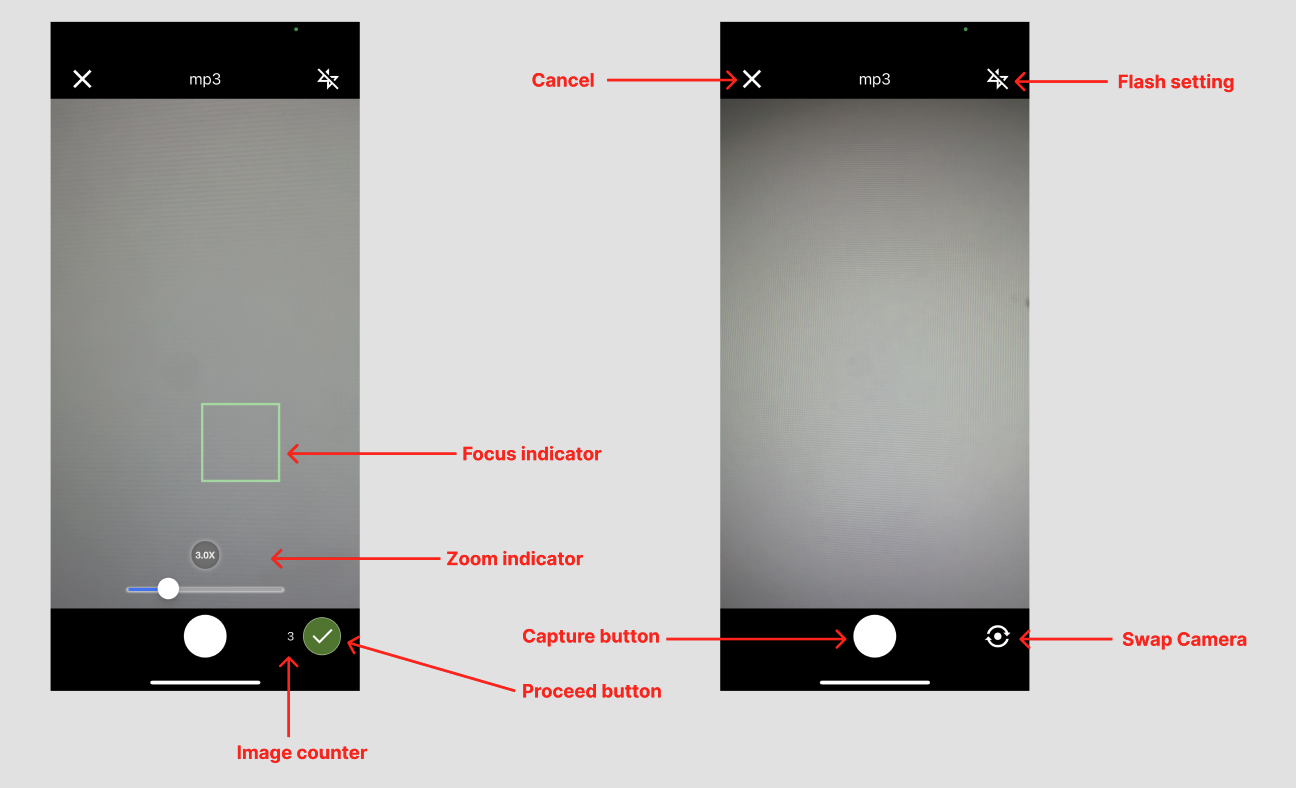
When the users click on add button for the multiple image property , camera screen will open where the users will be able to perform following actions
- The users will be able to see the property name on top of capture screen ( e.g. "mp3" is the property name utilized in attached screen shots)
- They can choose the camera (front or back) from which they wants to take pictures by clicking on swap camera icon
- This action is available only before the users have taken any image
- Once an image is captures the swap camera icon will be replaced by Proceed button and image counter
- They can pinch in / pinch out on screen to zoom in/ zoom out
- They can tap on the screen to indicate where they want the camera to focus on
- They can capture image by clicking on the capture button
- There will be an increase in image counter , confirming that the success of image capture
- Once the expected maximum of taken photos is reached the Capture button becomes inactive
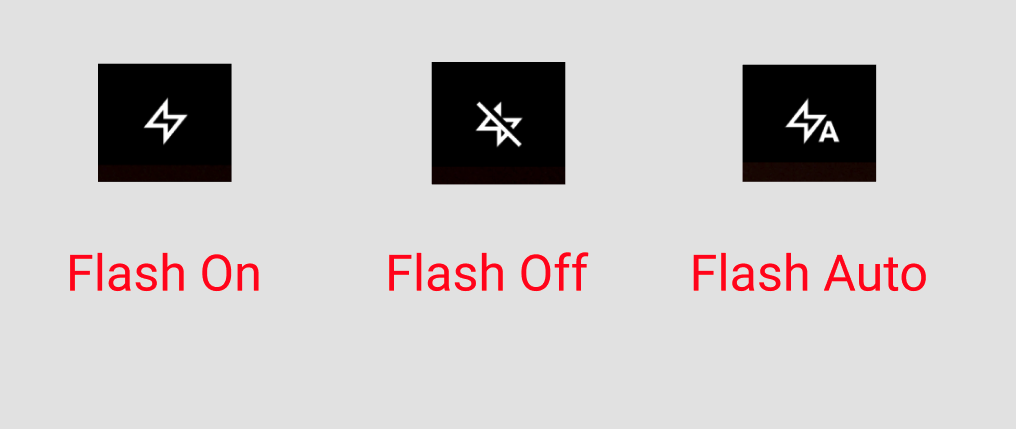
- They can change the flash setting by clicking on current flash setting icon. There are 3 flash settings available to the user
- Flash on which indicates that flash is permanently on
- Flash off which indicates that flash is permanently off
- Flash auto mode which indicates that flash will be chosen based on light conditions
- They can cancel the camera operation and move back by clicking on cancel button
- They can move to preview screen by clicking on Proceed Button
- The color of proceed button indicates whether the user has taken minimum number of images configured while setting the multiple image property
- The user is allowed to proceed forward even if he has not taken the minimum number of images since the technicians might need to take images in different places / different times during their activity thus they would like to come back and take additional images
Preview Screen
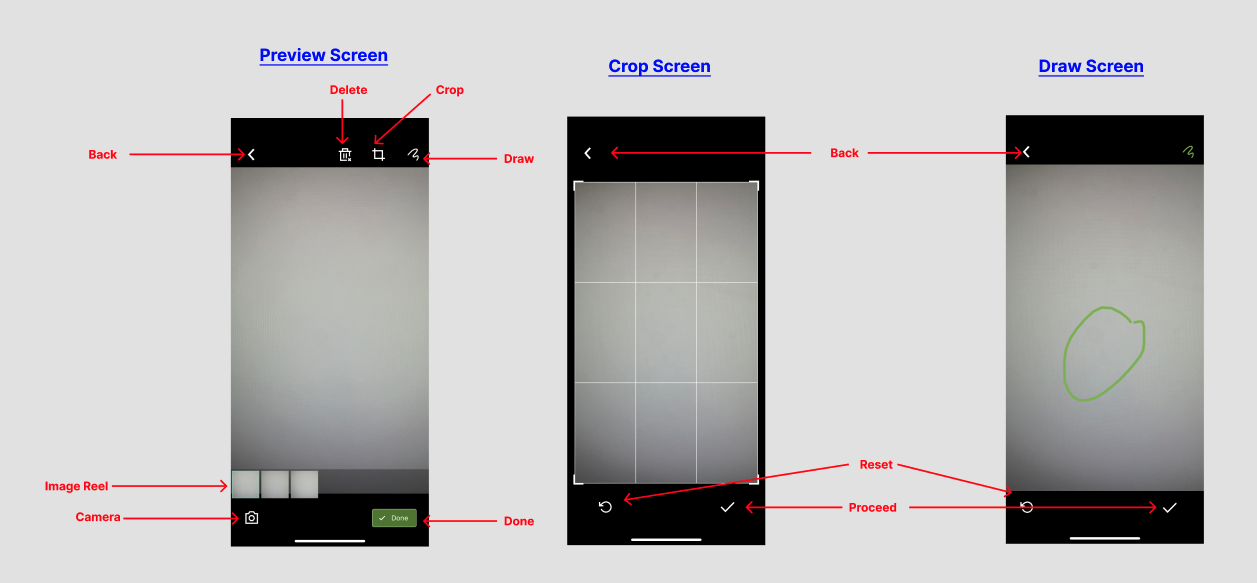
When the users click on proceed button on capture screen they will be led to preview screen where they will be able to perform following actions
- They can observe the images they have taken
- They can move between the images by either swiping left or right or by choosing the desired image on Image reel
- If they want to take additional images they can move back to capture screen either by clicking on Cross icon or on camera icon
- They can delete an image by clicking on delete icon
- If they want to crop an image they can click on crop icon which will open the crop mode
- They can confirm their changes by clicking on Proceed button
- They can cancel the crop operation by clicking on Back icon
- They can reset the cropping action by clicking on Reset icon
- They can highlight things on image by clicking on Draw icon
- They can confirm their changes by clicking on Proceed button
- They can cancel the draw operation by clicking on Back icon
- They can reset the drawing action by clicking on Reset icon
- They can complete the capture operation by clicking on Done button which
View photos
When photos are taken, the application will create a collage that will be displayed on a screen. The collage will contain up to 5 previews and adding a remaining quantity of photos if there were more then 5 pictures taken.
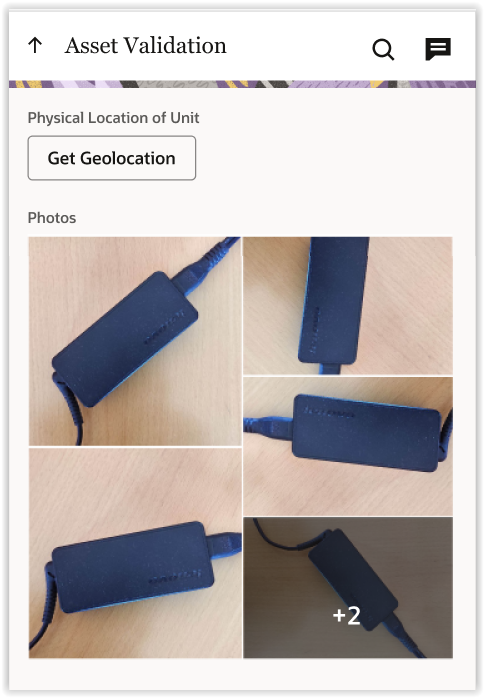
You have to click on a preview to open a full-size photo in a gallery allowing you to navigate over pictures. In addition the application will display a place of a ploto in a series along with a total quantity of pictures.
To display a photo the application will call it from Fusion attachments or OCI Object storage and show it in the gallery. Photos which are not uploaded yet will be called from a mobile device. You can consider this behavior for technicians working on offline.
Delete photos
To delete a photo you should click the 'trash' icon displayed on top of a gallery. Meanwhile it is possible to remove a specific picture which gives more control on data being deleted by a user. However, clicking the 'trash' icon is not enough. To finish the operation you have to click 'Submit' button at the bottom of the screen confirming the changes. Then the application will remove the picture from a Fusion business object or OCI Object storage all together with references to the photo in OFS.
Validation when deleting photos
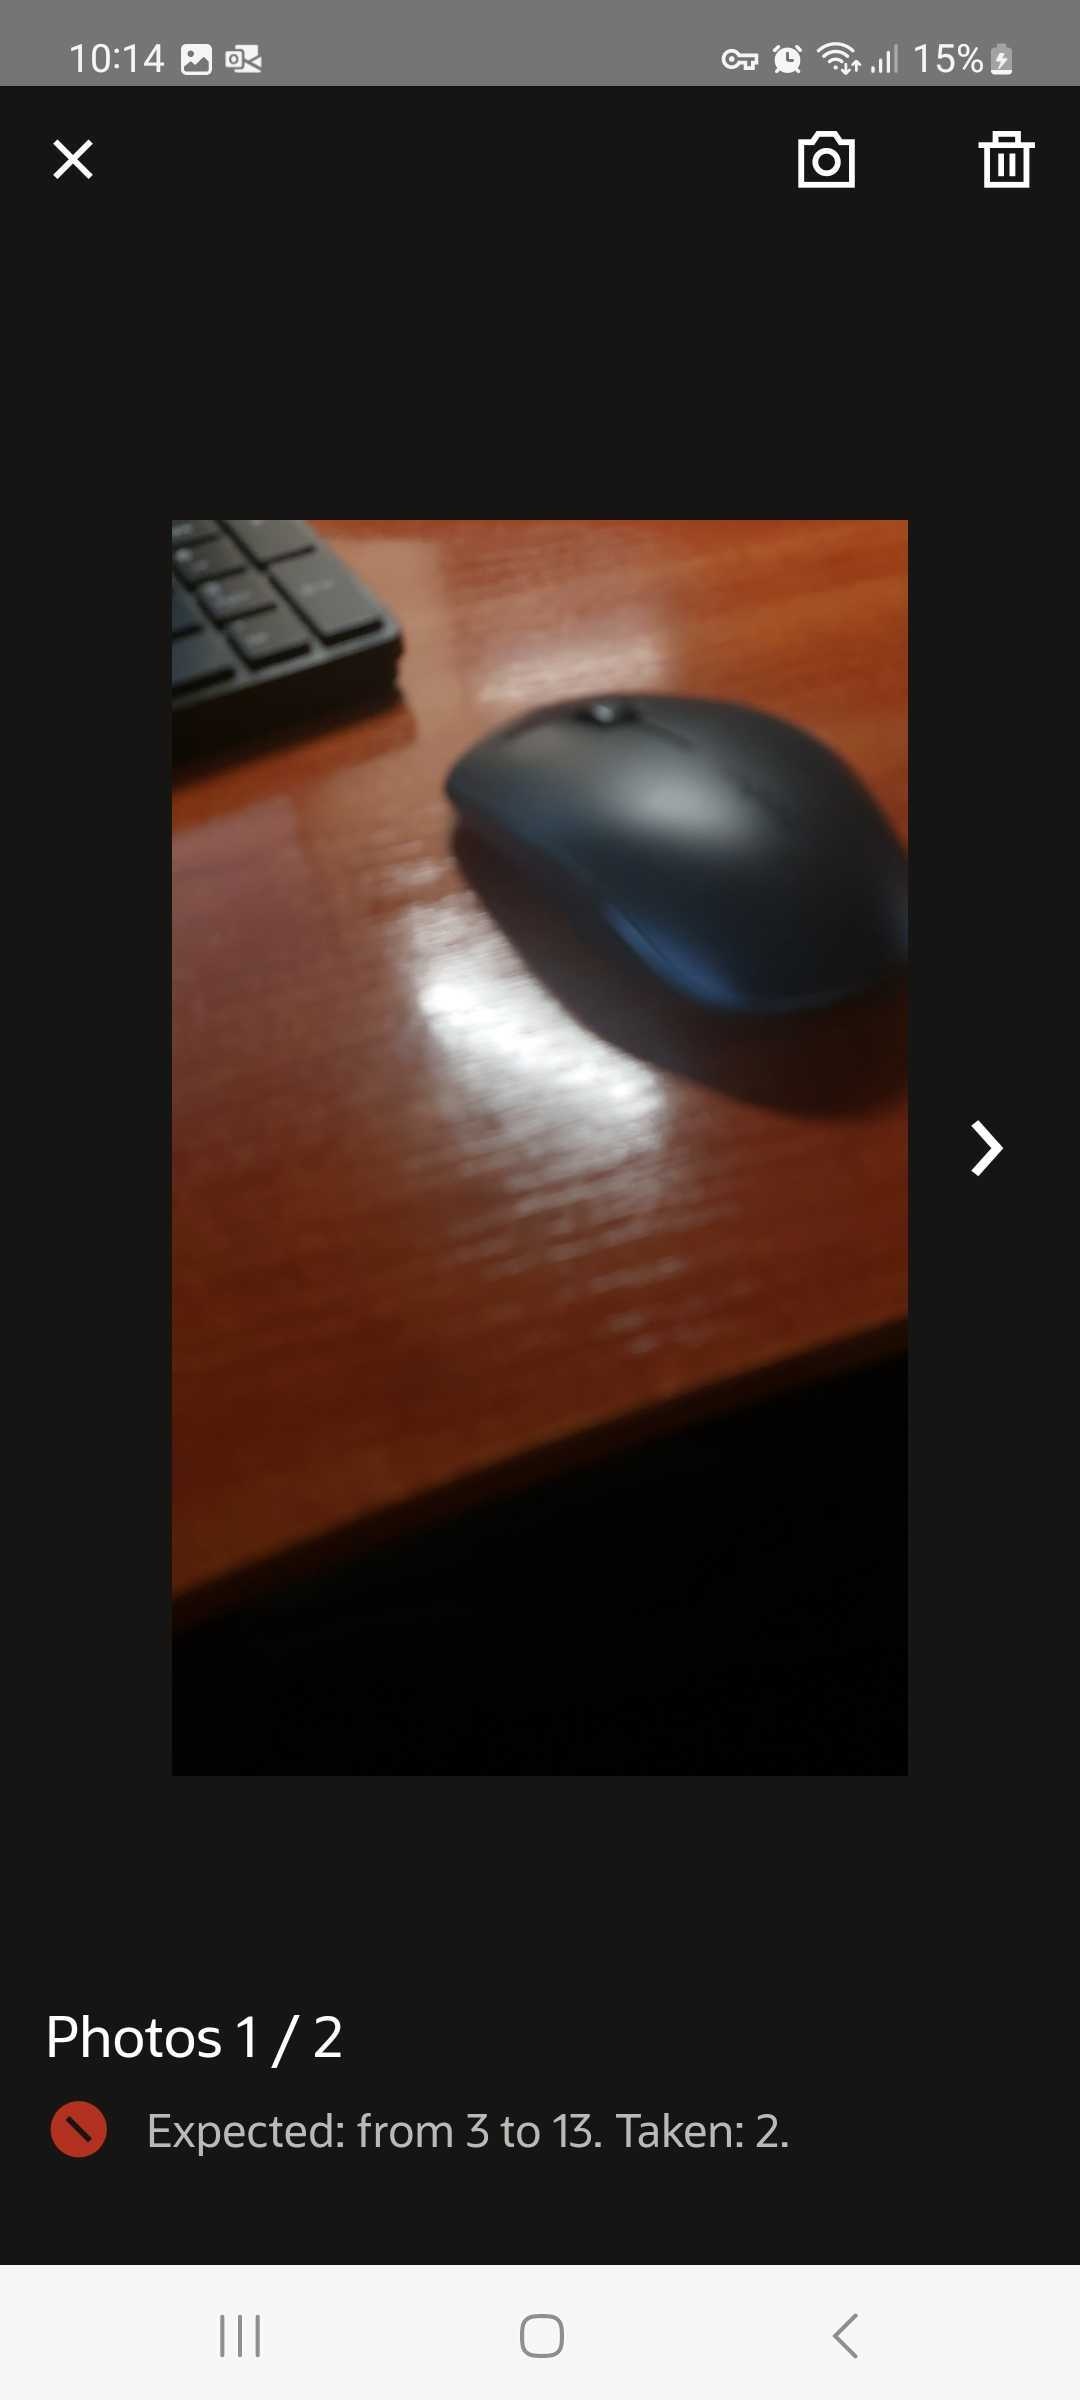
It might happen that you remove extra photos and a total quantity of pictures won't fall under the minimum needed quantity of images. The application will trigger notification messages to inform you that more photos are required.
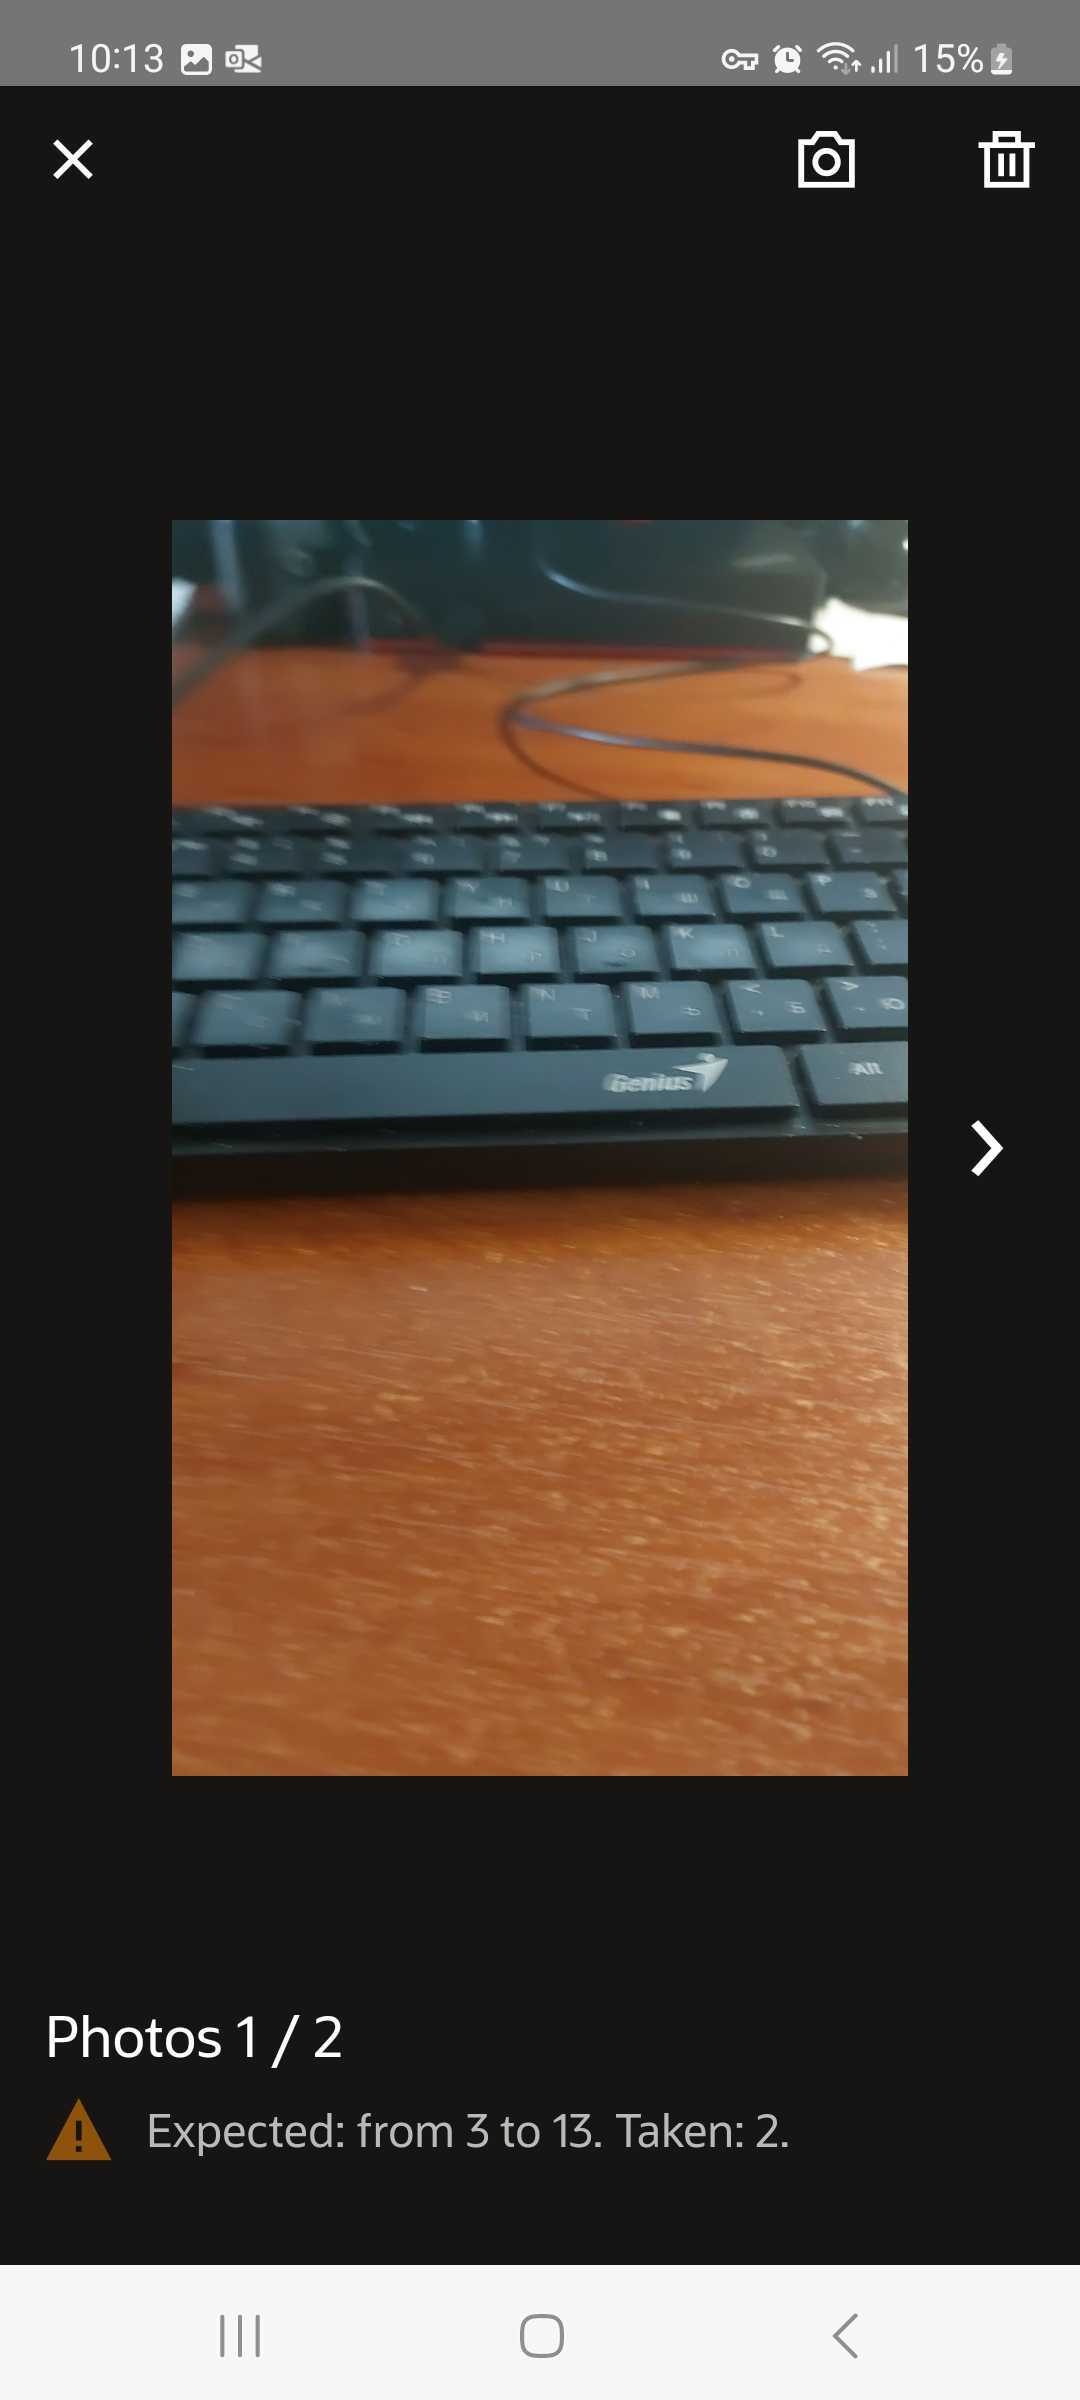
The error message will be displayed for properties having 'Mandatory' visibility preventing users to submit changed.
The warning message will be showed for properties of 'ReadWrite' visibility. Users will be advised on the recommended action however it would be possible to submit changes with a less number of photos that was expected.
Upload photos to External Storage
The images will be pushed to Fusion attachments or OCI Object storage directly from technicians device only when the user submits a screen and when ever the internet is available. A technician will see an uploading indicator when ever images are still on his device and not fully uploaded. The images will be cleared from technicians devices once they are successfully uploaded.
File and Folder names
The application automatically generates unique names of folders and files using multiple parameters depending upon the kind of exterior storage which utilised for saving images. However, 'Work order' is the most crusial parameter among all attributes used to build names.
In its current iteration if
- OCI is used as external storage, there will be a folder structure
- Fusion attachment is used there will be no folders as Fusion attachment doesn't support folder structure
Let's look at the examples below to find more details:
Folder name: WO40601202_4232069_1_Attachments. Folder name always starts with the Work order number; using this parameter, you can easily identify the folder that contains all files collected in OFS for a certain activity.
File name: 20240304184334571_WO40601202_4232069_1_Attachments.jpg. File name begins with the timestamp of when a photo was taken followed by a Work order number.
The main requirements allowing to generate correct names
- Activities must contain work order numbers
- Work order numbers must match business objects in customer systems
Working in offline
Offline mode is fully supported for multiple attachments. The application stores files in mobile devices for up to 45 days and tries to push them to Fusion attachments or OCI Object storage when connectivity is established.
Size of photos
The feature is built to save time of technicians, improve reliability of the application and control the size of data pushed through the network. To achieve these goals, the application compresses files before uploading in accordance with parameters configured by customers.
Checking file uploading process
Visually on 'Activity history' screen
All photos for the 'Attachments' properties will be displayed on the 'Activity history' screen. As long as photos become uploaded to Fusion attachment/Object storage this fact will be reflected in the activity history where a status for a certain file will be changed from 'Pending' to 'Uploaded'.
You have to add properties to the list of monitored activity fields in order to visualize them within activity history.
Via API
Be aware of photos taken for a certain form
Use 'formSubmitted' event which will contain descriptions of all photos taken for a form
Check uploading status
Monitor the 'activityCompleted' event, and in 5 minutes after activity completion, perform a 'Get activity' API call. The call will return data for all photos such as their names, URLs and uploading statuses. When a status for all photos gets changed to 'Uploaded' it means that images are successfully uploaded to the final destination.
The feature improves technician efficiency for capturing of visual data by allowing them to take multiple photos in one workflow. It results in:
- Decreased activity durations, since the process of taking photos takes less time
- Fewer mistakes in collecting data, since technicians can easily take photos instead of manually entering data in forms
- Increased compliance with company processes, since the quantity of photos required for a certain job can be controlled
Steps to Enable
How to configure Applications
Application to connect to Fusion attachments
You should use 'Applications using REST/SOAP API' type of application and choose the 'OAuth User Assertion' option
Application for integration with (OCI) Object Storage
A new type of application called "Oracle Cloud Infrastructure (OCI) Object Storage" is now available on the application configuration page. This can be used to store the necessary parameters to connect to OCI object storage from Field Service. OCI Object Storage can be used for storing attachments, such as images, uploaded from Field Service.
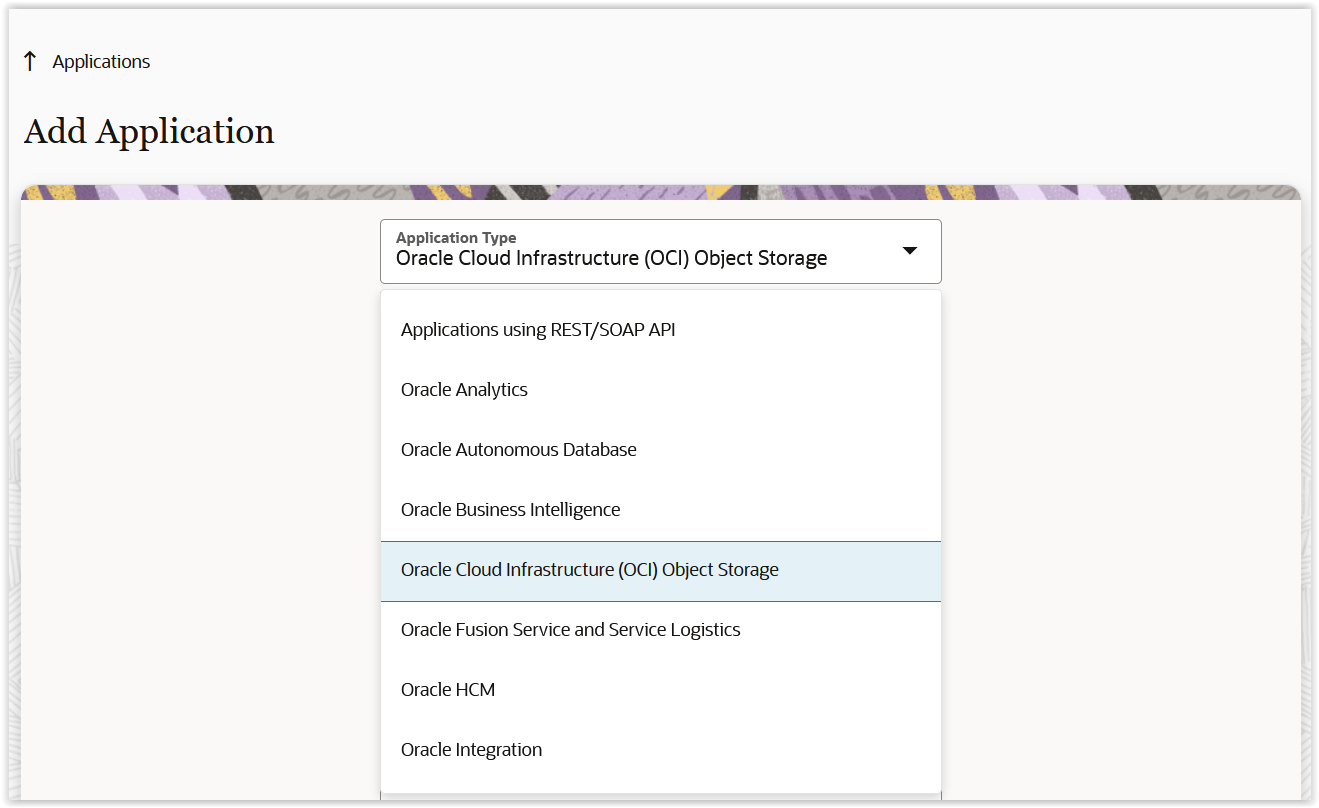
After selecting "Oracle Cloud Infrastructure (OCI) Object storage" application type, you can configure OCI parameters to connect with Object Storage in Field Service.
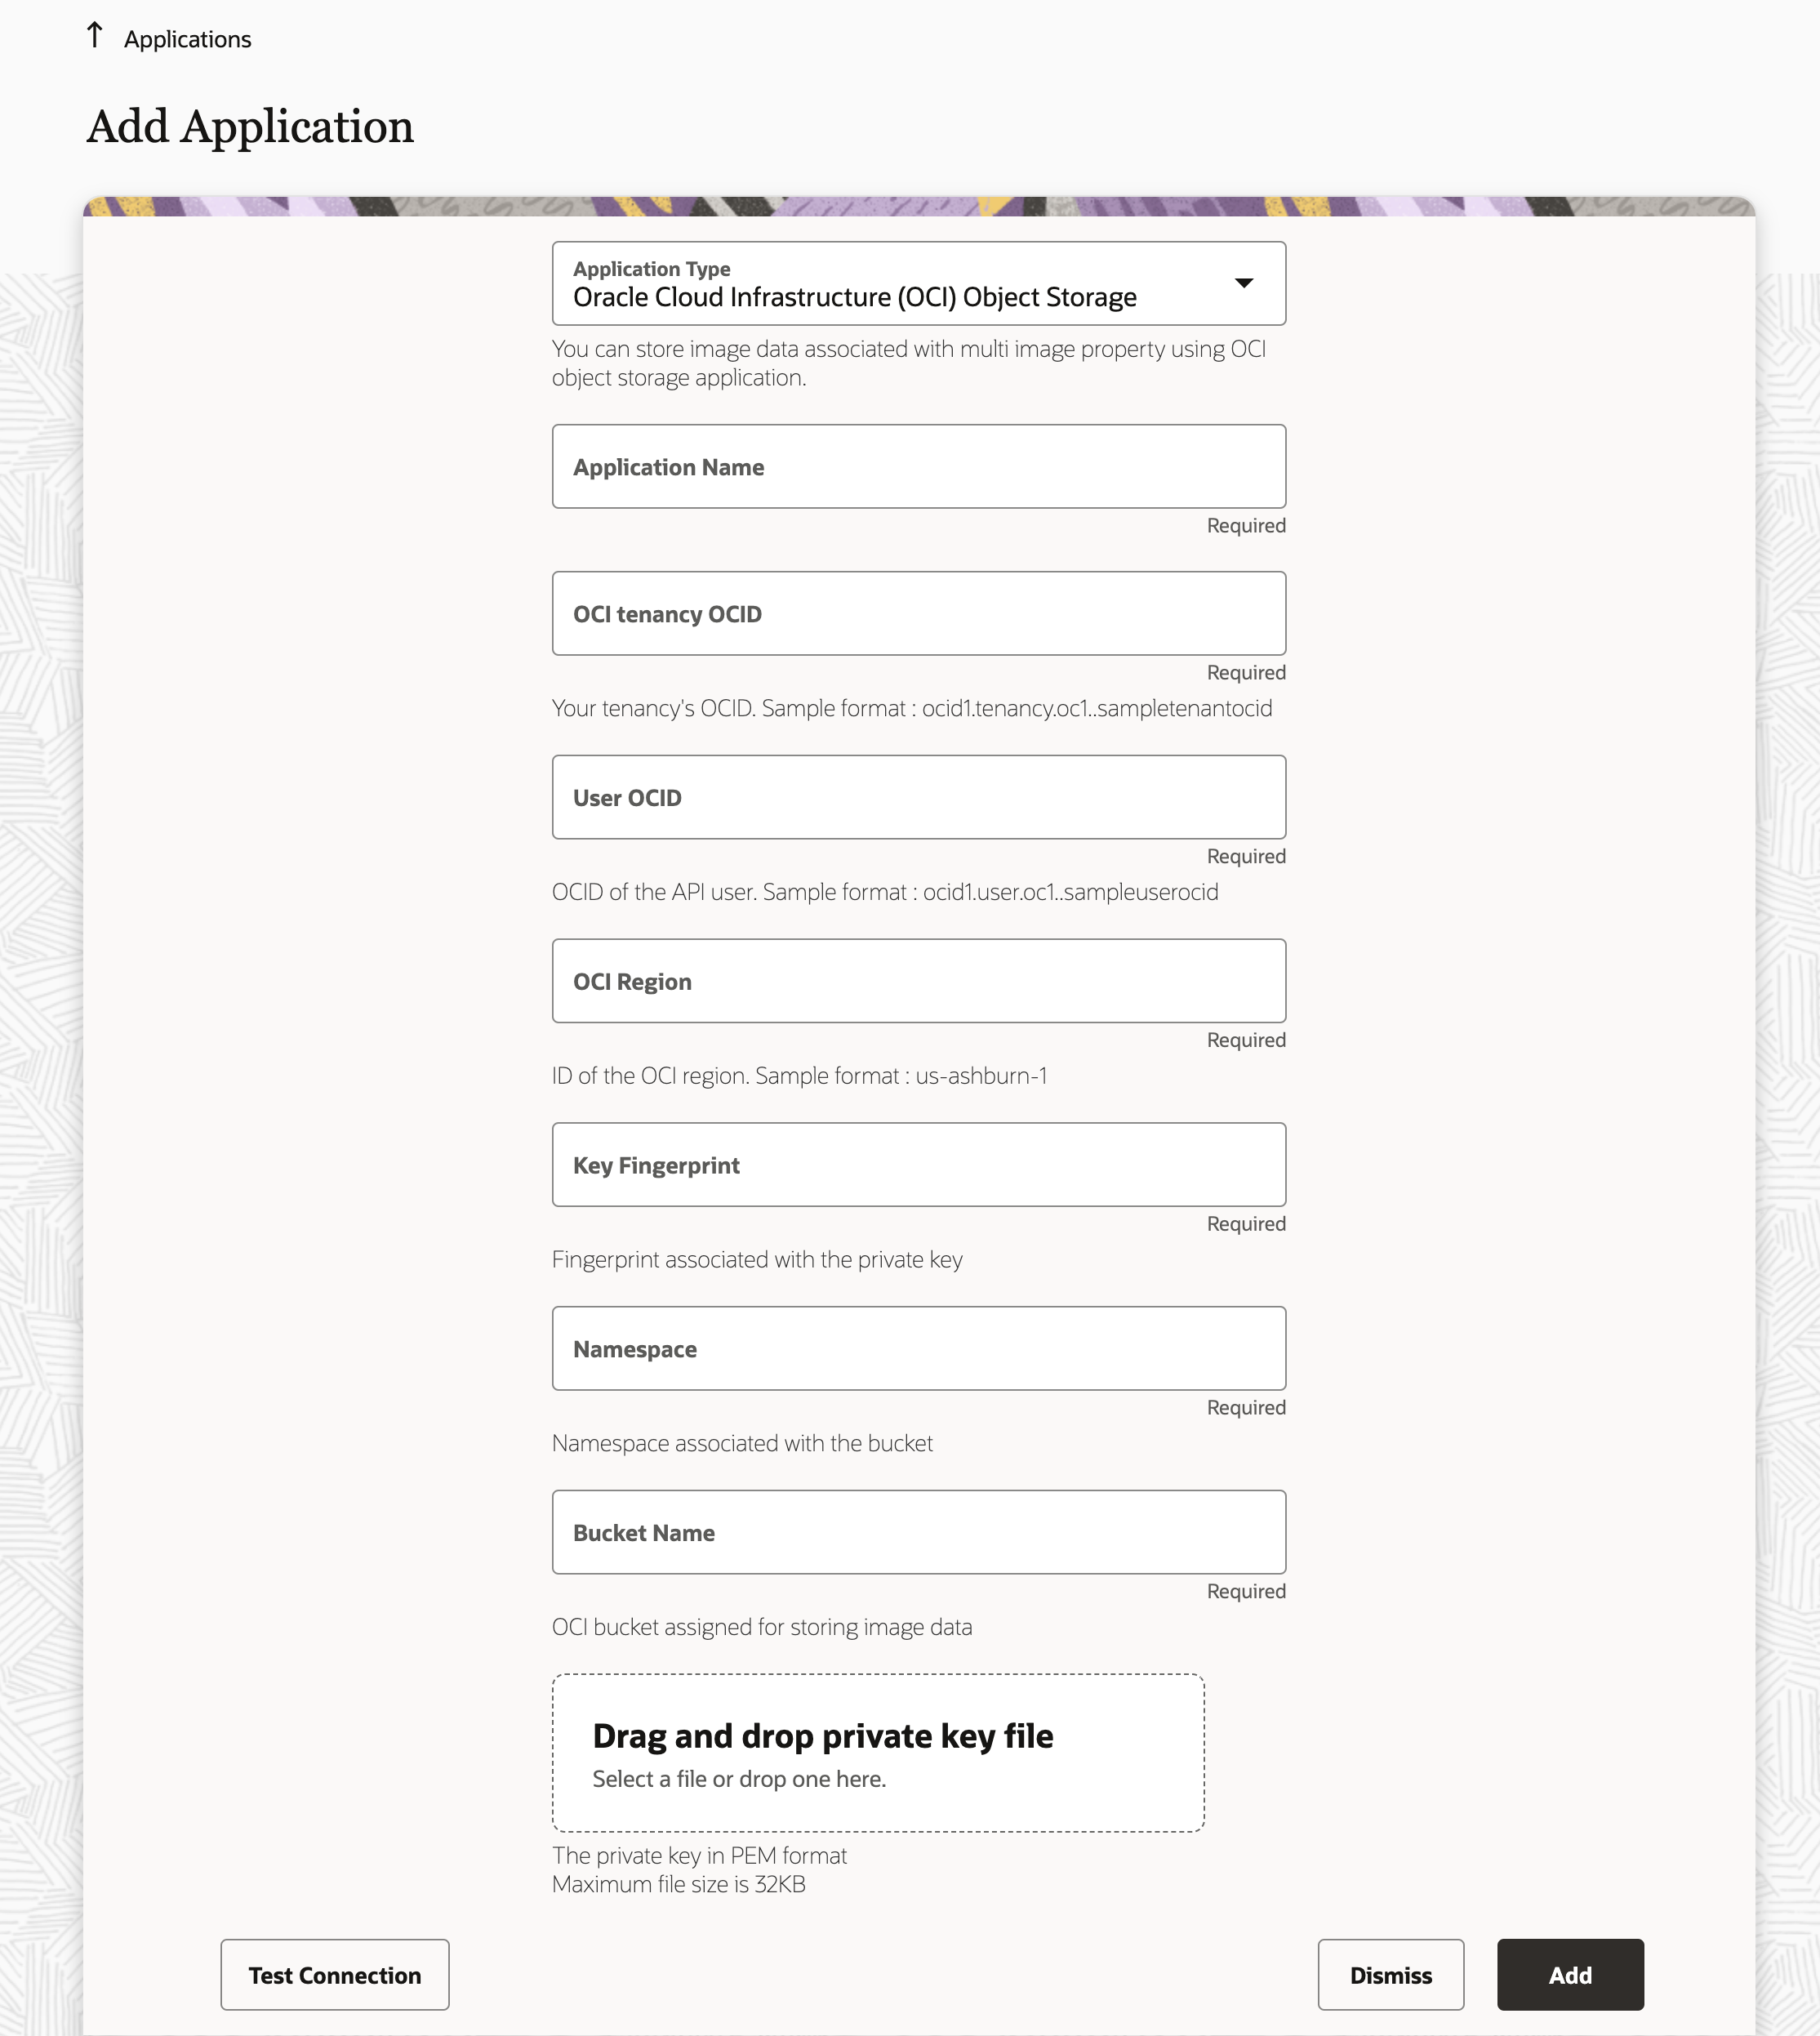
|
Fields |
Description |
|---|---|
|
Application Name |
Name of the application. This name will be displayed on the application page to identify this application |
|
OCI tenancy OCID |
OCID (Oracle Cloud Id) of the tenancy assigned to you . To access the OCID log into your Oracle cloud console go to Tenancy Information section of the Tenancy details page you can see the OCID of tenancy. |
|
User OCID |
Oracle Cloud Id of the user invoking object storage API. To access the user OCID log into your Oracle cloud console go to user page and selecting the appropriate user. You can see the OCID from the user information section. |
|
OCI Region |
This is the geographic area where OCI infrastructure is located . You can see more information about regions and availability domains from this document. Please refer to the region identifier column in the table described on the page. |
|
Key Fingerprint |
Finger Print for public key associated with a user |
|
Namespace |
Object Storage namespace serves as the top-level container for all buckets and objects in a tenancyUsing the Console. To access the Name Log into your Oracle Cloud Console go to Object Storage > Select the bucket and view Bucket details you can view the Name space from Bucket Information section |
|
Bucket Name |
OCI Object Storage bucket name. Each bucket within a namespace must have a distinct name to avoid overlap and ensure clear identification. Please use the name of the bucket you have configured in your Oracle Cloud Console |
|
Private Key |
Private key used to sign the OCI API requests. To download this API key log into your Oracle cloud console navigate to users>> select the appropriate user and select the add API key from the resource section |
After configuring the parameters, you'll be able to check the connectivity with OCI object storage from the field service. This can be done by using the "Test Connection" button before saving the application. Once you save the details, a new application will be created in the Storage Applications section of the application page with the name you've provided.
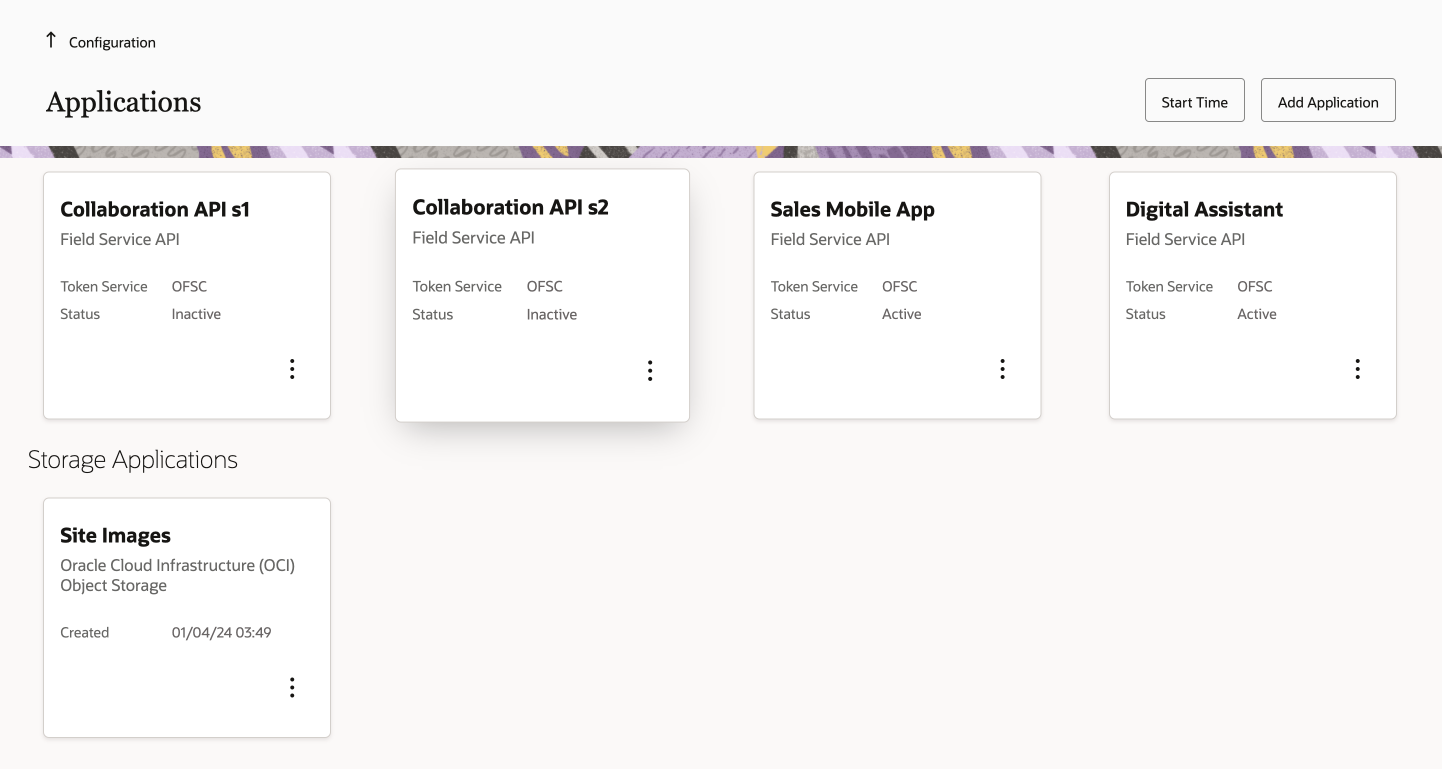
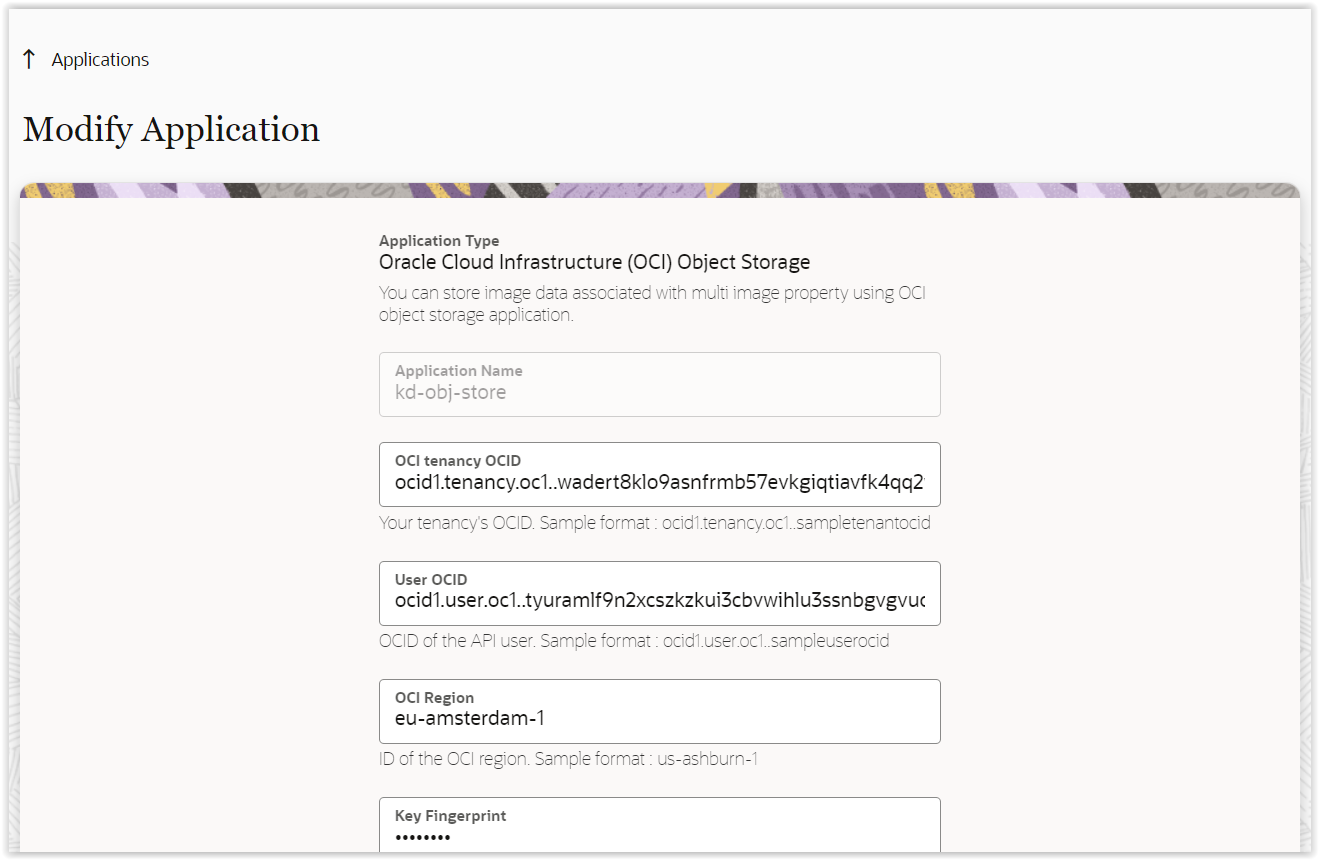
Options are available in the application page to modify or delete the storage applications. On the modify application page, you can change all attributes except the name of the application.
How to configure Property
There is the new 'Attachments' type of properties designed specifically for this feature. You should select a destination to store photos collected into a property.
NOTE: As for now only 'Activity' entity is supported for the 'Attachment' type of properties.
Selecting Fusion attachments
There are 3 parameters that should be filled to connect to Fusion attachments
- Application - a list of suitable applications will be automatically provided for selection
- Fusion business object - choose either Service Work Order and Maintenance Work Orders
- Attachment category - security setting limiting access to attachments from a certain category. The system will fetch attahments categories from Fusion and present the list of availabe categories for a selected business object.
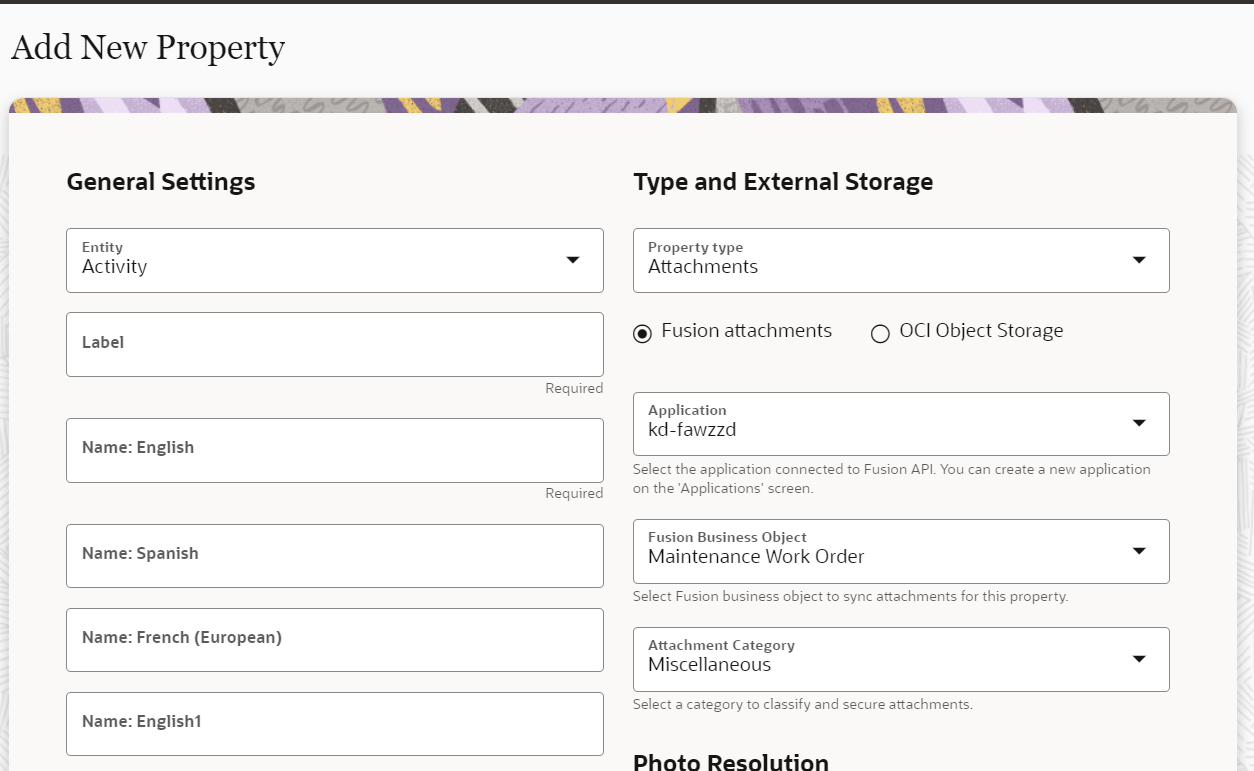
Selecting OCI Object Storage
You should select an application serving as a connection to the Object storage.
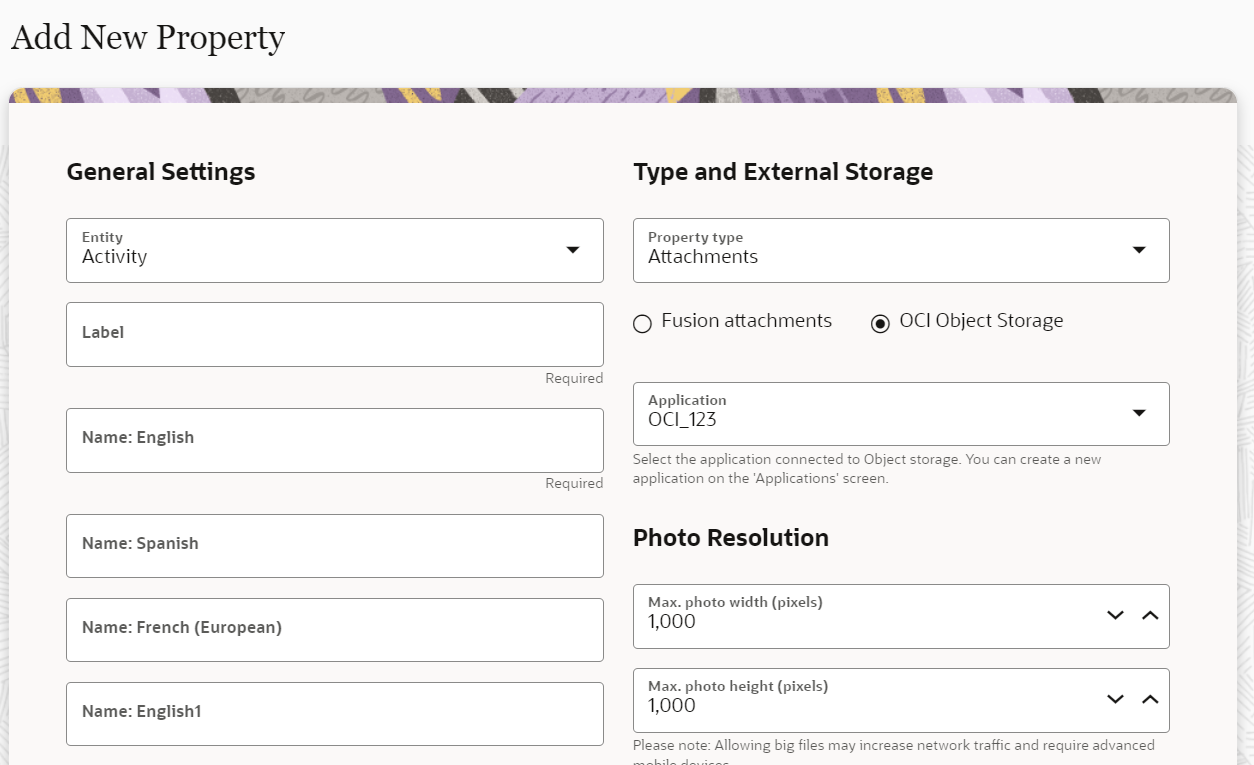
NOTE: The application doesn't enforce hard dependency in configuration and allows to create a property not selecting any of options required to connect to Fusion attachments/OCI Object storage. In such an event, the application will display the 'Property is misconfigured' warning along the property row on the 'Properties' screen.
You can control a size of photos to adjust them to capabilities of mobile devices, control traffic volume and increase time of uploading to a storage.

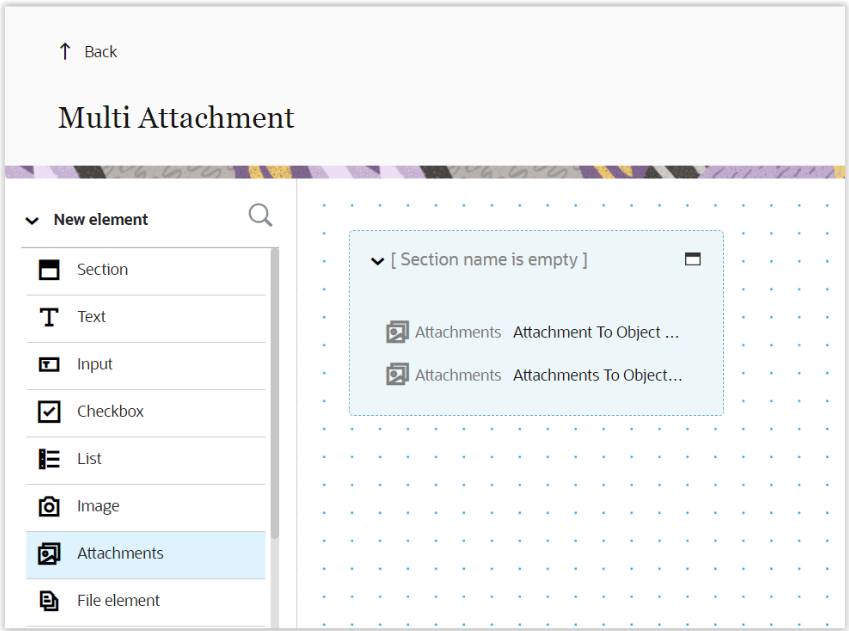
'Attachments' form element
The new 'Attachments' form element is available in configuration of forms and user types. The element allows to configure corresponding properties for a form or a standard screen.
Unlike other form elements, 'Attachments' form element doesn't work without a property thus it's required to select a property when dropping the element on the screen.
The system will show validation errors for empty 'Attachment' elements when clicking when publishing configuration changes or moving to the form's preview screen.
Validation for min/max quantity of photos
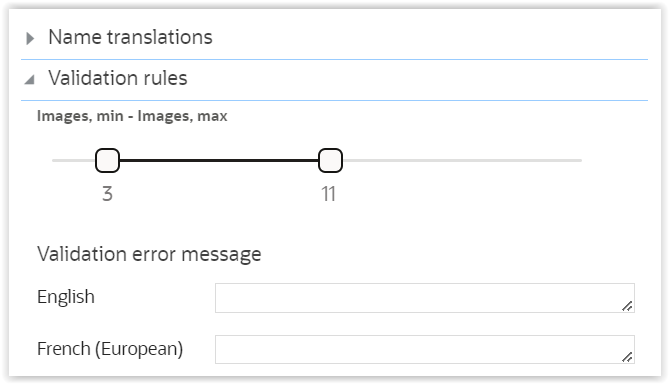
You can define a validation rule for form elements representing the 'Attachment' type of properties. The rule will allows to define min. and max. quantity of images which should be taken on a certain screen. The maximum possible range for this configuration is from 1 to 20 images, by default the range is from 1 to 5 photos.
Export & Import of properties
'Attachment' properties are supported in the Export & Import operations. When importing a property the system will check if an Application selected for a property exists in a target environment. If so, the opertaion will go trough. If not, a corresponding warning will be displayed in the 'Validation results' screen informing a user about this case. Then it would be possible either to import properties or dismiss the operation.
Export & Import of forms and user types
'Attachments' form element is supported in the export & import operations for forms and user types. It will help customers to migrate configuration of attachments incuding the new validation options for min/max quantity of images.
Tips And Considerations
Troubleshooting
If photos don't appear in the customer's storage, check the following settings:
- Property configuration - The application will show if any parameters were missed or if there is no connection to Fusion attachments/OCI Object storage
- Capacity of OCI object storage - storage might be full therefore unable to accept new photos
Define retention policy in OCI Object storage
Use Object Lifecycle Management to automatically manage the archiving and deletion of objects.
https://docs.oracle.com/en-us/iaas/Content/Object/Tasks/usinglifecyclepolicies.htm
Out of Scope
'Attachments' properties are not supported in:
- Plugin API Framework
- Daily extract
- Inbound & Outbound SOAP APIs
- Configuration of Filters, message scenarios, work skill conditions, capacity categories