Support for your sales organization with an efficient Sales Help Desk
Internal Help Desk now supports integration with Leads, Opportunities, Deals and Quotes, allowing an employee to link a particular sales object to their help desk request, and giving the agent the ability to easily link back to the appropriate sales object.
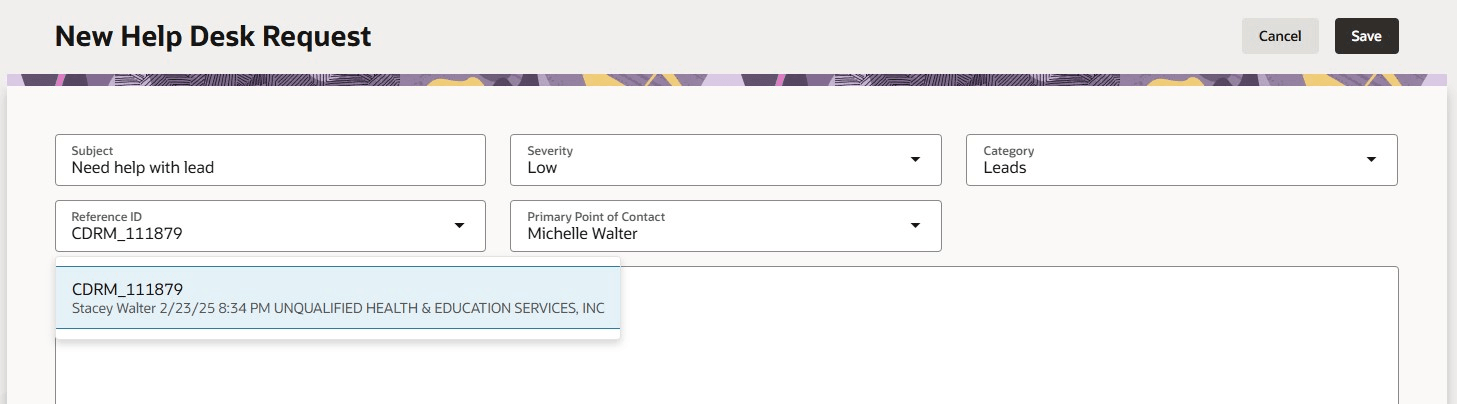
Sales Help Desk for Lead
A Scheduled Process job can be used to pre-populate the categories and base links to these sales reference objects, which makes it easier to set up an integrated sales help desk.
Administrators can now pre-populate categories representing and links to the following Sales reference objects
- Leads,
- Opportunities,
- Deal Registrations
- Quotes.
This makes it easy for salespeople to get help on a particular issue and gives help desk agents quick access into the exact spot where help is required within Fusion Sales.
Steps to enable and configure
To enable the Sales Help Desk, with the pre-defined categories and integration, you will need to:
- Complete the data setup - Run a scheduled job to add the required categories and other data required.
- Add Resources - Assign appropriate resources to the new queues.
- Enable the new sales categories - Add the sales objects to the list of referenceable objects.
- Setup routing rules - Map categories to new queues if desired.
- Embed a new Context Sensitive URL in the Sales Objects pages (e.g., "Get Help") to allow the employee to be directed to the create help desk request page.
Data Setup
Data Setup is done by executing the Scheduled Process job with the name 'Help Desk Sales Configuration Setup'. This job needs to be executed only one time to create the following data:
- Categories - Leads, Opportunities, Deal Registrations, and Quotes
- Queues - Leads, Opportunities, Deal Registrations, and Quotes
To execute the Scheduled Process, login as Administrator, and do the following:
- Select Tools from top left menu options.
- Click on the Scheduled Processes link.
- Click on the button Schedule New Process.
- Open the drop-down and click the Search... link at the bottom of the options list.
- Enter the Name Help Desk Sales Configuration Setup and click Search.
- Highlight the desired job and click OK.
- Click OK again with the name now populated.
- Click Submit to run the Setup job.
Add Resources to Sales Queues
You will need to add resources to each of the new queues that you intend to use by following the instructions below:
- Go to Home -> Help Desk -> Internal Help Desk Queues (under Quick Actions).
- For each of the queues created, Deal Registrations, Leads, Opportunities, and Quotes,
- Click on the Link
- Check the box to make Activation Disabled if you do not wish to use that queue.
OR - If you do plan to use the queue, click on the Resources tab.
- Add the desired Chat Agents as resources on the queue.
- Click Save and Close.
- Click on the line containing the new queue to highlight it.
- Click on the Capacities... button.
- Set the capacity for each agent resource to the desired value.
- Click Save and Close.
- Click Done.
Enable the new Sales Categories
To view the categories that have been properly mapped for the Sales objects, an administrator can go directly to the page /fscmUI/redwood/helpdesk/admin in your environment.
- Go to Setup and Maintenance.
- Click on the Tasks icon.
- Click Search.
- Search for Manage Administrator Profile Values and then click on its link.
- Enter ORA_SVC_ISR_REF_OBJ_ENABLED_CATEGORIES in the Profile Option Code and Search.
- Edit the Value to add SALES to the list (use a comma with no space to separate from the value ERP that may already exist).
- Save and Close.
Create Assignment Rules
To map the new Sales Help Desk categories to the new Sales Help Desk queues:
- Go to Setup and Maintenance.
- Under the Setup for Help Desk, highlight Assignment and Routing.
- In the right side, click Manage Service Assignment Rules.
- Select the Rule Set Category Internal Service Request Queuing Rules.
- Click the Plus sign to create a new Rule Set, giving it a Name and Description.
- In the bottom section, click the Plus sign to create a new Rule.
- Fill in the Rule Name, Description, and Effective Start Date.
- Click the Plus sign to add the category as the Condition for the assignment.
- Object = Internal Service Request
- Attribute = Category
- Operator = Equals
- Search for the Category Value. It should be set to one of the following:
- Quotes
- Leads
- Opportunities
- Deal Registrations
- Click OK.
- Click the Plus sign under Assign Internal Service Queue heading and selecting the queue to be assigned. The queue name should match the Category Value, one of:
- Quotes
- Leads
- Opportunities
- Deal Registrations
- Click Apply.
- Click Done.
- When the assignment rule is complete, click Save and Close.
- Click Save at the Manage Service Assignment Rules page.
- Repeat the process, starting with step 6, to add all the assignment rules required for the categories / queues that you intend to use.
- Click Save and Publish.
- Click Done.
Embed a Context Sensitive URL in the Sales Pages (if desired)
- Create a Sandbox or enter into an existing Sandbox.
- Navigate to the sales page which will have the link added (Leads, Opportunities, Deals, and Quotes).
- Select Page Composer from the Sandbox top menu.
- Under the Structure Tab, select the panel where the context sensitive URL will be added.
- Under Components, click Add for a Hyperlink.
- Navigate to Add Content on the page composer.
- Select Edit on the new hyperlink that was just added.
- The Destination will be as defined below, assuming that you are using the categoryCode that is provided by the Setup job.
- Leads:
/redwood/helpdesk/create-isr?categoryCode=LEADS&refObjId=#{bindings.LeadId.inputValue}&refObjPuid=#{bindings.LeadId.inputValue}&hdFlow=SALES - Opportunities:
/redwood/helpdesk/create-isr?categoryCode=OPPORTUNITIES&refObjId=#{bindings.OptyId.inputValue}&refObjPuid=#{bindings.OptyId.inputValue}&hdFlow=SALES -
Deal Registrations:
/redwood/helpdesk/create-isr?categoryCode=DEAL_REGISTRATIONS&refObjId=#{bindings.DealId.inputValue}&refObjPuid=#{bindings.DealId.inputValue}&hdFlow=SALES - Quotes:
/redwood/helpdesk/create-isr?categoryCode=QUOTES&refObjId=#{bindings.OrderHeaderId.inputValue}&refObjPuid=#{bindings.OrderHeaderId.inputValue}&hdFlow=SALES
9. Enter the Text to be used for the hyperlink (for instance, "Help me" or "Need Help?").
10. Click Apply.
Key resources
After this feature is generally available, a video showing the use and configuration will be found on Help Desk - Oracle Video Hub.
Access requirements
The administrator must have the privilege Schedule Internal Help Desk Jobs (SVC_SCHEDULE_SERVICE_JOBS) in order to run the setup ESS job.
This privilege is given, by default, to the duty role, Internal Service Request Administration which is a duty assigned to the Internal Help Desk Administrator job role.