Service AI Agents setup in 25D
This document shows how to configure and use the following AI Agents in Oracle Fusion Service Workflow Automation:
- SR Triage AI Agent to assess and categorize incoming service requests
- SR Resolution AI Agent to recommend solutions using knowledge and prior service history
- Service Work Order AI Agent to create draft work orders
- Escalation Prediction AI Agent to identify service requests that are at risk of escalation
These agents can be used as standalone workflow actions or combine them in orchestrated workflows to automate multi-step service processes.
This feature enables administrators to configure AI Agents in Oracle Fusion Service and invoke them from Service workflows. AI Agents published in AI Studio can be connected to Workflow Automation through custom actions and profile options. Once configured, they can help drive intelligent service processes such as triaging incoming requests, recommending next steps, creating work orders, and detecting escalation risk. The feature also supports adding business-specific context, such as resolved service requests, categories, and products, to improve the quality and relevance of AI-generated recommendations.
Steps to enable and configure
Triage AI Agent setup
- Set below Profile Option values so Workflow Automation can use the right Triage AI Agent from Fusion Application’s AI Studio. This also allows the Triage Agent to show AI recommendations on the Service Request Details page using the Action Plan Action
| Profile Option Name | Stripe | Default aka out-of-box value |
|---|---|---|
| ORA_SVC_TRIAGE_AGENT_TEAM |
CRM/HRHD/ISR
|
This Profile Option value, when set, uses Triage Agent published in FA AI Studio. Default value: ORA_TRIAGE_AGENT (seeded out of box) If you clone and change Triage Agent published in AI Studio and wish to use that customized Agent from Fusion Service Workflow Automation, then you need to update the value of Profile Option like so: <custom_agent_team_name:version> |
| ORA_SVC_TRIAGE_AP_DEFAULT_AGENT_ACTION | CRM (aka Service Request Object) |
Action used when we create action plan. Make sure they are not null & point to valid action plan actions. OOB or Seeded Triage Action Plan: “0RA_SVC_TRIAGE_ACT_101 - Triage Plan” Custom Ones are supported. seeded one takes precedence. |
| ORA_SVC_TRIAGE_AP_DEFAULT_HRHD_AGENT_ACTION | HRHD |
Action used when we create action plan. Make sure they are not null & point to valid action plan actions. OOB or Seeded Triage Action Plan: “0RA_SVC_TRIAGE_ACT_102 - Triage Plan” Custom Ones are still supported. seeded one takes precedence |
| ORA_SVC_TRIAGE_AP_DEFAULT_ISR_AGENT_ACTION | ISR |
Action used when we create action plan. Make sure they are not null & point to valid action plan actions. OOB or Seeded Triage Action Plan: “0RA_SVC_TRIAGE_ACT_103 - Triage Plan” |
| ORA_SVC_TRIAGE_SEVERITY_MAPPING | CRM |
Severity mapping used by Triage Agent. |
| ORA_SVC_TRIAGE_HRHD_SEVERITY_MAPPING | HRHD |
Severity mapping used by Triage Agent. Example: High:ORA_SVC_HRHD_SEV1,Medium:ORA_SVC_HRHD_SEV2,Low:ORA_SVC_HRHD_SEV3 |
| ORA_SVC_TRIAGE_ISR_SEVERITY_MAPPING | ISR |
Severity mapping used by Triage Agent. Example: High:ORA_SVC_ISR_SEV1,Medium:ORA_SVC_ISR_SEV2,Low:ORA_SVC_ISR_SEV3 |
| ORA_CSO_GEN_Q_ANSWERING | Knowledge Management | Enable this to get Generative AI Results from knowledge search |
| ORA_SVC_SR_AI_LOG_LEVEL | CRM/HRHD/ISR | Add AI System Notes. Default: ORA_SVC_INFO (None / Fine / info) if log level set to ORA_SVC_NONE - AI System not created if log level set to ORA_SVC_FINE - AI System note created and feed flag is false if log level set toORA_SVC_INFO (default PO value) - AI System note created and feed flag is true |

| Resolution AI Agent setup |
|---|
- Set below Profile Option values so that Workflow Automation can use the correct Resolution AI Agent from Fusion Application’s AI Studio. This also allows the Resolution Agent to show AI recommendations on the Service Request Details page using the Action Plan Action.
|
Profile Option Name |
Stripe |
Default PO Value |
|---|---|---|
|
ORA_SVC_RESOL_AGENT_TEAM |
CRM/HRHD/ISR |
This PO is used to enable FAI Agent Studio Agent. Default Value: ORA_SERVICE_REQUEST_RESOL_AGENT_TEAM Custom Resolution Agents cloned from seeded Agent: |
|
ORA_SVC_AP_DEFAULT_AGENT_ACTION |
CRM |
Below Action is used by Resolution Agent to show AI recommendations on the Service Request Details page. Make sure they are not null & point to valid action plan actions. Set the value to: 0RA_SVC_ACT_101 - Resolution Plan |
|
ORA_SVC_AP_DEFAULT_HRHD_AGENT_ACTION |
HRHD |
Below Action is used by Resolution Agent to show AI recommendations on the Service Request Details page. Make sure they are not null & point to valid action plan actions. Set the value to: 0RA_SVC_ACT_102 - Resolution Plan |
|
ORA_SVC_AP_DEFAULT_ISR_AGENT_ACTION |
ISR |
Below Action is used by Resolution Agent to show AI recommendations on the Service Request Details page. Make sure they are not null & point to valid action plan actions. Set the value to: 0RA_SVC_ACT_103 - Resolution Plan |
|
ORA_CSO_GEN_Q_ANSWERING |
CRM/HRHD/ISR |
Ensures KM results are constant. Default: off If this is turned on, KM generates GEN AI Results |
|
ORA_SVC_AIAGENT_DEFAULT_ITERATION_COUNT |
CRM/HRHD/ISR |
Default value: 3 |
|
ORA_SVC_AP_RECOMMENDED_AGENT_ACTION |
CRM/HRHD/ISR |
Add action of type Add Action plan CRM: ORA_SVC_ACT_RECOMM_101 Default: None Customer needs to set the PO value as shown above. |
|
ORA_SVC_SR_AI_LOG_LEVEL |
<IF set for Triage Agent, then, no need to set this again> |
Add AI System Notes. if log level set to ORA_SVC_FINE - AI System note created and feed flag is false |

| Service WorkOrder AI Agent Setup |
|---|
- Create custom action for Work Order AI Agent (Refer to section named “CREATING CUSTOM ACTION TO INVOKE WORKORDER AI AGENT”)
- Turn on the following profile option to let the ‘Service WorkOrder AI Agent’ create a draft WorkOrder for you. You can use this either by itself or as part of the Agentic Orchestration feature in Oracle Fusion Service Workflow Automation
| Profile Option Name | Stripe | Default PO value |
|---|---|---|
| ORA_SVC_WO_ENABLE_DRAFT_OFS_WORK_ORDERS | CRM (Other stripes not supported in 25D) |
Specify if draft work orders are enabled for work orders of integration type Field Service. Enable at Site level |

| Escalation Prediction AI Agent Setup |
|---|
- Create custom action for Escalation Prediction AI Agent (Refer to section named “CREATING CUSTOM ACTION TO INVOKE ESCALATION PREDICTION AI AGENT”)
- No additional setup required for Escalation Prediction AI Agent.

| Getting started with AI Agents in Service workflow |
|---|
Create Custom Statuses
- To orchestrate AI Agents, i.e. Triage AI Agent and Resolution AI Agent, in resolving incoming Service Request, one should create five custom Service Request statuses. Each status represents a specific phase in the Service Request Triage and Resolution process. When a status is updated, it triggers the appropriate agent(s) to perform their designated tasks.
- We suggest creating the following custom SR Statues. (Go to Setup & Maintenance à Service à Service Request à Manage Service Request Status Values)
| Status Type | New Status Label | Purpose and Use |
|---|---|---|
| New | TRIAGE_REQUIRED | Indicates that Triage Agent needs to be invoked to triage/assess and categorize the incoming service ticket |
| In Progress | TRIAGE_IN_PROGRESS | Signifies that Triage Agent is actively analyzing the Service Request. |
| In Progress | TRIAGE_DONE | Denotes that Triage Agent has completed the triage process, and Service Request is ready for the next steps. |
| In Progress | RESOLUTION_REQUESTED | Marks the initiation of Resolution Agent, whose purpose is to propose a solution for Service Request based on knowledge articles and similar service requests. |
| In Progress | RESOLUTION_IN_PROGRESS | Indicates that the Resolution Agent is currently working on a resolution. |
| In Progress | RESOLUTION_SUGGESTED | Shows that Resolution Agent has suggested a resolution, awaiting review and validation by Human Person. This suggestion would be displayed as a recommendation card or banner on Service Request UI. |
| Waiting | TRIAGE_WAITING | Represents a state when Triage Agent needs additional information to Triage Service Request. In this state, Triage Agent has drafted an email to requester of SR, and has prompted Human Agent via recommendation panel, to review the email content and send it requester. |

| Creating custom action to invoke Triage Agent Template available in AI Studio |
|---|
Purpose
Use this procedure to configure a custom action that calls the Triage AI Agent for Service Requests via a REST wrapper API. The action is asynchronous and completes via polling.
Navigate to Productivity card from Service Center Administration, and select ‘Add / Manage Workflow Action Types and Actions’
Step 1 of 3: Define the Action Type
- Add Action Type: (see screenshot)
- Action Type Name: Triage for Service Request (This is the User entered name for Triage AI Agent. It is recommended to use a descriptive name. Above Example is for ServiceRequest object. You can replace this as ‘Triage for HRHelpDeskRequest’ or ‘Triage for InternalServiceRequest’)
- Object Type: Select the record type the ai-agent to act on.
- ServiceRequest
- HRHelpDeskRequest
- InternalServiceRequest
- Application Context: Oracle Fusion Applications
- Authentication Context: Service Next Generation
- ActionType Code: Rest
- Operation Code: Create
-
Action URL: /api/cxservice-core/aiagent/requestTriageAgent
- Description: Provide a short description. Example: “Wrapper API for Triage Agent. Internally uses Triage-AI-Agent published in AI Studio; maintained for backward compatibility.”
- Continue
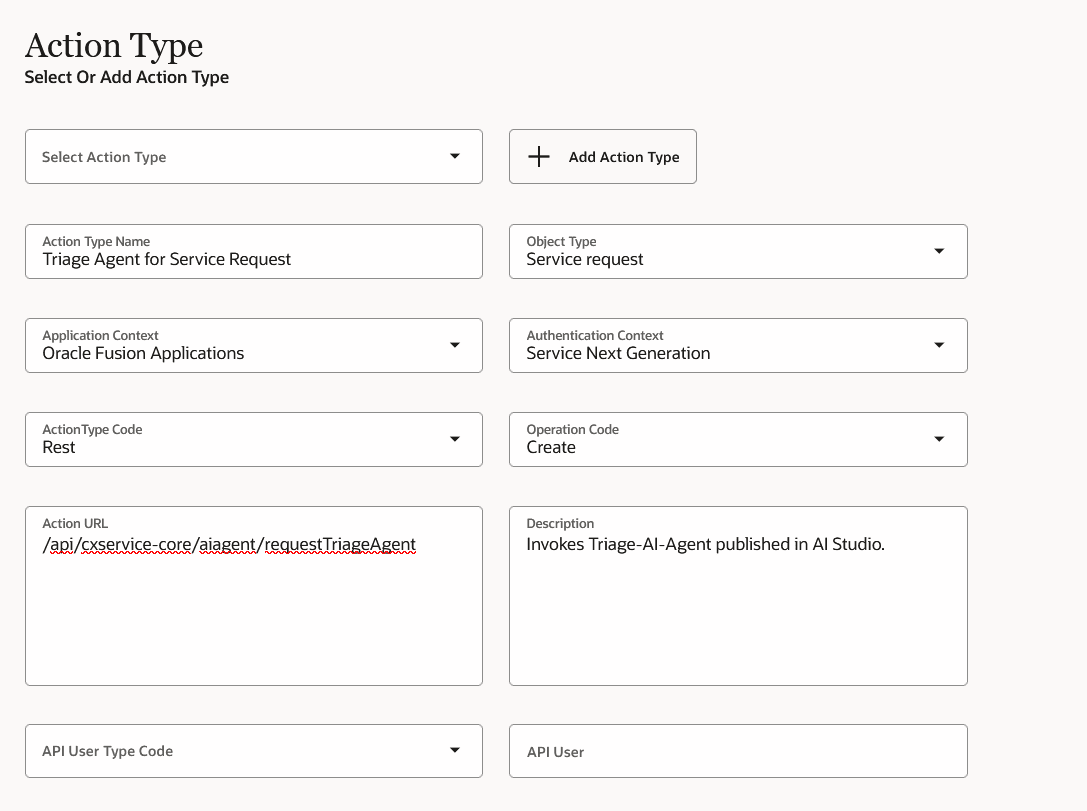
Creating custom action for Triage Agent - Screen 1
Step 2 of 3: Configure the Action
- Action:
- Action Name: Triage Agent for SR (Note: This name would show-up in Action-catalog of Workflow Automation’s Actions pane)
- Async Mode: Async with Polling
- Attributes tab:
- Attribute 1
- Attribute Name: objectNumber
- Attribute Source: Parent
- Attribute Value: SrNumber
- Attribute 2
- Attribute Name: objectType
- Attribute Source: User-defined
- Attribute Value: ServiceRequest
- NOTE: For HR HelpDesk Requests, attribute value would be: HRHelpDeskRequest and for Internal Service Requests, attribute value would be: InternalServiceRequest
- Attribute 1
- Headers tab
- Attribute Name: Enable-Output
- Attribute Value: Y
- Attribute Name: Output-In-HTML (Applicable only for HR HelpDesk)
- Attribute Value: Y
- Save, then Continue.
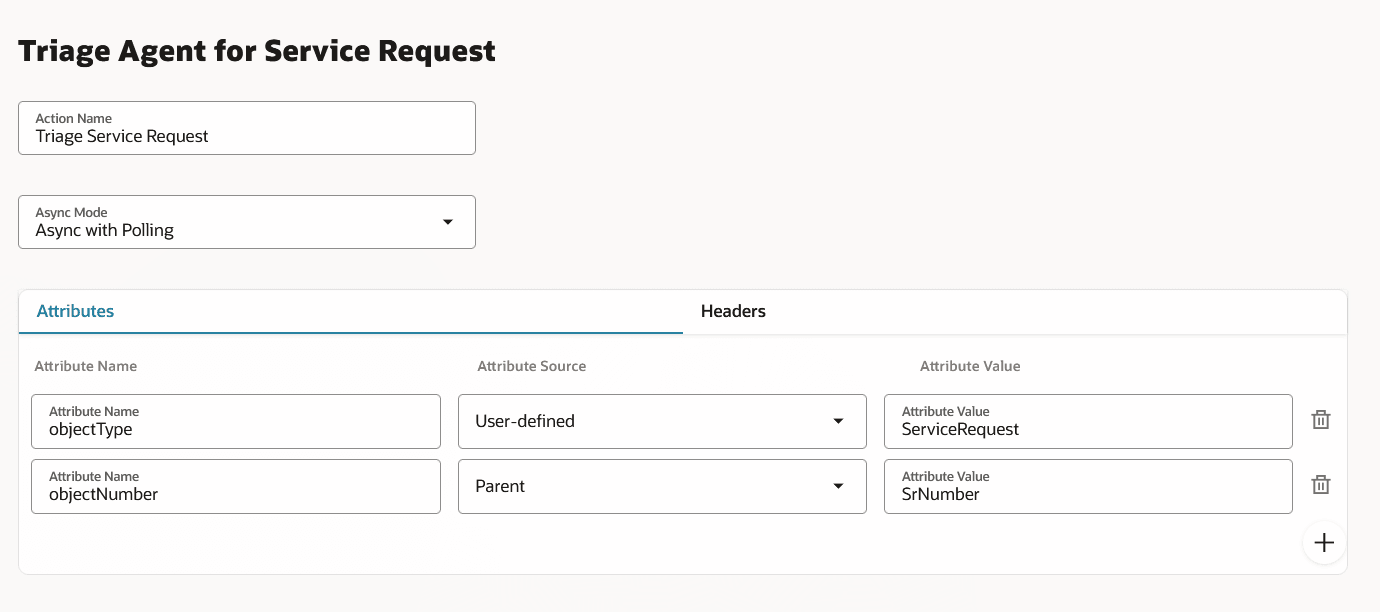
Custom Action for OOB Traige - screen 2
Screen shot for setting Header...note that for HR HelpDesk Request, there is an additional header (as noted above)
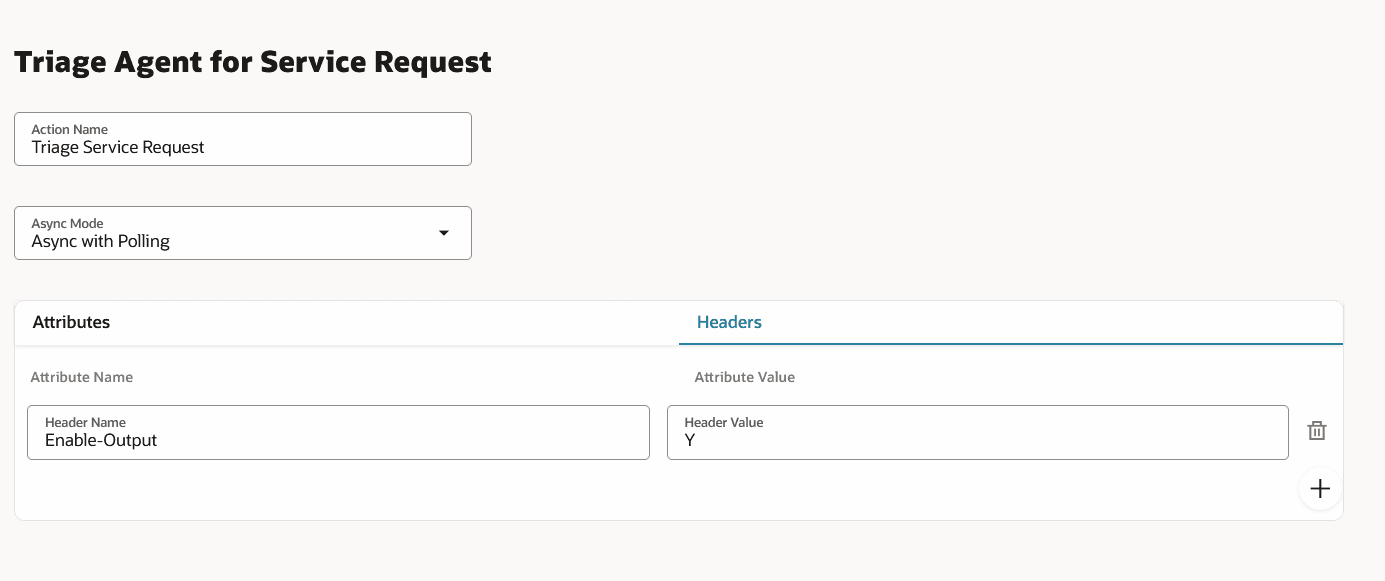
Custom action for OOB Triage Agent - screen2 - Headers
Step 3 of 3: Configure Polling
- Maximum Polling Count: 3
- Polling action success outcome key: status
- Polling action success outcome value: Completed
-
Endpoint URL for Polling request action: /api/cxservice-core/aiagent/srResolution
- Request Id in the Endpoint URL: requestId
- Preview Endpoint URL shows: /api/cxservice-core/aiagent/srResolution/#requestId#
- Submit.
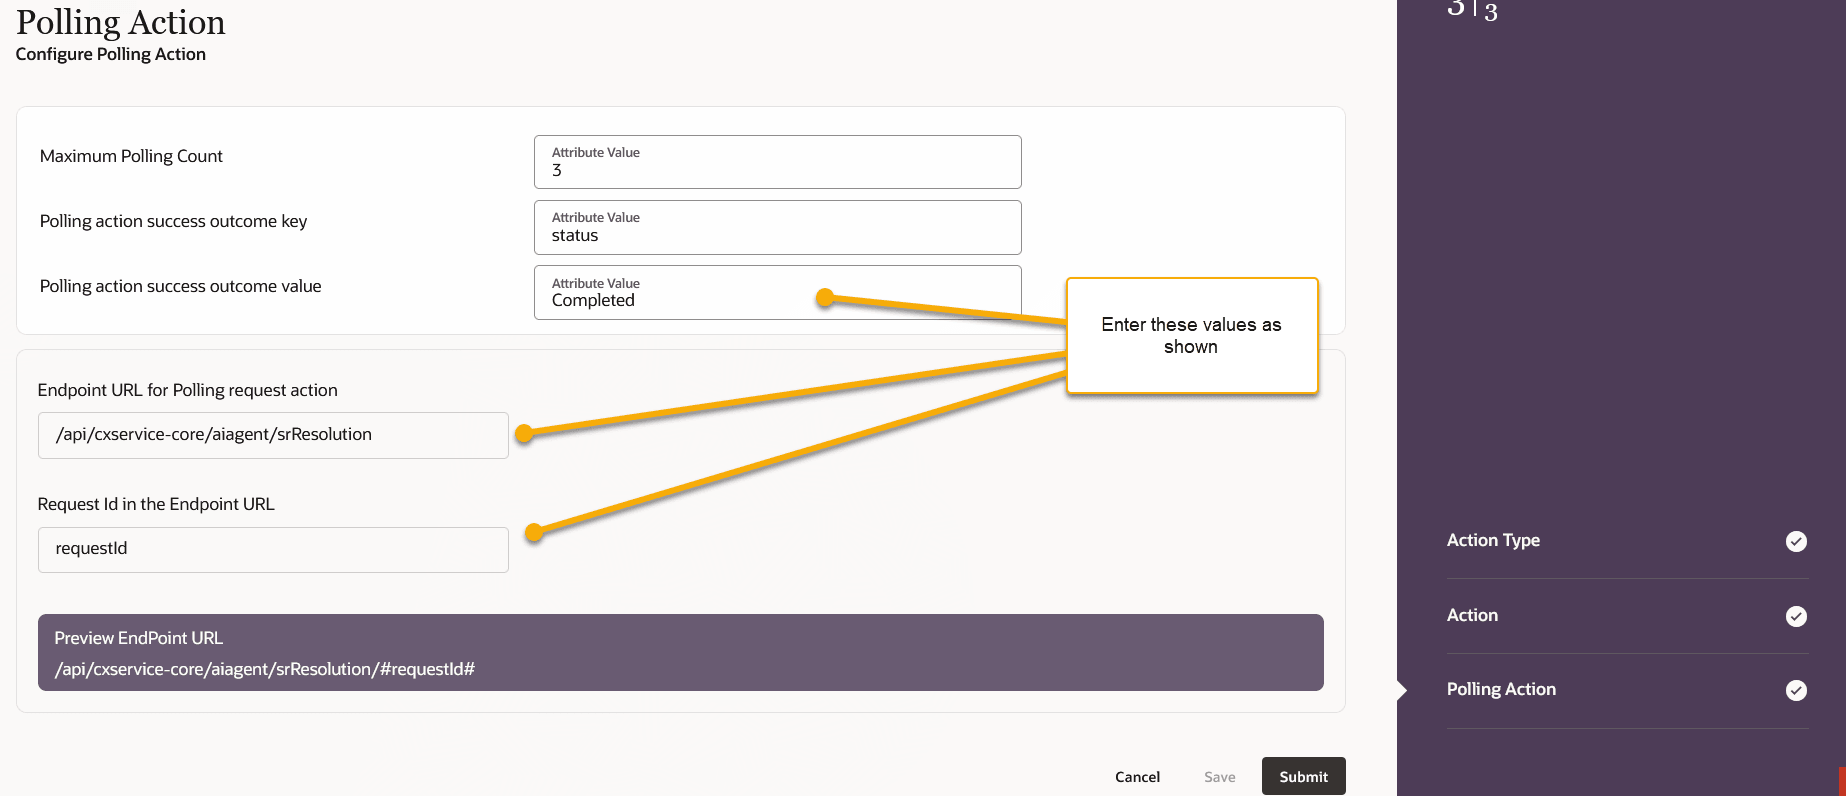
custom action for OOB Triage Agent - screen 3

| Creating custom action to invoke Resolution Agent Template available in AI Studio |
|---|
Purpose
Use this procedure to configure a custom action that calls the Resolution AI Agent for Service Requests via a REST wrapper API. The action is asynchronous and completes via polling.
Navigate to Productivity card from Service Center Administration, and select ‘Add / Manage Workflow Action Types and Actions’
Step 1 of 3: Define the Action Type
- Add Action Type:
- Action Type Name: Resolution Plan for Service Request (This is the User entered name for Resolution AI Agent. It is recommended to use a descriptive name)
- Object Type: Select the record type the ai-agent will provide a resolution for.
- Service Request
- HR HelpDesk
- ISR
- Application Context: Oracle Fusion Applications
- Authentication Context: Service Next Generation
- ActionType Code: Rest
- Operation Code: Create
-
Action URL: /api/cxservice-core/aiagent/srResolution
- Description: Provide a short description. Example: “Wrapper API for Resolution Agent. Internally uses Resolution-AI-Agent published in AI Studio; maintained for backward compatibility.”
- Continue
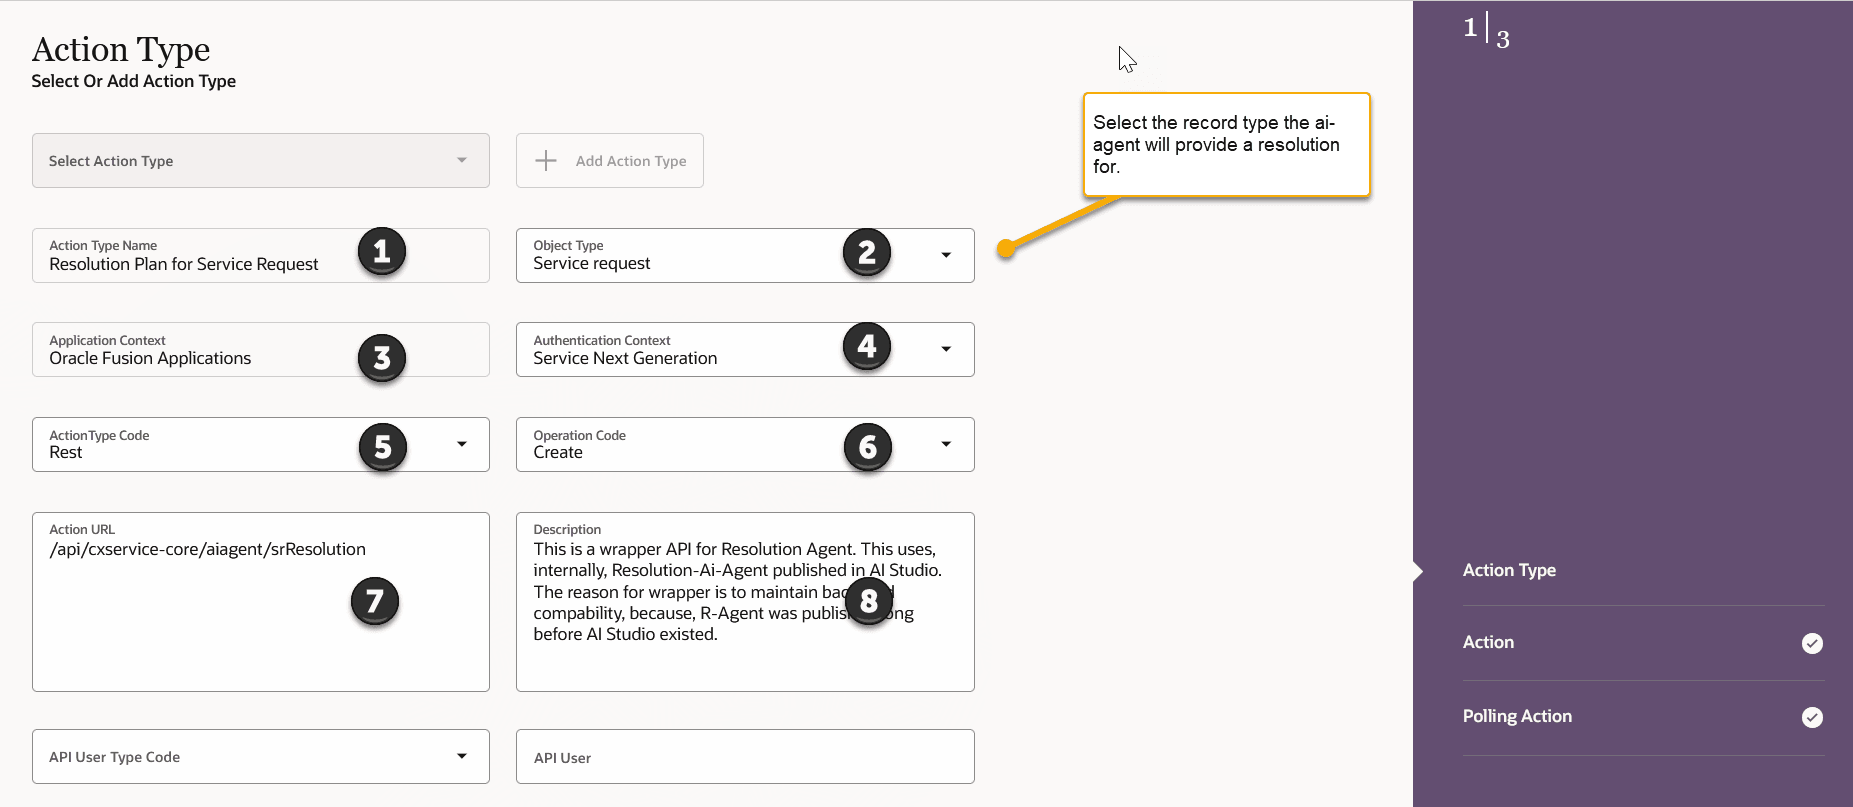
Custom Action for OOB Resolution Agent - screen1
Step 2 of 3: Configure the Action
- Action:
- Action Name: Resolution Agent for SR (Note: This name would show-up in Action-catalog of Workflow Automation’s Actions pane)
- Async Mode: Async with Polling
- Attributes tab:
- Attribute 1
- Attribute Name: objectNumber
- Attribute Source: Parent
- Attribute Value: SrNumber
- Attribute 2
- Attribute Name: objectType
- Attribute Source: User-defined
- Attribute Value: ServiceRequest
- NOTE: For HR HelpDesk Requests, attribute value would be: HRHelpDeskRequest and for Internal Service Requests, attribute value would be: InternalServiceRequest
- Attribute 1
- Headers tab
- Attribute Name: Enable-Output
- Attribute Value: Y
- Save, then Continue
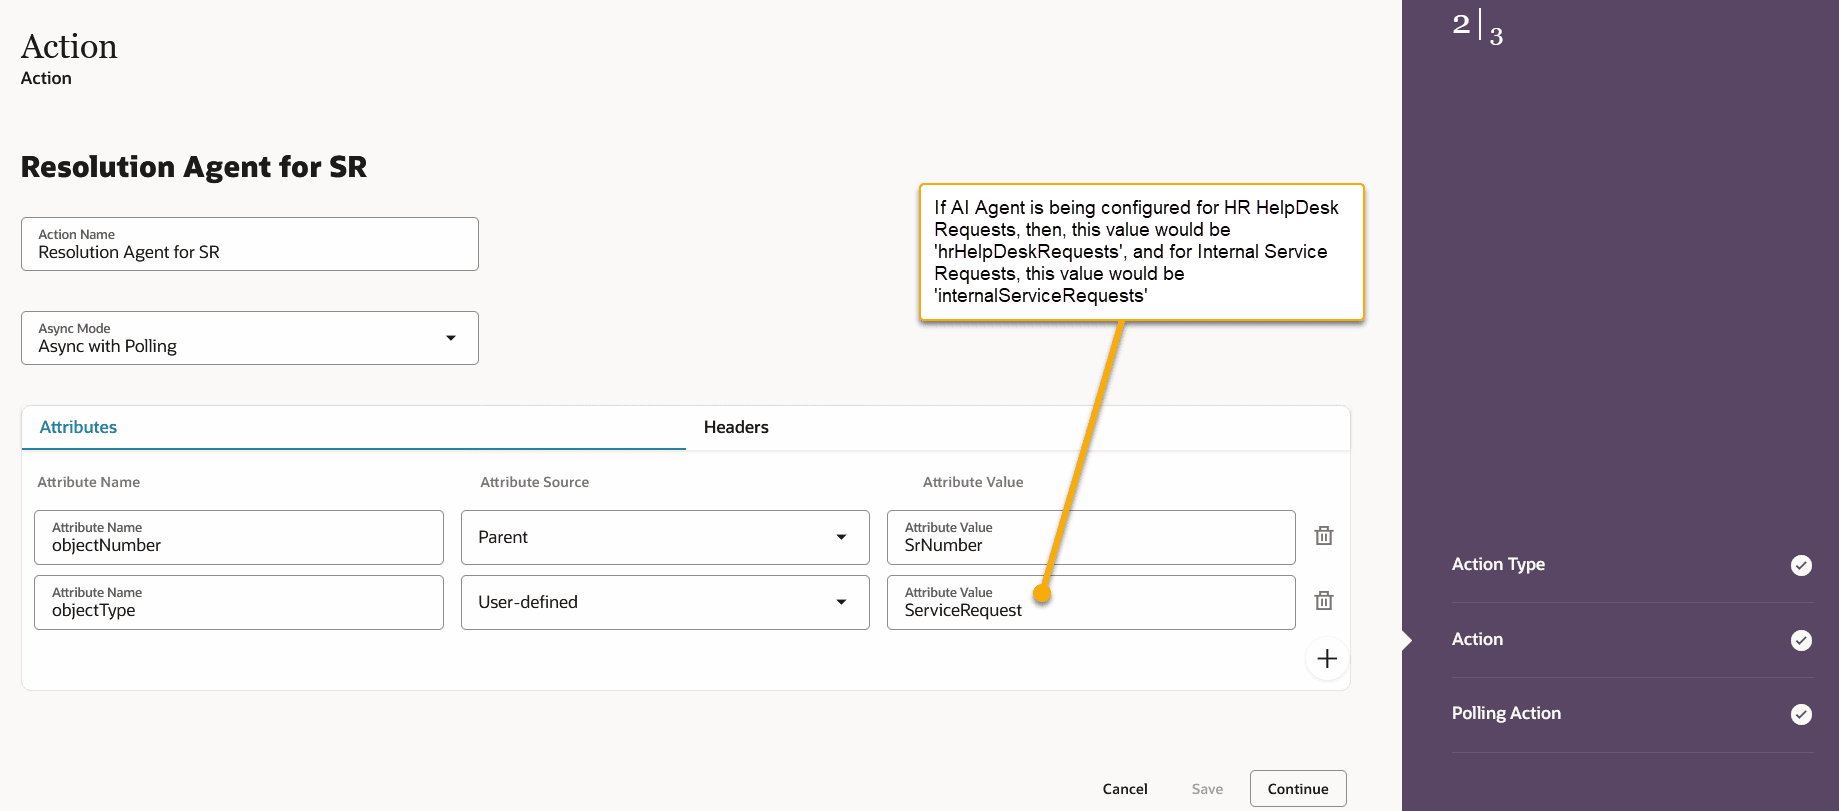
custom action for OOB Resolution Agent - screen 2
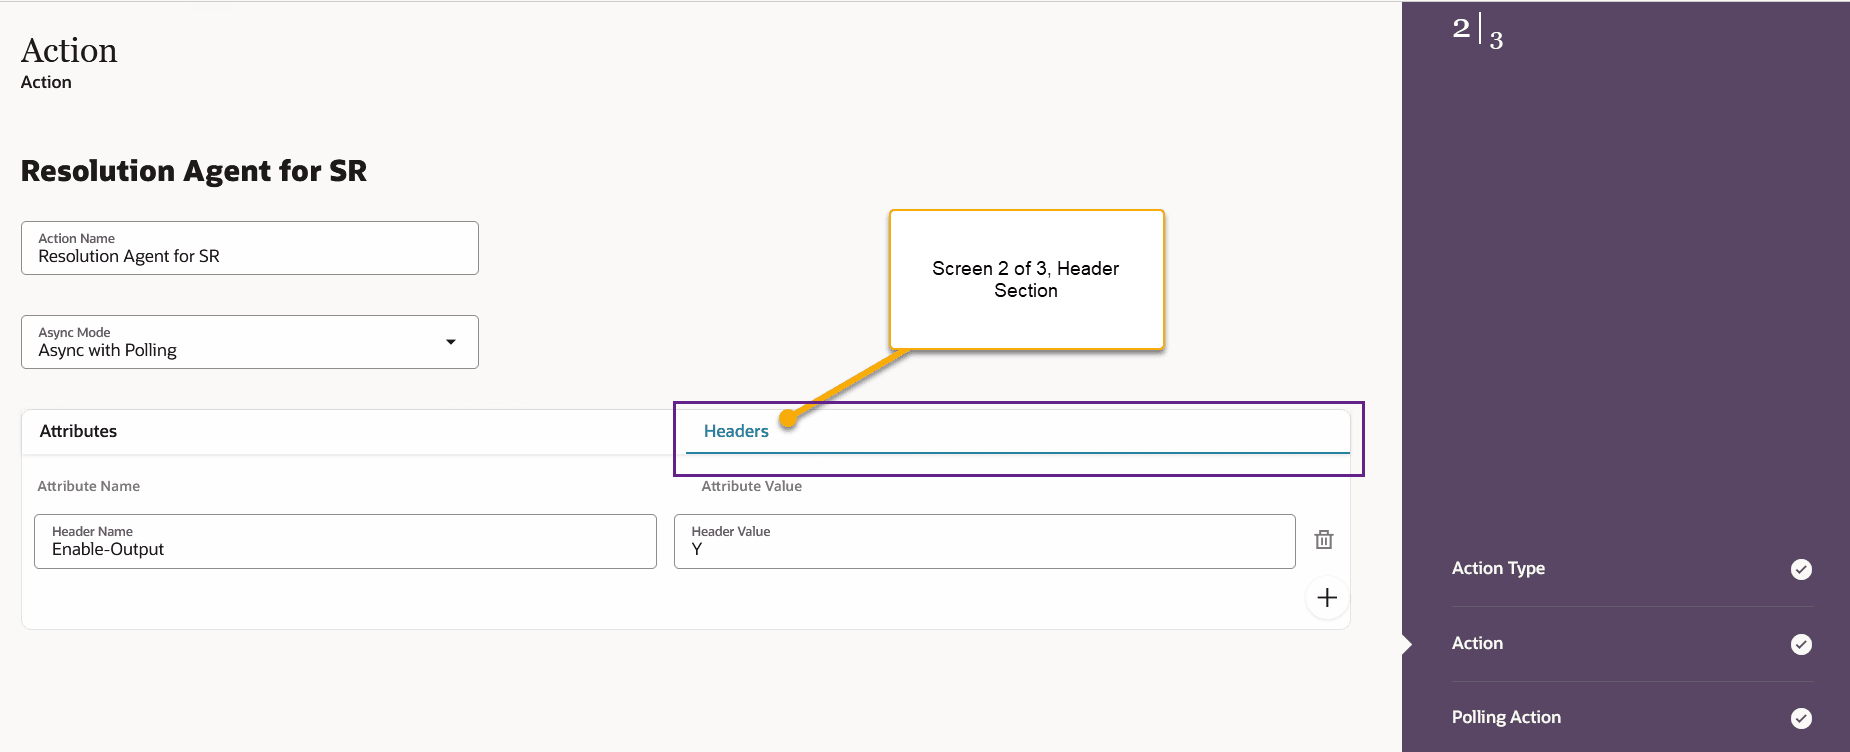
custom action for OOB Resolution agent header - screen 2
Step 3 of 3: Configure Polling
- Maximum Polling Count: 3
- Polling action success outcome key: status
- Polling action success outcome value: Completed
-
Endpoint URL for Polling request action: /api/cxservice-core/aiagent/srResolution
- Request Id in the Endpoint URL: requestId
- Preview Endpoint URL shows: /api/cxservice-core/aiagent/srResolution/#requestId#
- Submit.

custom action for OOB Resolution screen3

| Creating custom action to invoke Service WorkOrder AI Agent available in AI Studio |
|---|
Purpose
Use this procedure to configure a custom action that calls the Work Order AI Agent for Service Requests The action is asynchronous and completes via polling.
Applicable only for Service Request Object (aka CRM Stripe) and not applicable for HR HelpDesk Business Object.
Navigate to Productivity card from Service Center Administration, and select ‘Add / Manage Workflow Action Types and Actions’
Step 1 of 3: Define the Action Type
- Add Action Type:
- Action Type Name: Service Work Order Create Agent (This is the User entered name for WorkOrder AI Agent. It is recommended to use a descriptive name)
- Object Type: Select the record type the ai-agent will provide a resolution for.
- Service Request
- Application Context: Oracle Fusion Applications
- Authentication Context: Oracle AI Agent Studio
- ActionType Code: Rest
- Operation Code: Create
-
Action URL: /api/fusion-ai/orchestrator/agent/v1/ORA_SERVICE_WORKORDER_CREATE_AGENT_TEAM/invokeAsync
- Description: Provide a short description. Example: “Invokes WorkOrder AI Agent published in AI Studio.”
- Continue
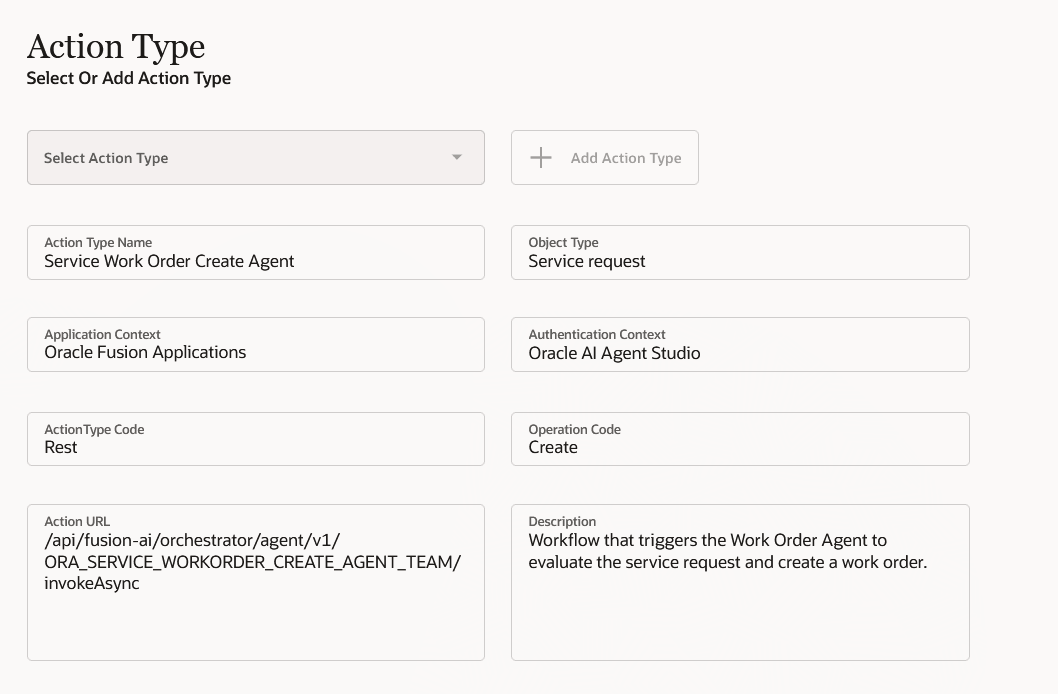
custom action for Service Work Order - screen1
Step 2 of 3: Configure the Action
- Action:
- Action Name: Service Work Order Create Agent (Note: This name would show-up in Action-catalog of Workflow Automation’s Actions pane)
- Async Mode: Async with Polling
- Attributes tab:
- Attribute 1
- Attribute Name: invocationMode
- Attribute Source: User-defined
- Attribute Value: ADMIN
- Attribute 2
- Attribute Name: message
- Attribute Source: parent
- Attribute Value: SrNumber
- Attribute 2
- Attribute Name: status
- Attribute Source: User-defined
- Attribute Value: PUBLISHED
- Attribute 1
- Headers tab
- none
- Save, then Continue.

custom action for Service Work Order - screen2
Step 3 of 3: Configure Polling
- Maximum Polling Count: 3
- Polling action success outcome key: status
- Polling action success outcome value: Completed
-
Endpoint URL for Polling request action: /api/fusion-ai/orchestrator/agent/v1/ORA_SERVICE_WORKORDER_CREATE_AGENT_TEAM/status
-
Request Id in the Endpoint URL: jobId
- Preview Endpoint URL shows: /api/fusion-ai/orchestrator/agent/v1/ORA_SERVICE_WORKORDER_CREATE_AGENT_TEAM/status/#jobId#
- Submit.
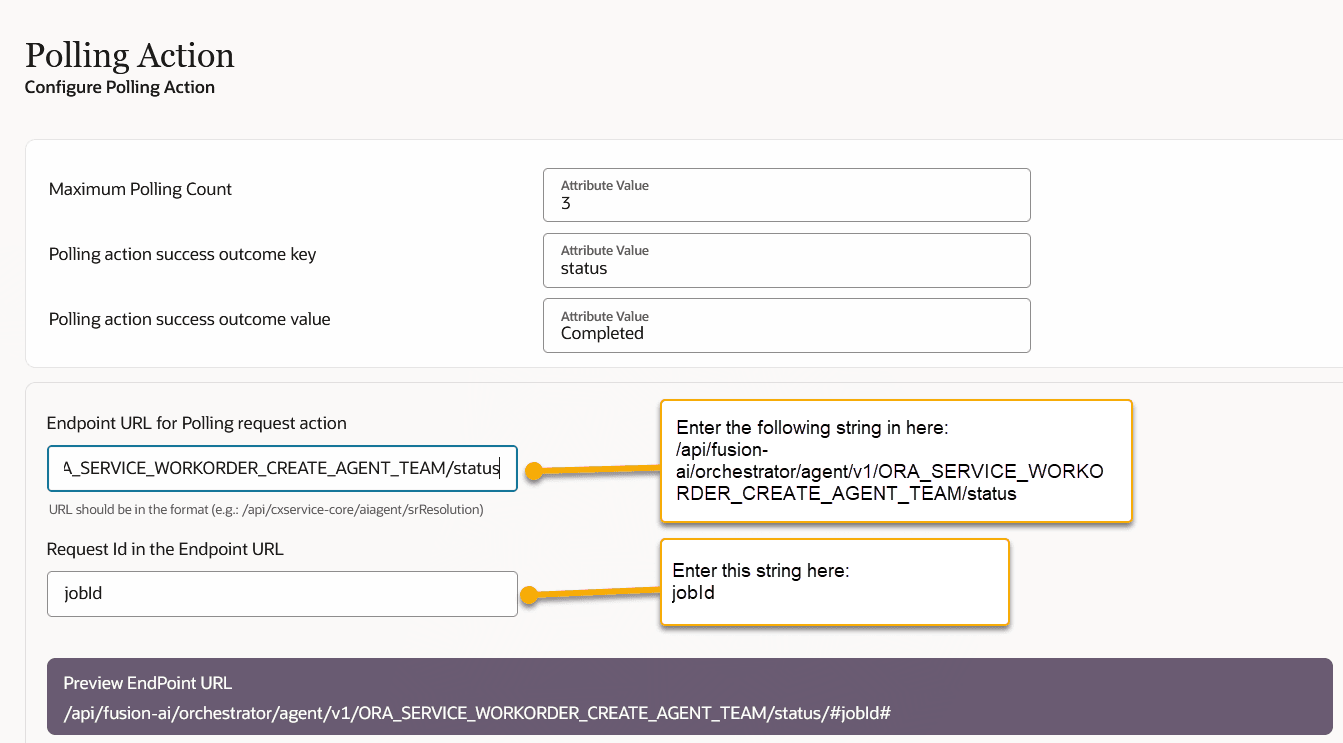
custom action for Service Work Order - screen3

| Creating custom action to invoke Escalation Prediction AI Agent template available in AI Studio |
|---|
Purpose
Use this procedure to configure a custom action that calls the Escalation Prediction AI Agent for Service Requests The action is asynchronous and completes via polling.
Navigate to Productivity card from Service Center Administration, and select ‘Add / Manage Workflow Action Types and Actions’
Step 1 of 3: Define the Action Type
- Add Action Type:
- Action Type Name: Escalation Prediction AI agent for Service Request (This is the User entered name for Escalation Prediction AI Agent. It is recommended to use a descriptive name)
- Object Type: Select the record type the ai-agent will provide a resolution for.
- Service Request
- Application Context: Oracle Fusion Applications
- Authentication Context: Oracle AI Agent Studio
- ActionType Code: Rest
- Operation Code: Create
-
Action URL: /api/fusion-ai/orchestrator/agent/v1/ORA_SR_ESCALATION_PREDICTION_AGENT/invokeAsync
- Description: Provide a short description. Example: “Invokes Escalation Prediction AI Agent published in AI Studio.”
- Continue
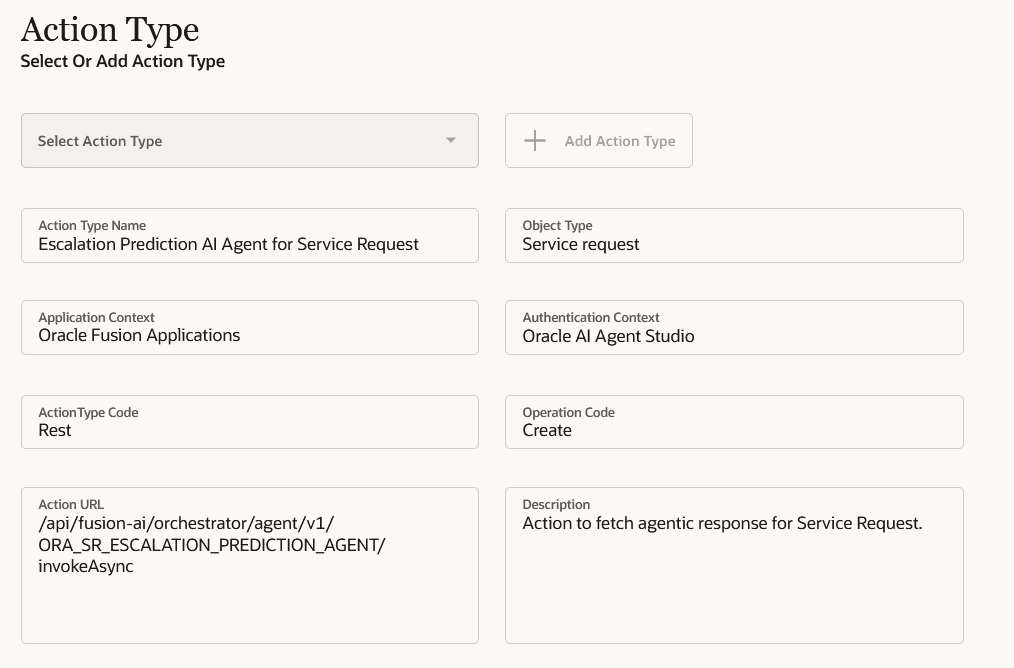
custom action for Escalation Prediction Agent - screen1
Step 2 of 3: Configure the Action
- Action:
- Action Name: Escalation Prediction AI Agent (Note: This name would show-up in Action-catalog of Workflow Automation’s Actions pane)
- Async Mode: Async with Polling
- Attributes tab:
- Attribute 1
- Attribute Name: invocationMode
- Attribute Source: User-defined
- Attribute Value: ADMIN
- Attribute 2
- Attribute Name: message
- Attribute Source: parent
- Attribute Value: SrNumber
- Attribute 2
- Attribute Name: status
- Attribute Source: User-defined
- Attribute Value: PUBLISHED
- Attribute 1
- Headers tab
- Attribute Name: Enable-Output
- Attribute Value: Y
- Continue.

custom action for Escalation Prediction Agent - screen2
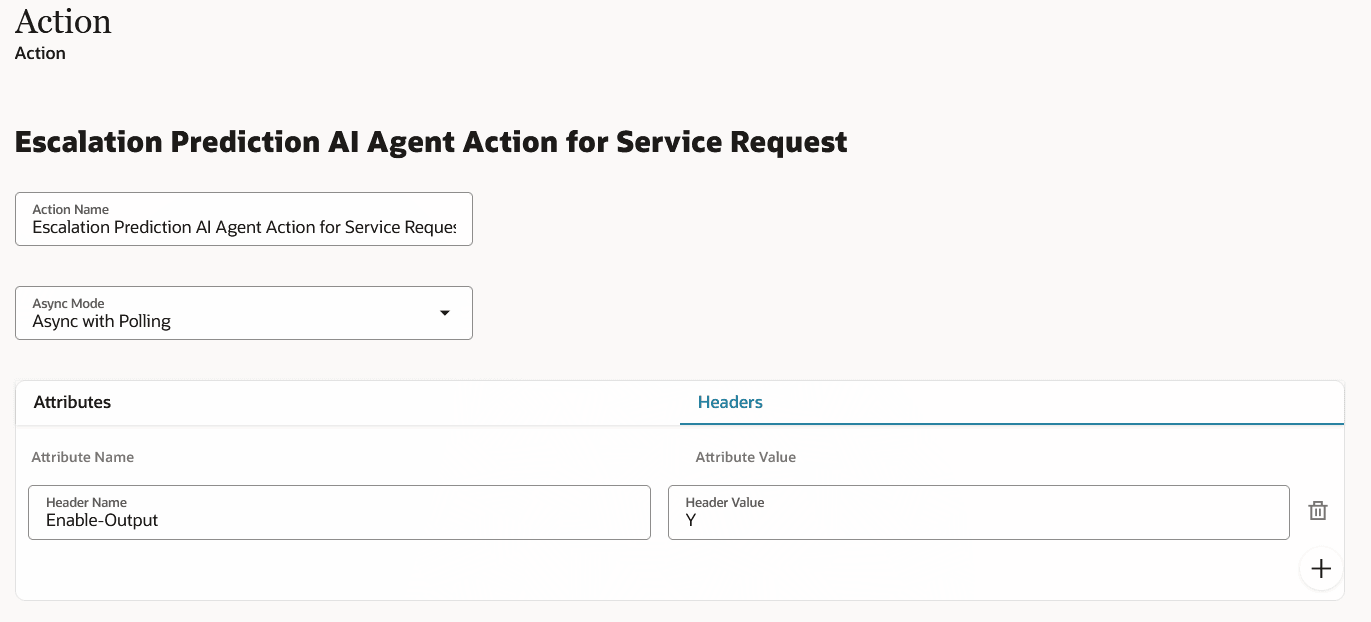
custom action for Escalation Prediction Agent - screen 2 Headers
Step 3 of 3: Configure Polling
- Maximum Polling Count: 3
- Polling action success outcome key: status
- Polling action success outcome value: Completed
-
Endpoint URL for Polling request action: /api/fusion-ai/orchestrator/agent/v1/ORA_SR_ESCALATION_PREDICTION_AGENT/status
-
Request Id in the Endpoint URL: jobId
-
Preview Endpoint URL shows: /api/fusion-ai/orchestrator/agent/v1/ORA_SR_ESCALATION_PREDICTION_AGENT/status/#jobId#
- Submit.
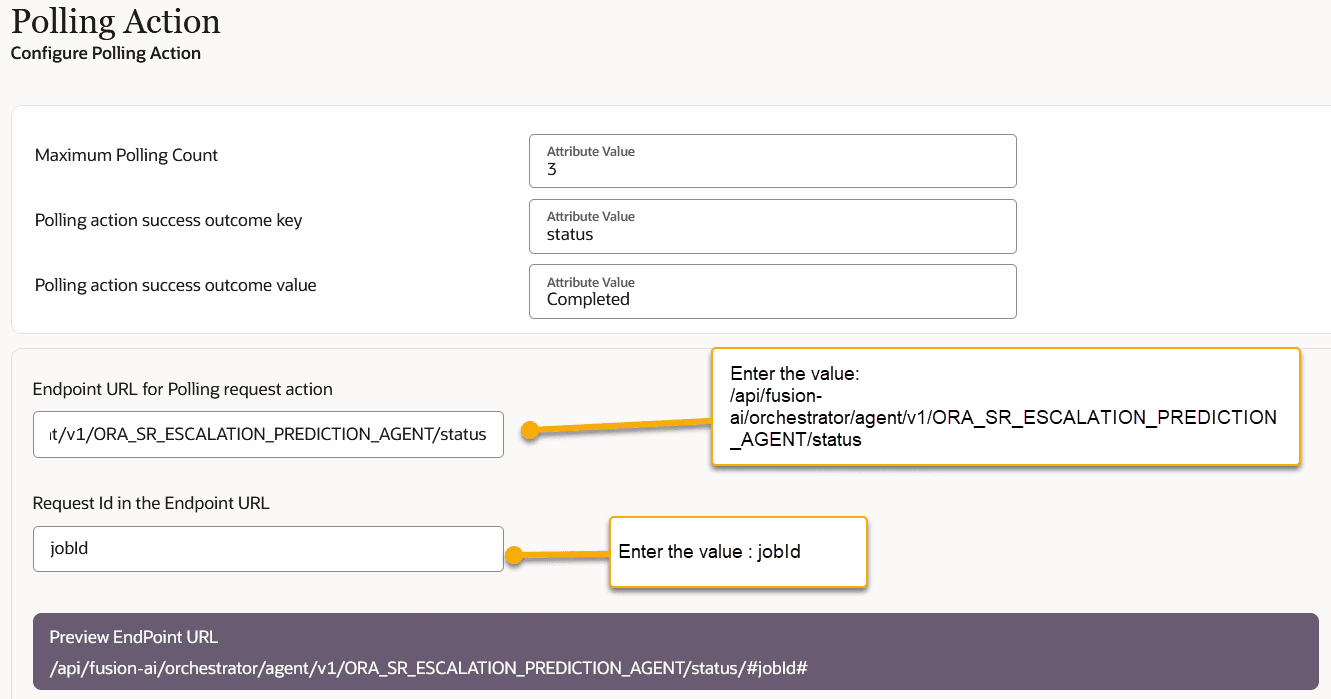
custom action for escalation prediction - screen 3

| Loading Contextual Data into RAG |
|---|
Triage and Resolution AI Agents need enterprise data specific to your business. This provides context, so that the predictions/suggestions from AI are precise and optimal. The following reference documents are needed:
- Knowledge Articles
- Previously resolved SRs
- Action Plan Templates ( Applicable only for Resolution Agent)
- SR Category list*
- Service Product Catalog*
(* not needed for Resolution Agent set-up)
For this release, you need to manually upload the above documents (except Knowledge Articles) to a RAG tool.
The steps to upload them are described below:
Upload Previously Resolved Service Requests
Pre-Requisite:
Admin should have the ‘Application Implementation Consultant’ role.
Verify that the admin has the following permission groups.:
1. oraCommonFusionAISecurityAuthorization_read_Rag_OraResource
2. oraCommonFusionAISecurityAuthorization_create_Rag_OraResource
3. oraCommonFusionAISecurityAuthorization_update_Rag_OraResource
4. oraCommonFusionAISecurityAuthorization_delete_Rag_OraResource
Export resolved SRs to .csv file
From your existing environment, select resolved service requests with filled-in or completed Category, Product and Solution Description fields. The required SR columns are SR number, Title, Problem Description, Solution Description. Rename solution desc to ‘Resolution Descriptions’ in the csv file.
Upload file to a dummy SR as an attachment
Create an SR and attach the extracted .csv file. This is necessary to obtain a document ID for the next step.
Get attachment documentIdentifier by using a tool like Postman
GET <fusion_url>/crmRestApi/resources/11.13.18.05/serviceRequests/{SR_NUMBER}/child/Attachment
E.g., https://cptbchdqy-test.fusionapps.ocs.oc-test.com /crmRestApi/resources/11.13.18.05/serviceRequests/SR0000096349/child/Attachment
sample documentIdentifier:
00020000000EACED00057708000110F0A00C30C20000000EACED00057708000110F0A00AE1FC
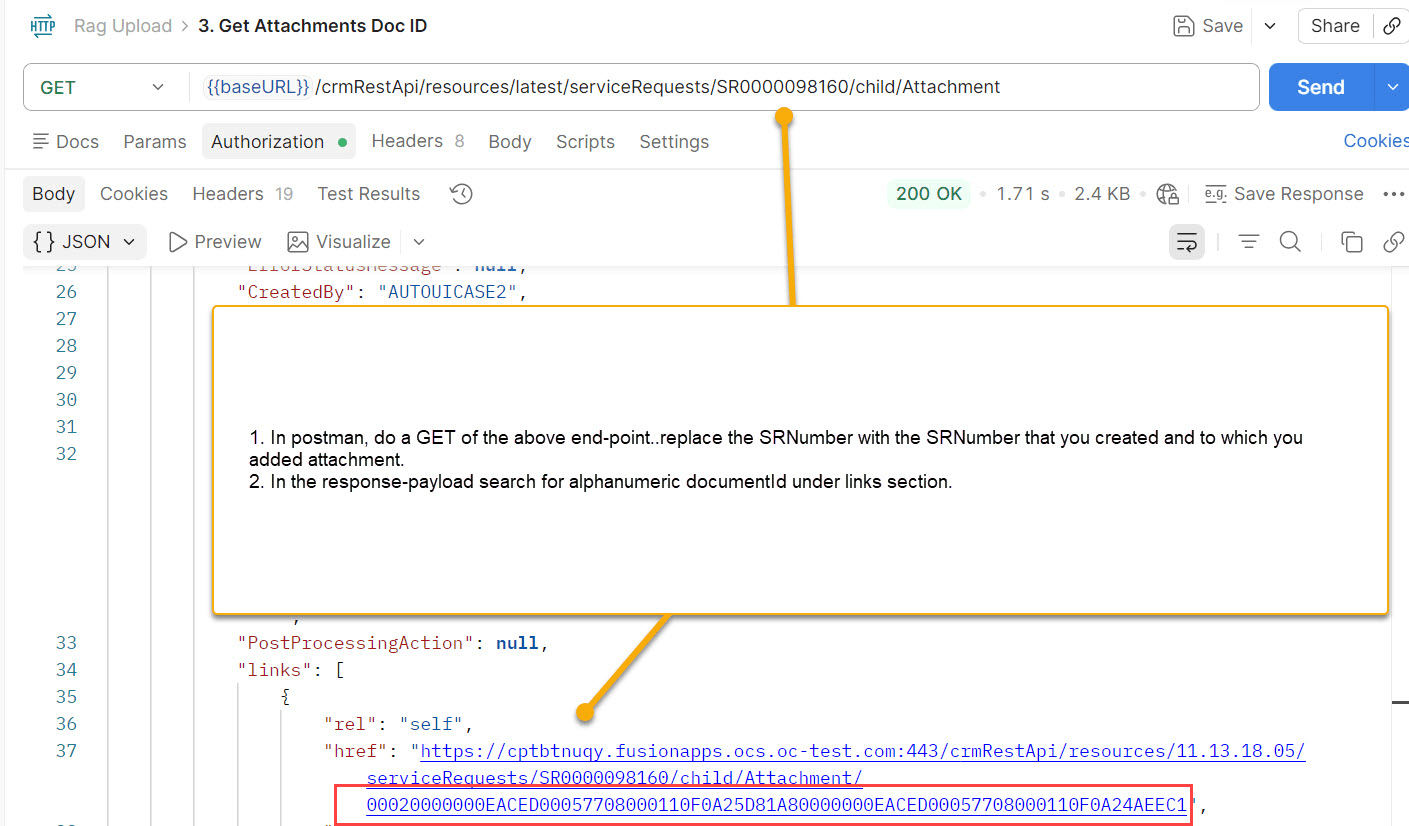
postman-getDocumentID screenshot
Generate fusion-ai token
Why needed?
To initiate RAG use case and index RAG documents
a) Assign RAG related permission groups mentioned under ‘Pre-Requisites’ to user via Security Console.
b) Generate fusion-ai token using a tool like Postman
POST
<fusion_url>/crmRestApi/resources/latest/actionplans/action/getProcessAccessToken
E.g., https://cptbchdqy-test.fusionapps.ocs.oc-test.com/crmRestApi/resources/latest/actionplans/action/getProcessAccessToken
Headers:
Content-Type: application/vnd.oracle.adf.action+json
Override-Scope: urn:opc:resource:fusion:<pod_name>:fusion-ai/
E.g., urn:opc:resource:fusion:cptbchdqy-test:fusion-ai/
Authorization:
Select Basic Auth and use the same user that you assigned RAG permission groups in previous step
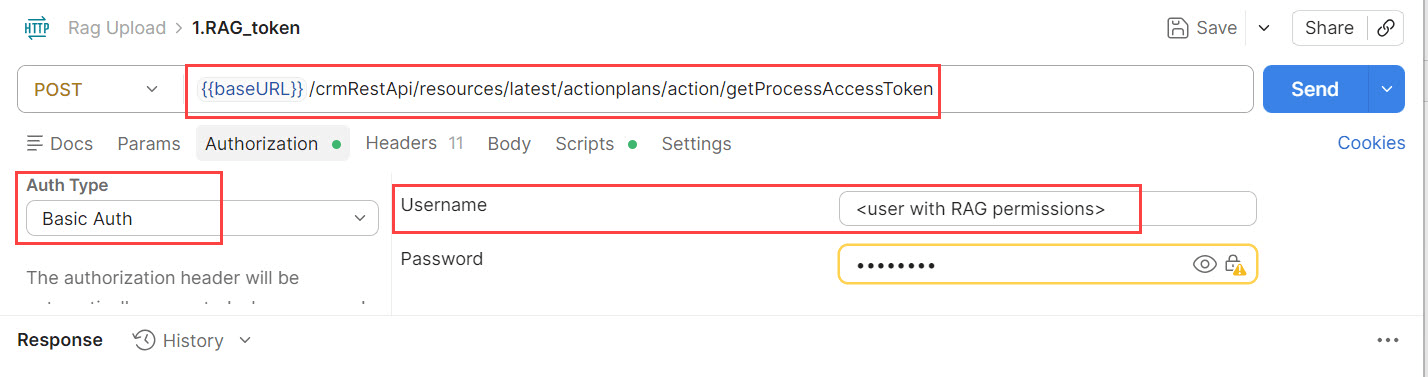
postman screenshot - getProcessAccessToken
Initiate RAG (one time activity)
POST https://cptbchdqy-test.fusionapps.ocs.oc-test.com/api/fusion-ai/orchestrator/rag/v1/initialization
payload:
{ “useCase”: “crm.svc.service_request_triage_agent_find_similar_service_requests” }
Note: Select Authorization as 'Bearer Token' and use token obtained in prior step as bearer token

postman screenshot - RAG initialization
Add a document to RAG
- Replace Document ID as shown below
- Replace entityID with SR number of dummy SR
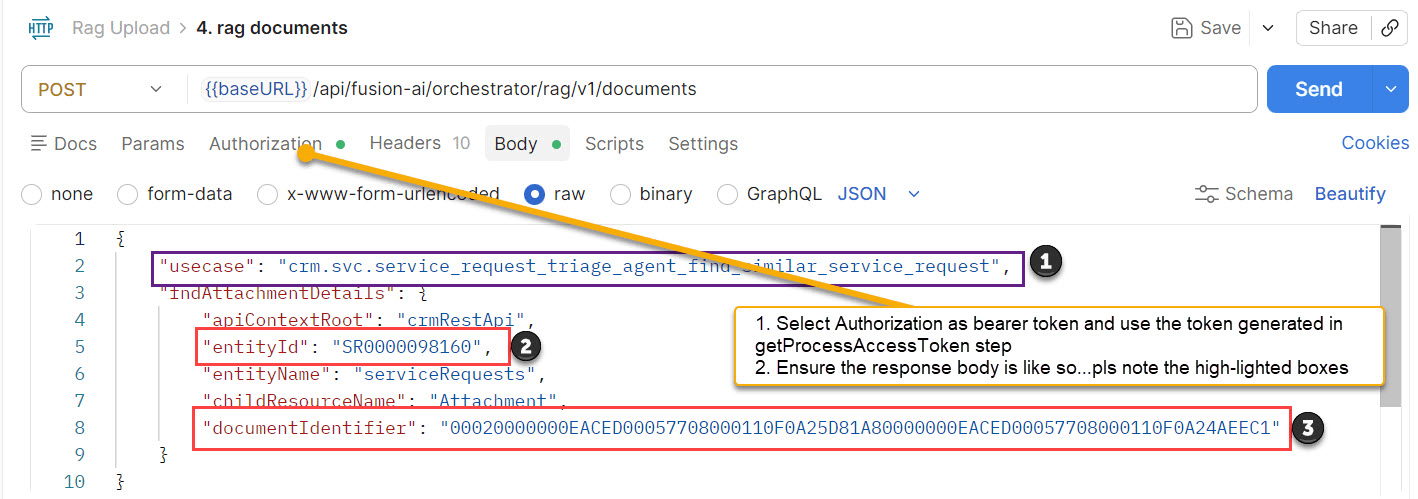
postman screenshot - RAG document upload
Upload Categories
- Export category to .csv file with following columns CategoryCode, CategoryName, ParentCategoryCode, Description
- upload file to dummy SR as an attachment (as in the previous step for Similar SRs)
- get attachment documentIdentifier (as in similar SR)
- generate fusion-ai token to initiate RAG use case n ingest document
- Initiate RAG use case
- POST <env url>/api/fusion-ai/orchestrator/rag/v1/initialization
- payload:{ “useCase”: “crm.svc.service_request_triage_agent_classify_sr”}
- Add Rag document:
- Post {{host}}/api/fusion-ai/orchestrator/rag/v1/documents
- Payload:{“usecase”: “crm.svc.service_request_triage_agent_classify_sr”,”fndAttachmentDetails”: {“apiContextRoot”: “crmRestApi”,”entityId”: “<srNumber>”,”entityName”:”<entityname>”,”childResourceName”: “Attachment”,”documentIdentifier”: “<docId>”}}
Upload Products
- Export product to .csv file with following columns ProductName, ProductId, Description, UsageCode
- Upload file to dummy SR as an attachment (as in the previous step for Similar SRs)
- get attachment documentIdentifier (as before)
- Generate fusion-ai token to initiate RAG use case and ingest document
- Initiate RAG use case
- POST <<env URL>>>/fusion-ai/orchestrator/rag/v1/initialization
- payload:{ “useCase”: “crm.svc.service_request_triage_agent_find_product”}
- Add Rag document:
- Post {{host}}/api/fusion-ai/orchestrator/rag/v1/documents
- Payload:{“usecase”: “crm.svc.service_request_triage_agent_find_product”,”fndAttachmentDetails”: {“apiContextRoot”: “crmRestApi”,”entityId”: “<srNumber>”,”entityName”:”<entityname>”,”childResourceName”: “Attachment”,”documentIdentifier”: “<docId>”}}

| Using Triage Agent as a standalone Action in Fusion Service Workflows |
|---|
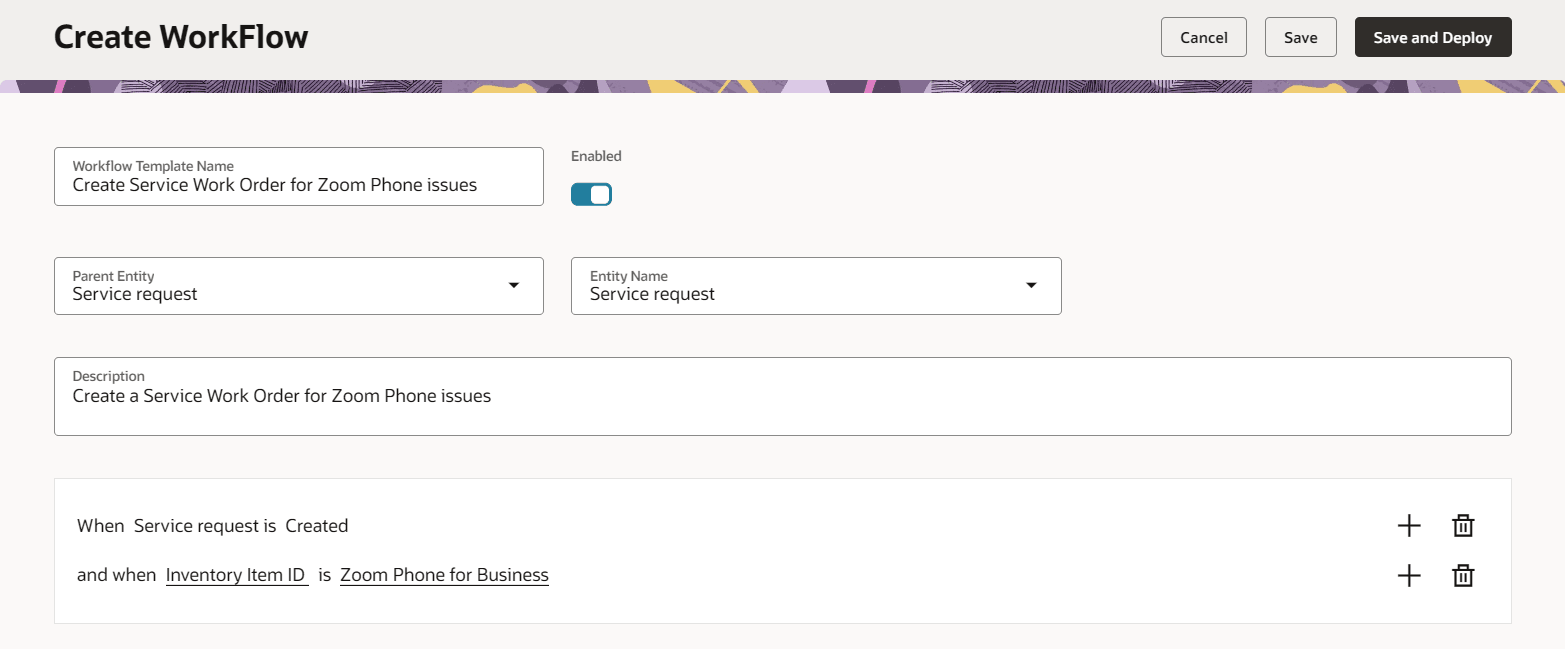
On ‘Service Center Administration’ page, click on ‘Productivity’ card and then select ‘Create / Manage Workflows’. This will take you to Workflow Automation landing page. On this page, click on ‘Create’. You will be taken to a ‘Create Workflow’ page.
For HR HelpDesk --> On horizontally scrollable top navigation tab strip, go to Help Desk and select 'Show More' --> 'Workflow Automation'. This will take you to Workflow Automation landing page. On this page, click on ‘Create’. You will be taken to a ‘Create Workflow’ page.
On ‘Create Workflow’ page, please fill Workflow-Name, enter condition and associated ‘actions’ as shown in below screenshot and click on ‘Save and Deploy’. In this example, Triage-Agent is invoked when a Service Request is Created.
-
Steps to create:
-
On the ‘Create Workflow’ page, enter the Workflow Name and set the business rules as conditions for when the Triage Agent should run. In the screenshot shown, Triage Agent is invoked when 'Service Request is Created'
-
In the Actions Pane, click on ‘+’ sign and select ‘Actions Catalog’. In ‘Actions catalog’, search for ‘Triage Service Request’ and select it. ‘Triage Service Request’ is the action that you added as custom action.
-
-
Click on the ‘Workflow Variable’ link, and this pop-up a UI where you can create a workflow-variable to hold the status or return value of ‘Triage Agent for Service Request’ REST-API output. (as shown in 'workflow variable' screenshot)
-
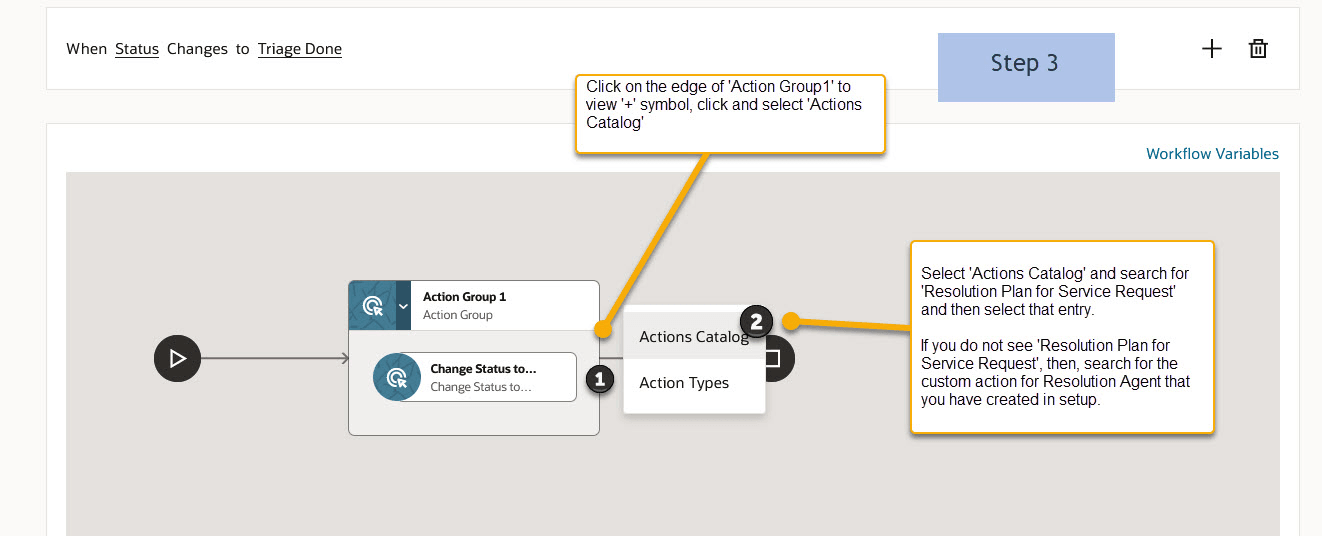
After ‘Triage Agent’ is done or completed it’s run, to update Service Request status to ‘Triage Done’, click on the ‘+’ on the ‘Action Group1’ (right-side edge). You will see a ‘Action Catalog’ and ‘Action Types’ drop-down. Select ‘Action Types’ and search for ‘Update Service Request’. In the ensuing ‘Update Service Request’ UI, enter the ‘Action Name’ (you can re-use this Action in other Workflows).
NOTE: You can follow the above steps to compose a Workflow to use available AI Agent as solo action.
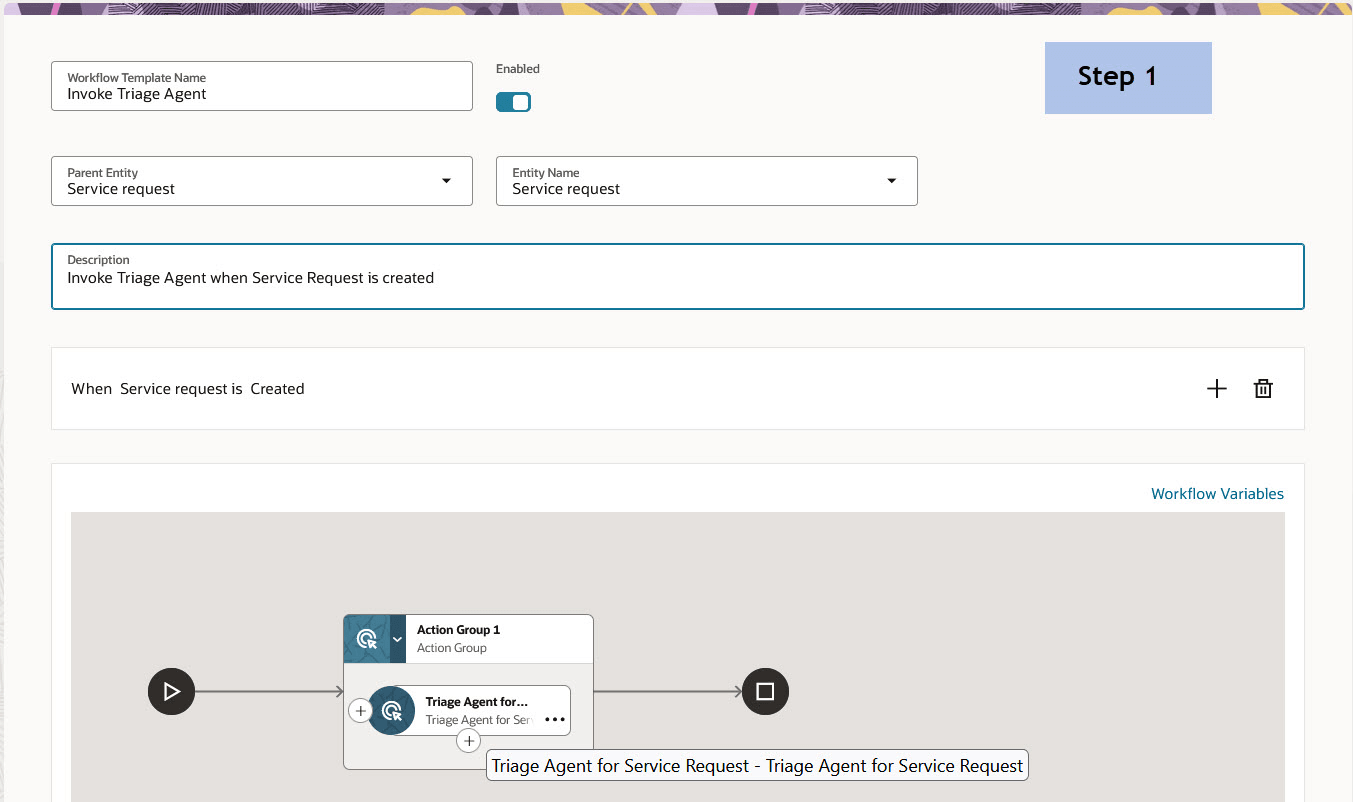
Step 1- Create Triage Agent Workflow
workflow variable screen - to save or hold the return value of Triage-AI-Agent. Please follow all sub-steps shown in the below 'workflow variables' screenshot.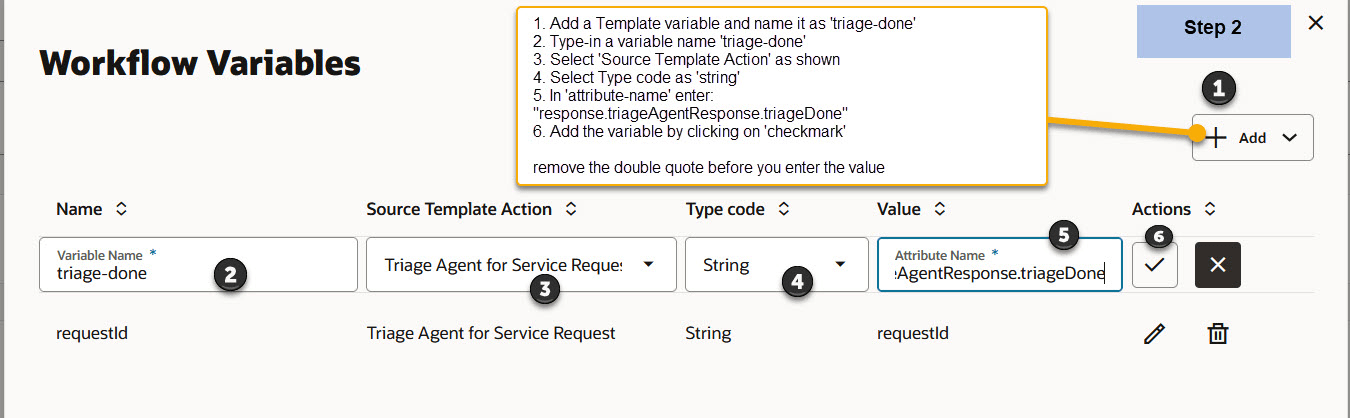
Step 2 - Create Workflow variable
Add another action to conditionally update Service Request Status to "Triage Done"
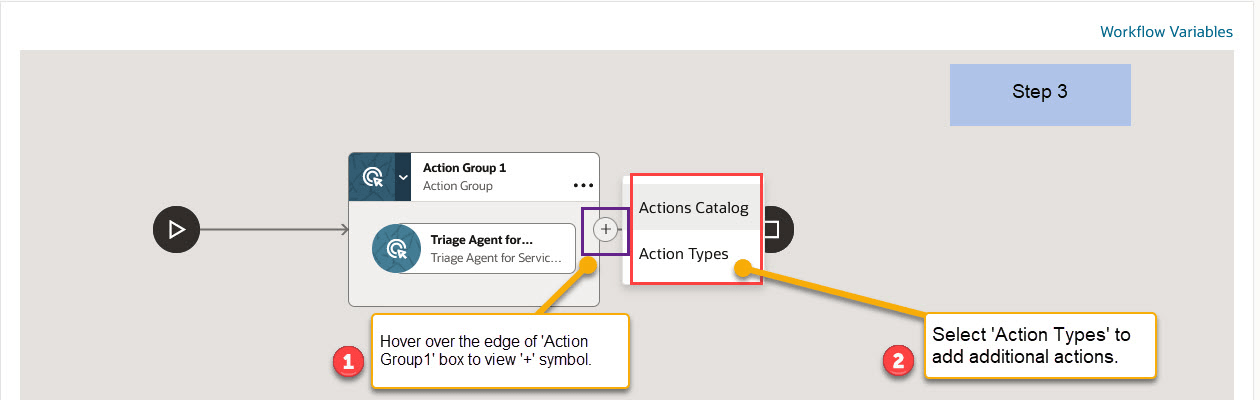
Step 3 - Adding sequential action
From the above Step 3, select 'Action Types' and in the ensuing UI, search and select 'Update Service Request'.
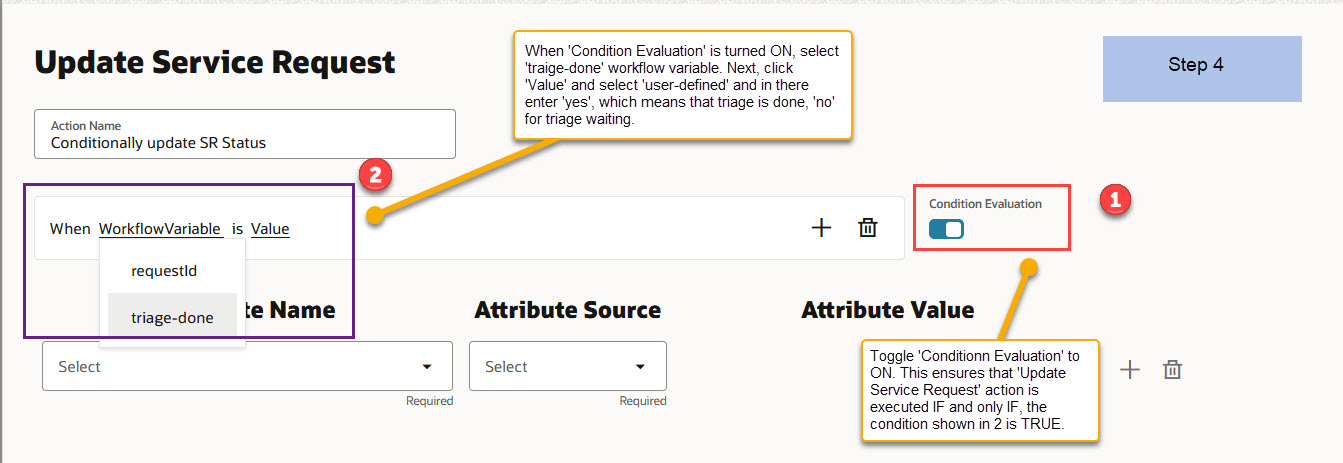
Step 4 - Conditionally update Service Request's Status
Please click on Save or Submit button that's on the UI (not shown due to large image)
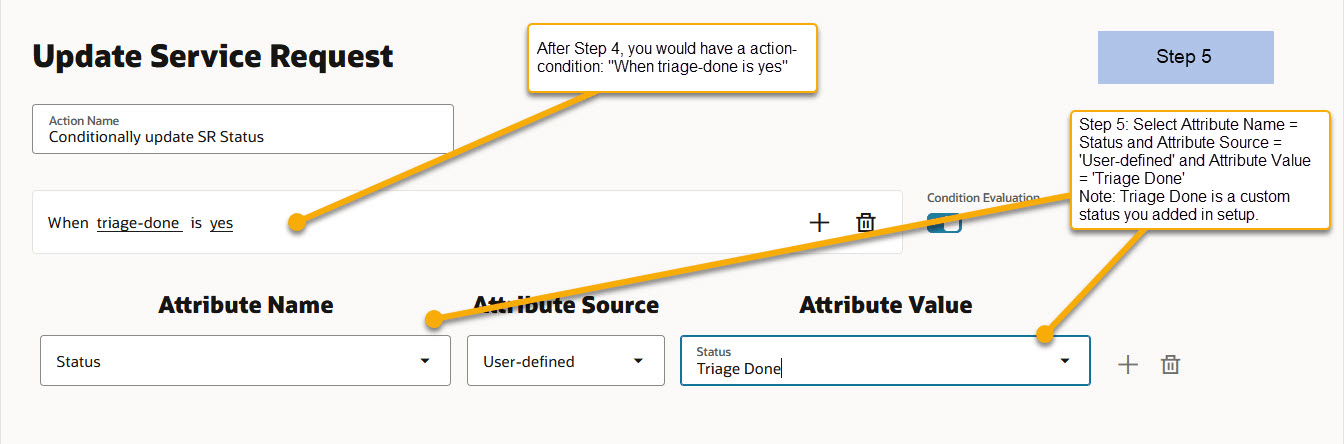
Step 5 - Update SR Status Attribute to Triage Done and 'Save'
Please click on Save or Submit button that's on the UI (not shown due to large image)
Step 6: After Step 5 is saved, you would see below screenshot. In essence, you are instructing the system to invoke Triage Agent (Action Group1) and depending on its outcome (triage-done = yes), Action Group2 updates Service Request status.
Step 6 - Two serial Actions in Actions Pane
Save and Deploy the above created workflow. Now AI Automation is ready, i.e. when a new Service Request is created, the above deployed workflow is evaluated, and Triage AI Agent is invoked, which will update SR status to triage-done (if Triage Agent returns 'yes'). You can add another conditional action, to update SR Status to 'Triage Waiting' IFF triage-done value = 'no'. Depending on your business requirement, you can add conditional actions as shown in Steps2, 3, 4 and 5.

| Using Resolution AI Agent in Fusion Service Workflows |
|---|
Creating a workflow to invoke Resolution Agent is similar to creating workflow for Triage Agent.
On ‘Service Center Administration’ page, click on ‘Productivity’ card and then select ‘Create / Manage Workflows’. This will take you to Workflow Automation landing page. On this page, click on ‘Create’. You will be taken to a ‘Create Workflow’ page.
Step1:
On ‘Create Workflow’ page, please fill Workflow-Name, enter condition and associated ‘actions’ as shown in below screenshot and click on ‘Save and Deploy’. In this example, Resolution-Agent is invoked when a Service Request Status changes to Triage Done (either manually or by Triage Agent as shown above)
Creating Resolution Agent Workflow - Step 1
Step2:
Click on 'Actions Types' and select 'Update Service Request Attribute' and you will be below UI.
Resolution Agent workflow step 2 - Add an action to update SR Status to Resolution in progress
Once you added the above, Action Pane would look like as shown below....now onto Step 3.
Resolution Agent Workflow - what we have done so far
Step 3:
Add an action to invoke "Resolution Plan for Service Request" that was created earlier.
Resolution workflow Step 3 - Adding Resolution AI Agent as an Action
Step 4
After adding a new action for 'Resolution Plan for Service Request' you would see below screen. Save and Deploy this workflow
Resolution Workflow Step 4 - Review and Save and Deploy
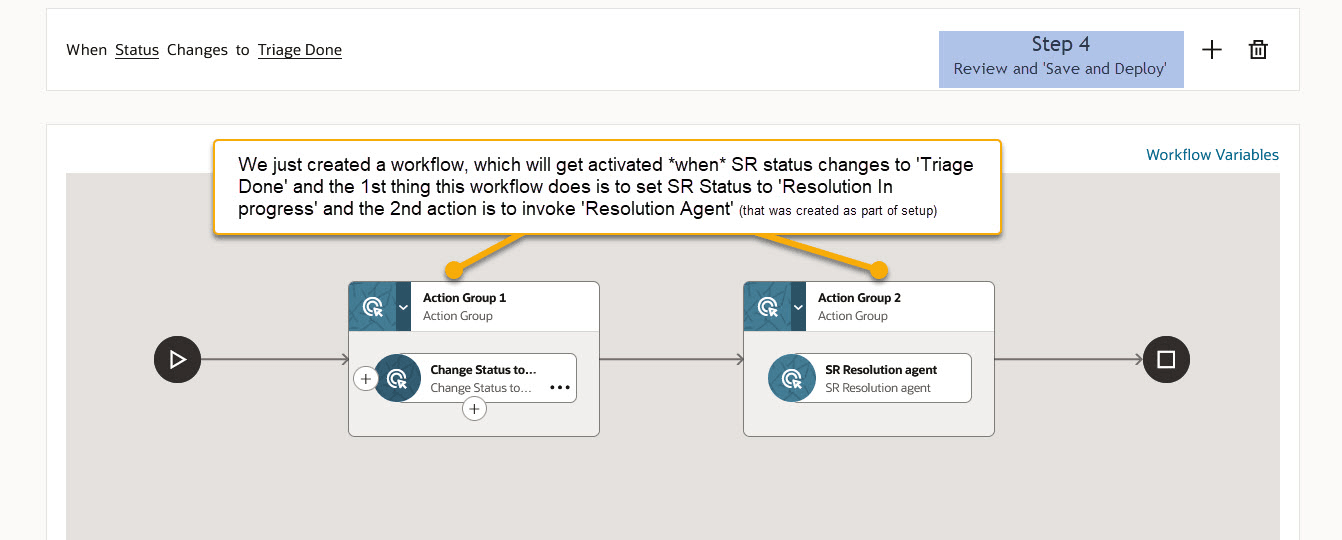
Save and Deploy the above created workflow. Once deployed, this workflow gets activated whenever Status of any Service Request is changed to 'Triage Done'.

| Composing Fusion Service Automation with Escalation Prediction Agentic Action which updates ‘Critical’ attribute of Service Request |
|---|
Goto Service à Service Center Administration à Productivity à Create/Manage Workflow
Click Create
Step 1:
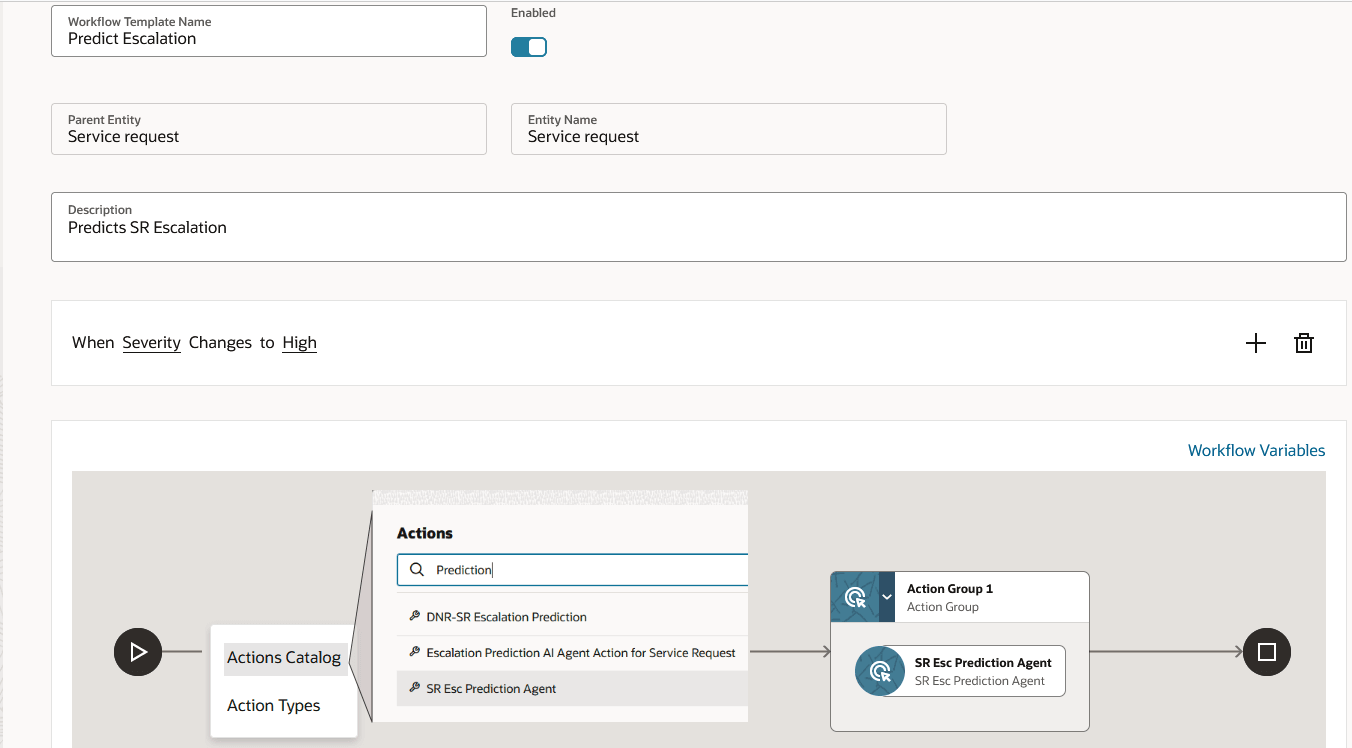
Fill the form – ie compose business conditions and pick the custom action for Escalation Prediction Agent.
Escalation Prediction Workflow - Step1
Step 2:
Create a Workflow Variable to hold or persist the response value of Escalation Prediction Agent
Escalation Prediction Workflow - Step2
Step 3:
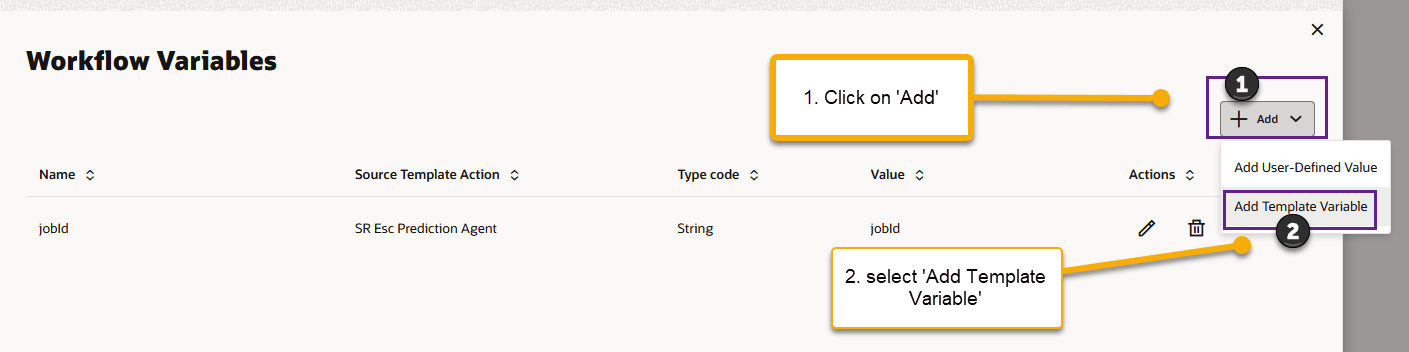
Add a workflow variable, named 'escResult' which holds the value of Escalation Prediction Agent. Fill the workflow variable screen as show in below screenshot and save (tickmark) and close (x sign)
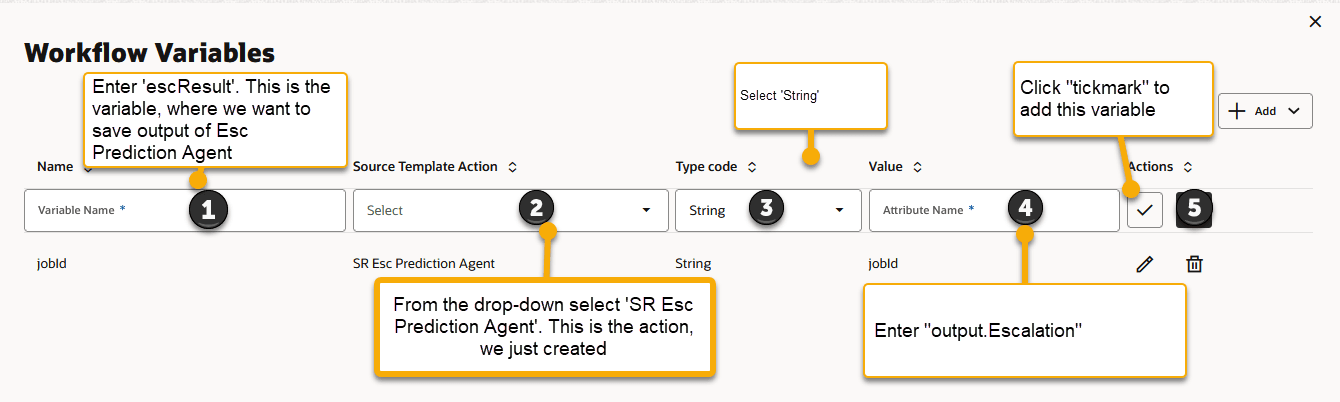
Escalation Prediction Workflow - Step 3 - Adding a workflow variable to hold Esc Pred Agent's value
Step 4:
Add a sequential action to conditionally update Service Request's attribute. Select 'Action Types' from the options displayed.
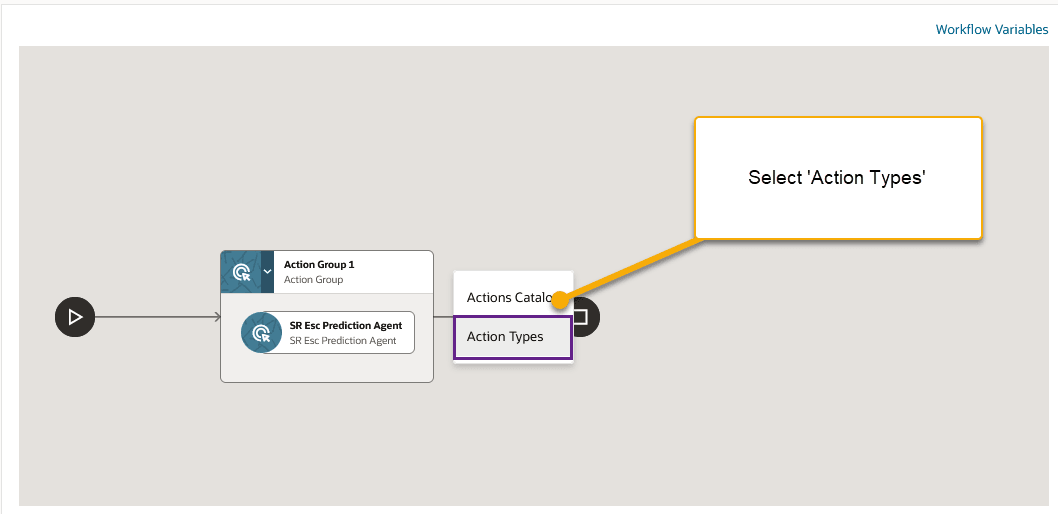
Escalation Prediction Workflow - Step 4 Adding conditional action
Step 5:
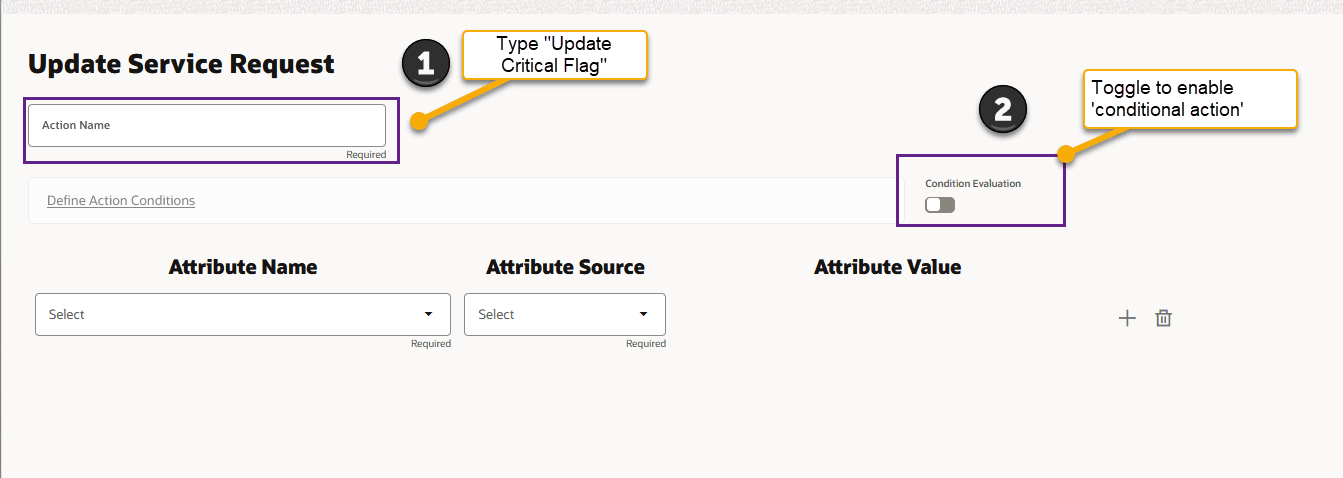
In the ensuing 'Action Types' screen, search for 'Update Service Request' and select it.

Escalation Prediction workflow - Step 5
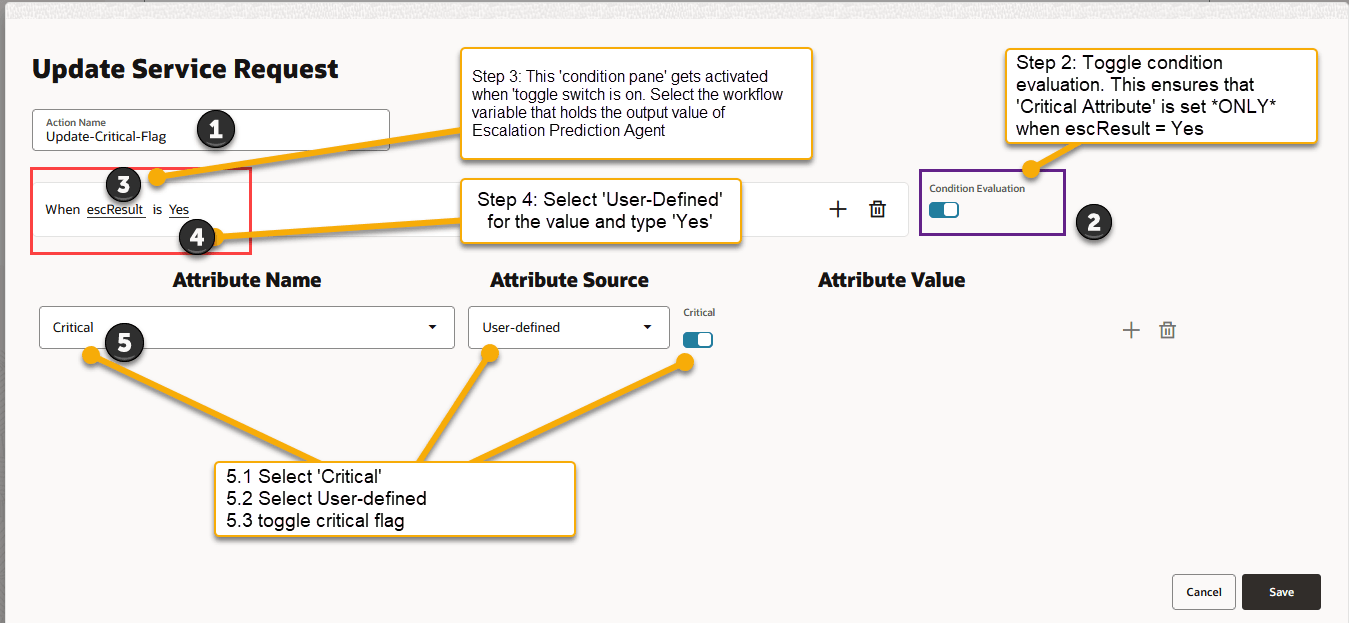
Step 6:
In the 'Update Service Request' UI, follow the steps as show in below screenshot.
Escalation Prediction workflow - Step6
Step 7:
Follow the steps as shown below to conditionally update 'Critical' attribute of Service Request. i.e. 'Critical' attribute is updated to True only when, the result of the prior action, i.e. Escalation Prediction Agent is 'Yes'
Save the changes (Save button)
Escalation Prediction workflow - Step 7 adding a conditional action
Step 8:
After step 7, the Actions Pane shows 2 serial actions. In essence, this informs the system to invoke Escalation Prediction Agent, when a Service Request Severity changes to High, and then, depending on the Escalation Agent's response, Critical attribute is set to yes.
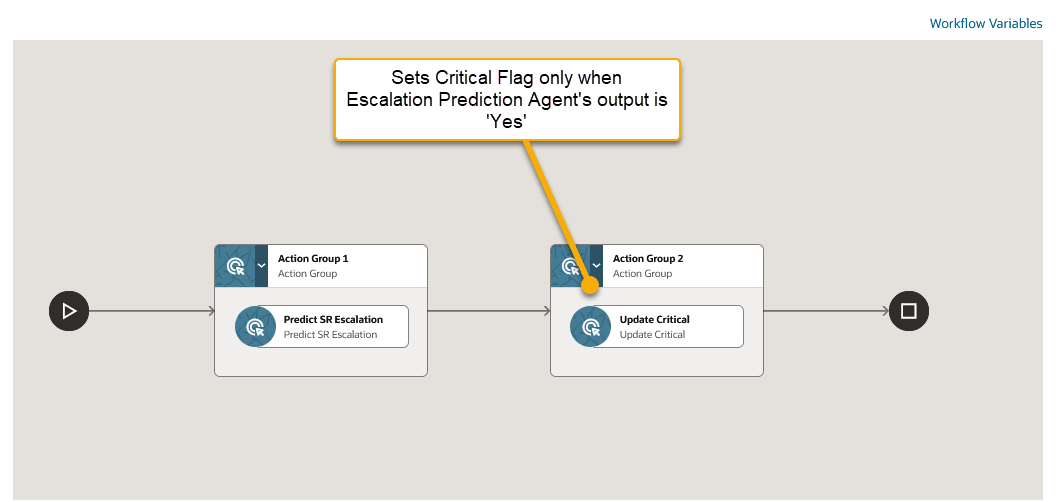
Escalation Prediction Workflow - Step 8 Review and Save and Deploy
Step 9
Save and Deploy this workflow

| Composing Fusion Service Automation with Service WorkOrder AI Agent |
|---|
Step 1:
Compose or create conditions on when to create a draft Service Work Order. In the example shown, This example shows a condition to create Service Work Order when a Service Request is created and when it’s Inventory Item (aka Asset) is ‘Zoom Phone for Business’
Service Workorder workflow - Step 1 - select condition
Step 2:
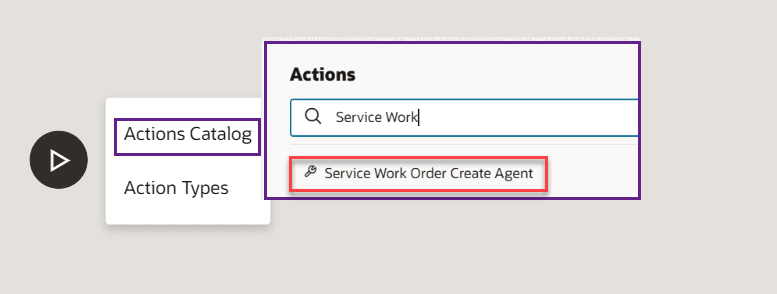
In Actions Pane, click on the ‘+’ symbol to view Actions Menu and select ‘Actions Catalog’. In the ensuing UI, search for ‘Service Work Order Create Agent’ and select it.
Service WorkOrder workflow - Step 2 - Add action
Step 3:
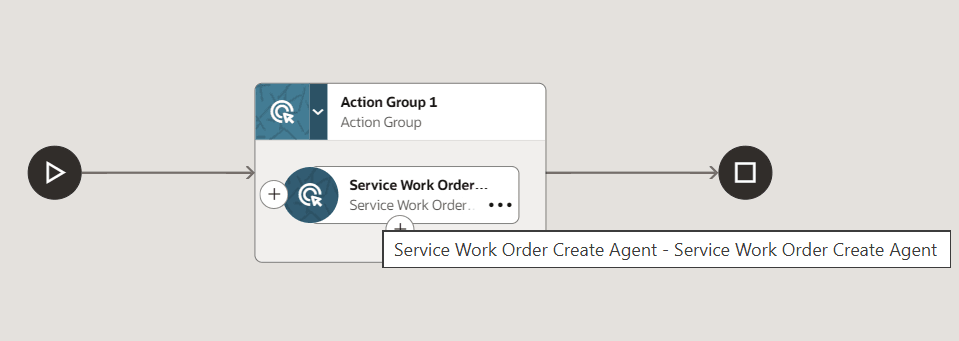
Save and Deploy. Whenever an SR is created with Asset = 'Zoom Phone for Business', a draft WO is created and is visible on Service Request UI. Note that in the below screenshot only the 'agentic action' is shown.
Service Workorder workflow - Step 3 Review and Deploy

Tips and considerations
- Ensure that Workflow can be enabled from 'Workflow Preference Page'. When enabled, AI Automation system is ready to listen to changes to a Service Request attributes, including SR creation and SR-attribute updates.
- When you enable Workflow for the 1st time it could take upto 60mins for the system to receive change data capture events, i.e. changes to Service Request attributes takes upto 60mins to get propogated.
- To use additional attributes in workflow aka business rule conditions, goto 'Workflow Preference' page and select the entity and then add attributes of that entity.
- To clone Triage or Resolution or seeded agents in AI Studio and use it: After you make a clone and made necessary changes, then, update the Profile Option’s to use your new-clone in Fusion Service Workflow Automation.
- For Resolution AI Agent, update the Profile Option: ORA_SVC_RESOL_AGENT_TEAM
- For Triage AI Agent, update the Profile Option: ORA_SVC_TRIAGE_AGENT_TEAM
- After composing a Triage Agent workflow, if you cannot see a recommendation card on Service Request UI page, please check the profile option ORA_SVC_TRIAGE_AP_DEFAULT_AGENT_ACTION
- The above PO value should be ORA_SVC_TRIAGE_ACT_101 - Triage Plan (for Service Request) .
- Goto Setup and Maintenance --> Service --> Action Plans --> Action Plan Actions and search for "ORA_SVC_TRIAGE_ACT_101 - Triage Plan" ...the visibility of this Action-Plan-Action should be set to visible
- After composing a Resolution Agent workflow, if you cannot see a recommendation card on Service Request UI page, please check the profile option ORA_SVC_AP_DEFAULT_AGENT_ACTION
- The above PO value should be ORA_SVC_ACT_101 - Resolution Plan (for Service Request) .
- Goto Setup and Maintenance --> Service --> Action Plans --> Action Plan Actions and search for "ORA_SVC_ACT_101 - Resolution Plan" ...the visibility of this Action-Plan-Action should be set to visible
Access requirements
1.0 Before you start
- All Service Adaptive Intelligence features should be initially used in non-production environments only (Stage or Test). This allows your organization to become familiar with the features in a controlled environment before opening for live user traffic.
- Generative AI features work only in Redwood UI. They do not work with Classic UI.
- Users wanting to use Service Center gen AI features such as Triage Agent, Resolution Agent or Summarization, should have ‘ORA_SVC_GEN_AI_USER’ duty role. Note that, this has been granted out of the box to all admin roles.
- Verify that the Gen AI features are enabled in ‘Set Up and Maintenance’. Example given below for ‘Service’. Similarly check for HelpDesk and Internal Service Request stripes.
- Go to FSM --> Offering: Service --> ‘Change Feature Opt-In’ --> ‘Service Adaptive Intelligence’ --> ‘Use Gen AI features in Service’ (box should be checked)
2.0 Enable Oracle Fusion Service Workflow Automation
Add Roles to manage workflows in service: To create, deploy, and manage workflows, users need specific roles. There are two ways to grant access: using standard (OOTB) roles or a custom job role.
2.1.Out-of-the-Box (OOTB) Roles
Assign one of the following standard roles to users who need to manage workflows:
- For CRM stripe aka Service Request object: Sales Administrator (ORA_ZBS_SALES_ADMINISTRATOR_JOB)
- For Internal Help Desk Administrator (ORA_SVC_INTERNAL_HELP_DESK_ADMINISTRATOR_JOB)
- Human Resource Help Desk Administrator (ORA_SVC_HUMAN_RESOURCE_HELP_DESK_ADMINISTRATOR_NG_JOB)
Required Setup:
- Enable SAS Integration Profile Option
- Go to: Setup and Maintenance
- Search: Manage Global Search Profile Options
- Find and ensure: Profile option code ORA_ASE_SAS_INTEGRATION_ENABLED is set to YES
- Enable Permission Group for Job Role (if not already enabled)
- Go to: Tools --> Security Console
- Search in 'Roles and Permission Groups' : The assigned role (i.e one of the administrator roles for your stripe as seen in step 2.1...see 'Roles and Permissions Group' screenshot)
- Edit the role
- Click the "Enabled Permission Groups" button under 'Basic Info' (if not already enabled)
- In the ensuing screens, please add or ensure that the User has access to role searched. (most likely it will be step 7 of the guided flow)
- Save and Submit
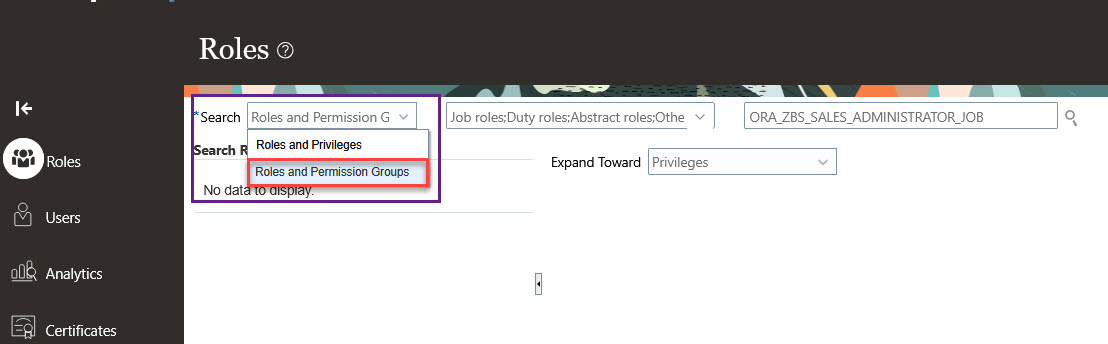
Roles and Permission Groups
2.2 Custom Job Role
If you are using a custom job role for workflow management, make sure to include the required duty role. ORA_DR_SVC_WORKFLOW_MANAGEMENT_DUTY
Steps:
- Ensure the “Enable Permission Group” button is enabled for the custom job role (as described above).
- Add the duty role:
- Go to: Tools --> Security Console
- Search and edit: Your custom job role
- Under: Role Hierarchy --> Roles and Permission Groups
- Click: Add Role
- Select: ORA_DR_SVC_WORKFLOW_MANAGEMENT_DUTY
- Save and Submit
2.3 Enable Oracle Fusion Service Workflow Automation
Starting 25D, there is no promo-code for Workflow Automation and this feature is ‘opt-in’ OOB for Service Request (aka CRM stripe)
For HR HelpDesk object or stripe, goto
- Go to Setup and Maintenance --> HelpDesk --> Change-Feature-opt-in
- In the ensuing screen, select Productivity-->Service Request Workflow Automation and ensure the check-box is selected (or checked), save and close.
- Ensure the Profile Option ORA_SVC_WORKFLOW_SIGNALS_ENABLED is set to Y (default is Y)
Follow these steps to use Workflow Automation feature for Service Request Object aka CRM stripe:
- From Navigator, go to ‘Service’ and then select ‘Service Center Administration’
- On ‘Service Center Administration’ page, click on ‘Productivity’ card and then select ‘Manage Workflow Preferences’ (Figure 1)
- In Manage Workflow Preferences, toggle ‘Enable Workflow’ to ON. Now the Workflow Automation is ready to be used. (Figure 2)
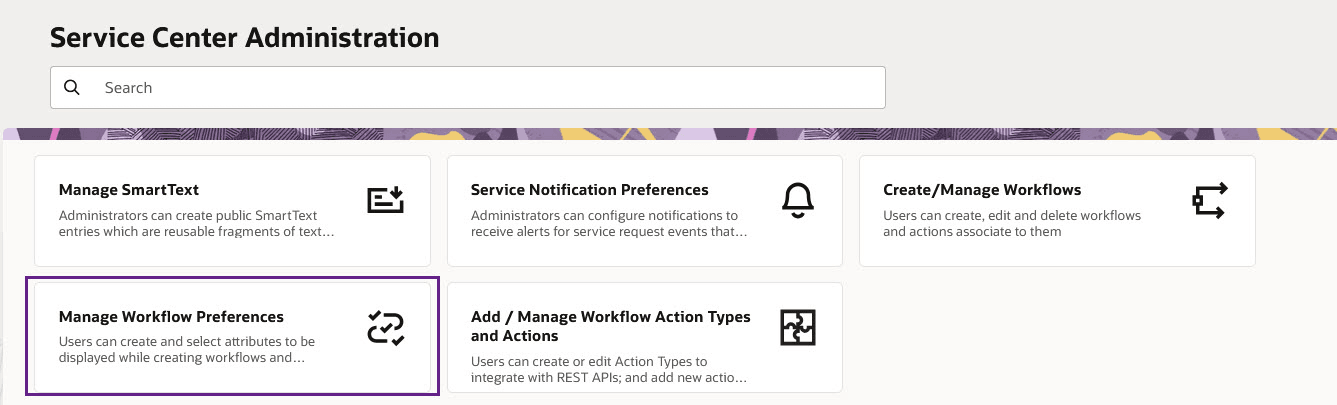
Figure 1
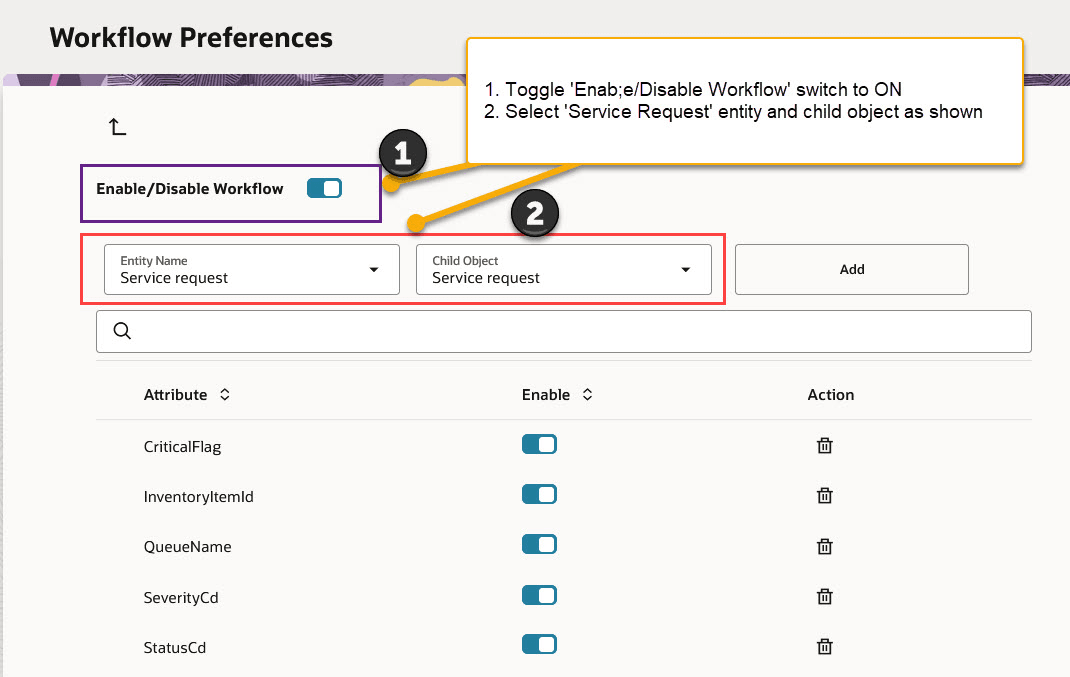
Figure 2
Follow these steps to use Workflow Automation feature for HR HelpDesk Object aka CRM stripe:
- From Navigator, go to ‘Help Desk’ and then select ‘Service Center Administration’
- On ‘Service Center Administration’ page, click on ‘Productivity’ card and then select ‘Manage Workflow Preferences’ (Figure 3)
- In Manage Workflow Preferences, toggle ‘Enable Workflow’ to ON. Now the Workflow Automation is ready to be used. (Figure 4)
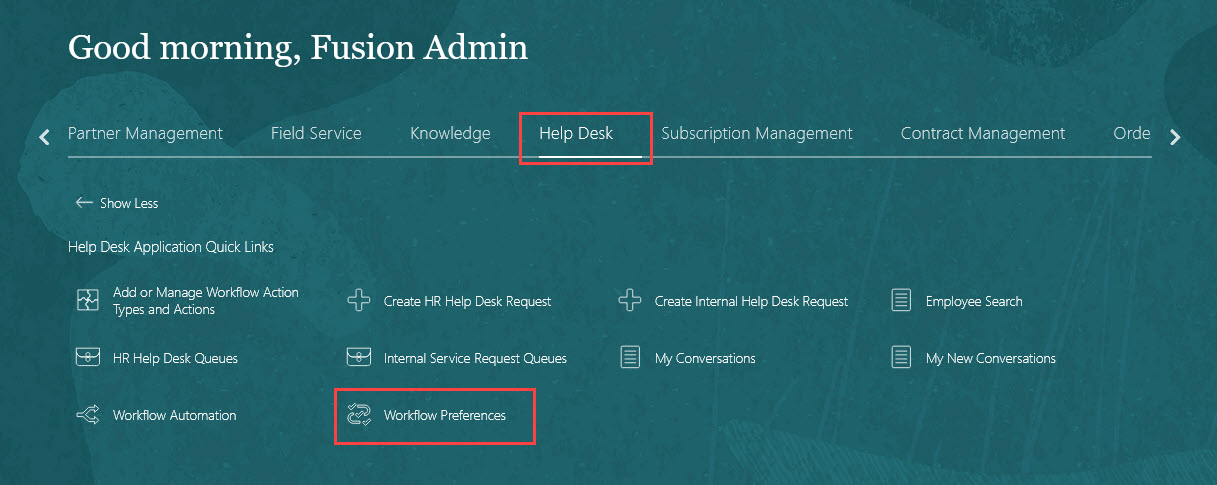
Figure 3
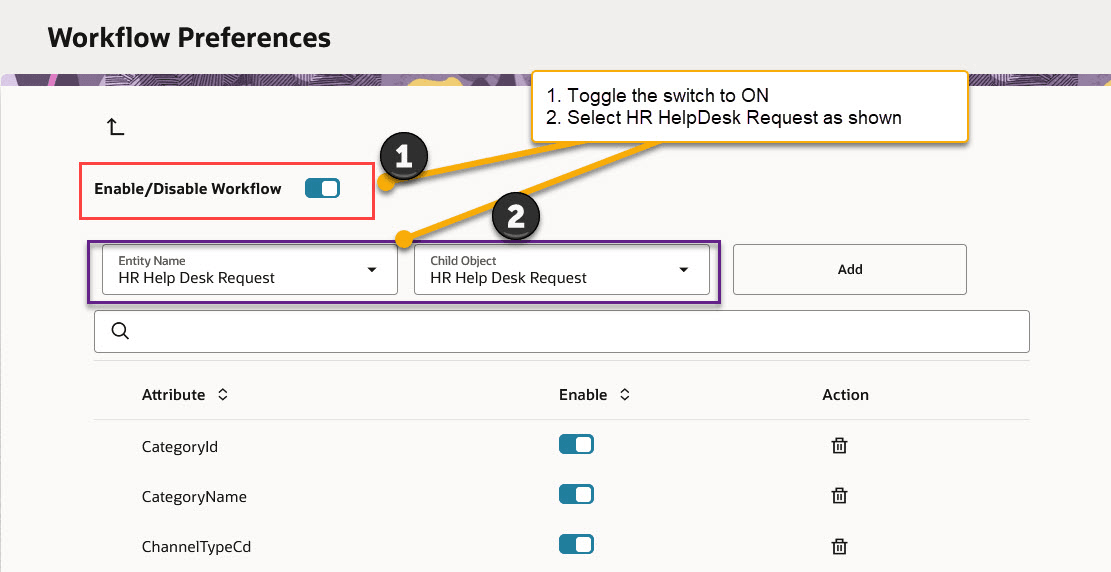
Figure 4