Workflow Automation for Case Management
Oracle Fusion Service’s Workflow Automation Platform empowers organizations to seamlessly automate lifecycle of Case Requests, from creation to resolution, with minimal manual intervention. The platform features an intuitive, no-code interface that allows business users to compose and deploy workflows, automating essential service processes such as automated notifications, attribute updates, and action plan activation.
Oracle Fusion Service’s Workflow Automation Platform – Key Features:
- Clean and Simple UI – Enables business users to automate common and repetitive tasks using plain English. Easily compose workflows with one or more conditions based on Case attributes, and define actions such as sending emails, updating attributes, or activating Action Plans.
- Automate Email Notifications – Leverages existing email templates configured in Application Composer or use a custom email form, with a rich text editor.
- Automate Updates to Service Request Attributes – Ensures information remains accurate and up-to-date without manual intervention.
- Select Business Object Attributes for Conditions – Empowers workflows to utilize specific attributes from business objects as conditions, tailoring process automation to precise business requirements.
- Add and Activate Action Plans – Enables automation of Action Plan activation within workflows to ensure timely and relevant task execution.
Benefit Summary:
Oracle Fusion Service’s Workflow Automation Platform empowers organizations to deliver faster, consistent, and proactive service experiences with robust workflow automation to help reduce costs and enables business teams to continually enhance and evolve customer service operations.
Increased Operational Efficiency
- Benefit: By automating repetitive and routine service tasks, from email notification automation to activating Action Plans, teams can reduce manual workloads and streamline Case handling.
- Impact: Frees up employees to focus on higher-value customer engagement and problem-solving activities, boosting overall productivity.
Faster Response and Resolution Times
- Benefit: Automated notifications, and attribute updates ensure quicker acknowledgment and processing of Case requests.
- Impact: Reduces customer wait times and enhances satisfaction by achieving faster time-to-resolution.
Improved Service Quality and Consistency
- Benefit: No-code workflows standardize processes and ensure that best practices are enforced consistently across all service interactions.
- Impact: Decreases errors and variability, increasing accuracy and delivering a reliable customer experience.
Empowerment of Business Users
- Benefit: Intuitive, no-code interface allows non-technical users to build, modify, and deploy workflows without needing IT resources.
- Impact: Accelerates automation initiatives, shortens time-to-value, and fosters a culture of agility and continuous improvement.
Reduced Operational Costs
- Benefit: Automation reduces manual effort, operational bottlenecks, and costly errors in the service process.
- Impact: Delivers significant cost savings while maintaining or improving service levels.
Enhanced Customer Experience
- Benefit: Personalized, timely, and accurate responses and resolutions ensure that customer expectations are met or exceeded.
- Impact: Drives higher customer satisfaction, repeat business, and positive brand advocacy.
Steps to enable and configure
Enable Oracle Fusion Service Workflow Automation
1.1. Give Users the Right Roles
Users need special roles to create and manage workflows. You can assign either a standard (out-of-the-box) role or a custom job role.
1.1.1. Standard Roles (Out-of-the-Box)
Assign one of these roles to users who will manage workflows:
- Sales Administrator (ORA_ZBS_SALES_ADMINISTRATOR_JOB)
Setup Steps:
- Enable SAS Integration:
- Go to: Setup and Maintenance
- Search: “Manage Global Search Profile Options”
- Make sure the profile option ORA_ASE_SAS_INTEGRATION_ENABLED is set to YES.
- Enable Permission Group for the Role:
- Go to: Tools > Security Console
- Find the assigned role.
- Edit the role, and if the "Enabled Permission Groups" button is available, click it.
- Save and submit.
1.1.2. Custom Job Roles
If using a custom job role, add the required duty role:
- Required Duty Role: ORA_DR_SVC_WORKFLOW_MANAGEMENT_DUTY
Steps:
- Ensure the “Enable Permission Group” button is enabled for your custom role (see above).
- Add the duty role:
- Go to: Tools > Security Console
- Find and edit your custom job role.
- In Role Hierarchy, click “Add Role” and select ORA_DR_SVC_WORKFLOW_MANAGEMENT_DUTY.
- Save and submit.
1.2. Turn On Workflow Automation
- In version 25D and later, Workflow Automation is an optional feature (opt-in) and needs no promo code.
- Make sure the profile option ORA_SVC_WORKFLOW_SIGNALS_ENABLED is set to Y (default).
- To enable Workflow Automation:
a. Go to Navigator > Service > Service Center Administration (Figure 1)
b. Click on the ‘Productivity’ card, then select ‘Manage Workflow Preferences’ (Figure 2)
c. In the preferences, toggle ‘Enable Workflow’ to ON. (Figure 3) The feature is ready to use. Please note that when you enable this flag for the very 1st time, it takes about 60minutes for Signals to be enabled. This is applicable only in Production.
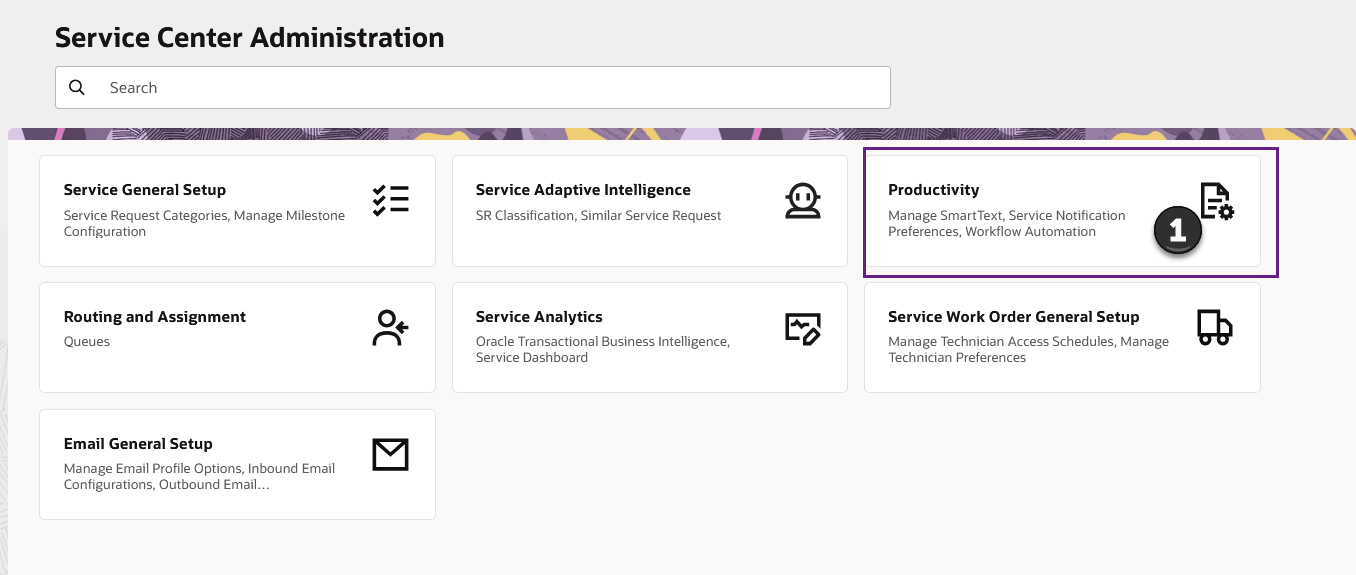
Figure 1
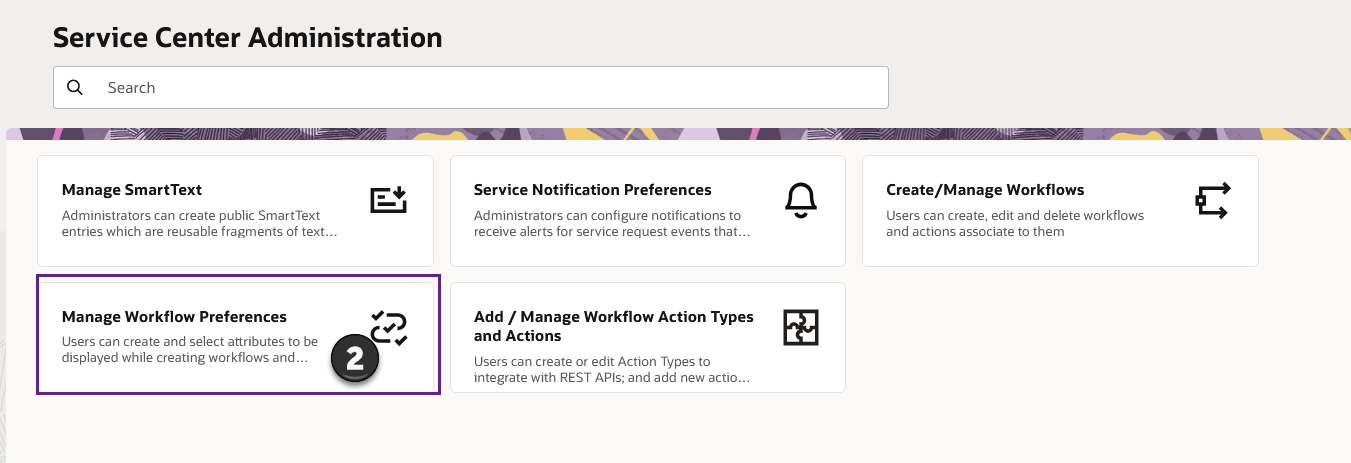
Figure 2
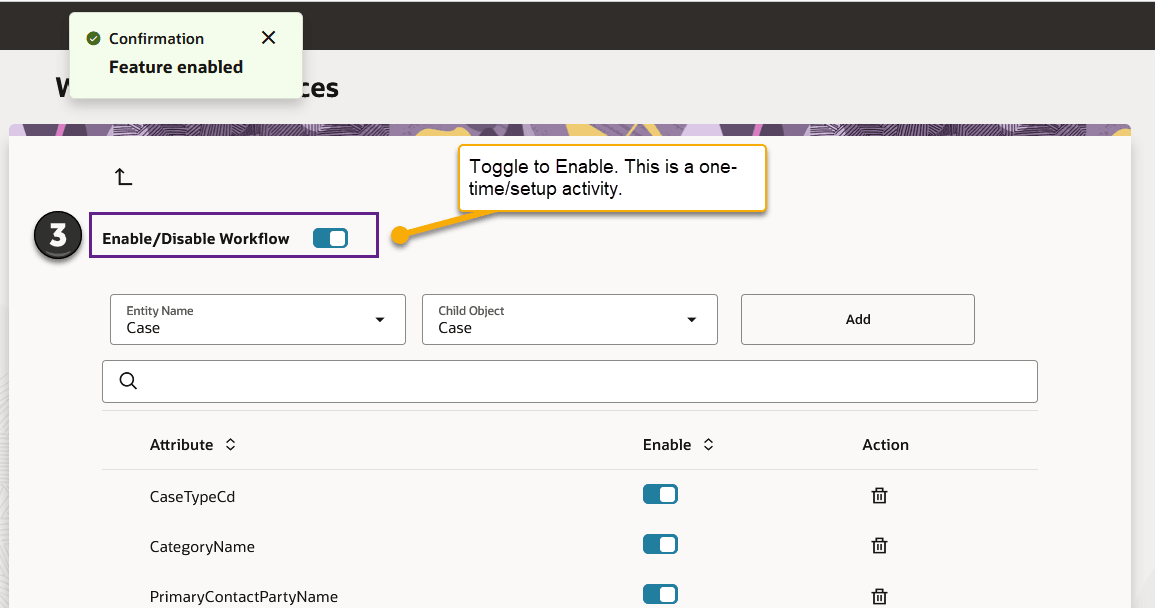
Figure 3
Tips and considerations
This section covers Oracle Fusion Service Workflow Automations’ Preference Page.
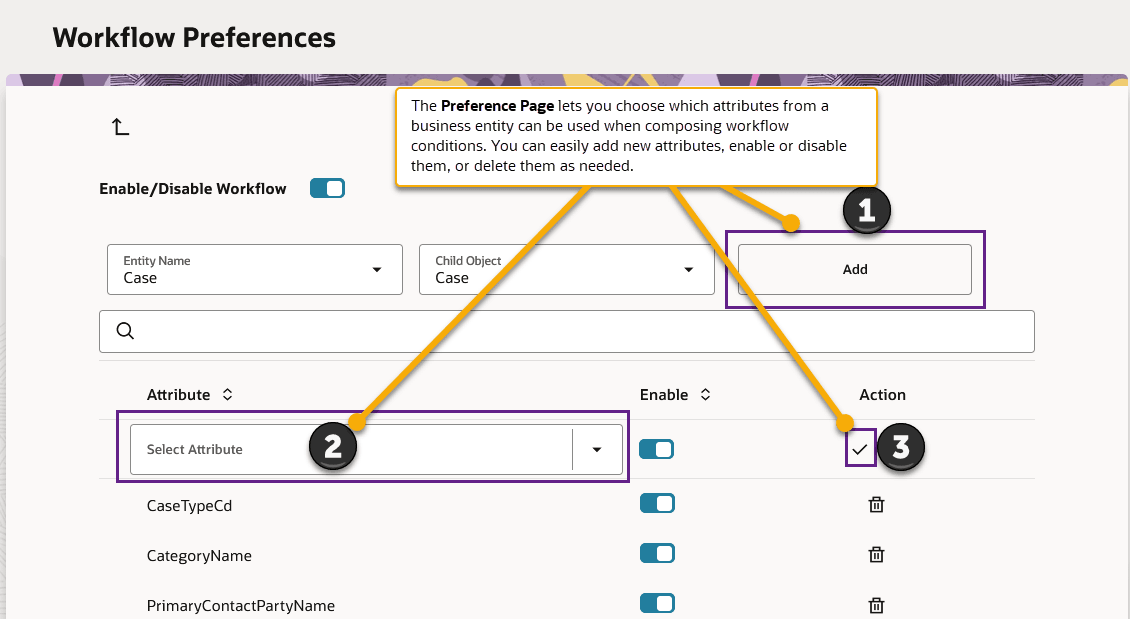
The Preference Page lets you choose which attributes from a business entity can be used when composing workflow conditions. You can easily add new attributes, enable or disable them, or delete them as needed.
Adding attributes to workflows
1. Enable or Disable Workflow
- Enable Workflow: Turn ON the Enable/Disable Workflow switch at the top left of the page to start using automation. Note: When enabling for the first time, it may take up to 60 minutes for workflows to be processed.
- Disable Workflow: Toggle the switch OFF to turn off automations. Note that when this switch is OFF, then, no automations are processed aka executed.
2. Adding Attributes
- Select Business Entity and Child Object: Use the Entity Name and Child Object dropdowns to choose the business entity whose attributes you want to manage (e.g., Service Request).
- To add a new attribute for use in workflow conditions:
- Click “Add” (button on the upper right).
- Select Attribute from the dropdown list that appears.
- Click the check-mark to confirm.
After adding, the new attribute will appear in the list below.
3. Enable or Disable Attributes
- Use the toggle switch in the “Enable” column next to each attribute to enable or disable it.
- Enabled: The attribute can be used in workflow conditions.
- Disabled: The attribute can’t be used in workflow conditions until re-enabled.
4. Out-of-the-Box (OOB) Attributes
- When workflows are enabled, you will see a default set of out-of-the-box (OOB) attributes. (Severity, Status, Channel, Queue, Critical)
- You can manage these attributes as described above, including custom attributes
Note:
- Only enabled attributes are available for use when composing workflow conditions.
- You can change your selections at any time by enabling, disabling, or deleting attributes as your business needs change.
Access requirements
Please refer to 'Steps to Enable' section.