Move Field Resources Pages under Fusion Setup and Maintenance
In update 26C, the Field Resource page has been redesigned using Oracle’s Redwood Design System and Oracle Visual Builder, providing a modern, intuitive experience that is consistent with the Oracle Fusion Applications user interface.
The page is available to Oracle Maintenance Cloud and to Oracle Fusion Service customers with the appropriate Fusion Setup and Maintenance privileges. It provides a centralized view of scheduled field resources that can be assigned to perform field activities. The enhanced experience enables managers and administrators to manage resource availability, including working hours, on-call schedules, and non-working time, helping ensure accurate activity assignment, effective scheduling, and optimized workforce utilization.
As part of Oracle’s ongoing investment in Fusion Field Service capabilities, this page is being delivered through a phased approach. Additional functionality will continue to be introduced in future releases, bringing the existing capabilities into the new experience while delivering improved usability, streamlined workflows, and a more consistent user experience across Oracle Fusion Applications.
The redesigned Field Resource page provides administrators and managers with a modern Redwood-based experience for managing field resource information, schedules, and availability.
Key capabilities include:
- Viewing all schedulable field resources in a single list (excludes Managers, Dispatchers, and Administrators, as these roles do not participate in field activity scheduling and do not require resource availability management.)
- Filtering resources using multiple search and filter criteria.
- Updating field resource information and attributes.
- Configuring regular working schedules and shifts.
- Configuring on-call schedules and shifts.
- Managing non-working time, such as absences and unavailable periods.
These capabilities help maintain accurate resource availability and support efficient activity assignment, scheduling, and workforce utilization.
To access the page:
For Fusion Field Service customers, this page is available through the unified Fusion Setup and Maintenance experience. As part of this enhancement, a new Scheduling and Dispatch functional area has been introduced to consolidate scheduling- and dispatch-related configuration tasks within Fusion. To access this page, navigate to the Scheduling and Dispatch functional area and select Field Resources.
In the Fusion Setup and Maintenance experience, navigate to:
My Enterprise > Setup and Maintenance
Oracle is introducing the enhanced Field Resource page experience through a phased rollout, with additional capabilities planned in upcoming releases. To support a smooth transition, the existing Field Resource page will remain available alongside the enhanced experience until all key functionality is available, giving customers the flexibility to adopt the new interface at their own pace while benefiting from ongoing usability and feature enhancements.
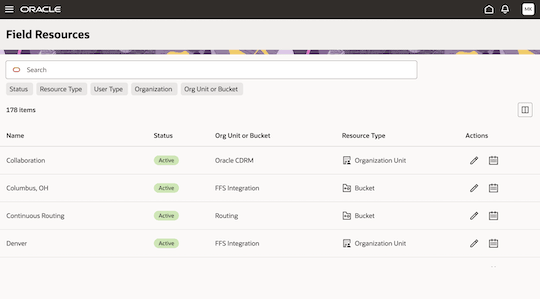
Field Resources List View
When you open the Field Resources page, you see the list of all Oracle Fusion Field Service resources, except those of type Manager/Dispatcher/Admin. You can filter this information either by entering a term into the Search field or selecting from the set of filters available, such as:
- Status
- Resource Type
- User Type
- Organization
- Org Unit or Bucket
Display or Hide Options
You can display or hide columns by clicking the Columns icon. This screenshot shows the Field Resources list page:
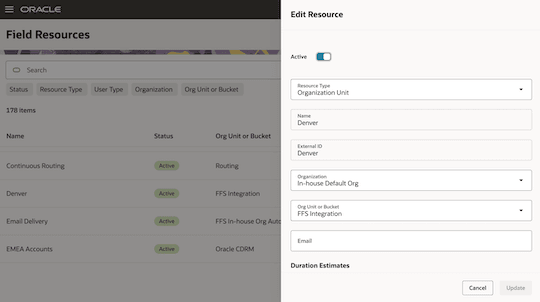
Update Information
Click the Edit (pencil) icon in the row for the resource you want to update. A drawer opens to the right of the page, where you can edit the information specific to Oracle Fusion Field Service.
Some information displayed on the edit page comes from other objects and is read-only in Oracle Fusion Field Service. To update that information, you must edit in the corresponding application area.
For example, to change the name of a field resource, go to the Users and Security functional area and select the Manage Users task.
This screenshot shows the Edit Resource page:
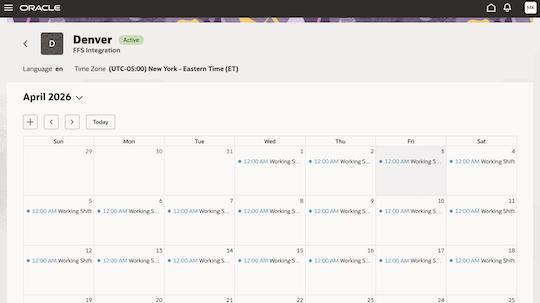
Configure Working and Nonworking Time
Click the View Resource Calendar button in the required row. A new page opens and shows the month grid with working, on-call, and nonworking time for the selected resource:
- The regular working time is marked with a blue circle and the start time for the shift.
- The on-call time is marked with a reddish-brown circle and the start time for shift.
- The regular nonworking time is shown as a blue bar, which represents an all-day event.
- The on-call nonworking time is shown as a beige/tan bar, which represents all-day event.
This screenshot shows the calendar for a resource:
You can perform these tasks in this view:
- Add a work schedule to a calendar
- Add a shift to a calendar
- Add custom working time to a calendar
- Add nonworking time to a calendar
You start the action by selecting the date for which the change in the schedule must be applied. After that a drawer appears to the right of the page.
The page shows information about the shifts for the selected day. You can click the pencil icon and see this page:
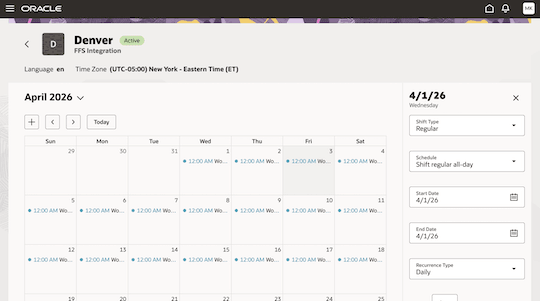
On this page you can select:
- Shift Type: Whether the information you want to provide is related to the regular or on-call time. An on-call shift shows the resources that are available to be contacted outside a regular working shift with the on-call icon. If you have not activated an on-call shift, it is not suitable for activity assignment - either manually or in routing optimization, and is not used in capacity calculations.
- Schedule: This list includes predefined work schedules and shifts. Two additional items are also available:
- Custom working time: You specify the time range of the working hours directly without using a predefined shift.
- Nonworking time: You this to specify that the mobile worker doesn't work on the specific day due to illness or vacation.
- Start Date: Date on which the new shift starts. Defaults to the date selected in the calendar. You can choose a different date if needed, but cannot set to a past date.
- End Date: Date on which the new shift ends. Defaults to the date selected in the calendar. You can choose a different date if needed, but cannot set to a past date.
- Recurrence Type: Select how often the new working time repeats (Daily, Weekly, or Yearly). Depending on the selected frequency, specify the number of days or the day of the week for the recurrence.
- Comment: Enter any comments that you would like to provide for the change in timings.
For the custom working time you can also provide:
- Start Time: Enter the time when the resource's work is to begin.
- End Time: Enter the time when the resource's day ends.
For the nonworking time you can provide the predefined reason from the list in addition to the comment.
Business Benefit
Provides the ability to configure field resources in the Fusion Shell, which helps to preserve consistent Fusion UX patterns and a consolidated setup location.
Steps to enable and configure
Use the Opt In UI to enable this feature. For instructions, refer to the Optional Uptake of New Features section of this document.
Offering: Field Service No Longer Optional From: Update 26C
- To use this page, you must have access to Fusion Setup and Maintenance.
- In addition, you must be assigned to a job role that includes the duty role Field Service Manager (code: ORA_FFS_FIELD_SERVICE_MANAGER_DUTY). By default, this duty role is included in the Field Service Manager job role (code: ORA_FFS_FIELD_SERVICE_MANAGER_JOB).
Tips and considerations
Changes to the field resource properties may take a few minutes to synchronize and appear in Fusion Field Service.