Field Resources in Functional Setup Manager Extended with Work Skills and Work Zones
The redesigned Field Resources page delivers a modern Redwood experience that helps administrators and managers efficiently manage field resource information, schedules, and availability.
This release expands the page with the ability to configure work skills and work zones directly for each field resource. These enhancements make it easier to maintain accurate resource profiles and support more effective scheduling and dispatch decisions.
To access the page:
- Sign in to the Functional Setup Manager.
- Navigate to My Enterprise > Setup and Maintenance.
- Select the Field Service offering.
- Open the Scheduling and Dispatch functional area and select Field Resources.
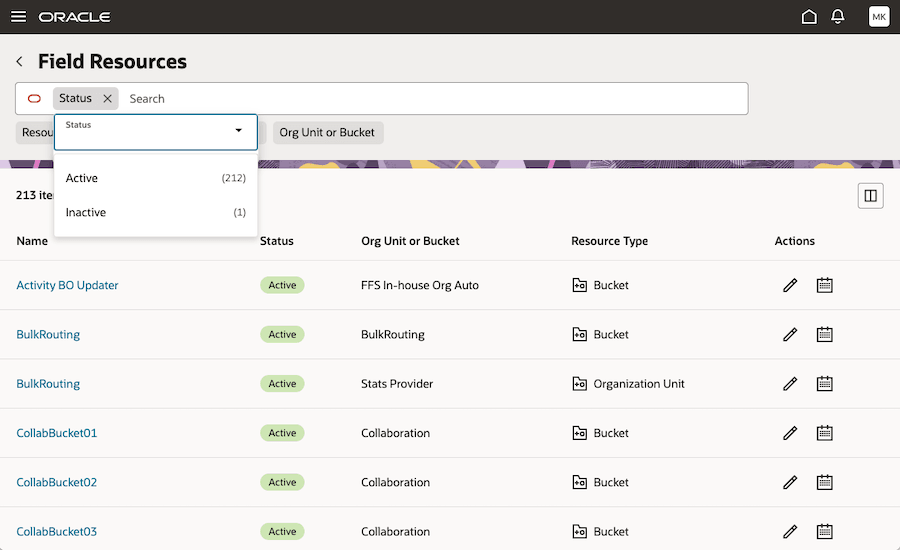
- Use Smart Search at the top of the page to quickly locate the resource you want to update. Smart filters now also display the number of matching resources before you select a filter option, giving you greater visibility and helping you refine your search with confidence.
This screenshot shows the Field Resources page with the Smart Search:
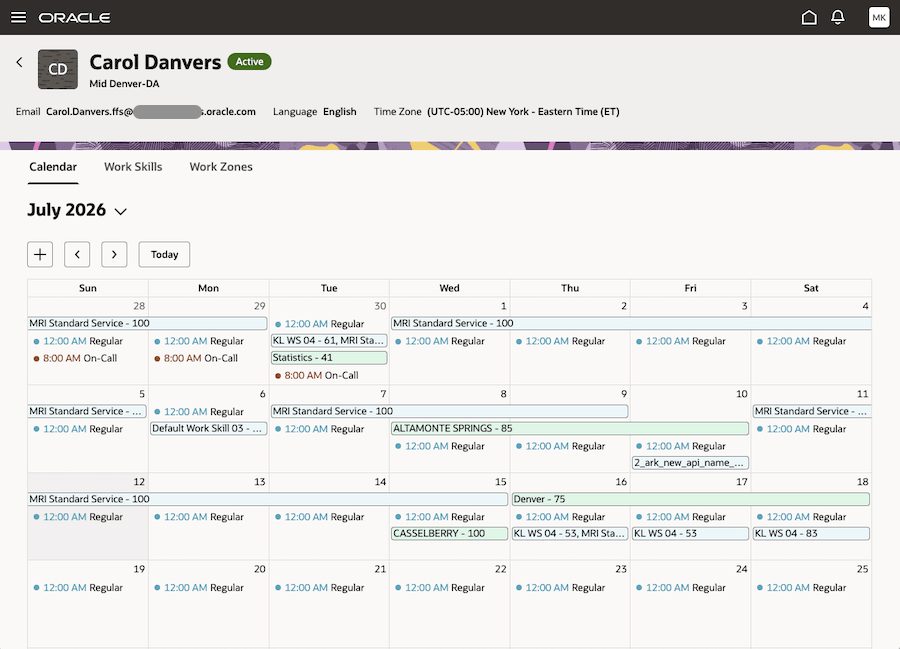
When you select the calendar icon, you see the calendar that was introduced in the previous release. In addition to resource calendar details, it now displays supplemental work skills and temporary work zones assigned to the field resource.
- Supplemental work skills: These appear as light-blue bars. Skills assigned for the same day are listed together, separated by commas. When the same set of skills applies across multiple consecutive days, one bar spans the full period.
- Temporary work zones: These appear as light-green bars. Work zones assigned for the same day are listed together, separated by commas. When the same set of work zones applies across multiple consecutive days, one bar spans the full period.
This screenshot shows the Calendar page for a field resource:
Day Overview
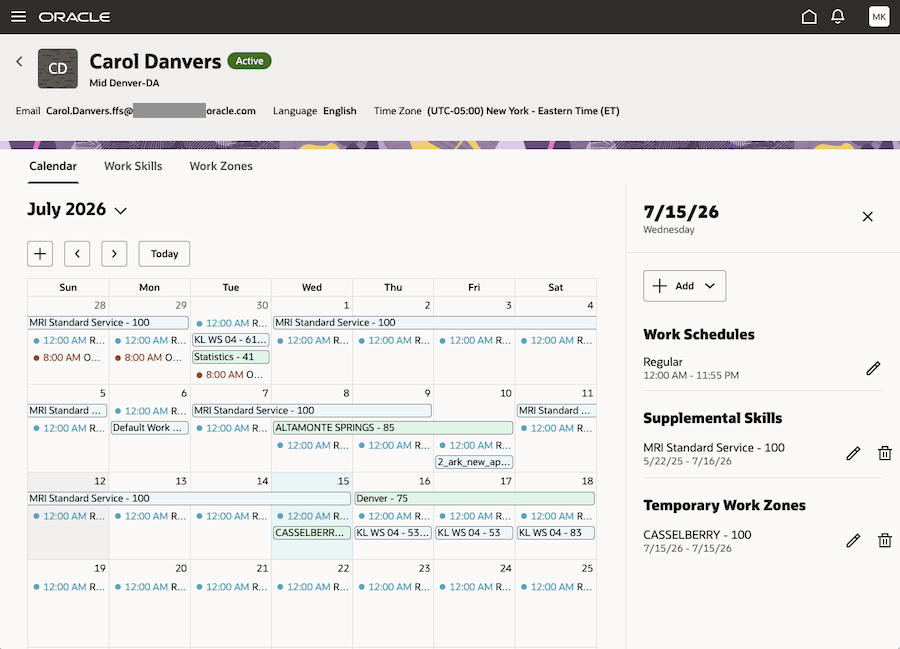
Select a date in the calendar to open the day overview drawer. It shows the field resource’s information for that day, including:
- Work schedules
- Supplemental work skills
- Temporary work zones
This screenshot shows the overview of the selected date, where the details are displayed in the drawer:
Supplemental Work Skills
Light-blue bars represent supplemental work skills. These are temporary skills added to a field resource, in addition to their regularly assigned skills.
For example, during a service outage, field resources may need to focus on urgent repair work instead of their usual installation, inspection, or maintenance activities. You can temporarily assign the required repair skills to those workers, allowing them to receive and complete repair activities during the outage. When the outage period ends, the supplemental skills expire and the workers return to using only their regular skills.
Supplemental work skills have start and end dates, so they appear on the calendar. Permanent work skills are not shown to avoid cluttering the calendar view. They do not have date limits and remain assigned until changed.
You can add, update, or remove a supplemental work skill to a field resource from the calendar view.
To add a supplemental work skill to a field resource:
- Sign in to Functional Setup Manager.
- Select the Field Service offering.
- In the Scheduling and Dispatch functional area, select Field Resources.
- Use Smart Search to locate the resource for which you want to add the supplemental work skills.
- Click the date when it should start. You will see a drawer with the overview information.
- Select Add and then select Work Skills from the menu that appears. The drawer is replaced with the form where you can provide all relevant information including the end date. Keep in mind that you can only add the supplemental work skill here so the Supplemental checkbox is always checked.
- If you want to update or remove the supplemental work skills from the day overview drawer, select Update or Remove. You can only perform these actions for today or future days. You can't update anything in the past.
Temporary Work Zones
The light-green bars represent temporary work zones. They let field resources work outside their regular zones for a defined period.
Temporary work zones require start and end dates and appear on the calendar. While active, they override the field resource's regular work zones, affecting routing, activity assignment, and capacity. This is existing behavior.
Permanent work zones are not shown in the calendar to avoid clutter. Unlike temporary zones, they do not have end dates and remain active unless changed.
You can add, update, or remove temporary work zones from the calendar for today or future dates only.
To add a temporary work zone to a field resource:
- Sign in to Functional Setup Manager.
- Select the Field Service offering.
- In the Scheduling and Dispatch functional area, select Field Resources.
- Use Smart Search to locate the resource for which you want to add the temporary work zone.
- Select the start date, and in the day overview drawer choose Add > Work Zones.
- Enter the required details, including the end date. The Temporary option is selected automatically.
- To update or remove a temporary work zone, open the day overview drawer and select Update or Remove. You can't change work zones assigned for past dates.
Work Skills Tab
The Work Skills tab on the Resource Calendar page displays all non-archived work skills in a single table. A work skill is considered archived when its end date is in the past.
This screenshot shows the Work Skills tab for a field resource:
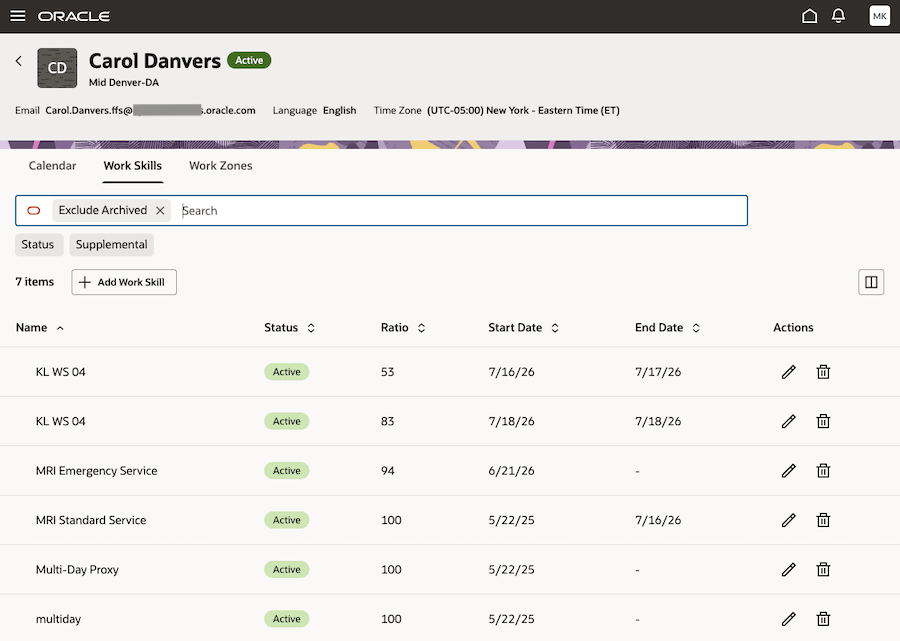
The page supports adding, updating, and removing both permanent and supplemental work skills for a resource. A smart search at the top of the table helps you quickly find a specific skill.
To add a work skill to a field resource:
- Sign in to Functional Setup Manager.
- Select the Field Service offering.
- In the Scheduling and Dispatch functional area, select Field Resources.
- Use Smart Search to locate the resource for which you want to add the work skills.
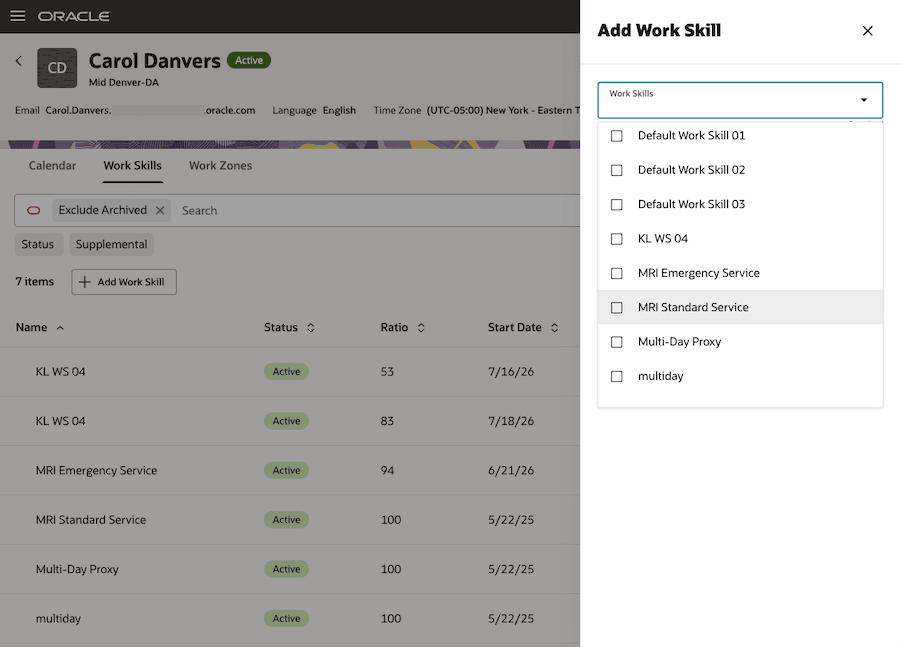
- Select Add Work Skill. A drawer opens where you can enter the work skill details.
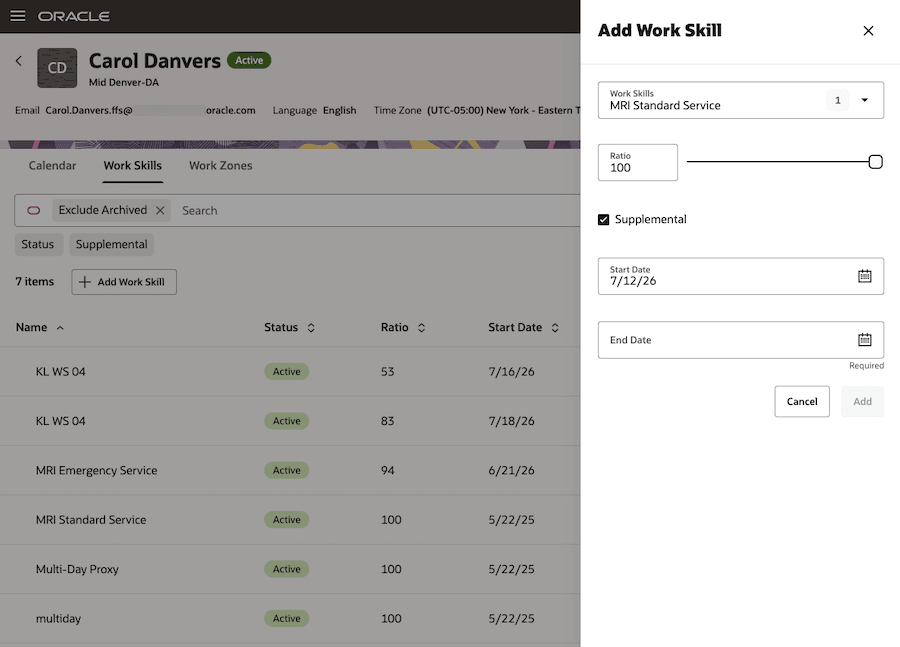
- Select one or more work skills and provide the required details. Supplemental work skills require a start date and end date.
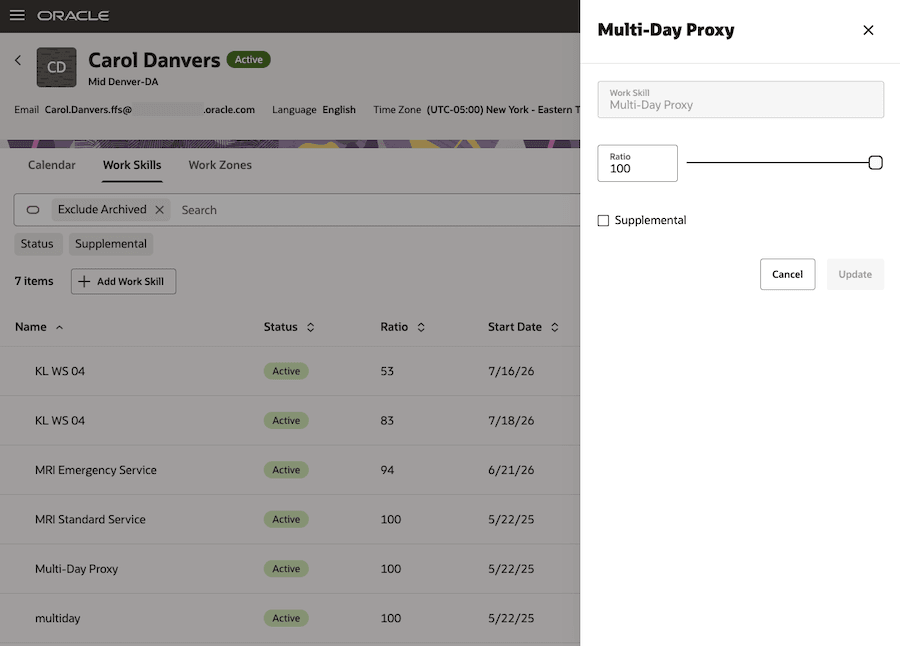
- To assign a work skill for only one day, set the end date to the same date as the start date. The same work skill can't have overlapping supplemental date ranges. If the skill is already assigned for an overlapping period, extend the existing assignment instead. When editing an existing work skill assignment, you can't change the work skill itself. This preserves the original assignment and prevents the record from being reassigned to a different skill. You can still update the assignment details, such as the skill ratio, which indicates the field resource's level of proficiency or suitability for that skill.
- You can remove a work skill assignment from a field resource when it is no longer needed.
- To remove a work skill for a field resource, select the assignment and click Remove. Removing a work skill ends the field resource's association with that skill. If the skill may be needed again later, consider updating its assignment details or, for supplemental skills, setting an appropriate end date instead.
This screenshot shows the Add Work Skill drawer:
This screenshot shows the Add Work Skill drawer with the Supplemental checkbox selected:
This screenshot shows the Add Work Skill drawer with the Supplemental checkbox deselected:
Work Zones Tab
The Work Zones tab on the Resource Calendar page displays all non-archived work zones in a single table. A work zone is considered archived when its end date is in the past.
This screenshot shows the Work Zones tab for a field resource:
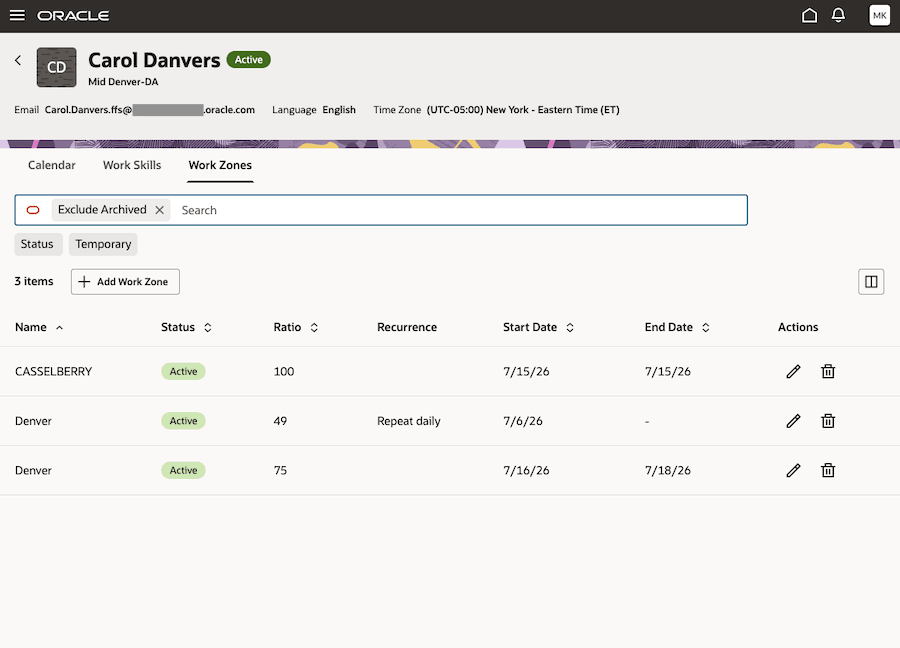
The page supports adding, updating, and removing both permanent and temporary work zones for a field resource. A smart search at the top of the table helps you quickly find a specific work zone.
To add a work zone to a field resource:
- Sign in to Functional Setup Manager.
- Select the Field Service offering.
- In the Scheduling and Dispatch functional area, select Field Resources.
- Use Smart Search to locate the resource for which you want to add the work zone.
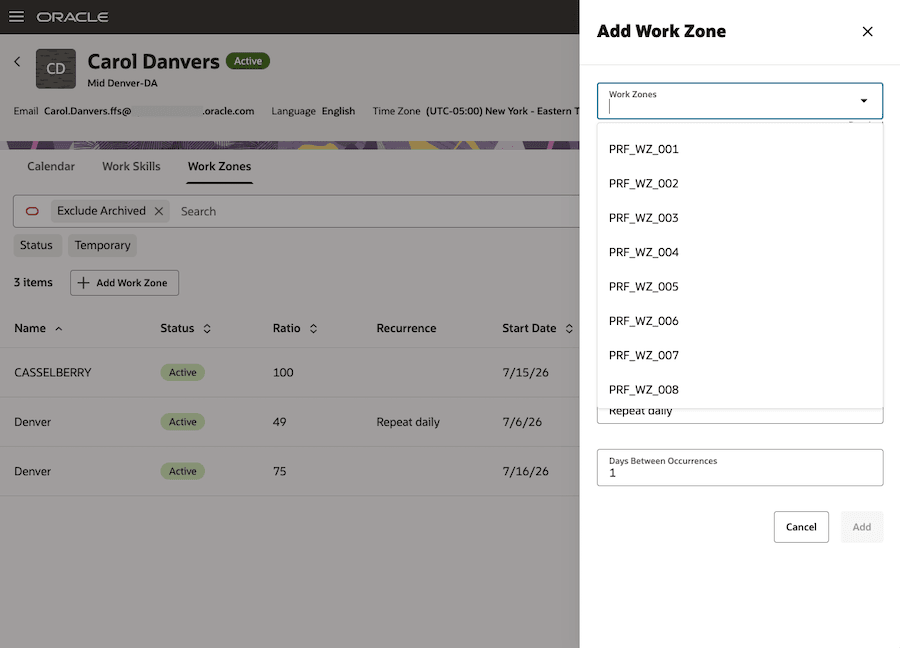
- Select Add Work Zone. A drawer opens where you can enter the work zone details.
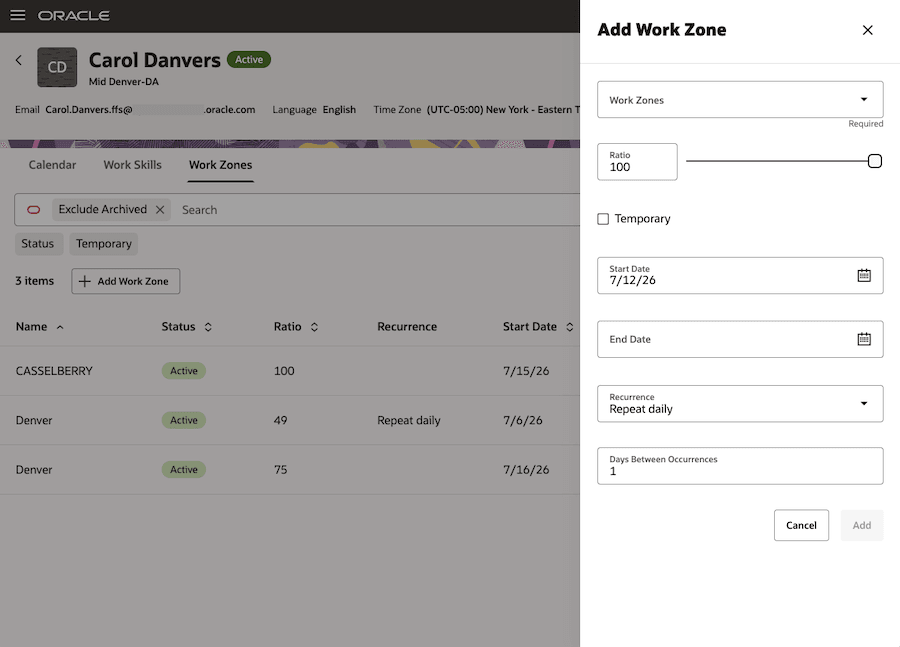
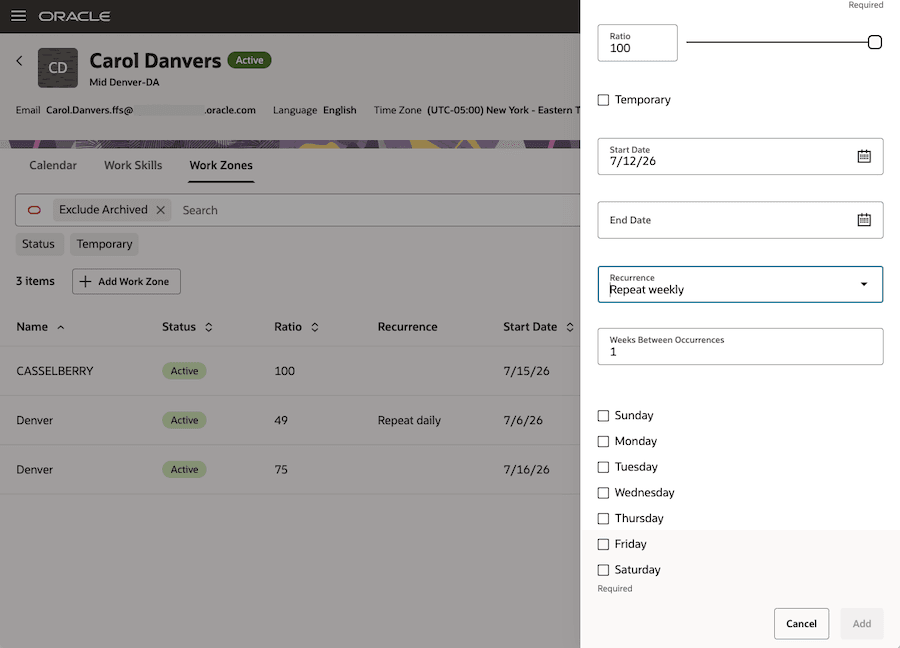
- Assign a work zone and provide the required details. A work zone can follow a repeating schedule, either daily or weekly. For example, it can apply every day, every two days, every week, or every two weeks. For weekly schedules, select the specific days when the work zone applies, such as every Monday and Wednesday. This flexibility helps reflect a field resource's regular coverage pattern. Temporary work zones require a start date and end date. When editing an existing work zone assignment, you can't change the assigned work zone. However, you can update other details, such as the ratio.
- To assign a work zone for only one day, set the end date to the same date as the start date. The same work zone can't have overlapping date ranges. If an overlapping assignment already exists, extend the date range of the existing assignment instead.
This screenshot shows the Add Work Zone drawer with the Work Zones field:
This screenshot shows the Add Work Zone drawer with the Temporary checkbox:
This screenshot shows the Add Work Zone drawer with the Recurrence fields:
You can remove a work zone assignment when it is no longer needed. Select the assignment and click Remove to delete it from the resource’s work zone list.
Business Benefits
- This enhancement provides a consistent Fusion experience by enabling administrators and dispatchers to configure mobile workers directly in Fusion, creating a consolidated location for managing resource setup.
- From the Field Resources page, teams can maintain each mobile worker's work skills, work zones, schedules, and availability in one place. Support for permanent and time-bound work skills and work zones helps organizations adapt quickly to outages, seasonal demand, and temporary coverage changes.
- Calendar visibility makes it easier to understand when a worker is available, qualified, and assigned to work in a specific area. This supports more accurate scheduling, routing, and activity assignment—helping ensure the right worker is sent to the right job at the right time while reducing manual coordination.
Steps to enable and configure
Provide the required access before using the feature. Details are in the Access Requirements section.
Tips and considerations
To use the Field Resources page, the user must have access to Functional Setup Manager and the user must be assigned a job role that includes the duty role Field Service Manager (code: ORA_FFS_FIELD_SERVICE_MANAGER_DUTY). By default, this duty role is included in the Field Service Manager job role (code: ORA_FFS_FIELD_SERVICE_MANAGER_JOB).
Access requirements
Duty role Field Service Manager (code: ORA_FFS_FIELD_SERVICE_MANAGER_DUTY)
By default, this duty role is included in the Field Service Manager job role (code: ORA_FFS_FIELD_SERVICE_MANAGER_JOB)