Enable Sub Tabs and Add Analytics to Object Edit Pages
There are three steps to adding analytics to object edit pages.
-
Set the "Is Prompted" filter in the analytic in Business Intelligence. This step is used when the requirement is to view contextual data specific to the record selected.
-
Enable the sub tab on the object page.
-
Add the analysis to the sub tab on the object page.
All of these steps are done using the Opportunities landing and edit pages. You can use these same steps for any of the object pages listed as analytics work areas in the sub table at the start of this section.
For service, the Service, Work Order, and Queue pages use the same procedures.
Set the "Is Prompted" Filter
For analytics to show on your user Opportunity pages you enable the "Is Prompted" filter on the name or object ID for the analysis. Adding this filter adds an analytic with data that relates only to the opportunity your user is currently viewing.
-
Open an existing analysis, or create a new analysis in BI.
-
In the report Criteria sub tab, select the Filter icon for the appropriate column. Under Operator, select is prompted. Leave the other options blank.
-
Click OK.
Enable Object Edit Page Analytics Sub Tabs
This procedure uses the Opportunity object landing page as an example. The procedure is the same for all object edit pages.
-
In Navigator click Application Composer.
-
Select Sales from the Application drop-down list.
-
Expand Standard Objects and go to Opportunity.
-
Under Opportunity click Pages.
-
Under Detail Page Layouts copy the standard layout or select an existing created layout where the Analytics sub tab is added.
-
Click the Reorder sub tab.
This shows the Configure sub tab option for the edit object page. 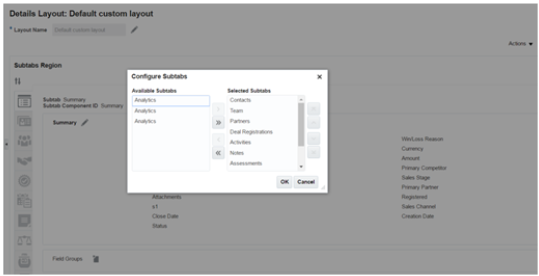
-
Click OK.
-
Click Done. The Analytics sub tab now shows on the Edit Opportunity page.
Add Analytics to Edit Object Sub Tabs
The final step is to add an analysis to the Edit Object sub tab you've just enabled. When an analysis is added to the object page, it shows data specific to the signed in user's transaction record. The specific data shows because of the "is prompted" filter being set in the analytic which passes parameters from the transaction record to the analytic. A parameter is visible in the analytic when a filter prompt is added.
-
At the top of the Home Page click the arrow next to your name and select Edit Pages. The Edit Pages dialog appears.
-
Select Job Role and choose the role to which your change should apply. Any analytics you add in this context apply only to the role you define here.
-
In Opportunities on the analytics sub tab click Add Content and navigate to the analysis you want to show on the Opportunity page.
-
Click Add next to the analysis and close the dialog. The analysis is now added to the Analytics sub tab.
-
Next step you want to either save the default parameters, or add parameters specific the object your are working with.
Click Parameters.
This shows the Parameters button on the Edit Opportunity analytic. 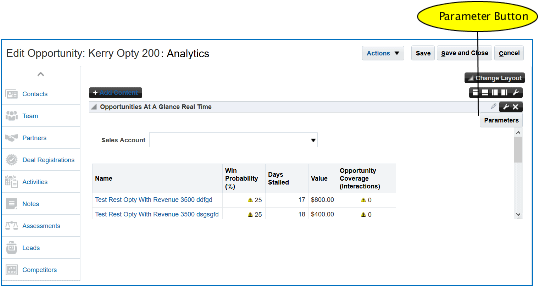
-
The parameter used is
pageFlowScopevariable and is set by default for Opportunity, Leads, Partners, Service Request and custom object pages. For example, in the case of Opportunity the parameter is#pageFLowScope.biFilterName_OpportunityOpportunityId. In the case of Service Request it's"#{pageFlowScope.biFilterName_ServiceRequestServiceRequestId}". If for any reason the parameter field is blank, insert the variable manually and save it.This shows the parameter value of #pageFLowScope.biFilterName_OpportunityOpportunityId on an Edit Opportunity ID analytic column ..#pageFLowScope.biFilterName_OpportunityOpportunityId on an Edit Opportunity ID analytic column. 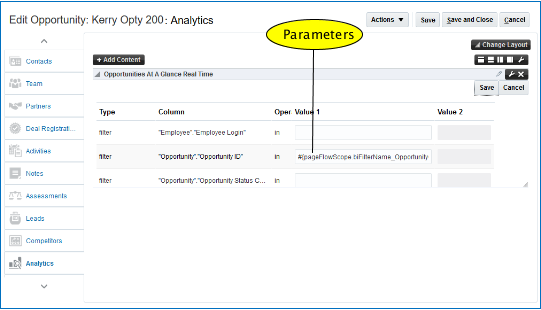
-
For the objects that aren't prepopulated with the
pageFlowScopeparameters, you can use one of thesesessionScopevariables depending on which object page you're on, and the columns available in the analytic.-
Customer ID:
#{sessionScope.zcmAnalyticsCustomerId} -
Contact ID:
#{sessionScope.hzAnalyticsContactPartyId} -
Contact Name:
#{sessionScope.hzAnalyticsContactName} -
Lead ID:
#{sessionScope.mklAnalyticsLeadId} -
Opportunity ID:
#{sessionScope.mooAnalyticsOpportunityId} -
Partner ID:
#{sessionScope.zpmAnalyticsPartnerId}
-