Schedule Snapshots of Your Sales Historical Pipeline
Keep an eye on your bottom line using the Generates Sales Historical Snapshots scheduling process. You get daily snapshots of your sales pipeline as well as snapshots of opportunity and revenue trends over time.
Snapshots are designed to work only when your enterprise calendar is configured to be either Monthly or Weekly. So you need to be sure to set up your calendar to be weekly or monthly before you start using snapshots.
The Generates Sales Historical Snapshots feature uses the Sales - CRM Historical Pipeline subject area to cull information on your key pipeline data.
The snapshot data will be retained for the new value for parameter for the days starting from the day the profile option was changed as long as the count of snapshot records (opportunity and revenue combined) does not cross 10 million records.
Configure Historical Snapshots
The Generates Sales Historical Snapshots scheduled process captures opportunity and revenue snapshots for open opportunities and opportunities closed within the time period you specify. You can set up a snapshot to run once, or set it up to run daily, weekly, monthly, yearly, or on your own time frame. You can also choose the number of days after which opportunities have been closed to continue to take a snapshot of the opportunity and its corresponding revenue information.
To configure your Sales Historical Snapshots scheduled process:
-
Navigate to Setup and Maintenance, All Tasks.
-
Under Name, search for Manage Opportunity Profile Options.
The search results returns the Manage Opportunity Profile Option in the bottom of the window.
-
Click Go to Task on the row that holds the Manage Opportunity Profile Options search result. The Manage Opportunity Profile Options page appears.
-
Under Profile Option Code, enter
MOO_MANAGE_SALES_HISTORICAL_SNAPSHOT_CONFIGURATION. Search for that profile. -
Under Profile Values on the right ensure that the value are
C=120,D=120,W=58,M=14,Q=5.The Profile Values are defined the following ways:
-
C is number of create snapshots for closed opportunities closed within the last C days. This value must be greater than zero.
-
D is number of days to retain daily snapshots. This value must be greater than zero.
-
W is umber of weeks to retain weekly snapshots if the enterprise calendar is a week based calendar.
-
M is number of months to retain monthly snapshots if the enterprise calendar is a month based calendar.
-
Q is number of quarters to retain a quarterly snapshot.
-
An upper limit of 10M snapshot records (opportunity and revenue records combined) is supported and once the record limit is reached, the snapshot process automatically purges records by oldest snapshot date until the record count is brought under the limit.
Schedule Historical Snapshots
You can schedule your Sales Historical Snapshots processes either from the SUI, or from the desktop UI.
To schedule your sales historical snapshots processes:
-
From the menu options choose More then Scheduled Processes.
-
Click the Schedule New Process tab.
This figure shows the Schedule New Process option from the Scheduled Process window. 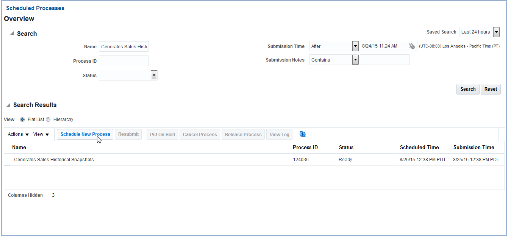
-
If you haven't already run this process, in which case it will show under the search results on the Scheduled Processes starting page, then you will search in the Scheduled New Process dialog. Click to view all of the choices. At the bottom there is a Search option. Click Search and enter Generates Sales Historical Snapshots. In Search Results highlight Generates Sales Historical Snapshots and click OK. The Schedule New Process dialog appears. Click OK again.
This figure shows the Search and Select dialog for choosing your Generate Sales Historical Snapshots process. 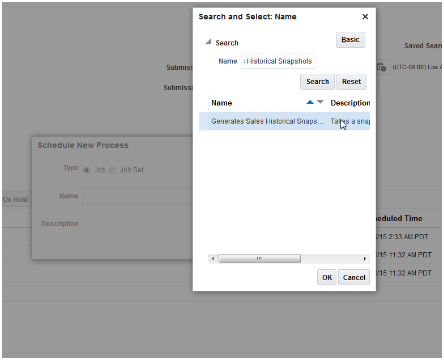
-
In the Process Detail dialog click the Advanced tab.
Here you set set when your process runs,, whether it is daily, weekly, or monthly. You will also set the start and end date.
This figure shows the scheduling options for your Sales Historical Snapshots processes. 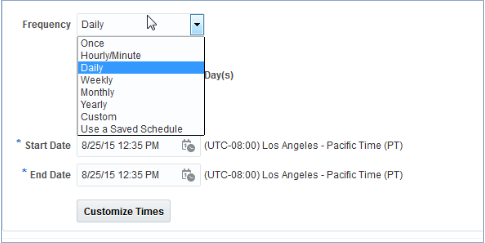
-
Click the Notification tab and define whom you want to be notified if the process run is successful, if it generates an error, or if there are warnings.
-
When you're finished with your scheduling process details for times, frequency, and notifications, click Submit. Your Generate Sales Historical Snapshot is now completed.