Create a Classification and Credit Category Hierarchy
This example shows how to create a four-tier classification rule and credit category hierarchy. Use the hierarchy to classify transactions and match those transactions with performance measures, forming the basis for attainment calculation.
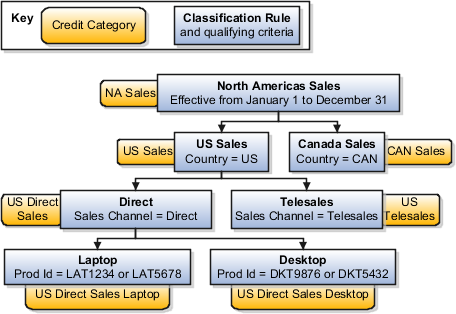
This table describes each rule in the hierarchy. All of the rules in this example hierarchy are effective from January 1 through December 31.
|
Hierarchy Level |
Classification Rule Name |
Parent Rule |
Rule Qualifying Criteria |
Credit Category |
|---|---|---|---|---|
|
1 |
North Americas Sales |
None |
None |
NA Sales |
|
2 |
US Sales |
North Americas Sales |
Country = US |
US Sales |
|
2 |
Canada Sales |
North Americas Sales |
Country = CAN |
CAN Sales |
|
3 |
Direct |
US Sales |
Sales Channel = Direct |
US Direct Sales |
|
3 |
Telesales |
US Sales |
Sales Channel = Telesales |
US Telesales |
|
4 |
Laptop |
Direct |
Prod Id = LAT1234 or LAT5678 |
US Direct Sales Laptop |
|
4 |
Desktop |
Direct |
Prod Id = DK9876 or DK5432 |
US Direct Sales Desktop |
In the Compensation Plans work area, do these tasks:
-
Create credit categories
-
Create classification rules, including associating a credit category with each rule
Create Credit Categories
Perform these steps seven times, once for each credit category.
-
Click Create in Manage Credit Categories.
-
Enter the Name.
-
NA Sales
-
US Sales
-
CAN Sales
-
US Direct Sales
-
US Telesales
-
US Direct Sales Laptop
-
US Direct Sales Desktop
-
-
The first six times, click Save and Create Another and repeat steps 2 and 3.
After creating the final category, click Save and Close to return to the Manage Credit Categories page.
Create Classification Rules and Hierarchy
-
Create the top-level rule.
-
Create the descendant rules, including credit categories and relevant qualifying criteria.
Step 1: Create the Top-Level Rule
-
Click the Manage Classification Rules task.
-
On the Classification Rules Hierarchy section toolbar, click Create Hierarchy.
-
In the Name field, enter North Americas Sales.
-
In the Start Date field, select January 1, 2021.
-
In the End Date field, select December 31, 2021.
-
Click Save and Close to return to the Manage Classification rules page.
-
-
In the Classification Rules Hierarchy section, select the North Americas Sales rule that you just created.
-
In the Details section, select the Credit Category tab.
-
On the toolbar, click Add Row.
-
In the Name field, search for and select NA Sales.
-
-
Click Save.
Step 2: Create the Descendant Rules
Using the data in the initial diagram and table, perform these steps six times to create two descendant classification rules under North Americas Sales, US Sales, and Direct rules, respectively.
-
In the Classification Rules Hierarchy section, select the appropriate parent rule.
-
On the toolbar, click Create Node.
-
In the Name field, enter the appropriate classification rule name.
-
Click Save and Close.
-
-
In the Classification Rules Hierarchy section, select the descendant rule that you just created.
-
Select the Credit Category tab.
-
On the toolbar, click Add Row.
-
In the Name field, search for and select the credit category name that corresponds to this classification rule.
-
-
Select the Qualifying Criteria tab.
-
On the toolbar, click Add Row.
-
In the Name field, add the attribute that corresponds to this classification rule.
-
In the Qualifying Attribute Values section, click Add.
-
In the Values field, add the value that corresponds to this classification rule.
-
-
-
Click Save.
Tip:View the entire qualifying criteria for a credit rule including the criteria the rule inherits from its parents by clicking View Full Qualifying Criteria in the Rules Hierarchy region.