Configure Navigation
Use the Structure tool to configure which selections appear in the Navigator, which icons area available on the springboard, and which infolet tabs are visible to users.
Create and Enter a Sandbox with the Structure Tool
Create and enter a sandbox with the Structure tool:
-
Navigate to .
-
Click Create Sandbox.
-
In the Create Sandbox page, enter a name and select Structure as the tool.
-
Click Create and Enter.
The Sandbox toolbar appears at the top of the page.
-
From Tools, select Structure to open the Structure page.
Specify What Users See on the Navigator and in the Springboard
With the Navigation Configuration tab selected, you can configure what appears on the Navigator and springboard. Just click the item or group name to edit.
-
Specify where and for whom the item shows up by making a selection from Show on Navigator and Show on Springboard. You can choose to display individual items in the Navigator only, in both the Navigator and springboard, or in neither. You can't display an item in the springboard only. If you hide an item in the Navigator, it gets automatically hidden on the springboard as well. Here are the options:
-
Yes: displays the item for all users with the right security permissions.
-
No: hides the item from all users in all applications.
-
EL Expression: lets you add an EL Expression that must be true to display the item.
Add EL Expression conditions to display items or groups selectively to users with specific job roles, or even by user name. Here are some examples of EL Expressions you can use:
Who can see the group or page entry
EL Expression and Example
Only users having any of the specific roles
#{securityContext.userInRole['<Role_Name>']}#{securityContext.userInRole['ORA_FND_APPLICATION_ADMINISTRATOR_JOB,ORA_PER_EMPLOYEE_ABSTRACT']}Only users not having any of the specific roles
#{!(securityContext.userInRole['<Role_Name>']}#{!(securityContext.userInRole['ORA_FND_APPLICATION_ADMINISTRATOR_JOB,ORA_PER_EMPLOYEE_ABSTRACT'])}Only users having all of the specific roles
#{securityContext.userInAllRoles['<Role_Name>']}#{securityContext.userInAllRoles['ORA_FND_APPLICATION_ADMINISTRATOR_JOB,ORA_PER_EMPLOYEE_ABSTRACT']}Only users not having all of the specific roles
#{!(securityContext.userInAllRoles['<Role_Name>']}#{!(securityContext.userInAllRoles['ORA_FND_APPLICATION_ADMINISTRATOR_JOB,ORA_PER_EMPLOYEE_ABSTRACT'])}Only users having access to specific resources, for example, the Social work area
#{securityContext.userGrantedResource['resourceType=FNDResourceType;resourceName=FND_Launch_Social_Menu;action=launch']}
-
-
Rename a group and change its icon.
-
Move items to a different group by using the arrow keys, or by selecting a different group while editing the item. You can't nest groups within other groups.
For example, move both Workspace items from the Workspace group to the Sales group. There are two Workspace items because Oracle provides two different versions of Workspace: one for sales and one for service. Users see only one icon on their home page, depending on their security settings.
-
Copy items.
-
Move items within a group using the up and down arrow keys.
For example, you may want to move the Workspace icon to be the first icon users see on their page.
-
Get rid of the Others group.
Any top-level items (items that aren't part of a group in the Structure tool) display in the Others group in the UI. You can't rename that category or move it, but you can hide the group by moving or hiding all items in it.
-
Create new groups and add your own content.
You can create new groups from the Create menu and display them selectively by adding EL Expressions. You can copy items into the group or create your own items by selecting Create Page Entry from the Create menu.
Note:To simplify future functionality updates, don't create groups to provide different views for different sets of users, however. Add the EL Expressions to individual items instead.
Example of Hiding a Whole Navigator Group You Don't Use
If you aren't implementing Oracle Global Human Resources Cloud, then hide the whole Me group, which appears in the Navigator for all sales users by default.
-
Click the Me group name.
-
Set Show on Navigator to No. Hiding the group hides all of the individual items in the group as well.
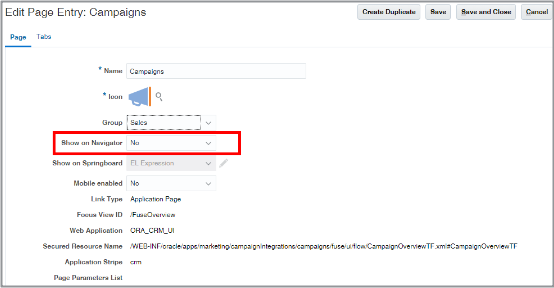
Example of Hiding an Individual Sales Feature You Don't Use
If you aren't implementing Oracle Marketing Cloud, then remove the Campaigns item from both from the Navigator and springboard:
-
Open the Sales group to display the different sales features.
-
Click Campaigns
-
In the Edit Page Entry page, set Show on Navigator to No.
Removing the selection from the Navigator automatically removes the link from the springboard as well. You can't display a selection on the springboard if it's not displayed in the Navigator
Selectively Hide Navigation
You may want to leave technical tasks, such as importing data or monitoring scheduled processes, to sales administrators. To remove the navigation links for a subset of users, you edit the EL Expression for these items and add your conditions. For example, here's how to remove the Scheduled Processes navigation from both the Navigator and springboard for all salespeople with the Sales Representative job role:
-
Open the Tools group to display its selections.
-
Click the second Scheduled Processes item.
Here's a screenshot of a portion of the Navigation Configuration page highlighting the item.
 Note:
Note:Oracle includes two Scheduled Processes items in the list because it supports two different interfaces for scheduled processes. If you aren't sure which item to edit, add your condition to both.
-
Click Edit for Show on Navigator to edit the EL Expression.
The Expression Editor displays the expression provided by Oracle. In this example:
#{(securityContext.userGrantedResource['resourceType=FNDResourceType;resourceName=FND_Scheduled_Processes_Menu;action=launch']) and(Profile.values.ESS_ALLOW_CLASSIC_INTERFACE ne null) and (Profile.values.ESS_ALLOW_CLASSIC_INTERFACE ne 'Y')} -
In the Expression Editor, append the condition:
and!(securityContext.userInRole['ORA_ZBS_SALES_REPRESENTATIVE_JOB'])to the original expression.Here's the resulting expression:
#{(securityContext.userGrantedResource['resourceType=FNDResourceType;resourceName=FND_Scheduled_Processes_Menu;action=launch']) and(Profile.values.ESS_ALLOW_CLASSIC_INTERFACE ne null) and (Profile.values.ESS_ALLOW_CLASSIC_INTERFACE ne 'Y')and!(securityContext.userInRole['ORA_ZBS_SALES_REPRESENTATIVE_JOB'])} -
Click Validate to check for errors.
-
Click OK.
-
It's a good idea to click Save after each edit to make sure your changes are saved.
-
Repeat the steps to add the condition to the Show on Springboard EL Expression.
Here's a screenshot of the Expression Editor with the edited Show on Springboard expression: :
#{(Profile.values.ESS_ALLOW_CLASSIC_INTERFACE ne 'Y'
and Profile.values.ESS_ALLOW_CLASSIC_INTERFACE ne null)and!(securityContext.userInRole['ORA_ZBS_SALES_REPRESENTATIVE_JOB'])}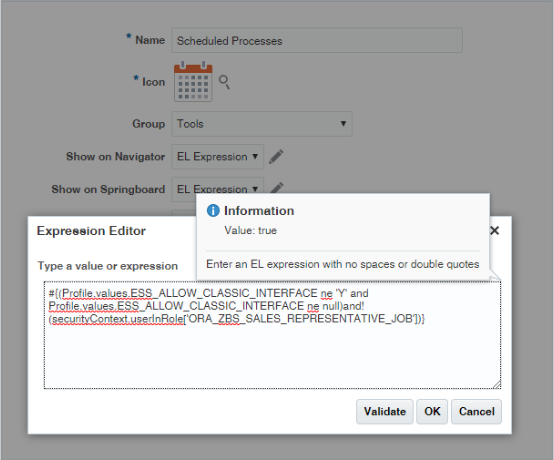
Specify Which Infolet Tabs Appear and in Which Order
You can specify which infolet tabs appear and in which order.
-
While in the Structure tool, click the Home Configuration tab.
-
Use the arrow keys to change the order of the infolet tabs.
-
To edit the infolet tab name and to specify how the infolet page gets displayed, click its name:
-
Yes: displays the infolet tab for all users with the right security permissions.
-
No: hides the infolet tab from all users in all applications.
-
EL Expression: lets you add an EL Expression condition that must be true to display the infolet page.
-
-
To create additional infolet tabs with your own content, you can edit the five sales tabs crated for this purpose: Sales Page 1 through Sales Page 5.