Create the Sales Territory Hierarchy
With your territory proposal open, create the sales territory hierarchy starting with the top territory. For each territory you create, enter the name of the salesperson or manager who owns the territory, and the values for the dimensions that form the territory boundaries.
When you create child territories, the application automatically copies all the dimension values from the parent territories to speed up entry.
Create the Overall Catchall as the Top of the Hierarchy
Here's how to create the territory at the top of the sales territory hierarchy as the overall catchall territory. The top territory is usually owned by a senior manager or executive. Because you don't want executives troubleshooting territory assignment, you must add a second resource to do the troubleshooting.
-
In the Territories region of your territory proposal, click Create.
-
On the Create Territory page, enter the territory name, for example,
US Product
Sales
. -
Enter the resource who is the owner of the top territory, most likely the VP of Sales:
-
From the Owner list, select Search.
-
Search for the resource name using any of the criteria.
-
Select the name and click OK.
The owner is now listed on the Territory Team tab in the Additional Information section at the bottom of the Create Territory page.
-
-
From the Type list, select Prime.
-
From the Enable Forecasting list, select Prime only. This setting enables the territory to be used for forecasting.
-
Now add the sales administrator or another resource for troubleshooting any accounts and opportunities that get assigned to the catchall territory.
-
In the Territory Team tab in the Additional Information region, click Select and Add (the document icon with a plus sign).
-
Search for the resource using any of the fields.
-
Select the resource from the search results and click OK.
-
-
Click Save and Close.
Your new territory appears in the Territories table of your proposal.
-
With the territory selected in the Territories table, click the Coverages tab in the Details region at the bottom of the page.

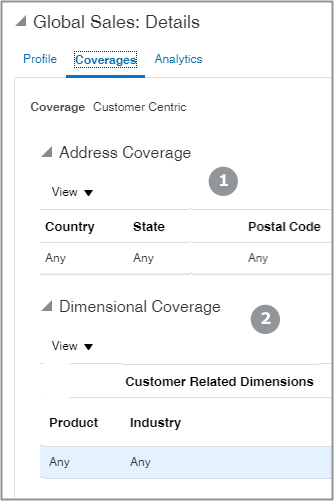
The Address Coverage section (callout 1 in the screenshot) lists the address elements you enabled for territories, all with the value of Any. The Dimensional Coverage section (callout 2), includes all of the other dimensions you are using, also with the value of Any for each. A setting of Any is what you want for your overall catchall territory.
Note: If the Coverages tab is blank, then your territory configuration is incomplete. Navigate to Scheduled Processes and check to see whether the Synchronize Stage Environment process completed successfully. See the topic Enable Territory Dimensions for more information.You're now ready to add the rest of the territory hierarchy.
Add the Rest of the Hierarchy
With the territory proposal open, add the rest of the sales territory hierarchy from the top down. Here's how to add a territory:
-
Select the parent territory in the Territories table.
-
Click Create Child of Selected Territory (the plus sign icon).
-
On the Create Territory page, enter the territory name.
-
Enter the owner for the territory.
-
Select the territory type, either Prime or Overlay depending on the territory you're creating.
-
From the Enable Forecasting list, select Prime only for territories involved in forecasts. For overlay territories, select Disabled. The setting of Disabled removes the territory from forecasting.
-
Click Save and Close.
You're returned to the Territory Proposal page. You're now ready to enter the values for the different territory dimensions.
-
If you're creating a territory with no coverage, then select the territory in the Territories table and do the following:
-
In the Coverages tab, select a row showing coverage values.
-
From the Actions menu, select Remove all.
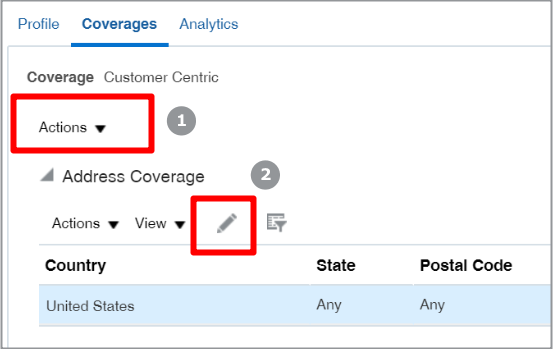
Here's a screenshot of the Coverages tab. Callout 1 highlights the location of the Actions menu.

The coverage now shows a No data to display message.
-
-
If you're creating a territory with coverage, then select the territory in the Territories table, and enter the values for the dimensions:
-
For the address dimension, do the following:
-
In the Address Coverage section, select any row and click Edit (the pencil icon, callout 2 in the screenshot).
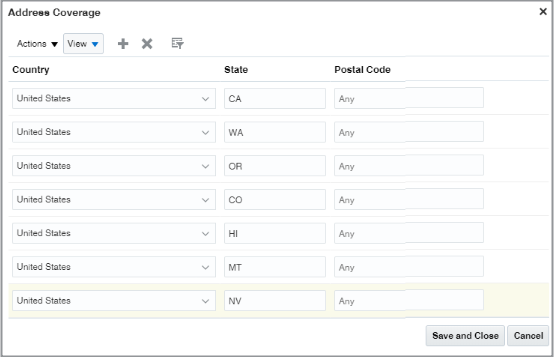
Your action opens up a separate window to enter all of the address values for the territory.
-
In the separate Address Coverage window, click Add and enter the values for each address element. Add as many rows as you need to cover all the possible address values in your data:
-
Except for the Postal Code field, the application matches your entries exactly, but the matches are not case-sensitive. If your data includes a variation of spellings, then you must add rows for them all. For example, if your data includes
CA,California, andCa., then you must include a row for each spelling variation to assure correct assignment.Here's a screenshot of the Address Coverage window with a row for each of the different states in a western US territory.

-
If you are creating territories using postal codes, such as US ZIP codes, you can enter ranges of values and use the percent sign (%) to indicate partial matches.
-
-
-
Here's how to enter values for the other dimensions in the Dimensional Coverage section:
-
In the Dimensional Coverage section, click Edit.
-
Select the dimension from the Dimensions list.
The Edit Coverage window shows a list of available values in the left Available Dimension Members pane.
-
Move the values you want to use for the territory to the Selected Dimension Members pane on the right.
Tip: If the Product dimension shows the wrong products, go to the Scheduled Processes work area and run the Refresh Denormalized Product Catalog Table for BI process. The wrong products may show up if you changed the root of your sales catalog. -
Click Save and Close.
You're returned to the Territory Proposal page.
-
-
After you complete adding territories and specifying coverages, you're ready to activate your territory proposal.