How can I enable multiple addresses for accounts?
Here's how to enable multiple addresses for accounts. You can use similar steps to enable multiple addresses for contacts and for other sales objects that display addresses, such as households.
Create and Enter a Sandbox
Create and enter a sandbox with the Application Composer tool enabled.
- In the Navigator, click .
- Click Create Sandbox.
- Enter a sandbox name.
- Select Active for Application Composer.
- Click Create and Enter.
- From the sandbox Tools menu, select Application Composer to enter the tool.
Display Multiple Addresses on the Account Profile Tab
While in Application Composer, expose Multiple Addresses in a custom layout:
-
Open the Standard Objects node on the left panel.
Open the Account node.
-
Click Pages
-
On the Application Pages tab, scroll down to the Details Page Layouts section.
-
Select Standard Layout and click Duplicate.
-
In the Duplicate Layout window, enter a new name for your layout or just click Save and Edit.
-
Drill down into your layout.
-
Click the Profile tab in the Subtabs Region.
-
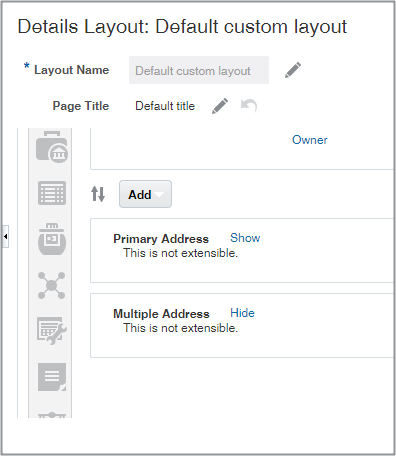
Scroll down until you see the Primary Address and Multiple Address selections.
-
Click the Show link for Multiple Address.
-
Click Hide for the Primary Address.
Multiple Address now displays Hide and Primary Address displays Show. Here's a screenshot:
 Note:
Note:You can't expose both regions at the same time.
-
Click Done to leave Application Composer.
Expose the Type Field
Expose the address Type field in the Add Address window. As they add addresses, salespeople use the field to indicate if an address is a sell-to address, a bill-to address, and so on. Exposing the field on the Add Address window automatically adds it to the Edit Address window as well.
-
While in the sandbox and Application Composer, open the Standard Objects node on the left panel.
Open the Address node.
-
Click Pages
-
On the Application Pages tab, Creation Page Layouts section, select the Standard Layout and click Duplicate.
-
In the Duplicate Layout window, enter a new name for your layout or just click Save and Edit.
-
Drill down into your layout.
-
Click Edit (the pencil icon) for Create and Edit Address.
- In the Configure Detail Form section, locate the Type field in Available Fields pane and move it to the Selected Fields pane.
- Click Save and Close.
-
Click Done to leave Application Composer.
Publish Your Sandbox
-
Click .
-
On the Sandboxes page, click the name of the sandbox.
-
Click Publish.
-
Click Continue to publish.
-
When the sandbox completes publishing, click Done.