Enable the Mass Update Action
You enable mass update for the legacy work areas that still haven't been updated to behave like Workspace, by creating a custom layout of the landing page in Application Composer. Within the layout, you specify which fields users can update.
Create and Activate a Sandbox
-
Click .
-
On the Sandboxes page, click Create Sandbox.
-
Enter a name for your sandbox.
-
In the All Tools section, select Application Composer as the tool you want to activate for this sandbox.
-
Click Create and Enter to create and enter the sandbox.
The application displays a bar at the top of the page with the sandbox name.
Enable the Update Action and Specify the Fields in a Custom Layout
-
Open Application Composer, .
-
In the navigation tree, expand Standard Objects, and then expand the object you want to modify. For example, expand the Opportunity object.
-
Within the object you're modifying, click the Pages node.
-
Ensure that the Simplified Pages tab is selected.
-
In the Landing Page Layouts region, select the Standard Layout and click Duplicate Landing Page Layout (the document icon).
-
In the Duplicate Layout window, enter a name for your layout. The Standard Layout is the source.
-
Click Save and Edit.
Notice that your new layout is now active. The Standard Layout you copied is inactive.
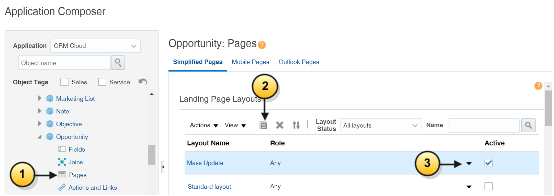
Here's a screenshot of Application Composer showing the Opportunity: Pages region. Callouts highlight some of the features.
Callout Number
Description
1
Pages node
2
Duplicate Landing Page Layout button
3
Role Name (down arrow icon) that you use to specify job roles that see the layout.
-
Edit the new layout to add the Update action and select the fields that users can update. Here are the steps for the Opportunities landing page:
-
Click Edit (the pencil icon) on the Fuse Opportunity Overview Table.
-
Navigate to the Configure Detail Form: Buttons and Actions region.
-
In the Available Actions window, move the Update action to the Selected Actions pane. You can either double-click or use the arrow buttons.
-
Scroll down to the Configure Mass Update Fields region.
-
Move the fields you want users to update to the Selected Fields column.
Tip:If entry in a field depends on the value of another field, you must expose both fields. For example, users can't enter a sales stage unless they select the sales method first.
-
Click Save and Close, then Done.
-
-
By default, your custom layout is available to everyone. Here's how to restrict use of layout to specific job roles:
-
Select the layout and click Role Name (the down arrow icon).
-
In the Select: Roles window, click Show available predefined roles and Specific Roles.
-
Move the job roles to the Selected Roles column and click OK.
-
Test and Publish the Sandbox
Test your new layout in the work area where you enabled it and publish the sandbox.
-
Click on the sandbox name in the sandbox toolbar and select Publish.
-
Click OK in the dialog box to navigate to the Sandbox Detail page.
-
In the Sandbox Detail page, click Publish again.
-
Click Continue to Publish in the warning message to confirm that you want to publish.