How to Handle Leads from External Sources
The leads you get from the web, from trade shows, from marketing campaigns, or from lists you purchased aren't always of the highest quality. You want to contact the potential customer and verify the information before creating new account and contact records in your application. And you don't want to pass worthless leads to your highly paid and busy field sales.
This chapter outlines how you can set up a process for creating, verifying, and qualifying these kinds of net new leads. We are calling these leads "net new" leads because the account and contact information stays in the lead until the lead is qualified and converted. Our use case follows the common practice of using inside sales to do the initial lead qualification. But there's nothing stopping you from modifying the use case to suit your needs.
Use Case Overview
The fictitious company, Vision Corp., uses a team of inside sales representatives to verify the information in leads. All qualified leads are automatically assigned to field sales representatives for further assessment and conversion into opportunities. Here's an overview of the process:
-
Net new leads can get created in one of three ways:
-
The leads are imported, perhaps by a sales administrator using the import macro you download from My Oracle Support.
-
The leads get created from an integration with a marketing application, such as Oracle Eloqua.
-
A salesperson can also create net new leads manually in the UI.
-
-
Using an assignment rule you create, the application automatically assigns all inside sales representatives to the sales team on each of the imported leads. Being on the sales team, makes it possible for the inside sales representatives to view and update the leads, but it doesn't assign them ownership of the leads. Salespeople become owners of a lead only when they accept a lead.
-
Individual inside sales representatives review the list of leads and accept the leads they want to work on. Accepting a lead lists you as the lead's owner.
-
The inside sales representatives verify the information in each lead. They check for potential duplicates, contact the customer, and answer a standard list of questions in a qualification template that you set up for them.
-
When leads meet the qualification criteria, the inside sales representatives set the leads to the qualified status.
-
If the leads don't meet the criteria, the inside sales representatives retire them instead.
-
The application automatically assigns the qualified lead to sales territories in the field sales organization.
-
Field sales representatives review the individual leads assigned to them, and convert the promising ones to opportunities.
The representative doing the conversion becomes the owner of the new opportunity.
-
During the conversion process, the application creates new account and contact records of type prospect. The lead is automatically set to a converted status and linked to the account and opportunity records.
Here's a diagram that illustrates the processes:
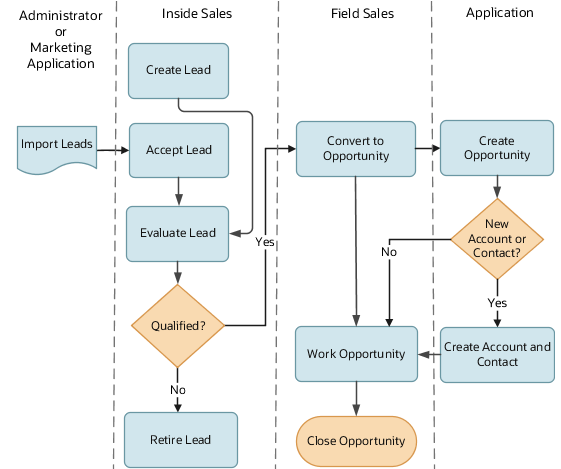
How Inside Sales Works Sales Leads
Here's how salespeople work leads in the Classic Sales UI. Because of the changed UI, the process in the Sales for Redwood UI is a bit different. For information about working with Leads in Sales for Redwood, see the Leads chapter in the Using Sales for Redwood guide.
-
To find the imported leads to work on, the inside sales representatives select the Unaccepted Leads list (callout 1 in the screenshot).
You create the saved search for this list during setup.
-
Representatives accept ownership of the leads that they want to work on, either by:
-
Selecting the Accept from the Actions list (callout 2).
-
Or by drilling down on the lead name (callout 3) and clicking the Accept button in the Edit Lead page.
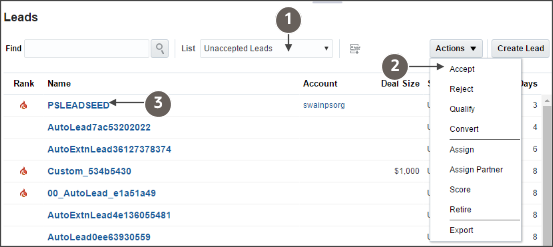
By accepting the lead, a representative becomes the lead owner and can now see the lead listed in the My Open Leads list.
-
-
Inside sales representatives check if the account and contact information in the lead duplicates information already in the sales application. In our use case, the representatives check for duplicates manually in the leads UI by selecting the Check for Duplicates action.
-
The representatives contact the customer and qualify the leads, guided by the questions you set up as part of a qualification template. Using the qualification template, while not mandatory, ensures that everyone follows the same procedure for qualifying leads.
Note: Qualification templates are replaced by Orchestration processes in Sales for Redwood.Here's a screenshot of a sample qualification template in the Classic Sales UI. Salespeople access the template on the Qualification tab (callout 1) of the Edit Lead page. They answer the questions that you provide (callout 2). These questions are organized in question groups, which serve as headings on the page. As they answer the questions, salespeople get visual feedback on the quality of the lead (callout 3). You select the ratings and color schemes during qualification template setup.

-
When inside sales representatives set the lead status to Qualified, an assignment process assigns the lead to the appropriate sales territory. The process also adds the appropriate field sales representatives to the sales team.
-
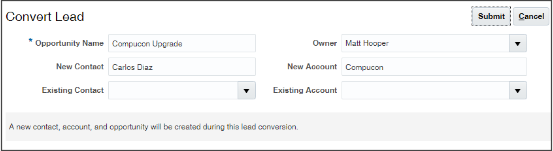
The field sales representatives convert the lead to an opportunity by selecting the Convert from the Actions menu after viewing the lead.
-
You can rename the opportunity and change ownership in the Convert Lead window (shown in the screenshot).
How You Import Leads Depends on the Lead Type
How you import leads depends on whether you're importing the net new leads described in this chapter or leads linked to existing accounts and contacts. Here are the main differences:
-
Net new leads
You import the account and contact as part of the lead business object. Account and contact records are created only when the sales representatives convert the leads to opportunities. You can use the Excel macro provided by Oracle to import these types of leads.
-
Leads linked to existing accounts and contacts
You must use IDs to reference the existing accounts and contact record in your import file. You can use the IDs you generated in your account and contact import files or you can export IDs from your application. You cannot use the leads import Excel macro for this type of import.
This chapter discusses only the import of net new leads using the import macro. See the Understanding Import and Export Management for Classic Sales and Fusion Service guide to understand how to import the other types of leads.