Review the Resource Hierarchy You Created and Upload User Images
Now that you have created users, you can verify the resource hierarchy in the Resource Directory and upload user images. The Resource Directory displays a visual representation of the hierarchy and lets you view and edit details for each resource.
The Resource Directory is part of the HCM application, so much of the detailed information you see is only used if you implement sales together with HCM. For example, your sales application doesn't track or use resource skills and doesn't use resource teams, so you can ignore these.
Verify the Resource Hierarchy
-
Click Resource Directory in the Navigator.
-
In the Resource Directory page, search for the top user (the CEO) by first name using the Search: Resources panel on the left of the page.
-
Click the user name link in the Search Results.
-
Here's what you can do on the Resource page:
-
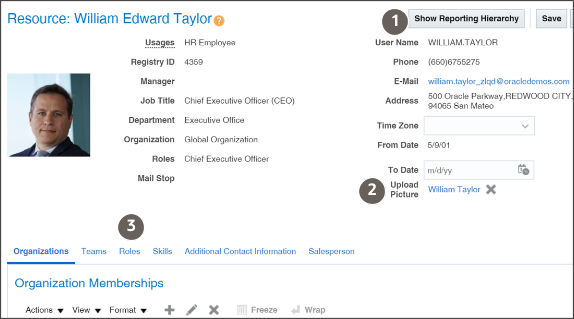
View the visual representation of the resource hierarchy by clicking Show Reporting Hierarchy (callout 1 in the screenshot).
-
Upload a picture of the user by clicking Upload Picture (callout 2).
-
Review the job and abstract roles provisioned to the user on the Roles tab.
Here's a screenshot of the Resource page showing details for the CEO. Because this screenshot was taken in an environment with both sales and human resources implemented, the page includes detail you don't see in a sales-only implementation. The Job Title, Department, and Manager fields are more important for HCM, so is the information on all of the tabs except Roles. Remember that the resource hierarchy in sales is different from the HCM hierarchy. The resource hierarchy displays the resource role that's in the Role field and the resource organization shown in the Organization field, not the job title and department. In this UI, you can maintain information about team membership, skills, and so on, but this information isn't used elsewhere in the sales application.
-
-
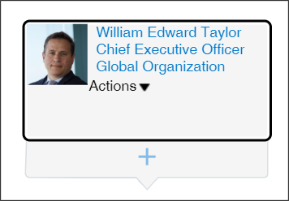
Click Show Reporting Hierarchy.
The application displays a box for the resource.
-
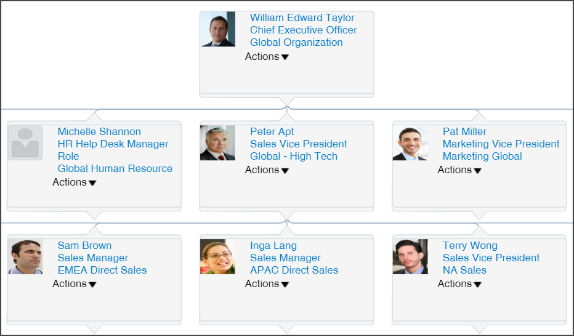
Double-click the Show icon (the plus sign) to display the whole hierarchy. Navigation tools on the top left of the page make it possible to zoom in and out.
Edit User Records
Here's how you can change the user name, fix spelling errors, and make other edits in a single record. Alternatively, you can perform these same edits in the Excel macro and import again.
-
Open the task Manage Users from the Setup and Maintenance work area:
-
Offering: Sales
-
Functional Area: Users and Security
-
Task: Manage Users
-
-
In the Keywords search field, enter the first name of the user.
-
Click Search (the right arrow icon).
-
Click the name link in Search Results.
The application displays the user record in the Edit User page.
-
In the Edit User page, you can edit the information about each user. For example, you can:
-
Fix spelling errors
-
Change the resource roles and provisioning of job roles
-
Change the user name
Changing the user name requires extra setup for Oracle BI Answers. Oracle BI Answers, the embedded reporting tool for building and modifying reports, creates a separate GUID from the user name when you create a user. If you change the user name, then you must update the BI Answers GUID by running the Rename Accounts Self-Service utility. You can download the utility from My Oracle Support article Oracle Fusion BI: Self-Service Forget Accounts and Rename Accounts Tools (Doc ID 2635720.1)
-
-
Click Save and Close when you are done.