Set Up Sales Quotas
Your sales organization sets sales quotas starting at the top of the territory hierarchy. Quotas pass down through the hierarchy to territories and the owners.
You create a sales quota plan to track the quotas for a year. Seasonality factors automatically split yearly quota into period quotas according to known seasonal fluctuations.
Create a Sales Quota Plan
This sales quota plan uses seasonality, which isn't required.-
Open the Manage Sales Quota Seasonality Groups task from the Setup and Maintenance work area:
-
Offering: Sales
-
Functional Area: Quotas
-
Task: Manage Sales Quota Seasonality Groups
-
-
Create a new group.
-
In the Seasonality Factors region, enter the factor percentages for time periods. Percentages must add up to 100.
-
Click Save and Close.
-
Open the Manage Sales Quota Plans task from the Setup and Maintenance work area:
-
Offering: Sales
-
Functional Area: Quotas
-
Task: Manage Sales Quota Plans
-
-
Click Create.
-
Enter information for your new sales quota plan.
Field
Value
Calculate Default Territory Quota
Deselect. If selected, the application calculates the quotas for each of the territories using the default territory quota formula.
Track
Select. Only one plan can track quotas for the year.
Copy Quotas From
Leave Blank. After creating your first sales quota plan, copy a previous plan for a quick way to create a new plan.
-
Click Save and Close.
-
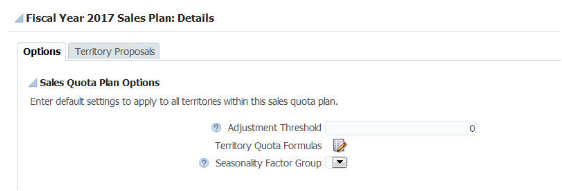
On the Options tab, select the name of your seasonality factor group.
Here's the Options tab. 
-
Click Save.
-
With your new quota plan selected in the list of plans, click the Activate button.
-
Set the activation to right now plus a few minutes in the future.
-
Click OK.
The initial status is Pending Activation. Refresh the page to verify that the status changed to Active.
-
A sales revenue goal is automatically assigned to every territory owner during the annual quota planning process. Upon activation, sales managers can sign in to the application and begin allocating revenue quotas to their teams. Click Synchronize if you suspect the territory hierarchy for quotas isn't current.
Allocate Sales Quotas
Use the following steps to allocate sales quotas to territories. Allocate quotas to each territory from the top of the territory hierarchy down. You can allocate a quota to a territory only after you allocate the quotas for all the territories higher in the territory hierarchy.
-
Navigate to Quotas.
-
Select your activated quota plan.
-
In the Edit Sales Quotas region, verify that the territory quotas and owners' quotas are zero.
-
Select the root territory in the hierarchy.
-
Enter a territory quota amount and a resource quota amount for the year for the whole organization.
-
Click Publish and verify that the status changed from Not Published to Published.
-
For each child territory of the root territory, enter a territory quota amount and an owner's quota amount.
-
Select the parent territory and click Details for the territory.
The Details table shows the rollup quotas total for the child territories and the variance from the parent quota. -
Click Save.
-
Click the Territory Quota tab and verify that as part of the publish process, seasonality was automatically applied to split the annual quota into period quotas.
-
In the Manage Sales Quotas page, select a child territory of the root territory and click Publish.
Note:If the Publish button is disabled, this could be the result of one of the following:
-
You did not publish the parent territory.
-
You don't own the parent territory.
-
The territory was already published. You can't republish a territory at the bottom of the hierarchy.
-
-
Verify that the status is Published.
The application notifies the territory owner and the analyst that the territory was published.
-
Click Save.
The following table lists common publishing errors and their solutions.
Error
Steps to Resolve
You can't publish quota for the territory because the territory has revenue quota assigned prior to the territory quota start date.
-
Select the parent territory.
-
Click Details to navigate to the Edit Sales Quotas page.
-
Select the territory.
-
Select the Territory Quota tab.
-
Set the period quota to zero for any period prior to the territory quota start date.
The total quota of all quarters for the territory doesn't equal the annual quota.
-
Select the parent territory.
-
Click Details to navigate to the Edit Sales Quotas page.
-
Select the territory.
-
Select the Territory Quota tab.
-
Update the period quotas so their sum equals the territory quota.
You can't perform this action for the selected record.
This error occurs when you attempt to publish a quota for a territory that you own. Only administrators and owners of parent territories can publish quotas for this territory.
-