Examples of Making Resource End-Dating Related Updates
You can end-date a resource when a worker leaves your enterprise, using import management. This example illustrates what happens when you end date a Sales Representative and a Sales Manager.
When a worker leaves your enterprise, you terminate them. When you terminate a worker, the person type of the worker record changes to ex-employee or ex-contingent worker and the associated resource usage is end-dated. However, the records of the ex-employee or ex-contingent worker remain in the database and you can reinstate or rehire the ex-employee or ex-contingent worker later to create a new period of service. You can also end date a resource, if you want to end all the assignments that are associated with the resource.
You may want to transfer the transaction objects related to end-dated resources to another resource.
These scenarios illustrate the various end-dating changes you can make to a resource.
-
End-dating a Sales Representative
-
End-dating a Sales Manager
End-Dating a Sales Representative
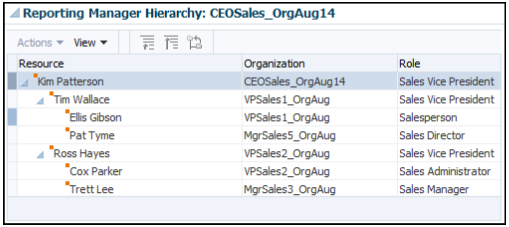
Allen King is a Sales Representative reporting to Pat Tyme. The reporting hierarchy and organization details of Allen King are displayed in this image:

In this scenario, Allen King resigns from Vision Corporation and his resource assignment is end-dated. To end-date Allen, you must create and import a source file (CSV) with the attributes listed in this table using import management.
When Allen King is end-dated, all the transaction objects owned by him, such as sales territories, leads, opportunities, and so on, may need to be manually transferred to his manager or another resource.
|
Attribute Name |
Value |
|---|---|
|
ResourcePartyNumber |
|
|
ResourceEndDate |
6/12/2020 |
You can import the source data file from the Import Management work area. Then, create mappings between the attributes in your source data file and the attributes in Sales and Fusion Service using the values given in the table.
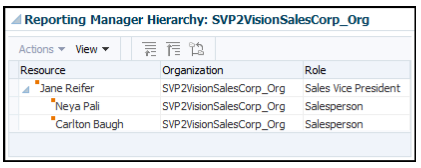
The reporting hierarchy and organization details after Allen King is removed from Pat Tyme's organization are displayed in this image:
End-Dating a Sales Manager
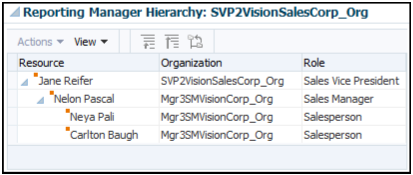
Nelon Pascal is a Sales Manager reporting to Jane Reifer. The reporting hierarchy and organization details of Nelon Pascal are displayed in this image:
In this scenario, Nelon Pascal is a sales manager who has two sales representatives, Neya Pali and Carlton Baugh, reporting to him. Nelon Pascal resigns from Vision Corporation and his resource assignment is end-dated. If the salespeople in the resource organization have any transactions assigned to them, then these are available once another manager assumes the vacant resource organization membership as manager. Before Nelon's resource assignment is end dated, Oracle recommends that you move his reports to a different manager such as Nelon's manager, Jane Reifer. However, if you want to move Nelon's reports to another manager, then you must provide additional rows in your source file (CSV) for the reports and specify all the mandatory attributes. To end date Nelon Pascal, you must create a source file (CSV) with the attributes and import it using import management as listed in this table.
|
Attribute Name |
Value |
|---|---|
|
ResourcePartyNumber |
|
|
ResourceEndDate |
12/10/2020 |
You can import the source data file from the Import Management work area.
You can import the source data file.
-
Go to .
-
Click Create Import Activity in the Manage Imports page.
-
In the Enter Import Options page, provide a name for the import activity, and select Resource from the Object drop-down list.
-
Select the CSV file in the File Name field, and click Next.
-
The source and target attributes are automatically mapped in the Map Fields page. Review and edit the mappings if required.
-
Check the file for unmapped columns or data format issues by clicking Validate Data. Click Next.
Note:Validation errors, if any, are displayed on the Mapping Validation screen. If you get warnings about unmapped columns, then you can ignore these columns and proceed to submit the import job. Validations are for informational purposes and applicable only for low-volume imports.
-
Review the import details on the Review and Submit page, and click Submit when you're ready.
After your import runs successfully, send the pending LDAP user update requests:
-
In the Navigator, click Scheduled Processes.
-
In the Scheduled Processes page, click Schedule New Process.
-
In the Schedule New Process dialog box, from the Name drop-down list, search for Send Pending LDAP Requests.
-
From the search results, select Send Pending LDAP Requests and click OK.
-
In the Process Details dialog box, click Submit.
-
In the Confirmation dialog box, click OK.
-
Click Close.
-
In the Scheduled Processes page, click the Refresh icon.
-
Verify if the status of the process has completed successfully.
Before you run the Send Pending LDAP Requests schedule process, you need to run the "Autoprovision Roles for All Users" schedule process with 'Process Generated Role Requests' parameter to NO to avoid performance issues.
You run the scheduled process Reporting Hierarchy Generation to re-generate the resource
reporting hierarchy when there is a change in the organization hierarchy.
For more information about the Reporting
Hierarchy Generation scheduled process, see the section
"Reporting Hierarchy Generation" in the Understanding
Scheduled Processes guide.
The reporting hierarchy and organization details after Nelon Pascal is removed from Jane Reifer's organization are as shown in this image.