Import Opportunity Information Minus the Opportunity Revenue
Opportunity information that you import includes the account, the opportunity owner, the primary competitor, and so on. You must import the individual revenue lines for the opportunities separately, using the opportunity revenue macro file.
- Open the opportunity import macro file.
- If you receive a security warning that macros have been disabled, you must enable macros.
- If you modified opportunity statuses, click the Status worksheet and enter the status codes and statuses in the appropriate columns.
- If you modified the win/loss reasons, click the Win_Loss_Reason worksheet and enter the codes and values in the appropriate columns.
- On the Competitors worksheet, click Populate Competitors from Server.
- Make these entries in the Login dialog:
- Enter the host name. The host name is in the portion of the URL between
https://and/sales. - Enter the user name and password.
- Click Submit.
The Competitors worksheet is populated with the competitors and their IDs. Here's a screenshot of the macro file Competitors worksheet.
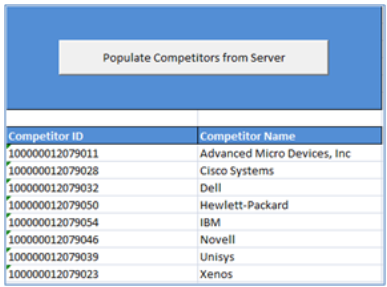
The macro uses this list to validate your entries in the Opportunity worksheet.
- Enter the host name. The host name is in the portion of the URL between
- Click the Resource_EMail_To_ID_Mapping worksheet.
- Click Populate Resource Attributes from Server to populate the
worksheet with information about the resources that you'll assign as owners of the
opportunities you're importing.
The Login window appears with the user and password information you entered previously.
- Click Submit. The worksheet populates with the resource data.
- If you're importing additional fields, including custom fields, then do the following:
- Click the Attributes Mapping worksheet.
- Click Fetch Attributes from Server.
- In an empty row in the worksheet, select the attribute from the Attribute Name column.
- Enter the name you want displayed as the column heading in the Opportunity worksheet. This name displays only in the macro file.
- Click Update Headers to add the column to the Opportunity worksheet.
- Click the Opportunity worksheet.
- Enter the currency code for your transactions.
- Enter your opportunity data as described in the following table.
You must always enter data in these columns:
- Opportunity Name
- Account Number
- Owner E-Mail
- Expected Close Date
- Status
- Creation Date
- Last Update Date
- Created By
- Last Updated By
You might need to enter data in additional columns, depending on your settings and what type of opportunity you're importing.
This table describes the available columns:
Column What to Enter Opportunity Number Leave this required column blank. The macro generates opportunity numbers automatically using the date and time when you click Generate Opportunity Number. You must generate opportunity numbers before entering opportunity revenue lines. The application uses the opportunity number to link the opportunity to the revenue lines and to identify opportunities during updates.
Opportunity Name Entry is required. The opportunity name shows in lists of opportunities in the UI. Account Number Enter the account number. You can copy the account number from macro you used to import accounts. Owner E-Mail Enter the email of the opportunity owner. The email must be one of the email addresses on the Resource EMail to ID Mapping worksheet. Win Probability Optionally, enter a win probability. Depending on your setup, a win probability can determine if an opportunity is included in a forecast. For example, you can decide to include all opportunities with a win probability greater than 70 percent in your forecasts. Expected Close Date Enter the expected close date in the following format MM/DD/YYYY. The expected close date determines which forecast includes the opportunity. Status Using the list of values, select one of the statuses available on the Status worksheet. You can also enter the statuses manually. Win/Loss Reason Using the list of values, enter a win or loss reason for a closed opportunity. If you enter an actual close date, then a win/loss reason is required, depending on the Close Opportunity Win/Loss Reason Required profile option setting. Primary Competitor Select the primary competitor from the list of values or enter one of the valid company names manually. For opportunities with a close date, entry in this field is required depending on the profile option setting you made. Creation Date Enter the opportunity creation date. The required format is YYYY-MM-DD'T'HH:MM:SS.SSS which stands for Year-Month-Date'Time'Hour:Min:Sec + UTC. You can enter the date as MM/DD/YYYY and have the macro convert your entry into the required format. For example, your entry 2017/01/2005 converts to 2017-01-05T00:00:00.000+0000. Last Update Date Enter the date the opportunity was last updated. This date field requires the same format as the creation date. You can enter MM/DD/YYYY, and have the macro convert your entry to the required format. Created By Enter the Party Number of the user who created the opportunity. You can copy the Party Number from the Resource EMail to ID Mapping worksheet. Last Updated By Enter the Party Number of the user who last updated the opportunity. You can copy the Party Number from the Registry ID column in the file you exported to obtain the Party ID. See the chapter on Importing Accounts and Contacts for details. - When you're done with your entries, click Create Import
Activity.
The Login dialog appears displaying the host name, user name, and password you entered earlier.
- Click Submit.
- If the application prompts you to correct errors, then do this:
- Click OK. The Error worksheet displays your errors.
- Click each error link in column D and make the correction on the Opportunity
worksheet.Note: After you correct an error, you must click outside the field for the correction to be recognized.
- Click Create Import Activity and Submit again.
- If the macro data is validated without errors then, the macro file displays one of the
following messages:
Message Meaning The file import activity was submitted successfully. Your import has started. If the file import activity is submitted successfully, then the confirmation message displays the job ID. Unable to connect to the server at this time. You might have entered an incorrect host. Unable to submit the file import activity. Check log for details. Open the Errors work sheet to view the error details. - If your import activity was submitted successfully, then click Activity
Details.
The Activity Details window appears, listing the import activity name, its ID and its status.
- If the import activity is still in progress, you can refresh the status periodically by clicking Refresh.
- If your import completed successfully, then the status listed is Completed.
- Optionally, click Generate Log to save a file listing the opportunities that were imported.