Create the Microsoft Azure Application
To create the Microsoft Teams add-in, you must first create the Microsoft Azure application. To get your host URL follow these steps:
- Sign in to the Microsoft Azure portal at
https://portal.azure.com. - Click Admin on the home page.
The Admin center page appears.
- Click Microsoft Entra ID under Azure Services.
The Microsoft Entra ID Admin Center page appears.
Note: If you're a first-time user, then you must sign up for your Microsoft Entra ID. - Click App registrations.
The Applications list page appears.
- Click + New registration.
The Register an application dialog box appears.
- For Name, enter a name for the application, for example, Microsoft Teams Collaboration.
- Under Supported account types, select Accounts in this organizational directory only (Oracle only - single tenant.
- Leave Redirect URI (optional) blank.
- Click Register to create the Microsoft Teams add-in
application.
The application appears on the App registrations page.
Note: Keep a note of these values because you insert these in the Manage Microsoft 365 task page later on. See the Register the Microsoft Azure Application in Oracle Sales section for more information. - Click + New registration.
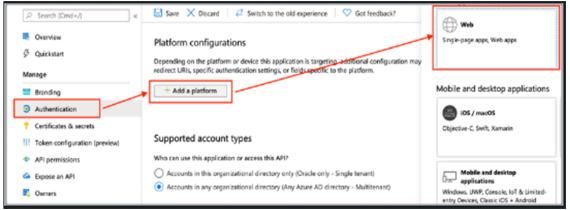
- Next click Authentication and from the Authentication page,
click Add a platform and select Web as
shown in this screenshot:
- In the Redirect URIs section of the Configure Web dialog box,
add the URI of your environment (for example,
https://sample-pod.oraclecloud.com). - In the Implicit grant section, select Access tokens and ID tokens.
- Click Configure.
- Next click Certificates & secrets, and from the Add a client secret section, click + New client secret.
- Select a duration for the expiration of the Client Secret. For example, if you
select 12 months, the Client Secret becomes invalid after 12 months, and the
automatic refresh stops. The sync process will start only after you sign in to the
client again.
If you select Custom, enter the start and end dates, which must be within 24 months. After the end date, you must sign in to the client again, to start the sync.
- Click Save.
The application generates a value for the key. Keep a note of this value because you'll use this as the Application Key in the Manage Microsoft 365 task page later on.
- Click API permissions and click Add a permission. The Request API permissions pane appears.
- Scroll to the end of the pane and click Microsoft Graph Commonly used Microsoft APIs.
- Click Application permissions and select the following permissions:
Directory.Read.AllDirectory.ReadWrite.AllGroup.Read.AllGroup.ReadWrite.All
- Click Add permissions.
- Click Grant admin consent for Oracle and then click Yes on the confirmation dialog box.