Create Partner Accounts and Partner Contacts for Channel Sales
This topic explains how you can create your partner accounts and partner contacts (partner sales users).
There are three ways to create partner accounts and partner contacts.
-
You can create them manually in the UI.
-
You can import them using import management.
-
You can create them using the set of REST APIs that Oracle provides. For more information, see the Partners and Partner Contacts REST endpoints in the REST API for CX Sales and Fusion Service guide.
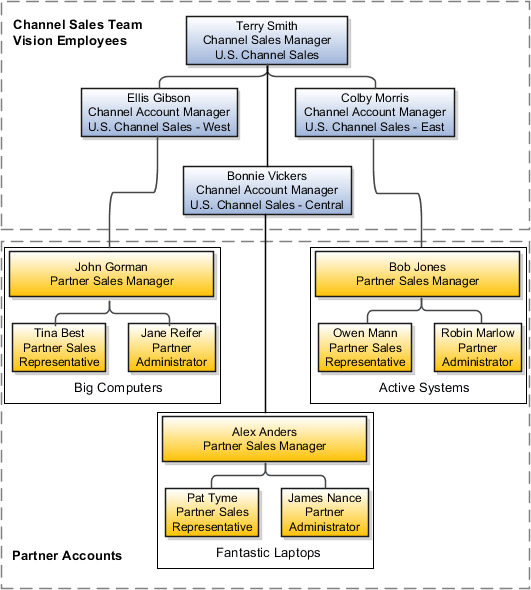
Your channel sales team consists of internal employees. Your partner accounts and partner contacts, meanwhile, are all external to your company. To support our business use cases, we need to create three partner accounts. The following figure shows how the three partner accounts exist outside the organizational hierarchy of Vision Corp.
Once you create partner accounts, you can mark partners as favorites from the Edit Partner page.
Create the Active Systems Partner Account in the UI
Since we are only creating one partner account to support the two business use cases, we can manually perform this procedure in the UI.
Use these steps to manually create the Active Systems partner account in the UI.
-
Sign in with your channel manager credentials.
-
From the landing page, click Partner Management, and click Partners.
-
Click Create Partner.
-
Provide the following information for the partner:
The following table shows the information you must provide for the Active Systems partner account, including Active Systems as the Name, Systems Integrator as the Type, Gold as the Tier, Active as the Status, United States as the Country, 431 Folsom St. as the Address Line 1, San Francisco as the City, CA as the State, and 94105 as the Postal Code.
Field Name
What to Type or Select
Name
Type "Active Systems".
Type
Select "Systems Integrator".
Tier
Select "Gold".
Status
Select "Active".
Country
Select "United States".
Address Line 1
Type "431 Folsom St.".
City
Type "San Francisco".
State
Type "CA".
Postal Code
Type "94105".
-
You can create the primary contact for this partner account at the same time we create the account. The primary contact is the person assigned to the business object team when that business object is assigned to the Active Systems partner account. The application automatically assigns the Partner Administrator role to the primary contact, which you can later change if necessary. A partner account must have a primary contact assigned before you can activate the partner account, unless you set the Partner Contact Required for Active Partners profile option (ZPM_PARTNER_CONTACT_MANDATORY) to No.
To create the primary contact for Active Systems, click the Create Primary Contact checkbox.
The first partner contact is automatically made the head of hierarchy.
-
Provide the following information for the primary contact:
The following table shows the information you must provide for the Active Systems primary contact.
Field Name
What to Type
First Name
Type "Robin".
Last Name
Type "Marlow".
Job Title
Type "Partner Administrator".
Email
Type "robin.marlow@noreply.com".
-
Click Save and Close.
At this point, the status of the partner account is Prospective. Before you can activate the partner account, you must change the partner account status to Registered, and you must select or create a primary contact for the partner account.
You can activate a partner account without a primary contact if you set the Partner Contact Required for Active Partners profile option (ZPM_PARTNER_CONTACT_MANDATORY) to No.
Create Partner Sales Users
When you create partner sales users, you not only provision the permissions they need to do their jobs, but you also build the organization chart for each partner resource organization. This means that you must set up not only the provisioning rules, but also the elements that the application uses to create the organizational hierarchy for each partner resource organization.
Each partner sales user must have:
-
Identify Partner User privilege
All roles that are assigned to partner users must include the Identify Partner User privilege (ZPM_PARTNER_USER_PRIV). This privilege is required for partner users to access standard pages in the CX Sales portal. Partner users whose assigned roles don't include this privilege won't be able to access standard pages in the CX Sales portal. Here are the steps:-
Open the Security Console.
-
Search for and edit the role that's assigned to the partner user.
-
Add the Identify Partner User privilege (
ZPM_PARTNER_USER_PRIV) to the role. -
Save the role.
-
-
A partner resource role
You must assign a partner resource role, a name describing the role each partner resource plays in the organization, to each partner sales user you create. Partner resource roles display underneath user names in the resource directory and elsewhere in the UI. They're also used as the primary condition in the role provisioning rules.
-
A partner resource organization
You must create a partner resource organization for every partner sales user. Each partner sales user who's not a manager automatically inherits the manager's organization. The name of the partner resource organization need not be any formal department name, but you should avoid using partner manager names to accommodate hierarchy changes.
Note:You can't delete a partner account's primary contact if the contact is the root of the partner resource organization. Also, if you delete any other partner contact from the partner object level, you can't add it back to the partner even if the relationship is reactivated. You'll need to recreate the partner contact.
The organization hierarchy of the partner account is based on the management hierarchy you specify when you create your partner sales users. You must enter a partner manager for each partner sales user you create.
What Oracle Provides for You
Oracle provides you with the standard partner resource roles and the role provisioning rules that automatically assign users with the job roles and abstract roles required to do their job.
The following partner resource roles supplied by Oracle trigger the automatic assignment of job and abstract roles:
-
Partner Administrator
-
Partner Sales Manager
-
Partner Sales Representative
For each of the partner resource roles provided by Oracle, there is a corresponding job role with the same name.
For example, when you create a partner sales manager with the provided Partner Sales Manager resource role, the application automatically provisions the Partner Sales Manager job role and the Resource abstract role.
The following table lists the partner role-provisioning rules provided by Oracle, the condition which triggers the provisioning, and the job and abstract roles the rule provisions. You can obtain a description of each job and abstract role from the Security Reference guide.
If you're setting up a Global Single Instance environment, then Oracle doesn't provide these role-provisioning rules for you. You must create them manually.
The following table shows the provisioning rule name, condition, and job or abstract role provisioned for each partner resource role. including Partner Administrator, Partner Sales Manager, and Partner Sales Representative.
|
Provisioning Rule Name |
Condition |
Job or Abstract Roles Provisioned |
|---|---|---|
|
Partner Administrator |
Resource Role is Partner Administrator |
Partner Administrator |
|
Partner Sales Manager |
Resource Role is Partner Sales Manager |
Partner Sales Manager |
|
Partner Sales Representative |
Resource Role is Partner Sales Representative |
Partner Sales Representative |
Grant Data Security Privileges to Partner Administrators and Other Users You Created
The following data security privileges that permit users to edit their partner hierarchy are included:
-
Add Parent Node
-
Add Child Node
-
Remove Node
By default, these data security privileges are included as part of the channel sales manager, channel operations manager, and channel account manager roles; however, they're not included with the partner administrator role. If you want your partner administrators or any other users you created to have edit level access to their partner hierarchy, you must add these privileges to those user roles. You add these privileges using the standard data security privilege addition process as defined in the Implementing Sales guide.
Who Are We Creating?
To support the two previously mentioned business use cases, we will need to create several partner contacts or sales users for the Active Systems partner account.
The following table shows the partner sales users for Active Systems, their job title, and the name of the partner account they belong to, including Robin Marlow as the Partner Administrator, Bob Jones as the Partner Sales Manager, and Owen Mann as the Partner Sales Representative.
|
Partner Contact Name |
Partner Job Role |
Partner Account |
|---|---|---|
|
Robin Marlow |
Partner Administrator |
Active Systems |
|
Bob Jones |
Partner Sales Manager |
Active Systems |
|
Owen Mann |
Partner Sales Representative |
Active Systems |
Create the Partner Contacts for Active Systems in the UI
Since we are only creating a few partner contacts for Active Systems to support the two business use cases, we can manually perform this procedure in the UI.
The partner account to which the partner contact belongs must be in Active status before you can see the Create User Account check box on the Manage User Details page.
Use these steps to manually create the partner contacts for the Active Systems partner account in the UI.
-
Sign in with your channel manager credentials.
-
From the landing page, click Partner Management, and click Partners.
-
From your list of partners search for and select Active Systems.
-
On the Edit Partner page, click the Contacts subtab.
-
On the Edit Partner Contacts page, click Create Partner Contact.
-
On the Create Partner Contact page, create the following contacts:
-
Owen Mann - Partner Sales Representative
-
Bob Jones - Partner Sales Manager
-
-
Click Save and Continue after you create each contact. Then click Manage User Details and provide the following additional information:
-
Role
-
Manager Name
-
User Name
-
-
Select the Create User Account check box.
-
Click Save and Close.
Once you create a partner contact, you can mark it as a favorite on the edit page.
If your partners could have 500+ partner contacts, then set the All Partner Contacts in Partner SOAP Service Enabled profile option (ZPM_ENABLE_ALL_PARTNER_CONTACTS_IN_SOAP) to No to ensure that deal registration submissions are successful. This means that SOAP web services will return only the preferred contact for the partner, not all 500+ partner contacts. By default, this profile option is set to Yes.