Configure the Subview for Related Objects (One-to-Many)
If your custom object has relationships with other objects, then users can add related object records directly from the custom object's detail page. To enable this, you must build two things: a new subview for the related object and an Add dialog that can be launched from the detail page. This topic illustrates how to create a subview for a related object (related via a one-to-many relationship).
In our example, the Payment object has a one-to-many relationship with the Order object. At runtime, the user should be able to add an order to a payment.
That's the scenario that we'll address in this topic.
Setup Overview
Enabling the addition of related object records involves multiple steps in Oracle Visual Builder Studio:
-
Create the subview for the related object.
This topic describes this process.
-
Create a link field on the subview table.
Users can click the link field to drill down to the related object record's details.
-
Build the Add dialog so that users can add the related object record to the custom object record.
-
Build the Delete dialog so that users can delete the related object record from the custom object record.
-
Add the Delete icon to the subview table so that users can access the Delete dialog.
Application Composer Prerequisites
Before creating the Add dialog, you must complete these prerequisite steps in Application Composer, inside a sandbox.
-
Create the one-to-many relationship for your custom object.
In our example, we want users to be able to add an order to a payment. In this case, create a one-to-many relationship between Payment as the source object and Order as the target object.
The relationship's display name can be something like PaymentOrder.
-
You must also create the Add smart action.
The Add smart action displays from the Action Bar on both the detail page and subview. Users can select the Add smart action to launch the Add dialog.
-
Publish your sandbox.
Note:If you're already running Visual Builder Studio, then sign out and sign back in before continuing to configure your application extension. Doing this ensures that Visual Builder picks up the latest published changes from Application Composer.
Visual Builder Studio Prerequisites
After completing the Application Composer prerequisites, you must complete these steps in Visual Builder Studio before adding the Add dialog to the detail page.
-
First, create a variable for the detail page.
-
Click the detail tab, then click the Variables subtab.
-
Click + Variable.
-
In the Create Variable dialog, make sure the Variable option is selected and, in the ID field, enter
enableAddOrder. -
In the Type field, select Boolean.
-
Click Create.
-
On the Properties pane, in the Default Value field, click false.
-
-
Let's add a new string to the translation bundle:
-
On the customBundle tab, click + String.
-
In the Key field, enter
OrderName. -
In the String field, enter
Order Name. -
Click Create.
-
After adding an order to a payment, the user will be navigated to the order subview page. The user can click the order name, which is a link field, to navigate to the Order detail page.
In our example, the Order object is a custom object. Let's create an order detail page and create page so that you can test the link field.
-
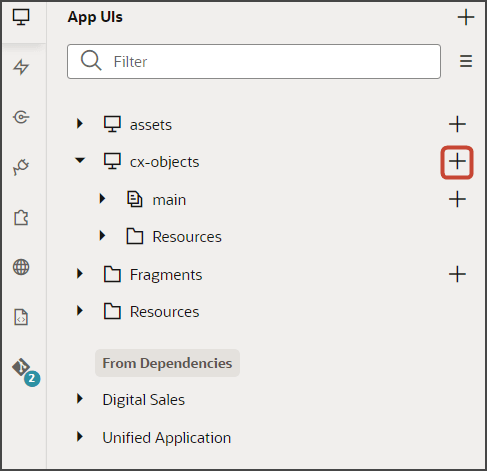
Click the App UIs tab.
-
Expand the cx-objects node.
Click the + icon next to cx-objects to create a new flow.
-
In the Create Flow dialog, in the Flow ID field, enter the flow name, such as
order. -
Click the + icon next to the order node to add pages to your custom application.
-
Click Create Page.
-
Create two pages:
-
list -
create -
detail
-
-
Enable navigation to your custom application.
-
Click the order flow's create tab > Settings subtab.
-
Select Let other App UIs navigate to this page.
-
Click the order flow's detail tab > Settings subtab.
-
Select Let other App UIs navigate to this page.
-
Click the order flow's list tab > Settings subtab.
-
Select Let other App UIs navigate to this page.
-
Click the order tab > Settings subtab.
-
In the Default Page field, select list.
-
Select Let other App UIs navigate to this page.
-
-
When you created the order flow, an order-start page was automatically created.
Delete the order-start node by right-clicking and clicking Delete.
-
Next, create a variable for the order flow's detail page.
Click the detail tab, then click the Variables subtab.
-
Click + Variable.
-
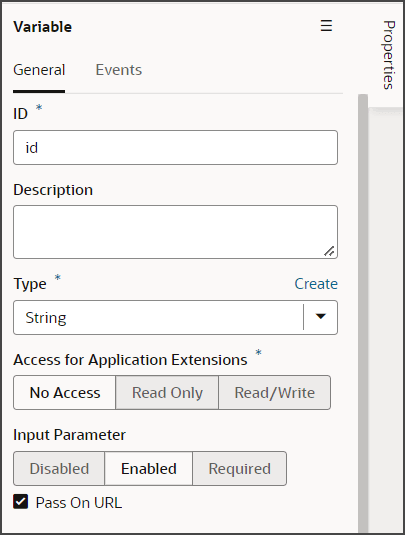
In the Create Variable dialog, make sure the Variable option is selected and, in the ID field, enter
id. -
Click Create.
-
On the Properties pane, in the Input Parameter section, click Enabled.
Click Pass On URL.
-
Finally, create a new service connection to your related object. In our example, we will create a service connection to the Order_c object.
-
Click the Services tab.
-
Click + Service Connection > Select from Catalog.
-
Click Sales and Service.
Click the pencil icon next to CrmRest and enter your custom object name.
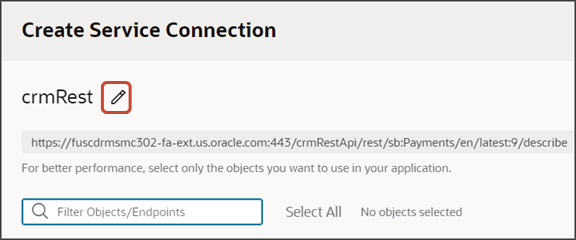
For example, enter
Order_c.-
In the Metadata Retrieval Option field, select Dynamically retrieve metadata.
-
In the Filter Objects/Endpoints field, enter your custom object name to filter the list.
For example, enter
order. -
Click the check box for your custom object.
For example, Order_c.
-
Click Create.
Create Event Listener and Action Chain
-
Next, create an event listener and action chain.
-
Click the payment flow's detail tab, then click the Event Listeners subtab.
-
Click + Event Listener.
-
In the Create Event Listener dialog, in the Filter Events field, enter
beforeInvokeSmartActionEvent. -
Click beforeInvokeSmartActionEvent.
-
Click Next.
-
Click the + icon next to Page Action Chains.
-
In the New Page Action Chain field, enter
AddOrderBeforeInvokeSAChain. -
Click Finish.
-
-
Let's modify the action chain.
-
On the refreshed Event Listeners page, next to the new AddOrderBeforeInvokeSAChain event listener, click Go to Action Chain.
-
Drag an If logic action to the Start node.
-
On the Properties pane for the If action, in the Condition field, enter the following:
[[ $variables.event.smartActionId === 'CUST-AddOrder-Payment_c' ]]Note:CUST-AddOrder-Payment_c is the Add Order smart action that you previously created.
-
Let's configure the true branch for the If logic action.
-
Drag an Assign Variables action to the true branch.
-
On the Properties pane, next to the Variables heading, click Assign.
-
In the Assign Variables dialog:
-
On the Target side, click enableAddOrder.
-
In the text entry box, enter
true. -
Click the Static option.
-
Click Save.
-
-
-
Create the Order Subview
Next, create a new subview for the orders that you're adding to a payment. This is where you'll add the Add Order dialog.
-
On the payment flow's detail tab, click Page Designer.
-
Click the Design button.
-
In the Structure view, click the Dynamic Container node inside the Drilldown slot.
This is the dynamic container that we added when we first created the framework of the detail page. This dynamic container holds the detail page's subview pages.
Note: In the Structure view, you can see two Dynamic Container nodes. One dynamic container holds the foldout panels. The other dynamic container holds the subview pages. We're using the dynamic container that holds the subview pages.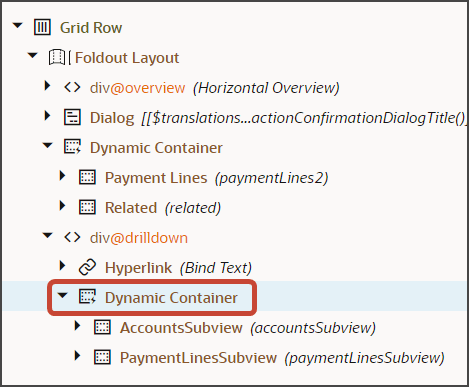
-
On the Properties pane, click + Case.
-
In the Condition field, enter:
$variables.view === 'Order_PaymentOrder_Tgt'This is the same value that you set in the navigation parameter for the Add Order smart action.
-
Next to the Section heading, click the Add Section icon, and then click New Section.
-
Enter a title for the section, such as
OrdersSubview, and click OK. -
On the Properties pane, click the OrdersSubview link.
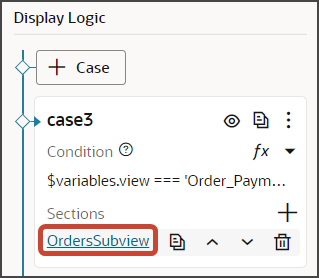
Page Designer navigates you to the template editor where you can design the subview template.
-
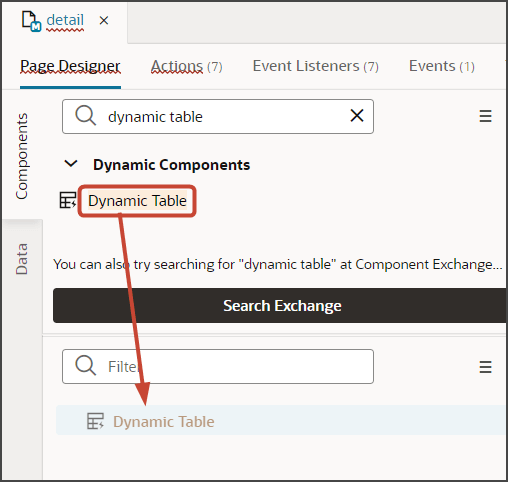
On the Components palette, in the Filter field, enter
Dynamic
                            Table
. Drag and drop the Dynamic Table component to the Structure view.
-
On the Properties pane for the Dynamic Table node, in the Class field, enter
oj-sm-width-full. -
On the Properties pane, click the Quick Start tab.
-
Click Configure Layout.
-
In the Configure Layout dialog, pick the related object's endpoint.
In our example, click Payment_c/Order_PaymentOrder_Tgt.

-
Click Next.
-
In the Label field, enter the rule set name. In our example, enter
subview. -
Click the fields that you want to include in this subview.
In our example, click RecordName and CurrencyCode.
-
Click Next.
-
Map the Page > Variables > id variable on the Sources side to the <primarykey>_Id (in our example, Payment__c_Id) on the Target side.
-
Click the Expression option.
-
On the Target side, click the onlyData parameter.
-
In the text entry box, enter
trueand click the Static Content option. -
On the Target side, click the totalResults parameter.
-
In the text entry box, enter
trueand click the Static Content option. -
Click Finish.
-
-
Here's a final look at where the Order subview should be located within the Dynamic Container:

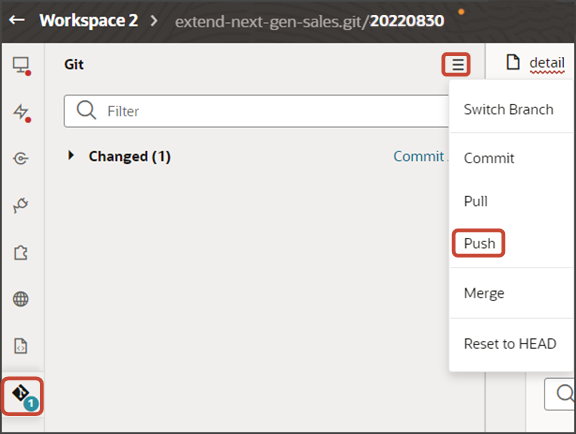
Save your work by using the Push Git command.
Navigate to the Git tab, review your changes, and do a Git push (which does both a commit and a push to the Git repository).