How do I enable the creation of a lead from an account in Oracle CX Sales Mobile?
You can enable salespeople to create leads directly from an account record in Oracle CX Sales Mobile by using Mobile Application Setup in Application Composer. Here's how.
Add the Lead Creation Capability to the Account Layout
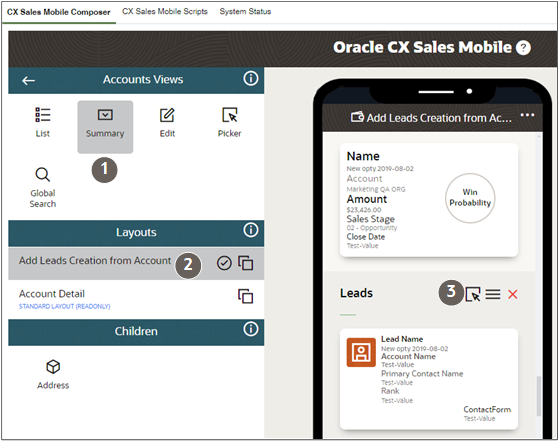
Here's a screenshot of the Account Summary view in the CX Sales Mobile Composer. The callouts highlight the steps to add the create lead action. Detailed steps follow.
| Callout | Description |
|---|---|
| 1 | With Account Views open, select the Summary view. |
| 2 | Duplicate the Account Detail layout. |
| 3 | In the screen mock-up, scroll down to the Leads card and click the square with arrow icon (that's the first icon from the left) and select the type of create lead action you want to enable. |
- Open Application Composer in a sandbox.
- Click Mobile Application Setup.
- In Application Features, click Accounts.
- In Accounts Views, click Summary.
- Click Clone (the two-suares icon) for the Account Detail standard layout.
- Enter a name for your custom layout and click OK.
- Select the layout you just created.
- In the phone image layout screen scroll down to the Leads section.
- Click the first icon at the top of the Leads card (a square with an arrow pointing into it) Click to change relationship association with the target.
- In the dialog box, select one of the three options:
- Create: salespeople can create new leads for the account.
- Add: salespeople can add existing leads to the account.
- Both: salespeople can both create and add existing leads.
Test Your Configuration and Publish the Sandbox
-
After making your configurations, keep the Oracle CX Sales application open and make sure that the sandbox where you made the changes is active in the application.
-
Open CX Sales Mobile on your mobile device and sign in as the same user that you used to make your configurations. If you've already signed in to CX Sales Mobile, you need to force close the app and open it again. This is because the app picks up the latest updates in the sandbox when you restart the app, or when you sign in.
-
Once you've restarted the app and signed in, your configurations are ready to view. The sandbox where you made your configurations is linked to your user details, and the configurations are automatically downloaded when you restart the app. However, you can double-check that you're in the correct sandbox by tapping in the CX Sales Mobile menu and checking the Sandbox Name and the Last Download Time.
-
Check your configurations. If you've more than one pod and you want to check your configurations in another pod, then you need to connect to the other pod by changing the host URL. Navigate to Settings in the CX Sales Mobile app, tap Reset Application, and enter the host URL of the relevant pod.
-
If you make further updates in the sandbox, you need to force close the app, and sign in again to see the updates.
-
When you're happy with your configurations, publish the sandbox to distribute the configurations to your users.